Atlas Copco LH 11 Safety And Operating Instructions Manual
Handheld hydraulic breakers
Hide thumbs
Also See for LH 11:
- Manual (36 pages) ,
- Safety and operating instructions manual (28 pages)
Table of Contents
Advertisement
Available languages
Available languages
LH
Safety and operating instructions
Handheld hydraulic breakers
Prescriptions de sécurité et instructions pour
l'opérateur
Brise-béton hydrauliques portatifs
Sicherheits- und Betriebsanleitung
Hand-Hydraulikhämmer
Instrucciones de seguridad y de funcionamiento
Martillos hidráulicos manuales
Instruções de segurança e operação
Demolidores hidráulicos manuais
Istruzioni per la sicurezza e per l'uso
Demolitori idraulici manuali
Veiligheidsvoorschriften en bedieningshandleiding
Handbediende hydraulische sloophamers
Οδηγίες ασφάλειας και χειρισμού
Υδραυλικοί θραυστήρες χειρός
Turvallisuusohjeet ja käyttöohje
Käsikäyttöiset hydrauliset iskuvasarat
Sikkerhedsinstruktioner og betjeningsvejledning
Håndholdte hydraulikhamre
Säkerhetsinstruktion och instruktionsbok
Handhållna hydraulhammare
Instrukcje bezpieczeństwa i obsługi
Ręczne młoty hydrauliczne
© 2011 Atlas Copco Construction Tools AB | No. 3392 5206 90b | 2011-01-27
Original instructions
www.CrowderSupply.com • Toll Free: 888-883-5144
11, 180, 190, 220, 230, 270, 280, 390, 400
Advertisement
Chapters
Table of Contents

Related Manuals for Atlas Copco LH 11


Summary of Contents for Atlas Copco LH 11
- Page 1 Υδραυλικοί θραυστήρες χειρός Turvallisuusohjeet ja käyttöohje Käsikäyttöiset hydrauliset iskuvasarat Sikkerhedsinstruktioner og betjeningsvejledning Håndholdte hydraulikhamre Säkerhetsinstruktion och instruktionsbok Handhållna hydraulhammare Instrukcje bezpieczeństwa i obsługi Ręczne młoty hydrauliczne © 2011 Atlas Copco Construction Tools AB | No. 3392 5206 90b | 2011-01-27 Original instructions...
- Page 2 www.CrowderSupply.com • Toll Free: 888-883-5144...
-
Page 3: Table Of Contents
POLSKI................278 © 2011 Atlas Copco Construction Tools AB | No. 3392 5206 90b | 2011-01-27... - Page 4 Disposal................20 © 2011 Atlas Copco Construction Tools AB | No. 3392 5206 90b | 2011-01-27...
- Page 5 EC Declaration of Conformity (EC Directive 2006/42/EC)......26 © 2011 Atlas Copco Construction Tools AB | No. 3392 5206 90b | 2011-01-27...
- Page 6 www.CrowderSupply.com • Toll Free: 888-883-5144...
-
Page 7: Introduction
Safety and operating instructions Introduction Thank you for choosing a product from Atlas Copco. Since 1873, we have been committed to finding new and better ways of fulfilling our customers' needs. Through the years, we have developed innovative and ergonomic product designs that have helped customers improve and rationalize their daily work. -
Page 8: Safety Instructions
Only authorised personnel are qualified to work with the accumulator. Appropriate work overall or similar clothing (not ● loose-fitting) that covers your arms and legs. © 2011 Atlas Copco Construction Tools AB | No. 3392 5206 90b | 2011-01-27 Original instructions... -
Page 9: Operation, Precautions
Never use the machine near flammable materials, ► fumes or dust. ► Make sure that there are no undetected sources of gas or explosives. © 2011 Atlas Copco Construction Tools AB | No. 3392 5206 90b | 2011-01-27 Original instructions... - Page 10 Keep the workplace free from foreign objects. ► recommended in the operating and safety ► Ensure that the work piece is securely fixed. instructions © 2011 Atlas Copco Construction Tools AB | No. 3392 5206 90b | 2011-01-27 Original instructions...
- Page 11 Before resuming the work, find and remove the cause of the increased vibrations. ► Never grab, hold or touch the inserted tool when using the machine. © 2011 Atlas Copco Construction Tools AB | No. 3392 5206 90b | 2011-01-27 Original instructions...
-
Page 12: Maintenance, Precautions
Operate and maintain the machine as ► recommended in these instructions. ► Select, maintain and replace the insertion tool as recommended in these instructions. © 2011 Atlas Copco Construction Tools AB | No. 3392 5206 90b | 2011-01-27 Original instructions... -
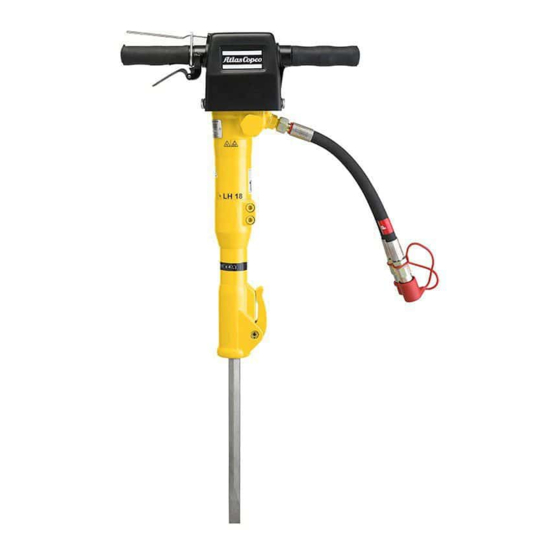
Page 13: Overview
New labels can be ordered from the spare parts list. Striking mechanism Valve hosing Sockets Accumulator (inside) Handles Trigger Safety trigger © 2011 Atlas Copco Construction Tools AB | No. 3392 5206 90b | 2011-01-27 Original instructions... -
Page 14: Data Plate
To resist exterior wear and tear, we recommend using a 2-layer hydraulic hose. The machine connection marked P (pump) is the oil inlet, © 2011 Atlas Copco Construction Tools AB | No. 3392 5206 90b | 2011-01-27 Original instructions... -
Page 15: Quick-Release Couplings
280 E and LH 280 E HBP are supplied factory set to 30 l.p.m (EHTMA D). There is a plastic bag in the Replacing the nipple © 2011 Atlas Copco Construction Tools AB | No. 3392 5206 90b | 2011-01-27 Original instructions... -
Page 16: Insertion Tool
Narrow chisel The narrow chisel is used for demolition and cutting work in concrete and other types of hard materials. © 2011 Atlas Copco Construction Tools AB | No. 3392 5206 90b | 2011-01-27 Original instructions... -
Page 17: Fitting And Removing The Insertion Tool
♦ Never exceed the maximum relief valve setting stated on the tool. © 2011 Atlas Copco Construction Tools AB | No. 3392 5206 90b | 2011-01-27 Original instructions... -
Page 18: Starting A Cut
Check regularly that the machine is well lubricated. ♦ Never use the machine as a hand held impact ♦ tool. ♦ Ensure that the work piece is securely fixed. © 2011 Atlas Copco Construction Tools AB | No. 3392 5206 90b | 2011-01-27 Original instructions... -
Page 19: When Taking A Break
♦ Check that the handle is moving freely (up and ♦ Store the machine in a dry place. down) and does not jam. © 2011 Atlas Copco Construction Tools AB | No. 3392 5206 90b | 2011-01-27 Original instructions... -
Page 20: Disposal
The remaining hydraulic oil must be deposited and any negative influence on the environment is to be kept as low as possible. © 2011 Atlas Copco Construction Tools AB | No. 3392 5206 90b | 2011-01-27 Original instructions... -
Page 21: Technical Data
32 x 160 23.7 95-115 18-22 LH 220 25 x 108 20.5 25-33 110-125 18-30 D (C) 28 x 152 22.1 25-33 110-125 18-30 D (C) © 2011 Atlas Copco Construction Tools AB | No. 3392 5206 90b | 2011-01-27 Original instructions... - Page 22 LH 220, 230 E, 270, 280 E, 390, 400 E LH 220 HBP, LH 230 E HBP, LH 270 HBP, LH 280 E HBP LH 390 HBP, LH 400 E HBP © 2011 Atlas Copco Construction Tools AB | No. 3392 5206 90b | 2011-01-27 Original instructions...
- Page 23 18-23 1600-1800 7-10 D (E) ⁄ ⁄ 79.4 30.1 18-23 1600-1800 7-10 D (E) ⁄ 79.4 30.1 18-23 1600-1800 7-10 D (E) ⁄ ⁄ © 2011 Atlas Copco Construction Tools AB | No. 3392 5206 90b | 2011-01-27 Original instructions...
-
Page 24: Noise And Vibration Declaration Statement
We, Atlas Copco Construction Tools AB, cannot be held liable for the consequences of using the declared values, instead of values reflecting the actual exposure, in an individual risk assessment in a work place situation over which we have no control. - Page 25 LH 400 E (Hex 32x160, 30 lpm) LH 400 E (Hex 32x160, 40 lpm) LH 400 E HBP (Hex 32x160, 30 lpm) LH 400 E HBP (Hex 32x160, 40 lpm) © 2011 Atlas Copco Construction Tools AB | No. 3392 5206 90b | 2011-01-27 Original instructions...
-
Page 26: Ec Declaration Of Conformity
EC Declaration of Conformity EC Declaration of Conformity (EC Directive 2006/42/EC) We, Atlas Copco Construction Tools AB, hereby declare that the machines listed below conform to the provisions of EC Directive 2006/42/EC (Machinery Directive) and 2000/14/EC (Noise Directive), and the harmonised standards mentioned below. - Page 27 www.CrowderSupply.com • Toll Free: 888-883-5144...
-
Page 28: Français
Destruction d'une machine usagée..........46 © 2011 Atlas Copco Construction Tools AB | No. 3392 5206 90b | 2011-01-27... - Page 29 Déclaration CE de conformité (Directive 2006/42/CE)......52 © 2011 Atlas Copco Construction Tools AB | No. 3392 5206 90b | 2011-01-27...
- Page 30 www.CrowderSupply.com • Toll Free: 888-883-5144...
-
Page 31: Introduction
Vous devez lire ces instructions attentivement et les comprendre avant d'utiliser le brise-roche hydraulique pour la première fois. © 2011 Atlas Copco Construction Tools AB | No. 3392 5206 90b | 2011-01-27 Instructions d’origine... -
Page 32: Consignes De Sécurité
► Assurez-vous que l'outil d'insertion est entièrement inséré et que la sécurité de l'outil est en position verrouillée avant tout démarrage de la machine. © 2011 Atlas Copco Construction Tools AB | No. 3392 5206 90b | 2011-01-27 Instructions d’origine... -
Page 33: Fonctionnement, Précautions
► Ne jamais faire passer des canalisations hydrauliques pour l'attache de la machine hydraulique à travers la cabine de conduite. © 2011 Atlas Copco Construction Tools AB | No. 3392 5206 90b | 2011-01-27 Instructions d’origine... - Page 34 être efficace pour le type de substance en cause (et le cas échéant, approuvée par l’autorité gouvernementale pertinente). Travailler dans une zone bien ventilée. ► © 2011 Atlas Copco Construction Tools AB | No. 3392 5206 90b | 2011-01-27 Instructions d’origine...
- Page 35 à des poussières et des fumées nocives devront être établis et mis en œuvre sur les conseils d’experts en santé et sécurité. Consultez ces experts. © 2011 Atlas Copco Construction Tools AB | No. 3392 5206 90b | 2011-01-27 Instructions d’origine...
- Page 36 (et celle de l'exposition aux vibrations) et peuvent induire ou contribuer à des niveaux plus élevés d'exposition aux vibrations. © 2011 Atlas Copco Construction Tools AB | No. 3392 5206 90b | 2011-01-27 Instructions d’origine...
-
Page 37: Maintenance, Précautions
► Apprenez à éteindre la machine en cas d'urgence. Arrêtez immédiatement la machine en cas de ► coupure d'énergie quelconque. © 2011 Atlas Copco Construction Tools AB | No. 3392 5206 90b | 2011-01-27 Instructions d’origine... -
Page 38: Stockage, Précautions
Stockage, précautions Conservez la machine et les outils bien verrouillés, ♦ dans un endroit sûr, hors de la portée des enfants. © 2011 Atlas Copco Construction Tools AB | No. 3392 5206 90b | 2011-01-27 Instructions d’origine... -
Page 39: Vue D'ensemble
être faciles à lire. De nouvelles étiquettes peuvent être commandées en utilisant la liste des pièces détachées. Mécanisme de frappe Bloc distributeur Douilles © 2011 Atlas Copco Construction Tools AB | No. 3392 5206 90b | 2011-01-27 Instructions d’origine... -
Page 40: Plaque Signalétique
Cette étiquette indique le niveau de bruit garanti ne sont pas endommagés. conformément à la directive 2000/14/CE. Voir les « caractéristiques techniques » pour un niveau de bruit précis. © 2011 Atlas Copco Construction Tools AB | No. 3392 5206 90b | 2011-01-27 Instructions d’origine... -
Page 41: Flexibles
L'indice de viscosité indique la relation entre la viscosité et la température. C'est la raison pour laquelle une viscosité élevée est préférée, ce qui © 2011 Atlas Copco Construction Tools AB | No. 3392 5206 90b | 2011-01-27 Instructions d’origine... -
Page 42: Outil D'insertion
Assurez-vous que l'outil inséré est correctement entretenu, pas usé et de la taille appropriée. Utilisez toujours un outil tranchant pour pouvoir ► travailler de manière efficace. © 2011 Atlas Copco Construction Tools AB | No. 3392 5206 90b | 2011-01-27 Instructions d’origine... -
Page 43: Contrôle De L'usure De La Tige De L'outil
3. Insérez ou retirez l’outil. s'arrête complètement ● Arrêtez la source d'alimentation. Débranchez les flexibles et montez les capuchons ● de protection sur les raccords rapides. © 2011 Atlas Copco Construction Tools AB | No. 3392 5206 90b | 2011-01-27 Instructions d’origine... -
Page 44: Utilisation
être évitée. Évitez d'activer le dispositif de marche/arrêt ♦ lorsque la machine est en position haute. © 2011 Atlas Copco Construction Tools AB | No. 3392 5206 90b | 2011-01-27 Instructions d’origine... -
Page 45: Lors Des Pauses
Lorsque le levier de la manette est appuyé à fond, il doit être possible de déplacer le cliquet de déclenchement (avec un tournevis) d'environ 1 millimètre supplémentaire. © 2011 Atlas Copco Construction Tools AB | No. 3392 5206 90b | 2011-01-27 Instructions d’origine... -
Page 46: Toutes Les 600 Heures De Service Ou Une Fois Par An
être vidée et nettoyée de toute l'huile hydraulique. L’huile hydraulique résiduelle doit être évacuée et tout impact négatif sur l'environnement doit être réduit au maximum. © 2011 Atlas Copco Construction Tools AB | No. 3392 5206 90b | 2011-01-27 Instructions d’origine... -
Page 47: Caractéristiques Techniques
25 x 108 17.5 95-115 18-22 28 x 152 19.1 95-115 18-22 28 x 160 19.1 95-115 18-22 32 x 152 19.1 95-115 18-22 © 2011 Atlas Copco Construction Tools AB | No. 3392 5206 90b | 2011-01-27 Instructions d’origine... - Page 48 28-40 D (E) LH 400 E 28 x 152 18-23 110-125 28-40 32 x 152 18-23 110-125 28-40 32 x 160 18-23 110-125 28-40 © 2011 Atlas Copco Construction Tools AB | No. 3392 5206 90b | 2011-01-27 Instructions d’origine...
- Page 49 55.1 30.1 23-31 1600-1800 D (C) ⁄ 55.1 30.1 23-31 1600-1800 D (C) ⁄ ⁄ LH 280 E ⁄ 30.1 23-31 1600-1800 D (C) © 2011 Atlas Copco Construction Tools AB | No. 3392 5206 90b | 2011-01-27 Instructions d’origine...
-
Page 50: Énoncé Déclaratif Sur Les Vibrations Et Le Bruit
Atlas Copco Construction Tools AB, ne peut être tenu pour responsable des conséquences d'une utilisation des valeurs déclarées à la place des valeurs correspondant à l'exposition réelle, dans le cadre d'une évaluation des risques sur un lieu de travail dont nous ne maîtrisons aucun élément. -
Page 51: Données Relatives Au Bruit Et Aux Vibrations
LH 400 E (Hex 32x160, 30 lpm) LH 400 E (Hex 32x160, 40 lpm) LH 400 E HBP (Hex 32x160, 30 lpm) LH 400 E HBP (Hex 32x160, 40 lpm) © 2011 Atlas Copco Construction Tools AB | No. 3392 5206 90b | 2011-01-27 Instructions d’origine... -
Page 52: Déclaration Ce De Conformité
Déclaration CE de conformité Déclaration CE de conformité (Directive 2006/42/CE) Nous, Atlas Copco Construction Tools AB, déclarons par la présente que les machines énumérées ci-dessous sont conformes aux dispositions de la directive européenne 2006/42/CE (directive « Machines ») et 2000/14/CE (directive «... - Page 53 www.CrowderSupply.com • Toll Free: 888-883-5144...
-
Page 54: Deutsch
Entsorgung............... 72 © 2011 Atlas Copco Construction Tools AB | No. 3392 5206 90b | 2011-01-27... - Page 55 EG-Konformitätserklärung (EG-Richtlinie 2006/42/EG)......78 © 2011 Atlas Copco Construction Tools AB | No. 3392 5206 90b | 2011-01-27...
- Page 56 www.CrowderSupply.com • Toll Free: 888-883-5144...
-
Page 57: Einleitung
LH 11, 180, 190, 220, 230, 270, 280, 390, 400 Sicherheits- und Betriebsanleitung Einleitung Wir danken Ihnen für die Wahl eines Produkts von Atlas Copco! Seit 1873 sind wir bestrebt, die Wünsche und den Bedarf unserer Kunden optimal zu decken. Unsere innovativen und ergonomischen Produktlösungen dienen der Kostensenkung und somit der besseren Rentabilität der Unternehmenstätigkeit... -
Page 58: Sicherheitshinweise
Person oder den eigenen Körper! Stellen Sie sicher, dass das Werkzeug vollständig ► eingesetzt ist und die Werkzeugaufnahme arretiert ist, bevor Sie die Maschine einschalten. © 2011 Atlas Copco Construction Tools AB | No. 3392 5206 90b | 2011-01-27 Originalbetriebsanleitung... -
Page 59: Betrieb, Vorsichtsmaßnahmen
Demontieren Sie niemals die Hydraulikmaschine, ► wenn das Hydrauliköl noch heiß ist. ► Betreiben Sie Hydraulikleitungen für den Anschluss der Hydraulikmaschine niemals über die Kabine des Trägergeräts. © 2011 Atlas Copco Construction Tools AB | No. 3392 5206 90b | 2011-01-27 Originalbetriebsanleitung... - Page 60 Arbeiten Sie in einem gut belüfteten Bereich. Verfügt die Maschine über ein Abgasrohr, richten ► Sie dieses so aus, dass die Staubaufwirbelungen in staubigen Umgebungen möglichst gering sind. © 2011 Atlas Copco Construction Tools AB | No. 3392 5206 90b | 2011-01-27 Originalbetriebsanleitung...
- Page 61 Körpergewicht auf beide Füße, die schulterbreit entsprechend dem Rat von Gesundheits- und auseinander stehen. Sicherheitsexperten erstellt und implementiert werden. Lassen Sie sich von Experten beraten. © 2011 Atlas Copco Construction Tools AB | No. 3392 5206 90b | 2011-01-27 Originalbetriebsanleitung...
- Page 62 Anlehnen irgendeines Körperteils an die Maschine, um die Vorschubkraft zu erhöhen. Wichtig ist auch, beim Zurückziehen des Werkzeugs aus der aufgebrochenen Bearbeitungsfläche den Start- und Stoppschalter nicht gedrückt zu halten. © 2011 Atlas Copco Construction Tools AB | No. 3392 5206 90b | 2011-01-27 Originalbetriebsanleitung...
-
Page 63: Wartung, Vorsichtsmaßnahmen
Abwasserleitungen. Ersetzen Sie verschlissene Komponenten ► Wenn Sie glauben, dass das Werkzeug ein ► rechtzeitig. verborgenes Objekt getroffen hat, schalten Sie die Maschine sofort aus. © 2011 Atlas Copco Construction Tools AB | No. 3392 5206 90b | 2011-01-27 Originalbetriebsanleitung... -
Page 64: Lagerung, Vorsichtsmaßnahmen
Werkzeug bei noch angeschlossener Energieversorgung. Lagerung, Vorsichtsmaßnahmen ♦ Lagern Sie die Maschine und die Werkzeuge in einer sicheren, abgeschlossenen Umgebung und für Kinder unzugänglich. © 2011 Atlas Copco Construction Tools AB | No. 3392 5206 90b | 2011-01-27 Originalbetriebsanleitung... -
Page 65: Übersicht
An der Maschine sind Etiketten mit wichtigen Informationen zu Sicherheit und Wartung angebracht. Die Etiketten müssen stets gut lesbar sein. Neue Etiketten können anhand der Ersatzteilliste bestellt werden. Schlagmechanismus Ventilgehäuse Anschlüsse © 2011 Atlas Copco Construction Tools AB | No. 3392 5206 90b | 2011-01-27 Originalbetriebsanleitung... -
Page 66: Typenschild
EC-Richtlinie 2000/14/EC an. Den Hydraulikschläuche mit dem erforderlichen korrekten Geräuschpegelwert finden Sie unter Anziehdrehmoment an. „Technische Daten“. Stellen Sie sicher, dass Hydraulikschlauch und ► Anschlüsse unbeschädigt sind. © 2011 Atlas Copco Construction Tools AB | No. 3392 5206 90b | 2011-01-27 Originalbetriebsanleitung... -
Page 67: Schläuche
Hydrauliksystems zwischen 20 und 40°C (68-104°F) über der Umgebungstemperatur. Die Viskosität des Öls muss bei Betriebstemperatur innerhalb der empfohlenen Grenzen liegen. Der Viskositätsindex gibt das Verhältnis von Viskosität und Temperatur © 2011 Atlas Copco Construction Tools AB | No. 3392 5206 90b | 2011-01-27 Originalbetriebsanleitung... -
Page 68: Werkzeug
Hammer jetzt auf vorgesehen. eine andere Flussrate eingestellt ist. 8. Verbinden Sie den Hammer mit der Energieversorgung, und prüfen Sie ihn auf Undichtigkeiten. © 2011 Atlas Copco Construction Tools AB | No. 3392 5206 90b | 2011-01-27 Originalbetriebsanleitung... -
Page 69: Prüfen Des Werkzeugschaft Auf Verschleiß
Bei jedem Einsetzen oder Entfernen des Werkzeugs Schnellkupplungen. müssen die folgenden Anweisungen beachtet werden: ● Säubern Sie bei Bedarf die Schnellkupplungen und verbinden Sie die Anschlussstutzen mit den Verlängerungsschläuchen der Energieversorgung. © 2011 Atlas Copco Construction Tools AB | No. 3392 5206 90b | 2011-01-27 Originalbetriebsanleitung... -
Page 70: Stopp
Ölfluss überschreiten könnte. ♦ Überschreiten Sie niemals die auf dem Werkzeug angegebenen Maximalwerte für das Überdruckventil. ♦ Verwenden Sie vor Arbeitsbeginn stets T- und P-Schläuche. © 2011 Atlas Copco Construction Tools AB | No. 3392 5206 90b | 2011-01-27 Originalbetriebsanleitung... -
Page 71: Aufbrechen
Prüfen Sie die Werkzeugaufnahme auf Verschleiß und Funktion. Stellen Sie sicher, dass das Werkstück wirklich ♦ fest sitzt. Führen Sie eine allgemeine Prüfung auf ♦ Undichtigkeit, Beschädigung und Abnutzung durch. © 2011 Atlas Copco Construction Tools AB | No. 3392 5206 90b | 2011-01-27 Originalbetriebsanleitung... -
Page 72: Wöchentlich
Alle 600 Betriebsstunden oder einmal jährlich Prüfen Sie bewegliche Teile auf Verschleiß und ♦ Brüche. Ersetzen Sie Teile bei Bedarf. Prüfen Sie die Funktion der Maschine. ♦ © 2011 Atlas Copco Construction Tools AB | No. 3392 5206 90b | 2011-01-27 Originalbetriebsanleitung... -
Page 73: Technische Daten
22 x 82.5 12.6 70-90 18-22 LH 180 25 x 108 17.5 95-115 18-22 28 x 152 19.1 95-115 18-22 28 x 160 19.1 95-115 18-22 © 2011 Atlas Copco Construction Tools AB | No. 3392 5206 90b | 2011-01-27 Originalbetriebsanleitung... - Page 74 110-125 28-40 D (E) LH 400 E 28 x 152 18-23 110-125 28-30 32 x 152 18-23 110-125 28-30 32 x 160 18-23 110-125 28-30 © 2011 Atlas Copco Construction Tools AB | No. 3392 5206 90b | 2011-01-27 Originalbetriebsanleitung...
- Page 75 30.1 23-31 1600-1800 D (C) 30.1 23-31 1600-1800 D (C) ⁄ ⁄ 30.1 23-31 1600-1800 D (C) ⁄ 30.1 23-31 1600-1800 D (C) ⁄ ⁄ © 2011 Atlas Copco Construction Tools AB | No. 3392 5206 90b | 2011-01-27 Originalbetriebsanleitung...
-
Page 76: Angaben Zu Geräuschemission Und Vibration
Arbeitsweise des Anwenders, vom bearbeiteten Material, von der Belastungsdauer, von der physischen Kondition des Anwenders und vom Zustand der Maschine ab. Atlas Copco Construction Tools AB haftet nicht für Folgen, falls die genannten Werte anstelle der Werte verwenden werden, die der tatsächlichen Belastung entsprechen, hervorgehend aus einer individuellen Risikoanalyse in einer Arbeitsplatzsituation, die wir nicht beeinflussen können. -
Page 77: Daten Zu Geräuschemission Und Vibration
LH 400 E (Hex 32x160, 30 lpm) LH 400 E (Hex 32x160, 40 lpm) LH 400 E HBP (Hex 32x160, 30 lpm) LH 400 E HBP (Hex 32x160, 40 lpm) © 2011 Atlas Copco Construction Tools AB | No. 3392 5206 90b | 2011-01-27 Originalbetriebsanleitung... -
Page 78: Eg-Konformitätserklärung
LH 11, 180, 190, 220, 230, 270, 280, 390, 400 EG-Konformitätserklärung EG-Konformitätserklärung (EG-Richtlinie 2006/42/EG) Wir, die Atlas Copco Construction Tools AB, erklären hiermit, dass die nachfolgend aufgelisteten Maschinen die Bestimmungen der EG-Richtlinien 2006/42/EG (Maschinenrichtlinie) und 2000/14/EG (Lärmschutzrichtlinie) sowie die nachfolgend genannten harmonisierten Normen erfüllen. - Page 79 www.CrowderSupply.com • Toll Free: 888-883-5144...
-
Page 80: Español
Desechar............... . . 97 © 2011 Atlas Copco Construction Tools AB | No. 3392 5206 90b | 2011-01-27... - Page 81 Declaración CE de conformidad (Directiva 2006/42/CE)......103 © 2011 Atlas Copco Construction Tools AB | No. 3392 5206 90b | 2011-01-27...
- Page 82 www.CrowderSupply.com • Toll Free: 888-883-5144...
-
Page 83: Introducción
Atlas Copco cuenta con una sólida red de ventas y servicios a escala mundial formada por centros de atención al cliente y distribuidores repartidos por todo el mundo. -
Page 84: Instrucciones De Seguridad
Nunca utilice una herramienta de inserción sin un ► protección lateral anillo. Protección respiratoria, cuando sea necesario ● Guantes protectores ● ● Botas protectoras adecuadas © 2011 Atlas Copco Construction Tools AB | No. 3392 5206 90b | 2011-01-27 Instrucciones originales... -
Page 85: Funcionamiento, Precauciones
► Nunca “pise” en la máquina con un pie sobre la empuñadura. ► No golpee nunca ni maltrate el equipo. © 2011 Atlas Copco Construction Tools AB | No. 3392 5206 90b | 2011-01-27 Instrucciones originales... - Page 86 La protección respiratoria debe ser eficaz para el tipo de sustancia concreta (y, si procede, aprobada por la autoridad gubernamental correspondiente). © 2011 Atlas Copco Construction Tools AB | No. 3392 5206 90b | 2011-01-27 Instrucciones originales...
- Page 87 Asegúrese de estar siempre en una posición estable, con los pies separados a la misma distancia que la anchura de los hombros, y con el peso del cuerpo equilibrado. © 2011 Atlas Copco Construction Tools AB | No. 3392 5206 90b | 2011-01-27 Instrucciones originales...
- Page 88 (y de exposición a las vibraciones) y pueden contribuir a la exposición a niveles más altos de vibración. © 2011 Atlas Copco Construction Tools AB | No. 3392 5206 90b | 2011-01-27 Instrucciones originales...
-
Page 89: Mantenimiento, Precauciones
Utilice siempre piezas, herramientas de inserción ► y accesorios originales. Cambie las piezas dañadas inmediatamente. ► ► Sustituya los componentes gastados con la debida antelación. © 2011 Atlas Copco Construction Tools AB | No. 3392 5206 90b | 2011-01-27 Instrucciones originales... -
Page 90: Visión General
Si se tarda menos de 10 segundos, debe ● seleccionar un martillo más pequeño. ● Si se tarda más de 20 segundos, debe seleccionarse un martillo más grande. © 2011 Atlas Copco Construction Tools AB | No. 3392 5206 90b | 2011-01-27 Instrucciones originales... -
Page 91: Etiquetas
Apriete las tuercas de las conexiones de las mangueras hidráulicas al par necesario. Compruebe que la manguera hidráulica y las ► conexiones no estén dañadas. © 2011 Atlas Copco Construction Tools AB | No. 3392 5206 90b | 2011-01-27 Instrucciones originales... -
Page 92: Mangueras
El índice de viscosidad indica la relación entre la viscosidad y la temperatura. Se prefiere por tanto una alta © 2011 Atlas Copco Construction Tools AB | No. 3392 5206 90b | 2011-01-27 Instrucciones originales... -
Page 93: Herramienta De Inserción
8. Conecte el martillo a la unidad de potencia y compruebe las fugas. © 2011 Atlas Copco Construction Tools AB | No. 3392 5206 90b | 2011-01-27 Instrucciones originales... -
Page 94: Comprobación De Desgastes En El Vástago De La Herramienta
Compruebe que la longitud (B) sea conforme con ● Retire las tapas protectoras de los acoplamientos ● el tipo de la máquina pedido. rápidos. © 2011 Atlas Copco Construction Tools AB | No. 3392 5206 90b | 2011-01-27 Instrucciones originales... -
Page 95: Parada
No supere nunca el ajuste máximo de la válvula de descarga, que viene indicado en la herramienta. ♦ Conecte siempre las mangueras T y P antes de arrancar. © 2011 Atlas Copco Construction Tools AB | No. 3392 5206 90b | 2011-01-27 Instrucciones originales... -
Page 96: Roturas
Realice una inspección general para determinar ♦ impacto manual. si hay fugas, desperfectos o desgaste. Asegúrese de que la pieza de trabajo esté bien ♦ sujeta. © 2011 Atlas Copco Construction Tools AB | No. 3392 5206 90b | 2011-01-27 Instrucciones originales... -
Page 97: Una Vez Por Semana
Compruebe si hay desgaste o grietas en las piezas móviles, los retenes y los pernos. Sustitúyalos si es necesario. ♦ Compruebe el funcionamiento de la máquina. © 2011 Atlas Copco Construction Tools AB | No. 3392 5206 90b | 2011-01-27 Instrucciones originales... -
Page 98: Especificaciones Técnicas
(mm) (kg) (mm) (Hz) (bar) (bar) (l/min) EHTMA LH 11 22 x 82.5 12.6 70-90 18-22 LH 180 25 x 108 17.5 95-115 18-22 © 2011 Atlas Copco Construction Tools AB | No. 3392 5206 90b | 2011-01-27 Instrucciones originales... - Page 99 28-40 D (E) LH 400 E 28 x 152 18-23 110-125 28-30 32 x 152 18-23 110-125 28-30 32 x 160 18-23 110-125 28-30 © 2011 Atlas Copco Construction Tools AB | No. 3392 5206 90b | 2011-01-27 Instrucciones originales...
- Page 100 55.1 30.1 23-31 1600-1800 D (C) ⁄ ⁄ LH 280 E ⁄ 30.1 23-31 1600-1800 D (C) 30.1 23-31 1600-1800 D (C) ⁄ ⁄ © 2011 Atlas Copco Construction Tools AB | No. 3392 5206 90b | 2011-01-27 Instrucciones originales...
-
Page 101: Declaración De Ruido Y Vibraciones
Nuestra empresa, Atlas Copco Construction Tools AB, no se hace responsable de las consecuencias de utilizar los valores declarados en lugar de valores que reflejen la exposición real, en una evaluación de riesgos individual en una situación del lugar de trabajo sobre la que no tenemos control. -
Page 102: Datos De Ruido Y Vibraciones
LH 400 E (Hex 32x160, 30 lpm) LH 400 E (Hex 32x160, 40 lpm) LH 400 E HBP (Hex 32x160, 30 lpm) LH 400 E HBP (Hex 32x160, 40 lpm) © 2011 Atlas Copco Construction Tools AB | No. 3392 5206 90b | 2011-01-27 Instrucciones originales... -
Page 103: Declaración Ce De Conformidad
Declaración CE de conformidad Declaración CE de conformidad (Directiva 2006/42/CE) Atlas Copco Construction Tools AB declara por la presente que las máquinas detalladas a continuación se ajustan a las disposiciones de las Directivas 2006/42/CE (Directiva sobre máquinas) y 2000/14/CE (Directiva sobre el ruido), y a las normas armonizadas mencionadas más abajo. -
Page 104: Português
Abate................123 © 2011 Atlas Copco Construction Tools AB | No. 3392 5206 90b | 2011-01-27... -
Page 105: Índice
Declaração de Conformidade da CE (Directiva da CE 2006/42/CE)....129 © 2011 Atlas Copco Construction Tools AB | No. 3392 5206 90b | 2011-01-27... - Page 106 www.CrowderSupply.com • Toll Free: 888-883-5144...
-
Page 107: Introdução
A Atlas Copco tem uma forte rede global de vendas e assistência, que consiste em centros de apoio ao cliente e aos distribuidores espalhados por todo o mundo. -
Page 108: Instruções De Segurança
● Capacete protector Protecção auricular ● Protecção para os olhos, resistente ao impacto e ● com protecção lateral © 2011 Atlas Copco Construction Tools AB | No. 3392 5206 90b | 2011-01-27 Instruções originais... -
Page 109: Operação, Precauções
Nunca desmonte a máquina hidráulica enquanto Técnicos”. o óleo hidráulico estiver quente. Nunca passe cabos hidráulicos para ligação à ► máquina hidráulica através da cabina do condutor. © 2011 Atlas Copco Construction Tools AB | No. 3392 5206 90b | 2011-01-27 Instruções originais... - Page 110 ► ► Se a máquina tiver um escape, dirija o escape por forma a reduzir a perturbação de poeiras num ambiente cheio de poeiras. © 2011 Atlas Copco Construction Tools AB | No. 3392 5206 90b | 2011-01-27 Instruções originais...
- Page 111 Saúde e Segurança equilibrado. para a protecção dos trabalhadores e de terceiros contra a exposição prejudicial a poeiras e fumos. Aconselhe-se com peritos. © 2011 Atlas Copco Construction Tools AB | No. 3392 5206 90b | 2011-01-27 Instruções originais...
- Page 112 É também importante que não tenha o dispositivo de arranque e paragem activado enquanto tirar a ferramenta da superfície de trabalho partida. © 2011 Atlas Copco Construction Tools AB | No. 3392 5206 90b | 2011-01-27 Instruções originais...
-
Page 113: Manutenção, Precauções
Se lhe parecer que a ferramenta inserida atingiu ► um objecto oculto, desligue a máquina imediatamente. ► Antes de voltar ao trabalho, certifique-se de que não há qualquer perigo. © 2011 Atlas Copco Construction Tools AB | No. 3392 5206 90b | 2011-01-27 Instruções originais... -
Page 114: Armazenamento, Precauções
à máquina. Armazenamento, precauções ♦ Guarde a máquina e as ferramentas num local seguro, fora do alcance de crianças e trancado. © 2011 Atlas Copco Construction Tools AB | No. 3392 5206 90b | 2011-01-27 Instruções originais... -
Page 115: Visão Geral
Se essa tarefa demorar menos de 10 segundos, ● então deve escolher um demolidor mais pequeno. ● Se essa tarefa demorar mais de 20 segundos, então escolher um demolidor maior. © 2011 Atlas Copco Construction Tools AB | No. 3392 5206 90b | 2011-01-27 Instruções originais... -
Page 116: Autocolantes
CE. Consulte a Declaração CE Autocolante de segurança que é fornecida com a máquina, para obter mais informações. Ano de fabrico. Pressão de operação nominal máxima © 2011 Atlas Copco Construction Tools AB | No. 3392 5206 90b | 2011-01-27 Instruções originais... -
Page 117: Instalação
40 l.p.m. (EHTMA E). Velocidade de caudal do óleo 20 l.p.m 30 l.p.m 40 l.p.m LH 11 sem bocal de restrição © 2011 Atlas Copco Construction Tools AB | No. 3392 5206 90b | 2011-01-27 Instruções originais... -
Page 118: Ferramenta De Inserção
É importante escolher ferramentas de inserção de alta qualidade, para evitar danos desnecessários à máquina. A máquina pode ser destruída se usar uma ferramenta de inserção incorrecta. © 2011 Atlas Copco Construction Tools AB | No. 3392 5206 90b | 2011-01-27 Instruções originais... -
Page 119: Escopro Estreito
Desligue a máquina da fonte de energia. 2. Antes de inserir a ferramenta, lubrifique o encabadouro da ferramenta com massa. 3. Encaixe ou remova a ferramenta de inserção. © 2011 Atlas Copco Construction Tools AB | No. 3392 5206 90b | 2011-01-27 Instruções originais... -
Page 120: Operação
Ligue sempre as mangueiras T e Pantes de dar ao material que vai ser demolido, e actue a arranque à máquina. alavanca do gatilho. © 2011 Atlas Copco Construction Tools AB | No. 3392 5206 90b | 2011-01-27 Instruções originais... -
Page 121: Começar Um Corte
Nunca use a máquina como uma ferramenta de impacto de mão. Certifique-se de que a peça de trabalho está ♦ fixada de forma segura. © 2011 Atlas Copco Construction Tools AB | No. 3392 5206 90b | 2011-01-27 Instruções originais... -
Page 122: Ao Fazer Uma Pausa
Substitua se necessário. Faça uma inspecção geral, procurando fugas, ♦ danos e desgaste. ♦ Verifique o funcionamento da máquina. © 2011 Atlas Copco Construction Tools AB | No. 3392 5206 90b | 2011-01-27 Instruções originais... -
Page 123: Armazenamento
óleo hidráulico. O óleo restante deve ser depositado e as influências negativas sobre o ambiente devem ser mantidas o mais baixo possível. © 2011 Atlas Copco Construction Tools AB | No. 3392 5206 90b | 2011-01-27 Instruções originais... -
Page 124: Dados Técnicos
28 x 152 19.1 95-115 18-22 28 x 160 19.1 95-115 18-22 32 x 152 19.1 95-115 18-22 32 x 160 19.1 95-115 18-22 © 2011 Atlas Copco Construction Tools AB | No. 3392 5206 90b | 2011-01-27 Instruções originais... - Page 125 28-40 D (E) LH 400 E 28 x 152 18-23 110-125 28-30 32 x 152 18-23 110-125 28-30 32 x 160 18-23 110-125 28-30 © 2011 Atlas Copco Construction Tools AB | No. 3392 5206 90b | 2011-01-27 Instruções originais...
- Page 126 23-31 1600-1800 D (C) 30.1 23-31 1600-1800 D (C) ⁄ ⁄ 30.1 23-31 1600-1800 D (C) ⁄ 30.1 23-31 1600-1800 D (C) ⁄ ⁄ © 2011 Atlas Copco Construction Tools AB | No. 3392 5206 90b | 2011-01-27 Instruções originais...
-
Page 127: Declaração De Ruído E Vibração
Nós, na Atlas Copco Construction Tools AB, não podemos ser considerados responsáveis pelas consequências de usar os valores declarados em vez de valores que reflictam a exposição real na avaliação de riscos pessoais numa situação de trabalho sobre a qual não temos qualquer controlo. -
Page 128: Dados Sobre O Ruído E Vibrações
LH 400 E (Hex 32x160, 30 lpm) LH 400 E (Hex 32x160, 40 lpm) LH 400 E HBP (Hex 32x160, 30 lpm) LH 400 E HBP (Hex 32x160, 40 lpm) © 2011 Atlas Copco Construction Tools AB | No. 3392 5206 90b | 2011-01-27 Instruções originais... -
Page 129: Declaração De Conformidade Da Ce
Declaração de Conformidade da CE Declaração de Conformidade da CE (Directiva da CE 2006/42/CE) Nós, Atlas Copco Construction Tools AB, declaramos pela presente que as máquinas listadas abaixo se encontram em conformidade com as provisões da Directiva 2006/42/CE da CE (Directiva de Maquinaria) e com a Directiva 2000/14/CE (Directiva de Ruído), e com as normas harmonizadas mencionadas abaixo. -
Page 130: Italiano
Smaltimento..............147 © 2011 Atlas Copco Construction Tools AB | No. 3392 5206 90b | 2011-01-27... - Page 131 Dichiarazione di conformità CE (Direttiva CE 2006/42/CE)......153 © 2011 Atlas Copco Construction Tools AB | No. 3392 5206 90b | 2011-01-27...
- Page 132 www.CrowderSupply.com • Toll Free: 888-883-5144...
-
Page 133: Introduzione
In tutti gli angoli del mondo, Atlas Copco è in grado di offrire assistenza per i prodotti e la competenza idonea a garantire che i suoi clienti possano lavorare con la massima efficienza in qualunque momento. -
Page 134: Norme Di Sicurezza
Elmetto protettivo ● ● Protezione acustica occhiali di sicurezza resistenti agli urti con ● protezioni laterali ● protezione delle vie respiratorie, se necessario © 2011 Atlas Copco Construction Tools AB | No. 3392 5206 90b | 2011-01-27 Istruzioni originali... -
Page 135: Funzionamento, Precauzioni
Lavarsi le mani dopo il contatto con olio idraulico. ► Non “arrampicarsi” mai sulla macchina ► appoggiando un piede sull'impugnatura. © 2011 Atlas Copco Construction Tools AB | No. 3392 5206 90b | 2011-01-27 Istruzioni originali... - Page 136 Lavorare in un'area ben ventilata. Se la macchina ha uno scarico, dirigerlo in modo ► tale da ridurre il disturbo delle polveri in un ambiente polveroso. © 2011 Atlas Copco Construction Tools AB | No. 3392 5206 90b | 2011-01-27 Istruzioni originali...
- Page 137 Il cambio di postura durante lavori prolungati può aiutare a ridurre il fastidio e la fatica. In caso di sintomi persistenti o ricorrenti, ► consultare un medico professionista qualificato. © 2011 Atlas Copco Construction Tools AB | No. 3392 5206 90b | 2011-01-27 Istruzioni originali...
- Page 138 Imparare come fermare la macchina in caso di contribuire a più alti livelli di esposizione alle emergenza. vibrazioni. Arrestare immediatamente la macchina in caso di ► interruzione di corrente. © 2011 Atlas Copco Construction Tools AB | No. 3392 5206 90b | 2011-01-27 Istruzioni originali...
-
Page 139: Manutenzione, Precauzioni
è collegata. Non ispezionare, pulire, installare o rimuovere ► l'utensile di inserimento quando l'alimentazione è collegata. © 2011 Atlas Copco Construction Tools AB | No. 3392 5206 90b | 2011-01-27 Istruzioni originali... -
Page 140: Avvertenze
È possibile ordinare nuove etichette facendo riferimento all'elenco dei pezzi di ricambio. Meccanismo di battuta Alloggiamento valvola Prese Accumulatore (interno) Impugnature © 2011 Atlas Copco Construction Tools AB | No. 3392 5206 90b | 2011-01-27 Istruzioni originali... -
Page 141: Targhetta Dei Dati
L'etichetta indica l'indicatore di livello rumore idraulici non siano danneggiati; garantito corrispondente alla direttiva CE 2000/14/CE. Vedere “Dati tecnici” per il livello di rumore preciso. © 2011 Atlas Copco Construction Tools AB | No. 3392 5206 90b | 2011-01-27 Istruzioni originali... -
Page 142: Tubi Flessibili
L'indice di viscosità indica il collegamento tra la viscosità e la temperatura. Viene preferita una viscosità elevata in © 2011 Atlas Copco Construction Tools AB | No. 3392 5206 90b | 2011-01-27 Istruzioni originali... -
Page 143: Iutensile Di Inserimento
è congelato. impostato su un flusso diverso. 8. Collegare il demolitore all'alimentazione per controllare le perdite. © 2011 Atlas Copco Construction Tools AB | No. 3392 5206 90b | 2011-01-27 Istruzioni originali... -
Page 144: Controllo Dell'usura Della Bussola Dell'utensile
● Verificare che il blocco sia attivato, in maniera tale che l'utensile non cada. ● Rimuovere i tappi protettivi dai raccordi a sgancio rapido. © 2011 Atlas Copco Construction Tools AB | No. 3392 5206 90b | 2011-01-27 Istruzioni originali... -
Page 145: Arresto
♦ Non superare mai le impostazioni max della valvola limitatrice indicate sullo strumento. ♦ Collegare sempre le tubazioni T e P prima di cominciare. © 2011 Atlas Copco Construction Tools AB | No. 3392 5206 90b | 2011-01-27 Istruzioni originali... -
Page 146: Demolizione
Accertarsi che il pezzo da lavorare sia ben fissato. ♦ usurato e funzioni correttamente. ♦ Eseguire un'ispezione generale per verificare che non vi siano perdite, danni e usura. © 2011 Atlas Copco Construction Tools AB | No. 3392 5206 90b | 2011-01-27 Istruzioni originali... -
Page 147: Settimanale
Verificare parti mobili, tenute e bulloni per ♦ eventuali segni di usura e rotture. Sostituirli se necessario. Verificare il funzionamento della macchina. ♦ © 2011 Atlas Copco Construction Tools AB | No. 3392 5206 90b | 2011-01-27 Istruzioni originali... -
Page 148: Dati Tecnici
28 x 152 19.1 95-115 18-22 28 x 160 19.1 95-115 18-22 32 x 152 19.1 95-115 18-22 32 x 160 19.1 95-115 18-22 © 2011 Atlas Copco Construction Tools AB | No. 3392 5206 90b | 2011-01-27 Istruzioni originali... - Page 149 28-40 D (E) LH 400 E 28 x 152 18-23 110-125 28-30 32 x 152 18-23 110-125 28-30 32 x 160 18-23 110-125 28-30 © 2011 Atlas Copco Construction Tools AB | No. 3392 5206 90b | 2011-01-27 Istruzioni originali...
- Page 150 23-31 1600-1800 D (C) 30.1 23-31 1600-1800 D (C) ⁄ ⁄ 30.1 23-31 1600-1800 D (C) ⁄ 30.1 23-31 1600-1800 D (C) ⁄ ⁄ © 2011 Atlas Copco Construction Tools AB | No. 3392 5206 90b | 2011-01-27 Istruzioni originali...
-
Page 151: Dichiarazione In Materia Di Rumore E Vibrazioni
- invece dei valori che riflettono l'esposizione effettiva - nella singola valutazione dei rischi di uno specifico posto di lavoro, sul quale Atlas Copco Construction Tools AB non ha controllo. Questo utensile può causare una sindrome da vibrazioni mano-braccio se non utilizzato nella maniera idonea. -
Page 152: Dati Su Rumore E Vibrazioni
LH 400 E (Hex 32x160, 30 lpm) LH 400 E (Hex 32x160, 40 lpm) LH 400 E HBP (Hex 32x160, 30 lpm) LH 400 E HBP (Hex 32x160, 40 lpm) © 2011 Atlas Copco Construction Tools AB | No. 3392 5206 90b | 2011-01-27 Istruzioni originali... -
Page 153: Dichiarazione Di Conformità Ce
Dichiarazione di conformità CE Dichiarazione di conformità CE (Direttiva CE 2006/42/CE) Atlas Copco Construction Tools AB, con il presente documento dichiara che i macchinari elencati di seguito sono conformi ai requisiti specificati dalle Direttive CE 2006/42/CE (Direttiva macchine) e 2000/14/CE (Direttiva sul rumore), nonché... -
Page 154: Nederlands
Opruimen............... . 172 © 2011 Atlas Copco Construction Tools AB | No. 3392 5206 90b | 2011-01-27... - Page 155 EG Conformiteitsverklaring (EG-richtlijn 2006/42/EG)......178 © 2011 Atlas Copco Construction Tools AB | No. 3392 5206 90b | 2011-01-27...
- Page 156 www.CrowderSupply.com • Toll Free: 888-883-5144...
-
Page 157: Inleiding
Veiligheidsvoorschriften en bedieningshandleiding Inleiding Dank u voor het kiezen van een product van Atlas Copco. Sinds 1873 zetten we ons al in voor het vinden van nieuwe en betere manieren om te voorzien in de behoeften van onze klanten. Door de jaren heen hebben we innovatieve en ergonomische producten ontwikkeld die onze klanten hielpen hun dagelijkse werkzaamheden te verbeteren en te rationaliseren. -
Page 158: Veiligheidsvoorschriften
Richt het inzetgereedschap nooit op u zelf of ► iemand anders. © 2011 Atlas Copco Construction Tools AB | No. 3392 5206 90b | 2011-01-27 Originele handleidingen... -
Page 159: Bediening, Voorzorgsmaatregelen
Demonteer de hydraulische machine onder geen beding zo lang de hydraulische olie heet is. Trek hydraulische leidingen voor bevestiging van ► de hydraulische machine nooit door de chauffeurscabine. © 2011 Atlas Copco Construction Tools AB | No. 3392 5206 90b | 2011-01-27 Originele handleidingen... - Page 160 (en, indien van toepassing, zijn goedgekeurd door de desbetreffende overheidsinstantie). Werk in een goed geventileerde ruimte. ► © 2011 Atlas Copco Construction Tools AB | No. 3392 5206 90b | 2011-01-27 Originele handleidingen...
- Page 161 Raadpleeg deskundigen. © 2011 Atlas Copco Construction Tools AB | No. 3392 5206 90b | 2011-01-27 Originele handleidingen...
- Page 162 Het is ook belangrijk dat de start- en stopvoorziening niet ingeschakeld is als u het gereedschap uit het gebroken werkoppervlak verwijdert. © 2011 Atlas Copco Construction Tools AB | No. 3392 5206 90b | 2011-01-27 Originele handleidingen...
-
Page 163: Onderhoud, Voorzorgsmaatregelen
Als het inzetgereedschap een verborgen object ► Vervang beschadigde onderdelen onmiddellijk. ► geraakt lijkt te hebben, zet de machine dan Vervang versleten componenten op tijd. ► onmiddellijk af. © 2011 Atlas Copco Construction Tools AB | No. 3392 5206 90b | 2011-01-27 Originele handleidingen... -
Page 164: Opslag, Voorzorgsmaatregelen
Opslag, voorzorgsmaatregelen ♦ Bewaar de machine en gereedschappen op een veilige plaats, buiten het bereik van kinderen en achter slot en grendel. © 2011 Atlas Copco Construction Tools AB | No. 3392 5206 90b | 2011-01-27 Originele handleidingen... -
Page 165: Overzicht
De stickers moeten in dusdanige staat zijn, dat ze makkelijk leesbaar zijn. Nieuwe stickers kunt u bestellen uit de reserveonderdelenlijst. Slagmechanisme Klepslangen Contacten © 2011 Atlas Copco Construction Tools AB | No. 3392 5206 90b | 2011-01-27 Originele handleidingen... -
Page 166: Gegevensplaat
Controleer of de hydraulische slang en de ► EU-richtlijn 2000/14/EG. Zie “Technische gegevens” koppelingen intact zijn. voor het exacte geluidsniveau. © 2011 Atlas Copco Construction Tools AB | No. 3392 5206 90b | 2011-01-27 Originele handleidingen... -
Page 167: Slangen
20-40°C (68-104°F) hoger dan de omgevingstemperatuur. Bij werktemperatuur moet de viscositeit van de olie binnen de voorkeurslimieten liggen. De viscositeitsindex drukt de relatie tussen viscositeit © 2011 Atlas Copco Construction Tools AB | No. 3392 5206 90b | 2011-01-27 Originele handleidingen... -
Page 168: Inzetgereedschap
8. Sluit de sloophamer aan op het krachtaggregaat en controleer hem op lekkage. © 2011 Atlas Copco Construction Tools AB | No. 3392 5206 90b | 2011-01-27 Originele handleidingen... -
Page 169: De Gereedschapsschacht Controleren Op Slijtage
Dat betekent dat de schacht is versleten en dat het inzetgereedschap moet worden vervangen. Controleer of de lengte (B) conform het bestelde ● machinetype is. © 2011 Atlas Copco Construction Tools AB | No. 3392 5206 90b | 2011-01-27 Originele handleidingen... -
Page 170: Starten En Stoppen
Keer de breekhamer niet om zonder hem eerst te ontkoppelen van het krachtaggregaat. Het werkgereedschap kan tijdens het aansluiten met grote kracht worden uitgeworpen als de sloophamer is aangesloten op het krachtaggregaat. © 2011 Atlas Copco Construction Tools AB | No. 3392 5206 90b | 2011-01-27 Originele handleidingen... -
Page 171: Breken
Gebruik de machine nooit als een handbediend ♦ slaggereedschap. Verricht een algemene inspectie op lekkage, ♦ beschadiging en slijtage. Verzeker u ervan dat werkstukken stevig en veilig ♦ bevestigd zijn. © 2011 Atlas Copco Construction Tools AB | No. 3392 5206 90b | 2011-01-27 Originele handleidingen... -
Page 172: Iedere Week
Na elke 600 bedrijfsuren of elk jaar Controleer bewegende onderdelen, afdichtingen ♦ en bouten op slijtage en barstvorming. Vernieuw indien noodzakelijk. Controleer de werking van de machine. ♦ © 2011 Atlas Copco Construction Tools AB | No. 3392 5206 90b | 2011-01-27 Originele handleidingen... -
Page 173: Technische Gegevens
25 x 108 22.1 95-115 18-22 28 x 152 23.7 95-115 18-22 28 x 160 23.7 95-115 18-22 32 x 152 23.7 95-115 18-22 © 2011 Atlas Copco Construction Tools AB | No. 3392 5206 90b | 2011-01-27 Originele handleidingen... - Page 174 LH 220, 230 E, 270, 280 E, 390, 400 E LH 220 HBP, LH 230 E HBP, LH 270 HBP, LH 280 E HBP LH 390 HBP, LH 400 E HBP © 2011 Atlas Copco Construction Tools AB | No. 3392 5206 90b | 2011-01-27 Originele handleidingen...
- Page 175 ⁄ ⁄ LH 390 HBP ⁄ 69.2 30.1 18-23 1600-1800 8-11 18-23 1600-1800 8-11 ⁄ 69.2 30.1 18-23 1600-1800 8-11 ⁄ ⁄ 69.2 30.1 © 2011 Atlas Copco Construction Tools AB | No. 3392 5206 90b | 2011-01-27 Originele handleidingen...
-
Page 176: Geluids- En Trillingsverklaring
Wij, Atlas Copco Construction Tolls AB, kunnen niet aansprakelijk worden gesteld voor de gevolgen van het gebruik van de verklaarde waarden in plaats van de waarden die de werkelijke blootstelling weerspiegelen, in een individuele risicobeoordeling in een werkplaatssituatie waarover we geen controle hebben. -
Page 177: Geluids- En Trillingsgegevens
LH 400 E (Hex 32x160, 30 lpm) LH 400 E (Hex 32x160, 40 lpm) LH 400 E HBP (Hex 32x160, 30 lpm) LH 400 E HBP (Hex 32x160, 40 lpm) © 2011 Atlas Copco Construction Tools AB | No. 3392 5206 90b | 2011-01-27 Originele handleidingen... -
Page 178: Eg Conformiteitsverklaring
EG Conformiteitsverklaring EG Conformiteitsverklaring (EG-richtlijn 2006/42/EG) Wij, Atlas Copco Construction Tools AB, verklaren hierbij onder geheel eigen verantwoordelijkheid dat de hieronder vermelde machines in overeenstemming zijn met de eisen van de richtlijnen 2006/42/EG (Machinerichtlijn) en 2000/14/EG (Richtlijn geluidsemissie) en met de hieronder vermelde geharmoniseerde normen. - Page 179 www.CrowderSupply.com • Toll Free: 888-883-5144...
- Page 180 Απόρριψη............... 199 © 2011 Atlas Copco Construction Tools AB | No. 3392 5206 90b | 2011-01-27...
- Page 181 Δήλωση Συμμόρφωσης της ΕΚ (Οδηγία ΕΚ 2006/42/ΕΚ)......205 © 2011 Atlas Copco Construction Tools AB | No. 3392 5206 90b | 2011-01-27...
- Page 182 www.CrowderSupply.com • Toll Free: 888-883-5144...
-
Page 183: Εισαγωγή
εκτέλεσης τακτικής συντήρησης στον υδραυλικό θραυστήρα. Πριν χρησιμοποιήσετε τον υδραυλικό θραυστήρα για πρώτη φορά πρέπει να διαβάσετε αυτές τις οδηγίες προσεκτικά και να τις κατανοήσετε πλήρως. © 2011 Atlas Copco Construction Tools AB | No. 3392 5206 90b | 2011-01-27 Αρχικές οδηγίες... -
Page 184: Οδηγίες Ασφαλείας
εξαερώστε το μηχάνημα ενεργοποιώντας τη διάταξη εκκίνησης/διακοπής της λειτουργίας. Μην στρέφετε ποτέ το εργαλείο εισαγωγής προς ► το σώμα σας ή προς την κατεύθυνση άλλου ατόμου. © 2011 Atlas Copco Construction Tools AB | No. 3392 5206 90b | 2011-01-27 Αρχικές οδηγίες... -
Page 185: Λειτουργία, Προφυλάξεις
► Μην χρησιμοποιείτε ποτέ το μηχάνημα κοντά σε εύφλεκτα υλικά, αναθυμιάσεις ή σκόνη. Να βεβαιώνεστε ότι δεν υπάρχουν αέρια ή ► εκρηκτικά άγνωστης προέλευσης. © 2011 Atlas Copco Construction Tools AB | No. 3392 5206 90b | 2011-01-27 Αρχικές οδηγίες... - Page 186 ίχνη φθοράς, καθώς και για ενδείξεις ζημίας ή ορατές ρωγμές. ► Να έχετε στραμμένη όλη την προσοχή σας και να παρακολουθείτε αυτό που κάνετε. © 2011 Atlas Copco Construction Tools AB | No. 3392 5206 90b | 2011-01-27 Αρχικές οδηγίες...
- Page 187 του κλάδου και σύμφωνα με τους κανονισμούς και τις συστάσεις περί υγείας και ασφάλειας στους επαγγελματικούς χώρους. Ζητήστε τη συμβουλή ιατρών με εμπειρία στο σχετικό πεδίο επαγγελματικής ιατρικής. © 2011 Atlas Copco Construction Tools AB | No. 3392 5206 90b | 2011-01-27 Αρχικές οδηγίες...
- Page 188 Μην χρησιμοποιείτε ποτέ ένα εργαλείο εισαγωγής ► ως εργαλείο χειρός. Έχουν σχεδιαστεί ειδικά και έχουν υποστεί θερμική κατεργασία, ώστε να χρησιμοποιούνται σε μηχάνημα μόνο. © 2011 Atlas Copco Construction Tools AB | No. 3392 5206 90b | 2011-01-27 Αρχικές οδηγίες...
- Page 189 αυξήσετε την ασκούμενη δύναμη. Είναι επίσης σημαντικό να μην συνεχίζετε να πιέζετε τη διάταξη εκκίνησης/διακοπής της λειτουργίας κατά την αφαίρεση του εργαλείου από τη σπασμένη επιφάνεια εργασίας. © 2011 Atlas Copco Construction Tools AB | No. 3392 5206 90b | 2011-01-27 Αρχικές οδηγίες...
-
Page 190: Συντήρηση, Προφυλάξεις
και είναι σε καλή κατάσταση λειτουργίας, εάν το μηχάνημα διαθέτει σιγαστήρα. ► Χρήση προστατευτικών ακοής, πάντα. ► Χρήση υλικού απόσβεσης κραδασμών, ώστε να αποτρέπεται το «κουδούνισμα» των τεμαχίων εργασίας. © 2011 Atlas Copco Construction Tools AB | No. 3392 5206 90b | 2011-01-27 Αρχικές οδηγίες... -
Page 191: Επισκόπηση
Ένας απλός κανόνας για την επιλογή σωστού μεγέθους θραυστήρα είναι ότι ένα κομμάτι σπασμένου υλικού κανονικού μεγέθους θα πρέπει να αφαιρείται από το τεμάχιο εργασίας εντός 10-20 δευτερολέπτων λειτουργίας. © 2011 Atlas Copco Construction Tools AB | No. 3392 5206 90b | 2011-01-27 Αρχικές οδηγίες... -
Page 192: Ετικέτες
Το σύμβολο CE σημαίνει ότι το μηχάνημα είναι εγκεκριμένο από την ΕΚ. Για περαιτέρω πληροφορίες, ανατρέξτε στη δήλωση της ΕΚ η οποία συνοδεύει το μηχάνημα. Έτος κατασκευής. καθαρη εγκατεστημενη ισχυς © 2011 Atlas Copco Construction Tools AB | No. 3392 5206 90b | 2011-01-27 Αρχικές οδηγίες... -
Page 193: Εγκατάσταση
με ετικέτα και ρακόρ χωρίς μειωτήρα, εάν απαιτείται Η μη συμμόρφωση ενδέχεται να καταλήξει σε λειτουργία του θραυστήρα σε 40 l.p.m (EHTMA E). πρόκληση ζημίας στους ταχυσυνδέσμους και © 2011 Atlas Copco Construction Tools AB | No. 3392 5206 90b | 2011-01-27 Αρχικές οδηγίες... -
Page 194: Εργαλείο Εισαγωγής
Η επιλογή του σωστού εργαλείου εισαγωγής είναι προϋπόθεση για τη σωστή λειτουργία του μηχανήματος. Είναι σημαντικό να επιλέγετε εργαλεία εισαγωγής υψηλής ποιότητας για να αποφεύγετε την πρόκληση ζημιάς στο μηχάνημα. © 2011 Atlas Copco Construction Tools AB | No. 3392 5206 90b | 2011-01-27 Αρχικές οδηγίες... -
Page 195: Στενό Κοπίδι
παροχή ισχύος. 2. Πριν από την εισαγωγή ενός εργαλείου, απαιτείται λίπανση του στελέχους του εργαλείου με γράσο. 3. Τοποθετήστε ή αφαιρέστε το εργαλείο εισαγωγής. © 2011 Atlas Copco Construction Tools AB | No. 3392 5206 90b | 2011-01-27 Αρχικές οδηγίες... -
Page 196: Χειρισμός
τύπου T και Pπριν από την εκκίνηση. Τοποθετήστε το θραυστήρα υπό ορθή γωνία πάνω ● στο υλικό προς θραύση και ενεργοποιήστε το μοχλό σκανδάλης. © 2011 Atlas Copco Construction Tools AB | No. 3392 5206 90b | 2011-01-27 Αρχικές οδηγίες... -
Page 197: Έναρξη Κοπής
Να ελέγχετε τακτικά ότι το μηχάνημα λιπαίνεται επαρκώς. Μην χρησιμοποιείτε ποτέ το μηχάνημα ως ♦ κρουστικό εργαλείο χειρός. Να φροντίζετε ώστε το τεμάχιο εργασίας να είναι ♦ σταθερά στερεωμένο. © 2011 Atlas Copco Construction Tools AB | No. 3392 5206 90b | 2011-01-27 Αρχικές οδηγίες... -
Page 198: Όταν Κάνετε Διάλειμμα
για φθορά και για τυχόν προβλήματα λειτουργίας. και ραγίσματα. Αντικαταστήστε, εάν απαιτείται. ♦ Να διενεργείτε γενική επιθεώρηση για διαρροές, ♦ Ελέγξτε τη λειτουργία του μηχανήματος. ζημίες και φθορά. © 2011 Atlas Copco Construction Tools AB | No. 3392 5206 90b | 2011-01-27 Αρχικές οδηγίες... -
Page 199: Αποθήκευση
πρέπει να το αδειάσετε και να το καθαρίσετε από το υδραυλικό λάδι. Το λάδι που απομένει πρέπει να φυλαχθεί και οι τυχόν αρνητικές επιπτώσεις στο περιβάλλον να ελαχιστοποιηθούν. © 2011 Atlas Copco Construction Tools AB | No. 3392 5206 90b | 2011-01-27 Αρχικές οδηγίες... -
Page 200: Τεχνικά Δεδομένα
στεγανοποίησης Πτώση εργαλείου εργασίας Φθαρμένο μάνδαλο Αντικαταστήστε το μάνδαλο και τους κυλινδρικούς πείρους Φθαρμένο έδρανο κοπιδιού ή εργαλείο Αντικαταστήστε το έδρανο ή το εργαλείο © 2011 Atlas Copco Construction Tools AB | No. 3392 5206 90b | 2011-01-27 Αρχικές οδηγίες... -
Page 201: Δεδομένα Μηχανήματος
28-40 D (E) LH 400 E 28 x 152 18-23 110-125 28-30 32 x 152 18-23 110-125 28-30 32 x 160 18-23 110-125 28-30 © 2011 Atlas Copco Construction Tools AB | No. 3392 5206 90b | 2011-01-27 Αρχικές οδηγίες... - Page 202 23-31 1600-1800 D (C) 30.1 23-31 1600-1800 D (C) ⁄ ⁄ 30.1 23-31 1600-1800 D (C) ⁄ 30.1 23-31 1600-1800 D (C) ⁄ ⁄ © 2011 Atlas Copco Construction Tools AB | No. 3392 5206 90b | 2011-01-27 Αρχικές οδηγίες...
-
Page 203: Δήλωση Εκπομπών Θορύβου Και Κραδασμών
μηχάνημα, από το χρόνο έκθεσης και τη φυσική κατάσταση του χρήστη, όπως και την κατάσταση του μηχανήματος. Εμείς, η Atlas Copco Construction Tools AB, δεν αναλαμβάνουμε την ευθύνη για τις συνέπειες της χρήσης των δηλωμένων τιμών αντί των τιμών που αντιστοιχούν στον πραγματικό χρόνο έκθεσης, σε μια κατάσταση... -
Page 204: Δεδομένα Θορύβου Και Κραδασμών
LH 400 E (Hex 32x160, 30 lpm) LH 400 E (Hex 32x160, 40 lpm) LH 400 E HBP (Hex 32x160, 30 lpm) LH 400 E HBP (Hex 32x160, 40 lpm) © 2011 Atlas Copco Construction Tools AB | No. 3392 5206 90b | 2011-01-27 Αρχικές οδηγίες... -
Page 205: Δήλωση Συμμόρφωσης Της Εκ
Δήλωση Συμμόρφωσης της ΕΚ Δήλωση Συμμόρφωσης της ΕΚ (Οδηγία ΕΚ 2006/42/ΕΚ) Εμείς, η Atlas Copco Construction Tools AB, δια του παρόντος δηλώνουμε ότι τα μηχανήματα τα οποία αναγράφονται κατωτέρω συμμορφώνονται με τις προβλέψεις των Οδηγιών της ΕΚ 2006/42/ΕΚ (Οδηγία περί... -
Page 206: Suomi
Käytöstä poistettava kone............223 © 2011 Atlas Copco Construction Tools AB | No. 3392 5206 90b | 2011-01-27... - Page 207 CE-vaatimustenmukaisuusvakuutus..........229 CE-vaatimustenmukaisuusvakuutus (EY-direktiivi 2006/42/EY)....229 © 2011 Atlas Copco Construction Tools AB | No. 3392 5206 90b | 2011-01-27 Alkuperäiset ohjeet...
- Page 208 www.CrowderSupply.com • Toll Free: 888-883-5144...
-
Page 209: Johdanto
Ohjeiden tarkoituksena on neuvoa käyttäjille hydraulisen iskuvasaran tehokas ja turvallinen käyttötapa. Lisäksi ohjeissa neuvotaan hydrauliselle iskuvasaralle tehtävät säännölliset huoltotyöt. Ennen hydraulisen iskuvasaran käytön aloittamista sinun on perehdyttävä näihin ohjeisiin perusteellisesti. © 2011 Atlas Copco Construction Tools AB | No. 3392 5206 90b | 2011-01-27 Alkuperäiset ohjeet... -
Page 210: Turvallisuusohjeet
Älä käytä työkalua, jossa ei ole kauluskappaletta. ► kuulonsuojaimia ● ● sivusuojilla varustettuja iskunkestäviä suojalaseja hengityssuojaimia tilanteen sitä edellyttäessä ● suojakäsineitä ● ● asianmukaisia turvasaappaita © 2011 Atlas Copco Construction Tools AB | No. 3392 5206 90b | 2011-01-27 Alkuperäiset ohjeet... -
Page 211: Käyttö, Varotoimenpiteet
Älä koskaan lyö tai kolhi mitään laitteiston osaa ► tahallasi. Tarkasta työkalun kuluneisuus säännöllisesti. ► Tarkasta myös, onko siinä näkyviä murtumia tai muita vaurioita. © 2011 Atlas Copco Construction Tools AB | No. 3392 5206 90b | 2011-01-27 Alkuperäiset ohjeet... - Page 212 Hengityssuojainten on sovelluttava käsiteltävien materiaalien aiheuttamien haittojen ehkäisyyn (ja tietyissä tapauksissa niille tulee olla vastaavan hallintoviranomaisen hyväksyntä). Varmista työalueen ilmanvaihdon riittävyys. ► © 2011 Atlas Copco Construction Tools AB | No. 3392 5206 90b | 2011-01-27 Alkuperäiset ohjeet...
- Page 213 Jos koet jatkuvia tai toistuvia rasituksesta johtuvia ► samalla altistuminen tärinälle kestää kauemmin) oireita, käänny työterveyslääkärin puoleen. huonosti huolletuilla, kuluneilla tai väärän kokoisilla työkaluilla, jolloin käyttäjä altistuu voimakkaammalle tärinälle tarpeettomasti. © 2011 Atlas Copco Construction Tools AB | No. 3392 5206 90b | 2011-01-27 Alkuperäiset ohjeet...
-
Page 214: Huolto, Varotoimenpiteet
Älä koskaan tarkasta, puhdista, asenna tai irrota ► työkalua, jos tehon lähde on kytkettynä koneeseen. © 2011 Atlas Copco Construction Tools AB | No. 3392 5206 90b | 2011-01-27 Alkuperäiset ohjeet... -
Page 215: Varastointi, Varotoimenpiteet
LH 11, 180, 190, 220, 230, 270, 280, 390, 400 Turvallisuusohjeet ja käyttöohje Varastointi, varotoimenpiteet ♦ Säilytä kone ja työkalut turvallisessa ja lukitussa paikassa poissa lasten ulottuvilta. © 2011 Atlas Copco Construction Tools AB | No. 3392 5206 90b | 2011-01-27 Alkuperäiset ohjeet... -
Page 216: Yleistä
Jos pala irtoaa alle 10 sekunnissa, on valittava ● pienempi iskuvasara. ● Jos palan irrottaminen kestää yli 20 sekuntia, on valittava isompi iskuvasara. © 2011 Atlas Copco Construction Tools AB | No. 3392 5206 90b | 2011-01-27 Alkuperäiset ohjeet... -
Page 217: Tarrat
Päästä hydraulijärjestelmän paine pois, ennen kuin avaat hydrauliletkun liitännän. ► Kiristä hydrauliletkujen kiinnitysmutterit tarvittavaan momenttiin. Tarkista, että hydrauliletku ja sen liittimet ovat ► ehjät. © 2011 Atlas Copco Construction Tools AB | No. 3392 5206 90b | 2011-01-27 Alkuperäiset ohjeet... -
Page 218: Letkut
öljyn kuristin 2.8 kuristin 3.2 kuristin 3.2 ei kuristinta käyttölämpötila ei ole 20–70 °C (68–158 °F). 280 E Keskitason virtausmäärille ei ole EHTMA-luokkaa. © 2011 Atlas Copco Construction Tools AB | No. 3392 5206 90b | 2011-01-27 Alkuperäiset ohjeet... -
Page 219: Työkalu
Turhien konevaurioiden estämiseksi on tärkeää valita korkealaatuiset työkalut. Kone voi vaurioitua korjauskelvottomaksi, jos siinä käytetään vääräntyyppistä työkalua. Valmistajan suosittelemat työkalut luetellaan koneen varaosaluettelossa. © 2011 Atlas Copco Construction Tools AB | No. 3392 5206 90b | 2011-01-27 Alkuperäiset ohjeet... -
Page 220: Työkalun Asentaminen Ja Irrottaminen
♦ Älä koskaan käännä iskuvasaraa ylösalaisin, ellei sitä ole irrotettu voimanlähteestä. Terätyökalu saattaa sinkoutua irti kytkennän yhteydessä, jos iskuvasara on kiinni voimanlähteessä. © 2011 Atlas Copco Construction Tools AB | No. 3392 5206 90b | 2011-01-27 Alkuperäiset ohjeet... -
Page 221: Työn Aloittaminen
Kun konetta nostetaan, liipaisinta ei saa painaa. ♦ Tarkista säännöllisesti, että kone saa riittävästi ♦ voiteluainetta. Älä koskaan käytä työkalua lyömäesineenä. ♦ ♦ Varmista, että työstökappale on turvallisesti kiinnitetty paikalleen. © 2011 Atlas Copco Construction Tools AB | No. 3392 5206 90b | 2011-01-27 Alkuperäiset ohjeet... -
Page 222: Poistuessasi Tauolle
Vältä tärinöiden kehittyminen sammutettuna. liian suuriksi tarkistamalla taltan holkin kuluneisuus ♦ Säilytä konetta kuivassa paikassa. päivittäin. ♦ Tarkista, että kahva liikkuu (ylös – alas) esteettä. © 2011 Atlas Copco Construction Tools AB | No. 3392 5206 90b | 2011-01-27 Alkuperäiset ohjeet... -
Page 223: Käytöstä Poistettava Kone
Ennen kuin käytetty kone romutetaan, siitä on poistettava kaikki hydrauliöljy ja öljyä sisältävät kohteet on puhdistettava. Jäljellä oleva hydrauliöljy on toimitettava asianmukaiseen koontipaikkaan ja ympäristöhaitat on pidettävä mahdollisimman pieninä. © 2011 Atlas Copco Construction Tools AB | No. 3392 5206 90b | 2011-01-27 Alkuperäiset ohjeet... -
Page 224: Tekniset Tiedot
20.5 25-33 110-125 18-30 D (C) 28 x 152 22.1 25-33 110-125 18-30 D (C) 28 x 160 22.1 25-33 110-125 18-30 D (C) © 2011 Atlas Copco Construction Tools AB | No. 3392 5206 90b | 2011-01-27 Alkuperäiset ohjeet... - Page 225 LH 220, 230 E, 270, 280 E, 390, 400 E LH 220 HBP, LH 230 E HBP, LH 270 HBP, LH 280 E HBP LH 390 HBP, LH 400 E HBP © 2011 Atlas Copco Construction Tools AB | No. 3392 5206 90b | 2011-01-27 Alkuperäiset ohjeet...
- Page 226 18-23 1600-1800 7-10 D (E) ⁄ ⁄ 79.4 30.1 18-23 1600-1800 7-10 D (E) ⁄ 79.4 30.1 18-23 1600-1800 7-10 D (E) ⁄ ⁄ © 2011 Atlas Copco Construction Tools AB | No. 3392 5206 90b | 2011-01-27 Alkuperäiset ohjeet...
-
Page 227: Melu- Ja Tärinäarvoilmoitus
LH 11 (Hex 22x82.5, 20 lpm) 16.5 LH 180 (Hex 25x108, 20 lpm) 15.1 LH 180 (Hex 32x160, 20 lpm) 14.9 LH 190 E (Hex 25x108, 20 lpm) © 2011 Atlas Copco Construction Tools AB | No. 3392 5206 90b | 2011-01-27 Alkuperäiset ohjeet... - Page 228 LH 400 E (Hex 32x160, 30 lpm) LH 400 E (Hex 32x160, 40 lpm) LH 400 E HBP (Hex 32x160, 30 lpm) LH 400 E HBP (Hex 32x160, 40 lpm) © 2011 Atlas Copco Construction Tools AB | No. 3392 5206 90b | 2011-01-27 Alkuperäiset ohjeet...
-
Page 229: Ce-Vaatimustenmukaisuusvakuutus
LH 11, 180, 190, 220, 230, 270, 280, 390, 400 Turvallisuusohjeet ja käyttöohje CE-vaatimustenmukaisuusvakuutus CE-vaatimustenmukaisuusvakuutus (EY-direktiivi 2006/42/EY) Me, Atlas Copco Construction Tools AB, vakuutamme täten, että alla luetellut koneet täyttävät EY-direktiivin 2006/42/EY (konedirektiivi) ja 2000/14/EY (meludirektiivi) määräykset sekä alla mainitut yhdenmukaistetut standardit. Taattu äänitehotaso [dB(A)] Mitattu äänitehotaso [dB(A)]... -
Page 230: Dansk
Bortskaffelse..............247 © 2011 Atlas Copco Construction Tools AB | No. 3392 5206 90b | 2011-01-27... - Page 231 EF-overensstemmelseserklæring (EF-direktiv 2006/42/EF)......253 © 2011 Atlas Copco Construction Tools AB | No. 3392 5206 90b | 2011-01-27...
- Page 232 www.CrowderSupply.com • Toll Free: 888-883-5144...
-
Page 233: Indledning
Sikkerhedsinstruktioner og betjeningsvejledning Indledning Tak, fordi De har købt et Atlas Copco-produkt. Siden 1873 har det været vores mål at finde nye og bedre måder at dække vores kunders behov på. Gennem årene har vi udviklet innovative og ergonomiske produkter, der har hjulpet vores kunder med at forbedre og rationalisere den daglige drift. -
Page 234: Sikkerhedsinstruktioner
● Beskyttelseshjelm Brug aldrig et indsætningsværktøj uden krave. ► Høreværn ● Slagfaste beskyttelsesbriller med sidebeskyttelse ● ● Åndedrætsværn når påkrævet Beskyttelseshandsker ● ● Passende sikkerhedsstøvler © 2011 Atlas Copco Construction Tools AB | No. 3392 5206 90b | 2011-01-27 Originalinstruktioner... -
Page 235: Betjening, Forholdsregler
Kontrollér regelmæssigt indsætningsværktøjet for ► slid, og kontrollér, om der er tegn på beskadigelse eller synlige revner. ► Vær opmærksom og se på det, De laver. © 2011 Atlas Copco Construction Tools AB | No. 3392 5206 90b | 2011-01-27 Originalinstruktioner... - Page 236 Hvis maskinen har en udblæsning, skal den ledes, ► så at genen ved støv reduceres i den støvfyldte omgivelse. Brug og vedligehold maskinen som anbefalet i ► sikkerhedsinstruktionerne og betjeningsvejledningen © 2011 Atlas Copco Construction Tools AB | No. 3392 5206 90b | 2011-01-27 Originalinstruktioner...
- Page 237 (og længere vibrationspåvirkning), som konsulteres. kan medføre eller bidrage til, at operatøren udsættes for højere vibrationsniveauer. © 2011 Atlas Copco Construction Tools AB | No. 3392 5206 90b | 2011-01-27 Originalinstruktioner...
-
Page 238: Vedligeholdelse, Forholdsregler
Efterse, rens, montér eller fjern aldrig ► indsætningsværktøj, når kraftforsyningen er tilsluttet. © 2011 Atlas Copco Construction Tools AB | No. 3392 5206 90b | 2011-01-27 Originalinstruktioner... -
Page 239: Opbevaring, Forholdsregler
LH 11, 180, 190, 220, 230, 270, 280, 390, 400 Sikkerhedsinstruktioner og betjeningsvejledning Opbevaring, forholdsregler ♦ Opbevar maskinen et sikkert sted, hvor den er uden for børns rækkevidde og låst inde. © 2011 Atlas Copco Construction Tools AB | No. 3392 5206 90b | 2011-01-27 Originalinstruktioner... -
Page 240: Oversigt
Mærkaterne skal være i en sådan tilstand, at de nemt kan læses. Nye mærkater kan bestilles fra reservedelslisten. Slagmekanisme Ventilhus Muffer Akkumulator (indvendig) Håndtag © 2011 Atlas Copco Construction Tools AB | No. 3392 5206 90b | 2011-01-27 Originalinstruktioner... -
Page 241: Typeskilt
(2300 psi) og have en 12.7 mm (½ in.) indvendig diameter. Vi anbefaler, at der bruges en 2-lags hydraulikslange, så den er modstandsdygtig mod © 2011 Atlas Copco Construction Tools AB | No. 3392 5206 90b | 2011-01-27 Originalinstruktioner... -
Page 242: Lynkoblinger
LH 220 HBP, LH 230 E, LH 230 E HBP, LH 270, LH 270 HBP, LH 280 E og LH280 E HBP er fra værket Der findes ingen EHTMA kategori for mellemflows. © 2011 Atlas Copco Construction Tools AB | No. 3392 5206 90b | 2011-01-27 Originalinstruktioner... -
Page 243: Indsætningsværktøj
Maskinen kan blive ødelagt, hvis De anvender forkerte indsætningsværktøjer. Anbefalede indsætningsværktøjer står på reservedelslisten til maskinen. © 2011 Atlas Copco Construction Tools AB | No. 3392 5206 90b | 2011-01-27 Originalinstruktioner... -
Page 244: Indsætning Og Fjernelse Af Værktøjet
De bruger (se „Tekniske data“). Brug den anbefalede oliemængdedeler, hvis flowet fra kraftkilden kan overskride det maksimalt tilladte olieflow. © 2011 Atlas Copco Construction Tools AB | No. 3392 5206 90b | 2011-01-27 Originalinstruktioner... -
Page 245: Start Af Skæring
♦ ikke betjenes. Kontroller regelmæssigt, at maskinen er velsmurt. ♦ ♦ Brug aldrig maskinen som håndholdt slagværktøj. ♦ Sørg for, at arbejdsemnerne er sikkert fastgjort. © 2011 Atlas Copco Construction Tools AB | No. 3392 5206 90b | 2011-01-27 Originalinstruktioner... -
Page 246: Når Der Holdes Pause
♦ Maskinen skal opbevares tørt. ♦ Kontrollér, at håndtagene kan bevæge sig frit (op og ned) og ikke blokerer. © 2011 Atlas Copco Construction Tools AB | No. 3392 5206 90b | 2011-01-27 Originalinstruktioner... -
Page 247: Bortskaffelse
Inden en brugt maskine bortskaffes, skal den tømmes og rengøres for hydraulikolie. Resterende hydraulikolie skal deponeres således, at en eventuel negativ påvirkning af miljøet holdes på et minimum. © 2011 Atlas Copco Construction Tools AB | No. 3392 5206 90b | 2011-01-27 Originalinstruktioner... -
Page 248: Tekniske Data
32 x 160 23.7 95-115 18-22 LH 220 25 x 108 20.5 25-33 110-125 18-30 D (C) 28 x 152 22.1 25-33 110-125 18-30 D (C) © 2011 Atlas Copco Construction Tools AB | No. 3392 5206 90b | 2011-01-27 Originalinstruktioner... - Page 249 LH 220, 230 E, 270, 280 E, 390, 400 E LH 220 HBP, LH 230 E HBP, LH 270 HBP, LH 280 E HBP LH 390 HBP, LH 400 E HBP © 2011 Atlas Copco Construction Tools AB | No. 3392 5206 90b | 2011-01-27 Originalinstruktioner...
- Page 250 30.1 18-23 1600-1800 7-10 D (E) ⁄ ⁄ 79.4 30.1 18-23 1600-1800 7-10 D (E) ⁄ 79.4 30.1 18-23 1600-1800 7-10 D (E) ⁄ ⁄ © 2011 Atlas Copco Construction Tools AB | No. 3392 5206 90b | 2011-01-27 Originalinstruktioner...
-
Page 251: Støj- Og Vibrationsdeklaration
Vi, Atlas Copco Construction Tools AB, kan ikke holdes ansvarlige for følgerne af at anvende de deklarerede værdier i stedet for værdier, der afspejler den faktiske eksponering i en individuel risikovurdering i en arbejdssituation, som vi ikke har nogen indflydelse på. - Page 252 LH 400 E (Hex 32x160, 30 lpm) LH 400 E (Hex 32x160, 40 lpm) LH 400 E HBP (Hex 32x160, 30 lpm) LH 400 E HBP (Hex 32x160, 40 lpm) © 2011 Atlas Copco Construction Tools AB | No. 3392 5206 90b | 2011-01-27 Originalinstruktioner...
-
Page 253: Ef-Overensstemmelseserklæring
LH 11, 180, 190, 220, 230, 270, 280, 390, 400 Sikkerhedsinstruktioner og betjeningsvejledning EF-overensstemmelseserklæring EF-overensstemmelseserklæring (EF-direktiv 2006/42/EF) Vi, Atlas Copco Construction Tools AB, erklærer hermed, at nedennævnte maskiner er i overensstemmelse med bestemmelserne i EF-direktiv 2006/42/EF (Maskindirektiv) og 2000/14/EF (Støjdirektiv), og nedennævnte harmoniserede standarder. Garanteret lydeffektniveau [dB(A)] Målt lydeffektniveau [dB(A)]... -
Page 254: Svenska
Kassering............... . 270 © 2011 Atlas Copco Construction Tools AB | No. 3392 5206 90b | 2011-01-27... - Page 255 EG-deklaration om överensstämmelse..........276 EG-deklaration om överensstämmelse (EG-direktiv 2006/42/EG)....276 © 2011 Atlas Copco Construction Tools AB | No. 3392 5206 90b | 2011-01-27 Originalinstruktioner...
- Page 256 www.CrowderSupply.com • Toll Free: 888-883-5144...
-
Page 257: Inledning
Säkerhetsinstruktion och instruktionsbok Inledning Tack för att ni valt en produkt från Atlas Copco. Sedan 1873 har vi arbetat med att hitta nya och bättre sätt att tillgodose våra kunders behov. Vi har under årens lopp utvecklat nyskapande och ergonomiska produktlösningar som har hjälpt kunderna att förbättra och rationalisera det dagliga arbetet. -
Page 258: Säkerhetsinstruktioner
Insatsverktyg utan krage får inte användas. vistas inom arbetsområdet måste bära minst följande skyddsutrustning: Skyddshjälm ● ● Hörselskydd Slagtåliga skyddsglasögon med sidoskydd ● ● Andningsskydd, vid behov Skyddshandskar ● © 2011 Atlas Copco Construction Tools AB | No. 3392 5206 90b | 2011-01-27 Originalinstruktioner... -
Page 259: Drift, Säkerhetsåtgärder
Kontrollera regelbundet att insatsverktyget inte är slitet och kontrollera om det finns några tecken på skador eller synliga sprickor. ► Var uppmärksam och fokuserad på arbetsuppgiften. © 2011 Atlas Copco Construction Tools AB | No. 3392 5206 90b | 2011-01-27 Originalinstruktioner... - Page 260 Håll obehöriga personer på avstånd från rekommendationerna i säkerhetsinstruktioner och arbetsområdet. bruksanvisning. Håll arbetsplatsen ren och fri från främmande ► föremål. Se till att arbetsmaterialet är ordentligt säkrat. ► © 2011 Atlas Copco Construction Tools AB | No. 3392 5206 90b | 2011-01-27 Originalinstruktioner...
- Page 261 ► Sluta arbetet omedelbart om maskinen plötsligt börjar vibrera våldsamt. Ta reda på orsaken till de ökade vibrationerna och åtgärda felet innan du återupptar arbetet. © 2011 Atlas Copco Construction Tools AB | No. 3392 5206 90b | 2011-01-27 Originalinstruktioner...
-
Page 262: Underhåll, Säkerhetsåtgärder
Tänk på att aldrig inspektera, rengöra, montera ► eller demontera insatsverktyget när strömkällan är ansluten. © 2011 Atlas Copco Construction Tools AB | No. 3392 5206 90b | 2011-01-27 Originalinstruktioner... -
Page 263: Förvaring, Säkerhetsåtgärder
LH 11, 180, 190, 220, 230, 270, 280, 390, 400 Säkerhetsinstruktion och instruktionsbok Förvaring, säkerhetsåtgärder ♦ Förvara maskiner och verktyg på en säker, låst plats utom räckhåll för barn. © 2011 Atlas Copco Construction Tools AB | No. 3392 5206 90b | 2011-01-27 Originalinstruktioner... -
Page 264: Översikt
Dekalerna ska vara i sådant skick att de enkelt kan läsas. Nya dekaler kan beställas med hjälp av reservdelslistan. Slagmekanism Ventilhus Uttag © 2011 Atlas Copco Construction Tools AB | No. 3392 5206 90b | 2011-01-27 Originalinstruktioner... -
Page 265: Typskylt
är oljeinloppet och anslutningen märkt T (tank) är Ackumulator oljeavloppet. Anslut alltid båda slangarna och se till att alla slanganslutningar sitter ordentligt. Bär aldrig maskinen i slangen. © 2011 Atlas Copco Construction Tools AB | No. 3392 5206 90b | 2011-01-27 Originalinstruktioner... -
Page 266: Snabbkopplingar
(T) om det finns behov av att ställa in hammaren på 20 lit/min. Öppningens storlek står Byte av nippel angiven på nippeln. LH 390, LH 390 HBP, LH 400 E © 2011 Atlas Copco Construction Tools AB | No. 3392 5206 90b | 2011-01-27 Originalinstruktioner... -
Page 267: Insatsverktyg
● Kontrollera att längden (B) stämmer överens med den beställda maskintypen. © 2011 Atlas Copco Construction Tools AB | No. 3392 5206 90b | 2011-01-27 Originalinstruktioner... -
Page 268: Montera Och Demontera Insatsverktyget
Rengör snabbkopplingarna vid behov och anslut ● slangarna till förlängningsslangarna från kraftkällan. ● Placera hammare i rät vinkel på det material som skall brytas och aktivera startreglaget. © 2011 Atlas Copco Construction Tools AB | No. 3392 5206 90b | 2011-01-27 Originalinstruktioner... -
Page 269: Brytning
Kontrollera regelbundet att maskinen är välsmord. och mejselbussningen ger upphov till ökade vibrationer. Kontrollera förslitningen av ♦ Använd aldrig maskinen som handhållet mejselbussningen dagligen för att undvika onödiga slagverktyg. vibrationer. © 2011 Atlas Copco Construction Tools AB | No. 3392 5206 90b | 2011-01-27 Originalinstruktioner... -
Page 270: Varje Vecka
I och med att snabbkopplingarna blockeras när de tas isär måste slagkolven tryckas uppåt med slangarna monterade men med kraftaggregatet avstängt. ♦ Förvara maskinen på en torr plats. © 2011 Atlas Copco Construction Tools AB | No. 3392 5206 90b | 2011-01-27 Originalinstruktioner... -
Page 271: Tekniska Specifikationer
25 x 108 20.5 25-33 110-125 18-30 D (C) 28 x 152 22.1 25-33 110-125 18-30 D (C) 28 x 160 22.1 25-33 110-125 18-30 D (C) © 2011 Atlas Copco Construction Tools AB | No. 3392 5206 90b | 2011-01-27 Originalinstruktioner... - Page 272 LH 220, 230 E, 270, 280 E, 390, 400 E LH 220 HBP, LH 230 E HBP, LH 270 HBP, LH 280 E HBP LH 390 HBP, LH 400 E HBP © 2011 Atlas Copco Construction Tools AB | No. 3392 5206 90b | 2011-01-27 Originalinstruktioner...
- Page 273 30.1 18-23 1600-1800 7-10 D (E) ⁄ ⁄ 79.4 30.1 18-23 1600-1800 7-10 D (E) ⁄ 79.4 30.1 18-23 1600-1800 7-10 D (E) ⁄ ⁄ © 2011 Atlas Copco Construction Tools AB | No. 3392 5206 90b | 2011-01-27 Originalinstruktioner...
-
Page 274: Buller- Och Vibrationsdeklaration
är unika och beror på personens arbetssätt, i vilket material maskinen används, användarens exponeringstid och fysiska kondition samt maskinens skick. Atlas Copco Construction Tools AB kan inte hållas ansvarigt för konsekvenserna av att de deklarerade värdena används, istället för värden som återspeglar den faktiska exponeringen vid en enskild riskbedömning i en arbetsplatssituation över vilken Atlas Copco Construction Tools AB inte har någon kontroll. - Page 275 LH 400 E (Hex 32x160, 30 lpm) LH 400 E (Hex 32x160, 40 lpm) LH 400 E HBP (Hex 32x160, 30 lpm) LH 400 E HBP (Hex 32x160, 40 lpm) © 2011 Atlas Copco Construction Tools AB | No. 3392 5206 90b | 2011-01-27 Originalinstruktioner...
-
Page 276: Eg-Deklaration Om Överensstämmelse
Emil Alexandrov Atlas Copco Lifton EOOD 7000 Rousse Bulgaria Nick Evans Tillverkare: Atlas Copco Construction Tools AB 105 23 Stockholm Sweden Ort och datum: Rousse, 2010-12-01 © 2011 Atlas Copco Construction Tools AB | No. 3392 5206 90b | 2011-01-27 Originalinstruktioner... - Page 277 www.CrowderSupply.com • Toll Free: 888-883-5144...
-
Page 278: Polski
Utylizacja............... . 296 © 2011 Atlas Copco Construction Tools AB | No. 3392 5206 90b | 2011-01-27... -
Page 279: Spis Treści
Deklaracja zgodności WE (Dyrektywa WE 2006/42/WE)......302 © 2011 Atlas Copco Construction Tools AB | No. 3392 5206 90b | 2011-01-27... - Page 280 www.CrowderSupply.com • Toll Free: 888-883-5144...
-
Page 281: Wprowadzenie
Przed użyciem młota hydraulicznego po raz pierwszy należy dokładnie przeczytać niniejszą instrukcję i ją zrozumieć. © 2011 Atlas Copco Construction Tools AB | No. 3392 5206 90b | 2011-01-27 Oryginalne instrukcje... -
Page 282: Wskazówki Dotyczące Bezpieczeństwa
Nigdy nie kieruj zamontowanego narzędzia ► roboczego na siebie ani na kogokolwiek innego. © 2011 Atlas Copco Construction Tools AB | No. 3392 5206 90b | 2011-01-27 Oryginalne instrukcje... -
Page 283: Obsługa, Środki Ostrożności
► Nie wolno demontować młota hydraulicznego zawierającego gorący olej hydrauliczny. Nie wolno przeprowadzać przewodów ► hydraulicznych służących do podłączenia młota hydraulicznego przez kabinę operatora. © 2011 Atlas Copco Construction Tools AB | No. 3392 5206 90b | 2011-01-27 Oryginalne instrukcje... - Page 284 (a jeżeli to wymagane, posiadać atesty odpowiednich władz). Dopilnuj, aby miejsce pracy miało dobrą ► wentylację. © 2011 Atlas Copco Construction Tools AB | No. 3392 5206 90b | 2011-01-27 Oryginalne instrukcje...
- Page 285 Konsultuj się z ekspertami. © 2011 Atlas Copco Construction Tools AB | No. 3392 5206 90b | 2011-01-27 Oryginalne instrukcje...
- Page 286 Ważne jest także, aby przy wyciąganiu narzędzia z pękniętej powierzchni roboczej nie trzymać włącznika w położeniu włączonym. © 2011 Atlas Copco Construction Tools AB | No. 3392 5206 90b | 2011-01-27 Oryginalne instrukcje...
-
Page 287: Konserwacja, Środki Ostrożności
Uszkodzone części należy niezwłocznie ► Wyłącz natychmiast urządzenie jeśli jego ► wymieniać. narzędzie robocze uderzy w jakiś niewidoczny Zużyte elementy należy wymieniać w odpowiednim ► obiekt. czasie. © 2011 Atlas Copco Construction Tools AB | No. 3392 5206 90b | 2011-01-27 Oryginalne instrukcje... -
Page 288: Przechowywanie, Środki Ostrożności
źródle zasilania. Przechowywanie, środki ostrożności ♦ Przechowuj urządzenie i narzędzia w bezpiecznym miejscu, niedostępnym dla dzieci i zamkniętym na klucz. © 2011 Atlas Copco Construction Tools AB | No. 3392 5206 90b | 2011-01-27 Oryginalne instrukcje... -
Page 289: Budowa
Jeśli usuwanie zajmuje mniej niż 10 sekund, ● należy wybrać młot mniejszy. ● Jeśli usuwanie zajmuje więcej niż 20 sekund, należy wybrać młot większy. © 2011 Atlas Copco Construction Tools AB | No. 3392 5206 90b | 2011-01-27 Oryginalne instrukcje... -
Page 290: Znaki I Naklejki
Przed poluzowaniem złącza węża hydraulicznego ► odpręż układ hydrauliczny. ► Dokręcaj wymaganym momentem nakrętki na złączach węży hydraulicznych. Sprawdzaj czy złącza i wąż hydrauliczny nie są ► uszkodzone. © 2011 Atlas Copco Construction Tools AB | No. 3392 5206 90b | 2011-01-27 Oryginalne instrukcje... -
Page 291: Węże
Dlatego preferuje się lepkość wysoką, ponieważ olej może być wtedy używany w szerszym zakresie temperatur. Maszyny nie wolno używać w wypadku wyjścia © 2011 Atlas Copco Construction Tools AB | No. 3392 5206 90b | 2011-01-27 Oryginalne instrukcje... -
Page 292: Narzędzia
8. Podłącz młot do źródła zasilania i sprawdź, czy nie ma żadnych wycieków. © 2011 Atlas Copco Construction Tools AB | No. 3392 5206 90b | 2011-01-27 Oryginalne instrukcje... -
Page 293: Kontrola Zużycia Trzonka Narzędzia
Ustaw młot pod właściwym kątem do rozbijanego materiału i aktywuj dźwignię włącznika. Montaż i demontaż narzędzia roboczego Når indsætningsværktøjet monteres/fjernes, skal følgende instruktioner altid følges: © 2011 Atlas Copco Construction Tools AB | No. 3392 5206 90b | 2011-01-27 Oryginalne instrukcje... -
Page 294: Zatrzymywanie
♦ Nigdy nie przekraczaj maksymalnego ustawienia zaworu bezpieczeństwa, które jest podane na maszynie. ♦ Przed uruchomieniem podłącz zawsze węże T i © 2011 Atlas Copco Construction Tools AB | No. 3392 5206 90b | 2011-01-27 Oryginalne instrukcje... -
Page 295: Kucie
Dopilnuj, aby obrabiany kawałek materiału był ♦ narzędzia. dobrze zabezpieczony na miejscu. Dokonaj ogólnego przeglądu pod kątem ♦ ewentualnych wycieków, uszkodzeń i śladów zużycia. © 2011 Atlas Copco Construction Tools AB | No. 3392 5206 90b | 2011-01-27 Oryginalne instrukcje... -
Page 296: Co Tydzień
Co 600 godzin pracy albo raz w roku Sprawdź czy części ruchome, uszczelki i śruby ♦ nie są zużyte lub popękane. W razie potrzeby wymień. Skontroluj działanie maszyny. ♦ © 2011 Atlas Copco Construction Tools AB | No. 3392 5206 90b | 2011-01-27 Oryginalne instrukcje... -
Page 297: Parametry Techniczne
19.1 95-115 18-22 LH 190 E 25 x 108 22.1 95-115 18-22 28 x 152 23.7 95-115 18-22 28 x 160 23.7 95-115 18-22 © 2011 Atlas Copco Construction Tools AB | No. 3392 5206 90b | 2011-01-27 Oryginalne instrukcje... - Page 298 28-40 D (E) LH 400 E 28 x 152 18-23 110-125 28-30 32 x 152 18-23 110-125 28-30 32 x 160 18-23 110-125 28-30 © 2011 Atlas Copco Construction Tools AB | No. 3392 5206 90b | 2011-01-27 Oryginalne instrukcje...
- Page 299 ⁄ ⁄ LH 280 E ⁄ 30.1 23-31 1600-1800 D (C) 30.1 23-31 1600-1800 D (C) ⁄ ⁄ 30.1 23-31 1600-1800 D (C) ⁄ © 2011 Atlas Copco Construction Tools AB | No. 3392 5206 90b | 2011-01-27 Oryginalne instrukcje...
-
Page 300: Deklaracja Dotycząca Hałasu I Wibracji
Firma Atlas Copco Construction Tools AB nie może być pociągana do odpowiedzialności za konsekwencje wynikające z zastosowania zadeklarowanych wartości, zamiast wartości rzeczywistych, w konkretnej ocenie ryzyka na stanowisku pracy, nad którym nie mamy kontroli. -
Page 301: Dane Dotyczące Hałasu I Wibracji
LH 400 E (Hex 32x160, 30 lpm) LH 400 E (Hex 32x160, 40 lpm) LH 400 E HBP (Hex 32x160, 30 lpm) LH 400 E HBP (Hex 32x160, 40 lpm) © 2011 Atlas Copco Construction Tools AB | No. 3392 5206 90b | 2011-01-27 Oryginalne instrukcje... -
Page 302: Deklaracja Zgodności We
Atlas Copco Lifton EOOD 7000 Rousse Bulgaria Dyrektor generalny: Nick Evans Producent: Atlas Copco Construction Tools AB 105 23 Stockholm Sweden Miejsce i data: Rousse, 2010-12-01 © 2011 Atlas Copco Construction Tools AB | No. 3392 5206 90b | 2011-01-27 Oryginalne instrukcje... - Page 303 www.CrowderSupply.com • Toll Free: 888-883-5144...
- Page 304 www.CrowderSupply.com • Toll Free: 888-883-5144 Any unauthorized use or copying of the contents or any part thereof is prohibited. This applies in particular to trademarks, model denominations, part numbers, and drawings. www.atlascopco.com...
Need help?
Do you have a question about the LH 11 and is the answer not in the manual?
Questions and answers