
Related Manuals for Genesis GTS10SB


Summary of Contents for Genesis GTS10SB
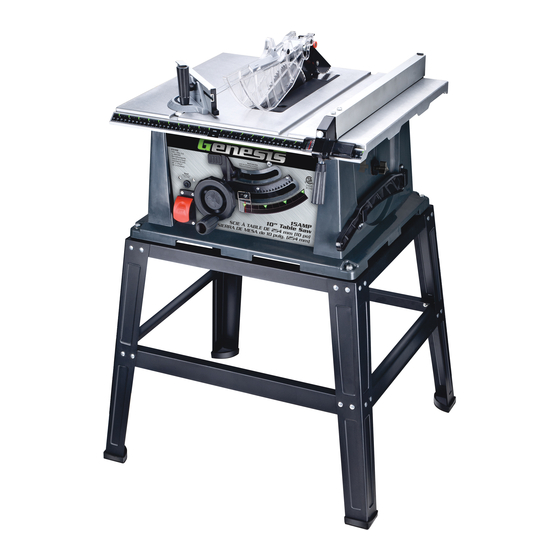
- Page 1 10" Table Saw Scie à table de 254 mm (10 po) Sierra de mesa de 10 pulg. (254 mm) Operator’s Manual Manuel d’utilisation Manual del Operario GTS10SB...
-
Page 2: Specifications
10" TABLE SAW 15 AMP Operator’s Manual Specifications • Model #---------------------------------- GTS10SB • Input ------------------------------------ 120V ~ /60Hz, 15.0 Amp • Blade Size ------------------------------- 10" (254 mm) • Blade Bevel ------------------------------ 0-45 Degrees • No-Load Blade Speed-------------------- 4,800 RPM • Arbor Size -------------------------------- 5/8" (16 mm) • Table Size ------------------------------- 24" L x 20" W • Cutting Capacity at 90 degrees ---------- 3" • Cutting Capacity at 45 degrees ---------- 2-1/2" Includes: Table Saw, 40T Carbide Blade, Miter Gauge, Rip Fence, Push-Stick, Metal Stand and Wrenches. WARNING: To reduce the risk of injury, user must read and understand this operator’s manual before operating this tool. Save this Manual for future reference. -
Page 3: Work Area Safety
WARNING: Read and understand all warnings, cautions and operating instructions before using this equipment. Failure to follow all instructions listed below may result in electric shock, fire and/or serious personal injury. SAVE THESE INSTRUCTIONS WORK AREA SAFETY: Keep your work area clean and well lit •... - Page 4 Don’t force the tool or attachment to do a job for which it is not designed. • Do not use tool if switch does not turn it on or off. Any tool that cannot be controlled with the switch is dangerous and must be repaired or replaced by an authorized service center • Turn power tool off, and disconnect the plug from the power source and/or battery pack from the power tool before making any adjustments, changing the accessories, or storing the tools Such preventive safety measures reduce the risk of an accidental start up which may cause personal injury • Store idle tool out of reach of children and other inexperienced persons. It is dangerous in the hand of untrained users. • Maintain power tools with care. Check for proper alignment and binding of moving parts, component breaks, and any other conditions that may affect the tool’s operation. A guard or any other part that is damaged must be properly repaired or replaced by an authorized service center to avoid risk of personal injury. • Use recommended accessories. Using accessories and attachments not recommended by the manufacturer or intended for use on this type tool may cause damage to the tool or result in personal injury to the user. Consult the operator’s manual for recommended accessories. • Keep cutting tools sharp and clean. Properly maintained cutting tools with sharp cutting edges are less likely to bind and are easier to control 10" Table Saw Operator’s Manual GTS10SB...
-
Page 5: Extension Cords
• Feed the work piece in the correct direction and speed. Feed the work piece into a blade, cutter, or abrasive surface against the direction of the cutting tool’s direction of rotation only. Incorrectly feeding the work piece in the same direction may cause the work piece to be thrown out at high speed. • Never leave the tool running unattended, turn the power off. Do not leave the tool until it comes to a complete stop. • Never start the power tool when any rotating component is in contact with the work piece. WARNING: USE OF THIS TOOL CAN GENERATE AND DISBURSE DUST OR OTHER AIRBORNE PARTICLES, INCLUDING WOOD DUST, CRYSTALLINE SILICA DUST AND ASBESTOS. Direct particles away from face and body. Always operate tool in a well-ventilated area and provide for proper dust removal. Use dust collection system wherever possible. Exposure to the dust may cause serious and permanent respiratory or other injury, including silicosis (a serious lung disease), cancer, and death. - Page 6 Long work pieces need extra support on the out-feed side. • Unplug saw from power source before making adjustments, repairs, maintenance or storing. Accidental start up can cause serious personal injury. • Do not turn on the table saw before clearing the table of all tools, wood scraps, etc, except the work piece and related feed or supporting devices • Wear eye and hearing protection. Always use safety glasses with side shields, unless otherwise specified, everyday glasses provide only limited impact resistance, they are not safety glasses, use only approved certified safety equipment; eye protection should comply with ANSI z87.1 standards, protective hearing equipment should comply with ANSI s3.19 standards. • Protect your lungs. Wear face or dust mask. Following this rule will reduce the risk of personal injury. • Tie back long hair and roll long sleeves above the elbow. Do NOT wear loose fitting gloves, loose clothing, jewelry and other items which can be caught in rotating parts and cause serious personal injury. • Always use blade guard, splitter and anti-kickback pawls on all through cutting operations. The guard system is designed to reduce the intensity of kickback and keep your hands away from the spinning blade. 10" Table Saw Operator’s Manual GTS10SB...
- Page 7 • Always secure the work piece against rip fence or miter gauge. • Always use push stick for ripping narrow stock so your hand does not come close to the saw blade Use a push block or feather board for non-through cuts • Never cut freehand, which means using only your hands to support or guide the work piece. Always use rip fence or miter gauge to position and guide the work • Stand to the side of the blade and work piece. NEVER stand or hand any part of your body in line with the path of the saw blade. • Never reach behind blade when the saw blade is rotating. • Move rip fence out of the way when cross cutting. NEVER use rip fence as a cut off gauge when cross cutting • Keep saw blade clean and sharp. A Dull and sticky blade will increase the risk of binding in the work piece. • Feed the work piece through AGAINST the rotation of the blade. Feeding material from the back of the saw invites an accident and can cause serious injury. Use support for the sides and back of the saw table when cutting •...
- Page 8 GLOSSARY OF WOOD-WOKING TERMS Work Piece-- A piece of wood on which the cutting operation is being performed. Anti-Kickback Pawls-- Device which, when properly installed and maintained, is designed to stop the work piece from being kicked back toward the operator during the operation. Arbor-- The shaft on which a cutting tool is mounted. Bevel Cut-- A cutting operation made with an angled blade. Compound Miter Cut -- A single cut made with both a miter angle and a bevel angle. Cross Cut -- A cut or shaping operation made across the work piece. Dado -- A non-through cut which produces a square sided notch or trough in the work piece. Feather board -- A device used to help control the work piece by guiding it securely against the table or fence during any rip cut operation. Freehand -- Performing a cut without using a fence, miter gauge, fixture, hold down clamp, or other proper device to keep the work piece from twisting during the cut – not recommended. Gum -- A sticky, sap-based residue from wood products. Heel -- Misalignment of the blade. Heel can cause binding, kickback, excessive force burning the work piece or splintering Kerf -- The amount of material removed by the blade in a through cut, or the slot produced by the blade in non-through or partial cut. Kickback -- An uncontrolled grabbing or throwing of the work piece back toward the front of the saw, associated with the work piece closing the kerf and pinching the blade or otherwise placing tension on the blade. Leading End -- The end of the work piece, which during a rip type operation is pushed into the cutting tool first. 10" Table Saw Operator’s Manual GTS10SB...
- Page 9 Miter Cut -- A cutting operation made with the wood at any angle other than 90 degree to the blade. Molding -- A cut which produces a special shape in the work piece, used for joining or decoration. Non-Through Cut -- Any cutting operation where the blade does not extend completely through the thickness of the work piece Push Block -- A device used to feed the work piece through the saw during narrow rip type operations where a push stick can not be used. It also helps keep the operator's hands well away from the blade. Push Stick -- A device used to feed the work piece through the saw to help keep the operator's hands well away from the blade. Rabbet -- A notch in the edge of the work piece. Resin -- A sticky, sap-based substance that has hardened. Rip Cut -- A cutting or shaping operation made along the length of the work piece. Rip Fence -- Adjustable guide used in ripping cuts to keep the work piece parallel to the saw blade. RPM -- Revolutions per Minute. The number of turns completed by a spinning object in one minute Saw Blade Path -- The area over, under, behind, or in front of the blade. As it applies to the work piece, that area which will be, or has been, cut by the blade.
- Page 10 11. Reset Button 2. Saw Blade 12. Blade Bevel Locking lever 3. Saw Blade Guard 13. Base 4. Splitter 14. Steel Work Stand 5. Anti-Kickback Pawls 15. Miter Gauge Storage 6. Rip Fence 16. Push Stick Storage 7. Miter Gauge 17. Sawdust Port 8. Push Stick 18. Blade Storage 9. Blade Control Wheel 19. Blade Throat Plate 10. ON/OFF Switch 10" Table Saw Operator’s Manual GTS10SB...
-
Page 11: Unpacking And Contents
UNPACKING AND CONTENTS IMPORTANT: Due to modern mass production techniques, it is unlikely the tool is faulty or that a part is missing. If you find anything wrong, do not operate the tool until the parts have been replaced or the fault has been rectified. Failure to do so could result in serious personal injury. -
Page 12: Assembly And Adjustment
When mounting table saw to a work bench or plywood, holes should be drilled through the supporting surface to the FIG 4 work bench or plywood and an opening must be made the same size as the opening in the bottom of the saw using the dimensions illustrated so the saw dust can drop through. 1. Place the saw on the mounting surface, and mark the location of the four 3/8” mounting holes. 2. Remove the saw. Drill 3/8” holes in the mounting surface 3. Mark an 11” x11” square centered between four mounting holes. FIG 5 10" Table Saw Operator’s Manual GTS10SB... - Page 13 4. Cut out and remove the square. (See FIG.5 ) 5. This opening will allow sawdust to fall through the saw base. 6. Place the saw on the work bench, and align the mounting holes of the saw with holes that have been drilled through the surface. 7. Secure the saw to the work bench using bolts and nuts. INSTALLING THE BLADE CONTROL WHEEL HANDLE (FIG 6) Place the nut into the nut slot on the back side of the blade control wheel (2). Insert the long screw (3) through the wheel handle (1), a plastic washer and the blade control wheel (2). Tighten the screw into FIG 6 the nut by using a screwdriver (not provided). WARNING: To prevent personal Injury, always unplug the saw from power source before make any adjustments. ADJUSTING THE SPLITTER (FIG 7) WORKING STORAGE POSITION...
- Page 14 The miter gauge is pre-assembled at the factory. To install it, simply slide miter gauge guide into the miter gauge groove on the saw table as shown in FIG. 11. NOTE: There are two miter gauge grooves, one on either side of the blade. When making 90° cross cut, you may use FIG 10 either of the grooves. When bevel cutting, use the groove on the right side so that the blade is tilted away from the miter gauge and your hand. MITER GAUGE ADJUSTMENT (FIG 12) To adjust the miter gauge angle, loosen miter gauge lock handle (1) and rotate the miter gauge body (2) so that the "0" mark on the end of the sliding bar points to desired position. Then tighten the lock handle. See FIG 12. FIG 11 10" Table Saw Operator’s Manual GTS10SB...
- Page 15 NOTE: The miter gauge body (2) has marks at 5 degrees increments. The sliding bar (3) has marks at 1 degree increments. Read both to get an accurate angle degree. To adjust the Miter Gauge Fence, loosen the lock knob (4) and slide the fence (5) to the desired position. Then tighten the lock knob (4). (See FIG 12) RIP FENCE INSTALLATION (FIG 13) The rip fence is pre-assembled at the factory. To install the Rip Fence, place the end furthest (2) from the lock handle (1) so that flange is over the rear edge of the table, then lower the end closest to the handle over the front rail. When the...
- Page 16 BLADE BEVEL INDICATOR ADJUSTMENTS (FIG 15, 17) 1. Loosen bevel locking lever (2), push blade control wheel (1) and turn clockwise to position the blade at 90° measured by using combination square. (See FIG 15) 2. Loosen the holding screw (4), position the pointer(4) over 0° and tighten the screw (4). NOTE: Always make a trial cut on a piece of FIG 17 wood when make critical cuts. Measure the cut accuracy. 10" Table Saw Operator’s Manual GTS10SB...
-
Page 17: Operation
BLADE BEVEL ADJUSTMENT (FIG 14) 1. Loosen the bevel locking lever by pulling it away from the base. 2. Push blade control wheel (1) so that the gear on the wheel engages into the gear bar (6) on the base. Turn the blade control wheel to desired blade angle. 0° on bevel scale (5) for 90° cutting. 3. Tighten the bevel adjustment lever (2). WARNING: Make sure bevel locking lever is tightened before each use to avoid risk of personal injury. TO REPLACE THE BLADE (FIG 18) WARNING: Always unplug the saw from power source before maintenance to avoid risk of serious personal injury. -
Page 18: Push Stick And Push Block
7. Always use clean, sharp, properly-set blades, Never make a cut with dull blade. 8. When making a cut, use steady, Even pressure, Never force a cut. 9. Do NOT cut wet or warped lumber. 10. Always hold your work piece firmly with both hands or use push stick or push block. Cross Cutting WARNING: Make sure the blade guard assembly is properly installed to avoid serious personal injury. 1. Remove the rip fence from the table surface. 2. Position Miter Gauge to 0°. 3. Make sure all loose pieces have been removed from the table surface and work piece is not in contact with blade. 4. Turn ON/OFF switch to the ON position. 5. Position the work piece flat on the table with edge flush against miter gauge fence. Wait until blade reaches full speed before feeding the work piece into the blade. 6. Use two hands to slowly feed the work piece and miter gauge toward the blade. Use the hand furthest from the blade to keep the work piece flush against miter gauge fence and use your other hand to push the miter gauge and work piece toward the blade. Stand slightly to the side of the blade to reduce the risk of injury should kickback occur. 7. Continue feeding the work piece into the blade until the cut has been completed. 8. Once the cut has been completed, pull the work piece back toward you. 10" Table Saw Operator’s Manual GTS10SB... - Page 19 9. Turn the switch off. 10. After blade has stopped completely, remove the cut off piece. Rip Cutting (FIG 21) WARNING: Make sure the blade guard assembly is properly installed to avoid serious personal injury. 1. Remove the Miter Gauge from the table. 2. Place the rip fence on the desired distance from the blade. Remember to allow for the kerf. 3. Make sure all loose items have been removed from the FIG 21 table and that work piece is not contact with the blade 4. If work piece is larger than 36” long, place a support with the same height as table behind the saw for the cut work. 5. Turn ON/OFF switch to ON position. 6. Position the work piece flat on the table with edge flush against rip fence. Wait until blade reaches full speed before feeding the work piece into the blade. 7. Stand slightly to the side of blade to reduce the risk of injury caused should kickback occur. Using a push stick or push block, slowly feed the work piece toward the blade. 8. Once the work piece has made contact with the blade, use hand closest to the rip fence to guide it. Make sure the edge of the work piece keeps in solid contact with the rip fence and table surface. If ripping a piece narrower than 4”, use a push stick to move the piece through the cut. 9. Continue feeding the work piece into the blade until the cut has been completed. 10. Once the cut has been completed, grasp the work piece from the lead end and pull it off the table surface.
-
Page 20: Bevel Cross Cutting
Make sure the blade guard assembly is properly installed to avoid serious personal injury. 1. Remove the rip fence from the table surface. 2. Adjust bevel angle to the desired degree. (0°-45°) (refer to Bevel Adjustment). 3. Set the blade to the correct depth.. 4. Position the Miter Gauge to the desired degree. (0°-60°) (Refer to Miter Gauge Adjustment). Use the miter gauge in the groove to the RIGHT of the blade. It can not be used in the groove to the LEFT because the blade guard will interfere. 5. Make sure all loose pieces have been removed from the table surface and work piece is not in contact with blade. 6. Turn ON/OFF switch to the ON position. 7. Position the work piece flat on the table with edge flush against miter gauge fence. Wait until blade reaches full speed before feeding the work piece into the blade. 8. Use two hands to slowly feed the work piece and miter gauge toward the blade. Use the hand furthest from the blade to keep the work piece flush against miter gauge fence and use your other hand to push the miter gauge and work piece toward the blade. Stand slightly to the side of blade to reduce the risk of injury should kickback occur. 9. Continue feeding the work piece into the blade until the cut has been completed. 10. Once cut has been completed, pull the work piece back toward you. 11. Turn the switch off. 12. After blade has stopped completely, remove the cut off piece. Non-Through Cutting Non-through cutting are in cutting grooves, rabbets and dados. This is the only type of cut made with the blade guard assembly removed. You must make sure the entire blade guard assembly is reinstalled properly after completion of this type of cut. 10" Table Saw Operator’s Manual GTS10SB... -
Page 21: Troubleshooting
WARNING: Never feed work piece through with your hands when making non-through cut, such as rabbets or dados. Always use a push stick and push block. Failure to do so can result in serious personal injury IMPORTANT: The table saw is a highly versatile tool, capable of a wide range of applications which cannot be covered in this manual. -
Page 22: Maintenance
ACCESSORIES INCLUDED IN THIS KIT ARE NOT COVERED BY THE 2 YEAR WARRANTY. TOLL-FREE HELP LINE 888-552-8665 For questions about this or any other GENESIS™ Product, please call Toll-Free: www.richpowerinc.com Or visit our web site: ©Richpower Industries, Inc. All Rights reserved Richpower Industries, Inc. 736 Hampton Road Williamston, SC 29697 Printed in China, on recycled paper 10" Table Saw Scie à table de 254 mm (10 po) Operator’s Manual Manuel d’utilisation GTS10SB GTS10SB... - Page 23 Richpower Industries, Inc. 736 Hampton Road Williamston, SC USA www.richpowerinc.com...
Need help?
Do you have a question about the GTS10SB and is the answer not in the manual?
Questions and answers