Table of Contents

Related Manuals for Gastroback 42712


Summary of Contents for Gastroback 42712
-
Page 1: Operating Instructions
Operating Instructions Design Coffee Advanced - Grind & Brew - Art.-No. 42712 Design Coffee Advanced - Grind & Brew - Read all provided instructions before first use! Model and attachments are subject to change! For household use only! -
Page 2: Table Of Contents
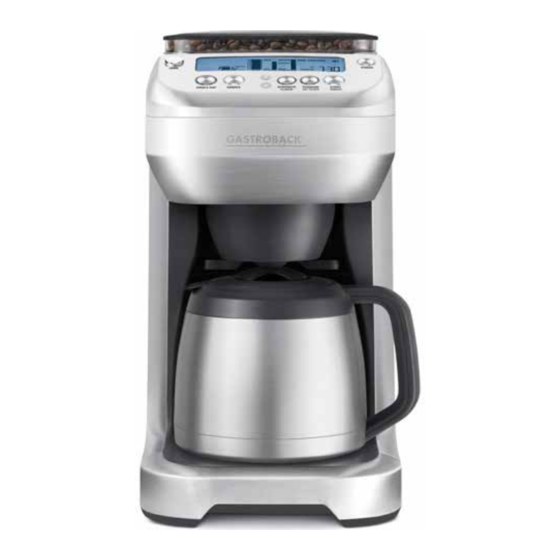
Carefully read all provided instructions before you start running the appliance and pay attention to the warnings mentioned in these instructions. Contents Knowing the Design Coffee Advanced ..........36 - Grind & Brew - Important safeguards ..................38 Important safeguards for all electrical appliance ..........39 Technical specifications ..................40 Using the Design Coffee Advanced ..........40... - Page 3 - Grind & Brew -, Gastroback´s coffee machine with integrated burr grinder. The burr grinder grinds your choice of beans just prior to brewing for maximum freshness, flavour and aroma. The grind is preset to the optimal size and can be turned off when using pre-ground coffee. The seven strength settings vary the amount of freshly ground coffee for a 'MILD', 'STRONG' or 'INTENSE' brew.
-
Page 4: Knowing The Design Coffee Advanced - Grind & Brew
Knowing the Design Coffee ADvAnCeD - GRIND & BREW - Bean Hopper Lid Removable Grinds Catcher catches loose grinds from the 250 g Bean Hopper coffee grinds chute. Bean Hopper Locking System seals the base of the bean Carafe Lid 12-Cup Double-Wall, Stainless Steel Thermal Carafe hopper for easy removal, storage and transfer of coffee beans. -
Page 5: Control Panel
Control panel 21 22 OPEN button STRENGTH | FLAVOUR button · Press to open the swing-out door. · Press to adjust the brew strength. 7 settings plus ‘PRE-GROUND’ SINGLE CUP button coffee setting vary the amount of freshly ground coffee for a mild, ·... -
Page 6: Important Safeguards
importAnt sAfeguArDs • Carefully read all instructions before operating the appliance for the first time and save for future reference. • Do not attempt to use this appliance for any other than the intended use, described in these instructions. Any other use, especially misuse, can cause severe injuries or damage by electric shock, heat or fire. -
Page 7: Important Safeguards For All Electrical Appliance
• This appliance is not intended to be operated by means of an external timer or separate remote control system. • The use of attachments not sold or recommended by Gastroback may cause fire, electric shock or injuries. important safeguards for all electrical appliance •... -
Page 8: Technical Specifications
Use in conjunction with a power strip or extension cord is not recommended. technical specifications model: Art.-No. 42712 Design Coffee Advanced - Grind & Brew - power supply: 220-240 V, 50 Hz... -
Page 9: Initial Set Up
This is normal. Only use the Longlife-Filter provided as others may cause the machine to overflow. b) paper filter Gastroback Art.-No. 98129 (Ø 85/215 mm). Ensure that the paper filter is completely open and touching the side walls and bottom of the coffee basket. -
Page 10: Using The Carafe Mode
Close the coffee basket lid. Press the OPEN button to open the swing-out door. Attach the coffee basket to the swing-out door by ensuring the hinge area of the coffee basket is firmly seated in its most downward position on the two door hooks. Close the door until it clicks shut. - Page 11 note: Never fill the water tank once the coffee machine has started a brewing cycle. This will affect the volume dispensed into the carafe. 2. pre-warm the Carafe A warm carafe will help maintain the coffee’s optimal temperature and keep coffee hotter for longer.
- Page 12 When using the machine for the first time, we recommend selecting the ‘PRE-GROUND’ cof- fee setting, however omitting the addition of pre-ground coffee. This will flush the machine and remove any dust particles or residues from the manufacturing process. 5. start the Brew Cycle Press the START | CANCEL button.
-
Page 13: Using The Single Cup Mode
8. pour and enjoy Ensure the carafe lid is securely locked in position. There is no need to turn or adjust the lid before pouring. The lid automatically opens when pouring and closes when not to keep coffee hot. CAution Hot steam may rise when pouring. - Page 14 2. pre-warm the Cup or travel mug A warm cup will help maintain the coffee’s optimal temperature and keep coffee hotter for longer. Fill the cup with hot water for about 30 seconds then discard the water. Place the cup into position under the drip stop outlet. tip: For taller cups and travel mugs, remove the drip tray at the base of the machine.
- Page 15 4. select the Brew strength or ‘pre-grounD’ Coffee setting Press the STRENGTH button. The LCD screen will flash the current strength setting and the buttons will illuminate and flash. Use these buttons to cycle through 7 strength settings from ‘MILD’, ‘STRONG’ to ‘INTENSE’ or for the ‘PRE-GROUND’ coffee setting. The- se settings vary the amount of coffee.
-
Page 16: Programming The Clock (Optional)
CAution Never open the swing-out door and remove the coffee basket while brewing. Hot water and coffee can cause injury. 7. empty the Coffee Basket Once the brewing cycle is complete, the ready signal will sound and a winding noise will be heard. -
Page 17: Programming Auto-Start (Optional)
progrAmming Auto-stArt (optionAL) The Auto-Start feature allows you to program the specific time when the coffee machine will automatically turn on and start the preheating and grinding cycle. 1. Ensure the clock is set. 2. Press the PROGRAM button until the LCD screen displays ‘START AT’. Once this appears, press and hold the PROGRAM button until the LCD screen displays a flashing hour. -
Page 18: Changing The 'Ready' Signal Volume
ChAnging the ‘reADY’ signAL voLume The volume of the ‘Ready’ signal can be changed to suit your preference. There are 3 options: HIGH MUTE Press and hold the STRENGTH | FLAVOUR button until the LCD screen flashes one of the sound icons pictured above. -
Page 19: Care And Cleaning
Longlife-Filter leaving sediment in the cup or carafe. The resulting coffee will be over ex- tracted, too dark and bitter. If the grind is too coarse the water will flow through the coffee too quickly. This will result in an under-extracted coffee lacking in flavour. •... -
Page 20: Cleaning The Bean Hopper
CAution The coffee basket, gold tone or paper filter may still be very hot after brewing. Use caution and allow to cool before removing. Cleaning the Carafe After each use, empty the carafe. Do not let brewed coffee stand overnight as this can cause the carafe to stain. - Page 21 6. Remove the locking button of the upper burr by turning the handle clockwise. 7. Using the provided cleaning brush, thoroughly remove any build-up of coffee grinds that have formed around the grinding burrs and coffee grinds chute. Ensure the grinds catcher is in place to catch the loose grinds, then remove and empty the catcher.
- Page 22 Descaler contains special metal gentle additives and is matched to the components used in our machines. We recommend a mixture of 150 ml of ›Gastroback Premium Descaler‹ and max. 1600 ml of water. Due to the differences of water hardness and we can not make any precise specifications on the frequency on the decalcifying.
- Page 23 Follow the de-scaling process (Step 2) with two full tanks of fresh and cold water – without adding ‘Gastroback Premium Descaler’. The machine is ready to use now. note: The ‘Gastroback Premium Descaler’ (Art. No.: 98175) is available at specialized retailers or at Gastroback directly.
-
Page 24: Troubleshooting
trouBLeshooting Problem POSSIBLE CAUSES WHAT TO DO ‘LOCK BEAN HOPPER’ Hopper not locked in place. Turn the locking knob clockwise in the on LCD screen direction of the LOCK arrow until it clicks. Unable to lock bean hopper Coffee beans obstructing bean hopper Remove bean hopper. - Page 25 Problem POSSIBLE CAUSES WHAT TO DO Coffee basket overflows The coffee basket is clogged. This can occur for a number of reasons: • If using pre-ground coffee, ensure it is a drip coffee grind and not too fine. Never use Espresso grind. •...
- Page 26 Problem POSSIBLE CAUSES WHAT TO DO Coffee not strong enough / Strength setting is incorrect. Check the selected strength setting too strong displayed on the LCD screen. To change the strength setting, refer to ‘Select the Brew Strength or ‘PRE-GROUND’ Coffee Setting’. Coffee not hot enough A pre-heated coffee basket, carafe or cup will help maintain the coffee’s optimal...
- Page 27 Problem POSSIBLE CAUSES WHAT TO DO I can only select 9 cups ‘INTENSE’ strength setting selected. The To brew 12 cups, select the ‘STRONG’ maximum number of cups that can be strength setting. brewed at the maximum strength is 9 cups. My cup does not fit under the The maximum cup or travel mug imensions Remove the drip tray at the base of the...
- Page 28 Problem POSSIBLE CAUSES WHAT TO DO Brewing cycle finishes before the If using the Longlife-Filter, this is normal. ready signal The total brewing time displayed on the LCD screen is calculated using paper filters as coffee passes through paper filters slower.
-
Page 29: Storage
Please check www.gastroback.de for further information. For technical support, please contact Gastroback Customer Care Center by phone: +49 (0)4165/22 25-0 or e-mail: info@gastroback.de. warranty We guarantee that all our products are free of defects at the time of purchase. - Page 30 notizen/notes:...
- Page 32 Gewerbestraße 20 . 21279 Hollenstedt / Germany Telefon +49 (0)41 65/22 25-0 . Telefax +49 (0)41 65/22 25-29 info@gastroback.de . www.gastroback.de...
Need help?
Do you have a question about the 42712 and is the answer not in the manual?
Questions and answers