Beurer BM 26 Instructions For Use Manual
Hide thumbs
Also See for BM 26:
- User manual ,
- Instructions for use manual (108 pages) ,
- Instructions for use manual (68 pages)
Table of Contents
Advertisement
Available languages
Available languages
Quick Links
BEURER GmbH • Söfl inger Str. 218 • 89077 Ulm (Germany)
Tel.: +49 (0) 731 / 39 89-144 • Fax: +49 (0) 731 / 39 89-255
www.beurer.de • Mail: kd@beurer.de
BM 26
D Blutdruckmessgerät
Gebrauchsanweisung .......................................... 2 - 11
G Blood pressure monitor
Instructions for use ............................................12 - 20
F Tensiométre
Mode d'emploi .................................................... 21 - 29
Manual de instrucciones ...................................30 - 38
I Misuratore di pressione
Istruzioni per l'uso ..............................................39 - 48
T Bilgisayarli tansiyon ölçer
Kullanım kılavuzu ...............................................49 - 57
Инструкция по применению ...........................58 - 68
Instrukcja obsługi ............................................... 69 - 77
...........78 - 80
0483
Advertisement
Table of Contents

Related Manuals for Beurer BM 26


Summary of Contents for Beurer BM 26
-
Page 1: Table Of Contents
Instrukcja obsługi ..........69 – 77 Electromagnetic Compatibility Information ...78 – 80 BEURER GmbH • Söfl inger Str. 218 • 89077 Ulm (Germany) Tel.: +49 (0) 731 / 39 89-144 • Fax: +49 (0) 731 / 39 89-255 www.beurer.de • Mail: kd@beurer.de... -
Page 2: Gebrauchsanweisung
Vorsicht bewahren Sie sie für späteren Gebrauch auf, machen Sie sie anderen Benutzern zugänglich und beachten Sie die Hinweise. Mit freundlicher Empfehlung Hinweis Ihr Beurer-Team Hinweis auf wichtige Informationen 1. Kennenlernen Gebrauchsanweisung beachten Das Oberarm-Blutdruckmessgerät dient zur nichtinvasiven Messung und Überwachung arterieller Blutdruckwerte von erwachsenen Menschen. - Page 3 begründen Sie daraus auf keinen Fall eigene medizinische Storage Zulässige Lagerungstemperatur und Entscheidungen (z.B. Medikamente und deren Dosierungen)! 55°C - luftfeuchtigkeit • Verwenden Sie das Blutdruckmessgerät nicht bei Neugebo- -20°C RH ≤85% renen, Schwangeren und Präeklampsie-Patientinnen. Operating Zulässige Betriebstemperatur und •...
- Page 4 • Legen Sie die Manschette nicht über Wunden an, da dies zu Hinweise zu Batterien weiteren Verletzungen führen kann. • Batterien können bei Verschlucken lebensgefährlich sein. • Sie können das Blutdruckmessgerät ausschließlich mit Bat- Bewahren Sie deshalb Batterien und Produkte für Kleinkinder terien betreiben.
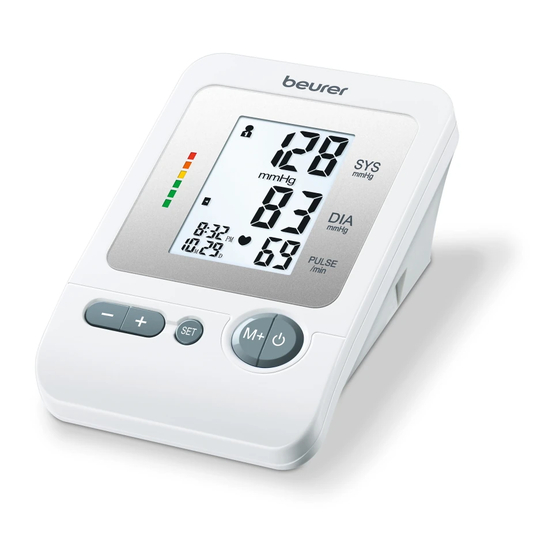
- Page 5 • Bitte entsorgen Sie das Gerät gemäß der Elektro- und Anzeigen auf dem Display: Elektronik Altgeräte EG-Richtlinie 2002/96/EC – WEEE 1. Systolischer Druck (Waste Electrical and Electronic Equipment). 2. Einheit mmHg Bei Rück fragen wenden Sie sich bitte an die für die 3.
- Page 6 4. Messung vorbereiten Zur Einstellung von Datum und Uhrzeit gehen Sie wie folgt vor: • Bestätigen Sie 2 x die Taste SET. Batterie einlegen • Stellen Sie mit den Tasten + oder - zuerst den Monat 1–12 • Entfernen Sie den Deckel des Bat- ein und bestätigen Sie mit der Taste SET.
- Page 7 Stecken Sie nun den Manschetten - Speicher wählen schlauch in den Anschluss für den Drücken Sie die Taste SET. Wählen Sie den gewünschten Man schetten stecker. Speicherplatz durch drücken der Funktionstasten -/+. Sie haben 4 Speicher á 30 Speicherplätze um die Messergebnisse von 4 verschiedenen Personen getrennt voneinander abzuspeichern oder Messungen morgens und abends separat abzuspeichern.
- Page 8 • Das Symbol erscheint, wenn die Messung nicht ord- Wiederholen Sie die Messung, wenn das Symbol nach der nungsgemäß durchgeführt werden konnte. Beachten Sie das Messung auf dem Display angezeigt wird. Bitte achten Sie da- Kapitel Fehlermeldung/Fehlerbehebung in dieser Gebrauchs- rauf, dass Sie sich 5 Minuten ausruhen und während der Mes- anweisung und wiederholen Sie die Messung.
- Page 9 Halten Sie die Taste SET ca. 3 Sekunden 9. Technische Angaben gedrückt. Alle Werte des gegenwärtigen Benutzerspeichers Modell-Nr. BM 26 werden nach 3 kurzen Signaltönen gelöscht. Messmethode Oszillometrisch, nicht invasive Blutdruck- • Möchten Sie den Benutzerspeicher ändern, beachten Sie messung am Oberarm Kapitel „Speicher wählen“.
- Page 10 dabei, dass tragbare und mobile HF-Kommunikationseinrich- Genauigkeit der Systolisch ± 3 mmHg, diastolisch ± 3 mmHg, tungen dieses Gerät beeinflussen können. Genauere Angaben Anzeige Puls ± 5 % des angezeigten Wertes können Sie unter der angegebenen Kundenservice-Adresse Messunsicherheit Max. zulässige Standardabweichung gemäß anfordern oder am Ende der Gebrauchsanweisung nachlesen.
- Page 11 Garantiezeit ist durch den Kunden der Nachweis des Kaufes zu führen. Die Garantie ist innerhalb eines Zeitraumes von 3 Jahren ab Kaufdatum gegenüber der Beurer GmbH, Söf- linger Straße 218, 89077 Ulm, Germany, geltend zu machen. Der Kunde hat im Garantiefall das Recht zur Reparatur der Ware bei unseren eigenen oder bei von uns autorisierten Werkstätten.
-
Page 12: Instructions For Use
Caution and observe the information they contain. Best regards, Your Beurer Team Note Note on important information 1. Getting to know your instrument The upper arm blood pressure monitor is used for non-invasive Follow instructions for use measurement and monitoring of adults’... - Page 13 curacy. The same also applies to very low blood pressure, Permissible operating temperature and Operating diabetes, circulatory disorders and arrhythmias as well as 40°C humidity chills or shaking. 10°C RH ≤85% • The blood pressure monitor must not be used in connection Keep dry with a high-frequency surgical unit.
- Page 14 • Never use different types of battery, battery brands or bat- Storage and Care teries with different capacities. You should preferably use • The blood pressure monitor is made up of precision electron- alkaline batteries. ic components. Accuracy of readings and the instrument’s Repair and disposal service life depend on careful handling.
- Page 15 3. Unit description Icons in the display: 1. Systolic pressure 2. Unit in mmHg 3. Diastolic pressure 4. Pulse symbol and calculated pulse value 5. Time and date 6. Cardiac arrhythmia symbol 7. Average values of the 3 most recent measurements – AVG 8.
-
Page 16: Measuring Blood Pressure
4. Prepare measurement Proceed as follows to set the date and time: • Confirm twice using the SET button. Inserting battery • Use the + or - buttons to first set the month 1–12, and then • Remove the battery cover from the confirm using the SET button. - Page 17 Important: The instrument should only be operated with the Measuring blood pressure original cuff. The cuff is suitable for an arm circumference of • Put on the cuff as described previously and assume the posi- 22 to 35 cm. tion in which you want to carry out the measurement. A larger cuff for upper arm circumferences from 30 to 42 cm is •...
- Page 18 Evaluating results ing the measurement. If the icon appears often, please contact your doctor. Any self-diagnosis and treatment based Cardiac arrhythmia: on the test results may be dangerous. It is vital to follow your This instrument can identify possible cardiac arrhythmia doctor’s instructions.
-
Page 19: Specifications
9. Specifications saved values in the respective user memory. • To clear the memory, you must first select a user memory. Model no. BM 26 Hold the SET button pressed for approx. 3 seconds. All the Measurement Oscillometric, non-invasive blood pres-... - Page 20 equipment – Part 2 – 30: Particular requirements for the safety Permissible operating +10 °C to +40 °C, ≤ 85 % relative air and essential performance of automated non-invasive blood conditions humidity (non-condensing) pressure monitors). Permissible storage - 20 °C to + 55 °C, ≤ 85 % relative air hu- •...
-
Page 21: Mode D'emploi
Ce symbole indique des informations impor- Avec nos sentiments dévoués tantes Beurer et son équipe Respectez les consignes du mode d’emploi 1. Premières expériences Le lecteur de tension artérielle au bras sert à la mesure non Appareil de type BF invasive et au contrôle de la tension artérielle chez l’adulte. - Page 22 • N’utilisez pas le tensiomètre sur des nouveaux-nés, des Température et taux d’humidité de stockage Storage femmes enceintes et les patientes atteintes de pré-éclampsie. 55°C admissibles • Les maladies cardio-vasculaires peuvent entraîner des er- -20°C RH ≤85% reurs de mesure, plus précisément des mesures imprécises. Température et taux d’humidité...
- Page 23 • L’arrêt automatique permet de faire passer le tensiomètre en Remarques relatives aux piles mode économie d’énergie lorsqu’aucune touche n’est mani- • L’ingestion de piles peut se révéler mortelle. Laissez par pulée pendant un délai de 3 minutes. conséquent les piles et les produits hors de portée des •...
- Page 24 • Pour éliminer l’appareil, conformez-vous à la directive Affichages à l’écran : sur les appareils électriques et électroniques 2002/96/ 1. Pression systolique CE – WEEE (Waste Electrical and Electronic 2. Unité mmHg Equipment). Pour toute question, adressez-vous aux 3. Pression diastolique collectivités locales responsables de l’élimination de ces 4.
- Page 25 4. Préparation à la mesure Pour le réglage de la date et de l’heure, veuillez procéder de la manière suivante : Mise en place des piles • Appuyez 2 x sur la touche SET. • Otez le couvercle du compartiment •...
- Page 26 Branchez le cordon dans la prise • Pour ne pas fausser le résultat de la mesure, il est important prévue à cet effet. de rester calme pendant la mesure et de ne pas parler. Choix de la mémoire Appuyez sur la touche SET. Sélectionnez l’emplacement de sauvegarde souhaité...
- Page 27 pression de brassard souhaitée soit atteinte. Celle-ci doit se au stress ou au manque de sommeil. L’arythmie ne peut être situer à env. 30 mmHg au-dessus de la valeur systolique. décelée que par une consultation médicale. • Le symbole s’affiche lorsque la mesure n’a pas pu être Si le symbole s’affiche à...
-
Page 28: Fiche Technique
9. Fiche technique utilisateur. Maintenez la touche SET enfoncée pendant env. N° du modèle BM 26 3 secondes. Toutes les valeurs de la mémoire utilisateur Mode de mesure Mesure de la tension artérielle au bras, actuelle sont supprimées après 3 brefs signaux sonores. - Page 29 • Cet appareil est conforme à la norme européenne Précision de Systolique ± 3 mmHg, diastolique ± 3 mmHg, EN60601-1-2 et répond aux exigences de sécurité spéciales l’indicateur Pouls ± 5 % de la valeur affichée relatives à la compatibilité électromagnétique. Veuillez Incertitude de Écart type max.
-
Page 30: E Tensiómetro Manual De Instrucciones
Atentamente, Aviso El equipo de Beurer Aviso sobre información importante 1. Introducción Tenga en cuenta las instrucciones de uso El tensiómetro para brazo sirve para la medición y el control de los valores de la presión sanguínea arterial de forma no invasi-... - Page 31 • No utilice el tensiómetro en recién nacidos, embarazadas o Storage Temperatura y humedad relativa de almace- pacientes con preeclampsia. 55°C namiento admisibles • Las enfermedades cadiovasculares pueden producir errores -20°C RH ≤85% de medición o afectar a la precisión de la medición. Esto Operating Temperatura y humedad relativa de funciona- también es aplicable en caso de tener la presión sanguínea...
- Page 32 • El tensiómetro puede funcionar con pilas exclusivamente. • Las pilas no se deben cargar o reactivar por otros medios, • La desconexión automática apaga el tensiómetro para con- abrirse, echar al fuego o cortocircuitar. servar las pilas si no se pulsa ninguna tecla en 3 minutos. •...
- Page 33 3. Descripción del aparato Indicaciones en la pantalla: 1. Presión sistólica 2. Unidad mmHg 3. Presión diastólica 4. Símbolo de pulso y pulso medido 5. Hora y fecha 6. Símbolo de alteraciones del ritmo cardiaco 7. Valores promedio de las 3 últimas mediciones AVG 8.
- Page 34 4. Preparación de la medición Siga estas indicaciones para ajustar la fecha y la hora del aparato: Colocación de las pilas • Pulse 2 veces la tecla SET. • Retire la tapa del compartimento • Ajuste con las teclas + o - primero el mes 1–12 y confirme de las pilas situado en la parte pos- con la tecla SET.
- Page 35 Introduzca el tubo flexible del Selección del registro brazalete en la conexión para el Pulse la tecla SET. Elija el puesto de almacenamiento que de- conector del brazalete. see pulsando las teclas de función -/+. Dispone de 4 registros con 30 puestos de almacenamiento cada uno para almacenar por separado los resultados de las mediciones de 4 personas diferentes.
- Page 36 Solución de problemas de estas instrucciones de uso y repi- Repita la medición si, tras efectuarla, aparece en la pantalla ta la medición. el símbolo . Tenga en cuenta que debe reposar durante • El aparato se apaga automáticamente tras tres minutos. 5 minutos y que durante la medición no puede hablar ni mo- verse.
- Page 37 • Para borrar el registro, deberá seleccionar primero un re- 9. Datos técnicos gistro de usuario. Mantenga pulsada la tecla SET aprox. Nº de modelo BM 26 3 segundos. El aparato borrará todos los valores del registro Método de Oscilométrico, medición no invasiva de la de usuario que esté...
- Page 38 • Este aparato cumple con la norma europea EN60601-1-2 y Precisión de la Sistólica ± 3 mmHg, diastólica ± 3 mmHg, está sujeto a las medidas especiales de precaución relativas indicación pulso ± 5 % del valor indicado a la compatibilidad electromagnética. Tenga en cuenta que Inexactitud de la La desviación estándar máxima permitida los dispositivos de comunicación de alta frecuencia por-...
- Page 39 Indicazione di importanti informazioni Cordiali saluti Seguire le istruzioni per l’uso Il Suo team Beurer 1. Note introduttive Parte applicativa tipo BF Lo sfigmomanometro da braccio serve per la misurazione non invasiva e il monitoraggio della pressione sanguigna di persone adulte.
- Page 40 caso di pressione molto bassa, diabete, disturbi della circo- Temperatura e umidità di esercizio consentite Operating lazione e del ritmo cardiaco nonché in presenza di brividi di 40°C febbre o tremiti. 10°C RH ≤85% • Non utilizzare il misuratore di pressione insieme ad altri ap- Proteggere dall’umidità...
- Page 41 • Se per 3 minuti non vengono utilizzati pulsanti, il dispositivo • Non ricaricare o riattivare le batterie con altri mezzi, non di arresto automatico spegne l’apparecchio per preservare le scomporle, non gettarle nel fuoco, non cortocircuitarle. batterie. • Rimuovere le batterie quando sono scariche o l’apparecchio •...
- Page 42 3. Descrizione dell’apparecchio Indicazioni sul display: 1. Pressione sistolica 2. Unità mmHg 3. Pressione diastolica 4. Icona battito cardiaco e battito cardiaco rilevato 5. Ora e data 6. Icona disturbi del ritmo cardiaco 7. Medie delle ultime 3 misurazioni AVG 8.
-
Page 43: Misurazione Della Pressione Sanguigna
4. Preparazione della misurazione Per impostare la data e l’ora procedere come segue: • Premere due volte il pulsante SET. Inserimento delle batterie • Impostare il mese da 1 a 12 con i pulsanti + e - e confermare • Togliere il coperchio lato posteriore con il pulsante SET. - Page 44 Inserire quindi il flessibile del brac ciale • Per non falsare il risultato della misurazione, è importante nell’attacco della spina del bracciale. mantenere un atteggiamento calmo e non parlare durante la misurazione. Selezionare la memoria Premere il pulsante SET. Selezionare la posizione di memoria Attenzione: l’apparecchio deve essere utilizzato unicamente desiderata premendo i pulsanti funzione -/+.
- Page 45 sante M+ subito dopo l’inizio della procedura fino a quando Tener presente che occorre riposare per 5 minuti e si deve viene raggiunta la pressione del manicotto desiderata. La rimanere fermi senza parlare durante la misurazione. Se l’icona pressione di pompaggio corretta dovrebbe superare il valore compare frequentemente, consultare il proprio medico.
- Page 46 Campo dei valori della pressione Pressione sistolica Pressione diastolica Misura da prendere sanguigna (in mmHg) (in mmHg) Livello 3: ipertensione grave >=180 > = 110 visitare un medico Livello 2: ipertensione moderata 160 – 179 100 – 109 visitare un medico Livello 1: ipertensione leggera 140 –...
-
Page 47: Istruzioni Per L'uso
Durata delle batterie Ca. 180 misurazioni, in base alla pres- 9. Dati tecnici sione sanguigna e di pompaggio Codice BM 26 Accessori Istruzioni per l’uso, 4 batterie del tipo Metodo di Oscillometrico, misurazione non invasi- alcaline AA da 1,5 V, custodia... - Page 48 dettagliate, rivolgersi all’Assistenza clienti oppure consultare la parte finale delle istruzioni per l’uso. • L’apparecchio è conforme alla direttiva CE per i dispositivi medici 93/42/CEE, alla legge sui dispositivi medici e alle norme europee EM1060-1 (Sfigmomanometri non invasivi Parte 1: Requisiti generali), EN1060-3 (Sfigmomanometri non invasivi Parte 3: Requisiti integrativi per sistemi elet- tromeccanici per la misurazione della pressione arteriosa) e IEC80601-2-30 (Apparecchi elettromedicali Parte 2 –...
-
Page 49: Kullanım Kılavuzu
Lütfen bu kullanım kılavuzunu dikkatle okuyun, ileride kullan- Dikkat mak üzere saklayın, diğer kullanıcıların erişebilmesini sağlayın ve içindeki yönergelere uyun. Yeni cihazınızı iyi günlerde kullanmanızı dileriz Beurer Ekibiniz Önemli bilgilere yönelik notlar 1. Ürün özellikleri Kullanım kılavuzunu dikkate alın Üst kol tansiyon ölçme cihazı, yetişkinlerin atardamarlarında- ki tansiyon değerlerini, invaziv olmayan bir şekilde ölçmek ve... - Page 50 • Kalp ve kan dolaşımı sistemi hastalıkları olması durumun- Storage İzin verilen depolama sıcaklığı ve nem da hatalı ölçümler meydana gelebilir veya ölçüm doğruluğu 55°C olumsuz etkilenebilir. Bu aynı zamanda çok düşük tansiyon, -20°C RH ≤85% diyabet, kan dolaşımı ve ritim rahatsızlıklarında ve titreme Operating İzin verilen çalışma sıcaklığı...
- Page 51 • Cihaz sadece kullanım kılavuzunda açıklanan şekilde kulla- • Farklı pil türleri, markaları veya farklı kapasitelere sahip piller nılmak üzere tasarlanmıştır. Uygunsuz ve yanlış kullanımdan kullanmayın. Alkalin pilleri tercih edin. ötürü oluşacak hasarlardan üretici firma sorumlu değildir. Onarım ve elden çıkarma ile ilgili bilgiler Saklama ve bakım ile ilgili bilgiler •...
- Page 52 3. Cihaz açıklaması Ekrandaki göstergeler: 1. Sistolik basınç 2. Birim mmHg 3. Diyastolik basınç 4. Nabız simgesi ve ölçülen nabız değeri 5. Saat ve tarih 6. Kalp ritim bozukluğu sembolü 7. Son 3 ölçümün ortalama değeri AVG 8. Havayla şişirme, havayı tahliye etme (Ok) 9.
- Page 53 4. Ölçüme hazırlık • Gün/Saat/Dakika bilgilerini ayarlayın ve her defasında SET tuşuyla onaylayın. Pilleri yerleştirme Ayarlama modundan çıkmak için tuşuna basın. • Ölçüm cihazının arka tarafındaki pil bölmesinin kapağını çıkarın. 5. Tansiyon ölçme • Dört adet 1,5 V AA tip (alkalin tip Manşeti takma LR06) pil yerleştirin.
- Page 54 Sipariş numarası 162.973 ile 30 ile 42 cm arası üst kol çevreleri • düğmesine uzunca basarak ölçüm işlemini başlatın. Tüm için daha büyük bir manşeti yetkili bir satıcıdan veya servis rakamların yandığı ekran kontrol edildikten sonra manşet oto- adresinden temin edebilirsiniz. matik olarak şişer.
- Page 55 Bu, ritim bozukluğu (aritmi) göstergesi olabilir. Ritim bozukluğu kendinizi tedavi etmeniz tehlikeli olabilir. Mutlaka doktorunuzun (aritmi), kalp atışına kumanda eden biyoelektrik sistemde talimatlarını yerine getirin. hatalar nedeniyle kalp ritminin anormal olduğu bir hastalıktır. WHO sınıflandırması: Semptomların (atlayan veya erken kalp atışları, yavaş veya çok Ölçüm sonuçları, Dünya Sağlık Örgütü’nün (WHO) standartları/ hızlı...
- Page 56 • AVG ortalama değer ancak seçili kullanıcı hafızasında kayıtlı 9. Teknik veriler 3 değer varsa gösterilebilir. Model no. BM 26 • Hafızayı silmek için önce bir kullanıcı hafızası seçin. SET tu- şunu yakl. 3 saniye basılı tutun. Geçerli kullanıcı hafızasındaki Ölçüm yöntemi Üst koldan, osilometrik, invaziv olmayan...
- Page 57 Aksesuarlar Kullanma kılavuzu, 4 x 1,5 V AA pil (alkali tip LR06), saklama çantası Sınıflandırma Dahili besleme, IPX0, AP veya APG yok, devamlı kullanım, uygulama parçası tip BF Güncelleme sebebiyle önceden haber verilmeksizin teknik bilgi- lerde değişiklik yapılabilir. • Bu cihaz Avrupa Normu EN60601-1-2’ye uygundur ve elekt- romanyetik uyumluluk bakımından özel koruma tedbirlerine tabidir.
-
Page 58: Прибор Для Измерения Кровяного Давления В Плечевой Артерии Инструкция По Применению
ции, сохраняйте ее для дальнейшего использования, дайте ее прочитать и другим пользователям и строго следуйте приведенным в ней указаниям. Указание С дружескими пожеланиями сотрудники компании Beurer Отмечает важную информацию 1. Ознакомление Соблюдайте инструкцию по применению Аппарат для измерения кровяного давления в плечевой... - Page 59 гут заменить медицинского обследования! Обсудите ре- Допустимая температура хранения и Storage зультаты Ваших измерений с врачом, но ни в коем случае 55°C влажность воздуха не принимайте самостоятельных решений относительно -20°C RH ≤85% лечения (например, по использованию лекарств и их до- Допустимая...
- Page 60 • Убедитесь в том, что к кровеносным сосудам руки, на – Используйте только входящие в объем поставки или которую накладывается манжета, не подсоединено меди- оригинальные запасные манжеты. В противном случае цинское оборудование (через внутрисосудистый доступ, получаются неверные результаты измерений. артериовенозный шунт или при внутрисосудистой тера- •...
- Page 61 • Запрещается самостоятельно ремонтировать или регули- 3. Описание прибора ровать прибор. В этом случае больше не гарантируется безупречность работы. • Ремонт разрешается выполнять только службе техниче- ского обеспечения фирмы или авторизированным сер- висным организациям. Но перед любыми рекламациями вначале проверьте батарейки и, при необходимости, замените...
- Page 62 Индикация на дисплее: 4. Подготовка к измерению 1. Систолическое давление Установка батарейки 2. Единица «мм ртутного столба» • Снимите крышку с батарейного 3. Диастолическое давление отсека на задней стенке аппарата. 4. Символ пульса и измеренное значение пульса • Установите 4 алкалиновых бата- 5.
- Page 63 на экран. Время отображается в 12-часовом формате, т.е. Заверните свободный конец время после 13:00 часов отображается как 01:00 PM. манжеты плотно, но не слишком, вокруг руки и зажмите замок на Настройка даты и времени производится следующим липучках. Манжета должна образом: прилегать...
- Page 64 • Измерения можно проводить в положении сидя или в • По окончании измерения остаточное давление воздуха положении лежа.Следите при этом, чтобы манжета на- быстро понижается. Появляются показания частоты ходилась на уровне сердца. пульса, систолического и диастолического кровяного • Для измерения кровяного давления займите удобное давления.
- Page 65 ляет сердечными сокращениями. Симптомы (пропущенные Классификация ВОЗ: или преждевременные сердечные сокращения, медленный Согласно директивам/положениям Всемирной организации или слишком быстрый пульс) могут вызываться, среди здравоохранения (ВОЗ) и новейшим исследованиям ре- прочего, заболеваниями сердца, возрастом, физиологиче- зультаты измерений можно классифицировать и оценивать ской...
- Page 66 Пиктограмма на дисплее и шкала на аппарате указыва- пользовательской памяти будут удалены после 3 корот- ют, в каком диапазоне находится измеренное кровяное ких звуковых сигналов. давление. • Если Вы хотите сменить пользовательские ячейки, то со- Если значения для систолы и диастолы находятся в двух блюдайте...
- Page 67 9. Технические данные Электропитание 4 x 1,5 В батарейки типа AA Модель № BM 26 Срок службы Для ок. 180 измерений, в зависимости батареек от высоты кровяного давления или дав- Метод измерения Осциллометрическое, неинвазивное ления накачивания измерение кровяного давления на плече...
- Page 68 ские приборы, часть 2 – 30: особые предписания по обе- Сервисный центр: 109451 г. Москва, спечению безопасности, включая основные особенности ул. Перерва 62, корп. 2, производительности автоматизированных неинвазивных Тел(факс) 495 – 658 54 90 приборов для измерения артериального давления). bts-service@ctdz.ru •...
-
Page 69: Q Ciśnieniomierz Instrukcja Obsługi
2. Ważne wskazówki Dziękujemy, że wybrali Państwo produkt z naszego asortymen- Objaśnienie symboli tu. Firma Beurer oferuje dokładnie przetestowane, wysokiej W instrukcji obsługi, na opakowaniu i tabliczce znamionowej jakości produkty przeznaczone do pomiaru ciężaru, ciśnienia urządzenia oraz akcesoriów znajdują się następujące symbole: krwi, temperatury ciała i tętna, a także przyrządy do łagodnej... - Page 70 • Nie wolno używać ciśnieniomierza do pomiaru ciśnienia Storage Dopuszczalna temperatura i wilgotność tętniczego u noworodków, kobiet w ciąży i kobiet cierpiących 55°C powietrza w miejscu przechowywania na zatrucie ciążowe. -20°C RH ≤85% • Choroby układu krążenia mogą powodować błędy pomiaru Operating Dopuszczalna temperatura i wilgotność...
- Page 71 • Urządzenie jest przeznaczone wyłącznie do używania w celu • Po rozładowaniu baterii lub w przypadku dłuższego nieuży- określonym w niniejszej instrukcji obsługi. Producent nie po- wania urządzenia baterie należy wyjąć. Pozwala to uniknąć nosi odpowiedzialności za szkody wynikłe z niewłaściwego ewentualnych szkód spowodowanych przez wypłynięcie użycia urządzenia.
- Page 72 3. Opis urządzenia Informacje na wyświetlaczu: 1. Ciśnienie skurczowe 2. Jednostka mmHg 3. Ciśnienie rozkurczowe 4. Symbol tętna i zmierzone tętno 5. Godzina i data 6. Symbol zaburzeń rytmu serca 7. Średnia wartość ostatnich 3 pomiarów AVG 8. Pompowanie, wypuszczanie powietrza (strzałka) 9.
- Page 73 4. Przygotowanie do pomiaru Aby ustawić datę i godzinę, należy wykonać następujące czynności: Wkładanie baterii • Potwierdź, naciskając 2 razy przycisk SET. • Zdejmij pokrywę komory baterii z • Za pomocą przycisku + lub - ustaw najpierw miesiąc (1–12), tyłu urządzenia. a następnie zatwierdź...
- Page 74 Podłącz wężyk mankietu jące osobne zapisanie po 30 pomiarów dla 4 różnych osób lub do przyłącza w urządzeniu. osobne zapisanie wyników pomiaru rano i wieczorem. Potwierdź wybór, naciskając przycisk Pomiar ciśnienia tętniczego krwi • Załóż mankiet zgodnie z powyższym opisem i przyjmij pozy- Uwaga: Urządzenie może być...
- Page 75 Przed rozpoczęciem kolejnego pomiaru odczekaj co najmniej pomiaru należy odpocząć co najmniej 5 minut, a podczas 5 minut. pomiaru nie rozmawiać i nie ruszać się. W przypadku częste- go pojawiania się symbolu skontaktuj się koniecznie z Interpretacja wyników lekarzem. Samodzielne diagnozowanie i leczenie w oparciu o Zaburzenia rytmu serca: zmierzone wartości może być...
- Page 76 9. Dane techniczne saniu 3 wyników danego użytkownika. • Aby skasować wybraną pamięć użytkownika, należy ją Nr modelu BM 26 najpierw wybrać. Naciśnij i przytrzymaj przycisk SET przez Metoda pomiaru Oscylometryczny, nieinwazyjny pomiar ok. 3 sekundy. Wszystkie wartości aktywnej pamięci zostaną...
-
Page 77: Instrukcja Obsługi
Producent zastrzega sobie prawo do zmiany danych technicz- Dokładność ciśnienie skurczowe ± 3 mmHg, nych z powodu aktualizacji bez konieczności powiadamiania. wskazania ciśnienie rozkurczowe ± 3 mmHg, tętno ± 5% wyświetlanej wartości • Urządzenie spełnia europejską normę EN60601-1-2 i wymaga zachowania szczególnych środków ostrożności Odchylenia Maks.dopuszczalne odchylenie od dotyczących kompatybilności elektromagnetycznej. -
Page 78: Electromagnetic Compatibility Information
Guidance and manufacturer’s declaration – electromagnetic immunity The BM 26 is intended for use in the electromagnetic environment specifi ed below. The customer or the user of the BM 26 should assure that it is used in such an environment. - Page 79 Guidance and manufacturer’s declaration – electromagnetic immunity The BM 26 is intended for use in the electromagnetic environment specifi ed below. The customer or the user of the BM 26 should assure that it is used in such an environment.
- Page 80 Recommended separation distances between portable and mobile RF communications equipment and the BM 26 The BM 26 is intended for use in an electromagnetic environment in which radiated RF disturbances are controlled. The customer or the user of the BM 26 can help prevent electromagnetic interference by maintaining a minimum distance between portable and mobile RF communications equipment (transmitters) and the BM 26 as recommended below, according to the maximum output power of the communications equipment.
Need help?
Do you have a question about the BM 26 and is the answer not in the manual?
Questions and answers