Table of Contents
Advertisement
Quick Links
Advertisement
Table of Contents

Related Manuals for Omega OI64MZ


Summary of Contents for Omega OI64MZ
- Page 1 INSTALLATION, OPERATION AND MAINTENANCE INSTRUCTIONS Induction Cooktop OI64MZ...
- Page 2 CONGRATULATIONS Welcome to the Omega Community and thank you for choosing one of our many fantastic cooking appliances. We are confident that you will now be able to meet your cooking needs. Before you use the cooktop we strongly recommend that you read though the whole user manual which provides the description of this product and the proper use of its functions.
-
Page 3: Important Safety Instructions
IMPORTANT SAFETY INSTRUCTIONS IMPORTANT: Read the assembly instruction section and safety precautions of this booklet carefully before removing the contents of this carton. This appliance is not intended for use by persons (including children) with reduced physical, sensory or mental capabilities, or lack of experience or knowledge, unless they have been given supervision or instruction concerning the use of the appliance by a person responsible for their safety. -
Page 4: Appliance Details
Induction 7400W SIZES: Relevant Sizes: LENGTH (mm) WIDTH (mm) HEIGHT (mm) Cooktop Size Due to continual product development, Omega reserves the right to alter specifications or appearances without notice. Dispose of packaging responsibly – recycle where facilities are available. ELECTRICAL CONNECTIONS... -
Page 5: Electrical Installation
LOCAL AUTHORITY REQUIREMENTS Installation is only permitted by a licensed electrician, and carried out according to instructions provided by the manufacturer. Incorrect installation might cause harm and damage, for which the manufacturer accepts no responsibility. ELECTRICAL INSTALLATION Before carrying out the connection to the power supply, the voltage rating of the appliance (stamped on the appliance identification plate) must be checked for correspondence to the available mains supply voltage, and the mains electric wiring should be capable of handling the oven’s power rating (also indicated on the identification plate). - Page 6 The adjacent furniture must be able to withstand a minimum temperature rise of 50°C above the ambient temperature of the room it is located in, during periods of use. The power supply to the appliance must be cut off before any adjustments or maintenance work is done on it. PREPARATION FOR INSTALLATION AND USE Manufactured with best quality parts and materials, this modern, functional and practical cooktop will meet your needs in all respects.
-
Page 7: Operating Instructions
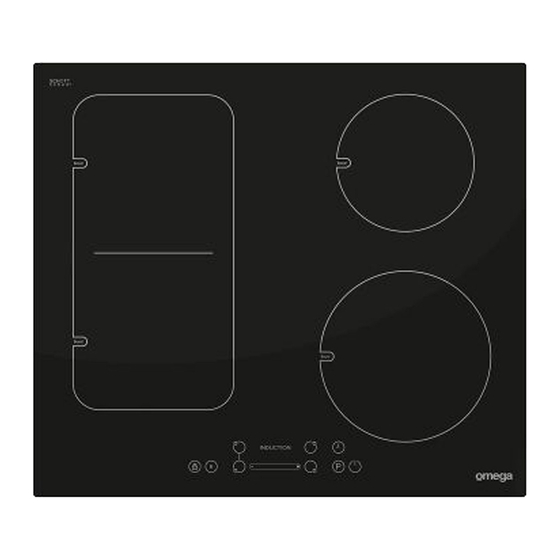
In order to prevent leakage of any liquids on the counter, a special sealing tape is supplied together with your cooktop. Apply this seal around the bottom edge of the cooktop (see below). The brackets are installed to hold the cooktop in place. This appliance can be installed into a workbench 30-40mm thick. - Page 8 Cooking Surface Control Panel The induction cooktop appliance is operated by touching buttons, with the functions confirmed by LED displays and acoustic signals. Turning On and Turning Off the Cooktop Appliance NOTE: Do not operate the cooktop without first placing a suitably sized cooking vessel containing food on the appropriate cooking zone.
-
Page 9: The Boost Function
Select a single cooking zone by pressing the corresponding Heater Selection button, the Decimal Point of the chosen cooking zone flashes. For the selected cooking zone, you can set or adjust the heat level between 1-9 by sliding your finger on the Slider Button from left to right (for the cooking zone in question) or Decrease the Heat Setting with the Slider button by sliding from right to left . -
Page 10: Child Lock
While the decimal point is flashing, press the Timer Setting button . The timer display will show the current timer setting (flashing) for that cooking zone (00), with a separate indicator to the side representing the particular cooking zone. Slide your finger from left to right on the Slider to increase the timer length (inminutes) or the Decrease the time by sliding from right to left to start from 60 minutes... - Page 11 NOTE: Cleaning and maintenance operations must only be carried out when the cooktop is cool (all residual heat indicators are off). The appliance should be disconnected from the power outlet or turned off at your isolation switch before commencing any cleaning process. Do not use plastic, plastic coated or aluminium cooking equipment on this appliance.
- Page 12 A division of Shriro Australia Pty Ltd 104 Vanessa St Kingsgrove NSW 2208 IN AUSTRALIA: 1300 795 572 IN NEW ZEALAND: (09) 415 6000 www.omegaappliances.com.au IM Ref: OI64MZ 12/2015/09FC FOR INDOOR USE ONLY...
Need help?
Do you have a question about the OI64MZ and is the answer not in the manual?
Questions and answers