Advertisement
Quick Links
Advertisement

Related Manuals for Omega OCC90TZ


Summary of Contents for Omega OCC90TZ
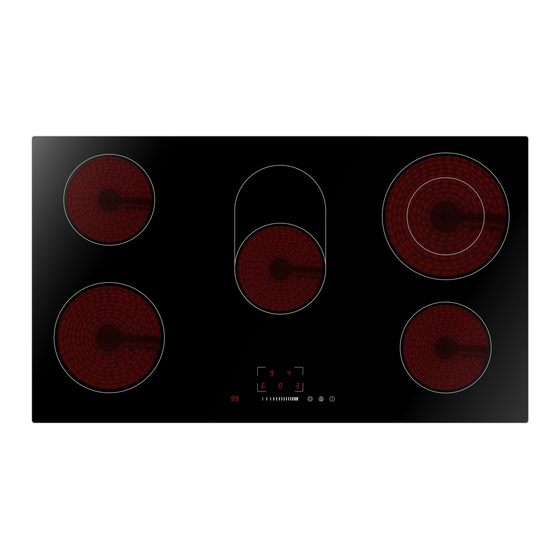
- Page 1 Instruction Manual Ceramic Cooktop OCC90TZ...
- Page 2 Thank you for purchasing an Omega appliance Tailored for the modern aesthetic and lifestyle of busy people, your new Omega Appliance will make a welcome addition to the family. Omega caters to style-savvy customers who look for balance between stunning form and clever function.
-
Page 3: Table Of Contents
The manufacturer will not be responsible for any damage to property or to persons caused by incorrect installation or improper use of the appliance. Due to continual product development, Omega reserves the right to alter specifications and appearances without notice. -
Page 4: Important Safety Warnings
A means for disconnection must be incorporated in the fixed wiring in accordance with the wiring rules. • If the supply cord is damaged, it must be replaced by the authorised Omega service center in order to avoid a hazard. •... -
Page 5: Product Details
2. Power/Timer slider touch control 3. Dual zone control 4. Keylock control 5. ON/OFF control 2. 6. Timer display Technical Specification Cooking Hob OCC90TZ Cooking Zones 5 Zones Supply Voltage 220-240V~ 50Hz/60Hz Installed Electric Power 7600-9200W Product Size L×W×H (mm) 900x520x55 Building-in Dimensions A×B (mm) -
Page 6: Installation Instructions
Installation Instructions Cut out the work surface according to the sizes shown in the drawing. A 3mm minimum gap should be left between the side of the appliance and the cupboard edges. Be sure the thickness of the work surface is at least 30mm. Please select heat-resistant work surface material to avoid any deformation caused by the heat radiating from the hotplate. - Page 7 Installation Instructions Before Locating the Fixing Brackets The unit should be placed on a stable, smooth surface (use the packaging). Do not apply force onto the controls protruding from the hob. Fix the hob on the work surface by screw four brackets on the bottom of hob (see picture) after installation. Screw Bracket Screw hole...
- Page 8 Installation Instructions Connecting the Hob to the Mains Power Supply The power supply should be connected in compliance with the relevant standard, or a single-pole circuit breaker. The method of connection is shown below. 1. . If the cable is damaged or needs replacing, this should be done by an after-sales technician using the proper tools, so as to avoid any accidents.
-
Page 9: Operating Instructions
Operating Instructions Touch Controls • The controls respond to touch, so you don’t need to apply any pressure. • Use the ball of your finger, not its tip. • You will hear a beep each time a touch is registered. •... - Page 10 Operating Instructions Start Cooking After power on, the buzzer beeps once, all the indicators light up for 1 second then go out, indicating that the ceramic hob has entered the standby mode. Touch the ON/OFF control. All the indicators will show “-”. Place a suitable pan on the cooking zone that you wish to use.
- Page 11 Operating Instructions Locking the Controls • You can lock the controls to prevent unintended use (for example children accidentally turning the cooking zones on). • When the controls are locked, all the controls except the ON/OFF control are disabled. To lock the controls The timer indicator will show “Lo”...
- Page 12 Operating Instructions Timer Control You can use the timer in two different ways: a) You can use it as a minute minder. In this case, the timer will not turn any cooking zone off when the set time is up. b) You can set it to turn a cooking zone off after the set time is up.
- Page 13 Operating Instructions Setting the Timer to Turn One Cooking Zone Off *Touch the heating zone selection control that you want to set the timer for. INCREASE OR DECREASE TEMPERATURE OR TIME TIMER CONTROL/DISPLAY Touch timer control; “10” will show on the timer display and the “0”...
-
Page 14: Cooking Guide
Cooking Guide Take care when frying as the oil and fat heat up very quickly. At extremely high temperatures oil and fat will ignite spontaneously and this presents a serious fire risk. Cooking Tips • When food comes to the boil, reduce the power setting as needed to maintain a steady boil. •... -
Page 15: Cleaning And Maintenance
Cleaning and Maintenance What? How? Important! • When the power to the cooktop is switched off, there will be no ‘hot surface’ indication but the cooking zone 1. Make sure the cooktop is off. Everyday soiling on may still be hot! Take extreme care. 2. - Page 16 Cleaning and Maintenance Problem Possible causes What to do Make sure the ceramic hob is connected to the power supply and that it is switched on. The cooktop cannot No power. Check whether there is a power outage in be turned on. your home or area.
-
Page 17: Australian & New Zealand Product Warranty Statements Of Standard Warranty Conditions
The Damage which occurs during delivery or installation. product will be repaired or replaced at the option of Omega, and 10. Claims to product surface coating due to liquid or solid all costs of installation, removal, cartage, freight travelling spill-overs, accidental damage or damage caused from expenses and insurance are to be paid by the customer.
Need help?
Do you have a question about the OCC90TZ and is the answer not in the manual?
Questions and answers