AUSTRALIAN MONITOR DigiPageJr Installation & Operation Manual
Multizone paging & program selection system
Hide thumbs
Also See for DigiPageJr:
- Specifications (2 pages) ,
- Installation and operation manual (21 pages)
Table of Contents
Advertisement
Quick Links
Clever Features, Contractor Friendly
DigiPageJr
ZONE 1
ZONE 2
ZONE 3
PROG 1
TREBLE
PROG 1
TREBLE
PROG 1
TREBLE
PROG 2
BASS
PROG 2
BASS
PROG 2
BASS
PROG 3
PROG
PROG 3
PROG
PROG 3
PROG
PROG 4
MIC
PROG 4
MIC
PROG 4
MIC
5
5
5
4
4
4
6
6
6
3
7
3
7
3
2
8
2
8
2
1
9
1
9
1
0
10
0
10
0
10
MASTER 1
MASTER 2
MASTER 3
Australian Monitor
I N S T A L L A T I O N
Multizone Paging
Program Selection
System
Installation
Operation
Manual
ZONE 4
ZONE 5
PROG 1
TREBLE
PROG 1
TREBLE
PROG 2
BASS
PROG 2
BASS
PROG 3
PROG
PROG 3
PROG
PROG 4
MIC
PROG 4
MIC
5
5
4
4
6
6
7
3
7
3
7
8
2
8
2
8
9
1
9
1
9
0
10
0
10
MASTER 4
MASTER 5
&
&
ZONE 6
ZONE 7
ZONE 8
PROG 1
TREBLE
PROG 1
TREBLE
PROG 1
TREBLE
PROG 2
BASS
PROG 2
BASS
PROG 2
BASS
PROG 3
PROG
PROG 3
PROG
PROG 3
PROG
PROG 4
MIC
PROG 4
MIC
PROG 4
MIC
5
5
5
4
4
4
6
6
6
3
7
3
7
3
2
8
2
8
2
1
9
1
9
1
0
10
0
10
0
10
MASTER 6
MASTER 7
MASTER 8
S E R I E S
PAGE ENABLE
ZONE 1
ZONE 5
ZONE 6
ZONE 2
ZONE 3
ZONE 7
ZONE 4
ZONE 8
7
8
Australian Monitor
9
INSTALLATION SERIES
ON
POWER
Advertisement
Table of Contents

Related Manuals for AUSTRALIAN MONITOR DigiPageJr


Summary of Contents for AUSTRALIAN MONITOR DigiPageJr
- Page 1 Australian Monitor I N S T A L L A T I O N S E R I E S Clever Features, Contractor Friendly DigiPageJr Multizone Paging & Program Selection System Installation & Operation Manual ZONE 1 ZONE 2 ZONE 3...
- Page 2 TO REDUCE THE RISK OF FIRE OR ELECTRIC SHOCK. To prevent electric shock, match wide blade of plug to DO NOT EXPOSE THIS EQUIPMENT TO RAIN OR MOISTURE. wide slot, fully insert. Australian Monitor INSTALLATION SERIES...
-
Page 3: Table Of Contents
CONTENTS Page 1. Introduction 2. Front Panel 3. Back Panel 4. Installation 5. Setup 6. Linking Two DigiPageJr Systems 7. Paging Station 8. Accessories 9. Troubleshooting Guide 10. Block Diagram 11. Dimensions 12. Specifications Australian Monitor INSTALLATION SERIES... -
Page 4: Introduction
Four program inputs are available to each of eight zone outputs. The DigiPageJr is also expandable to 16 zones via a simple link cable to a second unit. Paging stations are available in 8 zone and 16 Zone models allowing paging into any individual zone, any combination of zones or All Call. -
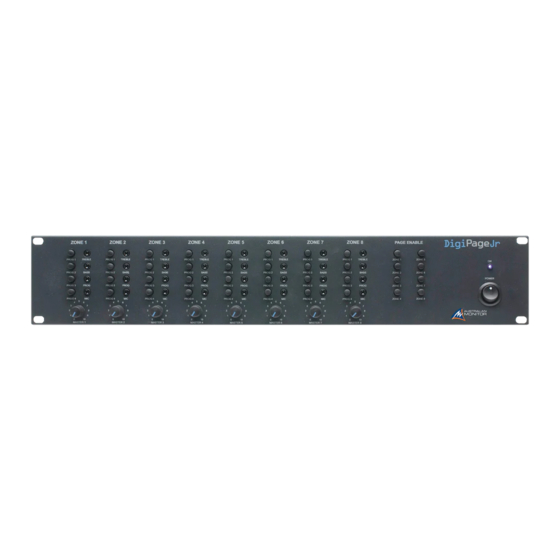
Page 5: Front Panel
PROG 4 PROG 4 PROG 4 PROG 4 PROG 4 PROG 4 PROG 4 PROG 4 ZONE 4 ZONE 8 Australian Monitor INSTALLATION SERIES MASTER 1 MASTER 2 MASTER 3 MASTER 4 MASTER 5 MASTER 6 MASTER 7 MASTER 8... - Page 6 To balance the differing levels of each program input, the program trim controls on the Back Panel should be used (see Back Panel and Setup sections) 6 PAGE This control adjusts the paging mic level into the zone. Australian Monitor INSTALLATION SERIES...
- Page 7 When 24VDC emergency power is supplied this LED will always be on. 9 POWER This switches power from the power supply (included ). NOTE: When 24VDC emergency power is supplied, the unit is on regardless of the switch position. Australian Monitor INSTALLATION SERIES...
- Page 9 These RJ45 inputs accept the CAT5 cables coming from the Paging Stations. See page 12 for more information. NOTE: These are NOT Ethernet connections. NOTE: Connecting and disconnecting these inputs while the unit is on may cause the unit to lock up requiring system power to be cycled. Australian Monitor INSTALLATION SERIES...
- Page 10 7 MASTER/SLAVE This switch is used when linking 2 units in Master/Slave configuration. (see ‘Linking Section’ on page 18) 8 POWER IN VAC This 2.1mm power socket accepts the 20VAC power supply provided with the unit. Australian Monitor INSTALLATION SERIES...
-
Page 11: Installation
CABLE INSTALLATION FOR PAGING STATIONS Four RJ45 ports (labelled CAT 5 RUN 1-4) are provided for connection to the DigiPageJr Zone Paging Stations. The four ports allow for easy cable infrastructure, as CAT5 runs can be of differing lengths depending on the installation and the number of paging stations connected. - Page 12 NOTE: CAT5 cable consists of four pairs of wires: it is not sufficient to simply wire the two ends pin for pin, ignoring pairing. POWER REQUIREMENTS The DigiPageJr can operate from the plug pack supplied and/or a separate 24V DC power supply. A NOTE ABOUT GROUNDING: It may be necessary in some circumstances to ground the DigiPageJr to eliminate noise in the system.
- Page 13 NOTE: The maximum voltage on these inputs must not exceed 5.5V PRE-ANNOUNCE CHIME The only internal setup that is available in the DigiPageJr is for the configuration of the chime tone that sounds in each zone. The unit comes shipped with the chime enabled in all zones.
-
Page 14: Setup
The following step by step procedure has been devised to assist during the setup process. When the DigiPageJr was shipped to you from the factory it was set up in a particular way. In the following procedure it is essential that you are starting from these initial settings. - Page 15 NOTE: A full discussion of setting up a complex system with correct gain structure is beyond the scope of this manual. The procedure above assumes that the installer has correctly set up external equipment connected to DigipageJr prior to initiating the set up procedure.
-
Page 16: Linking Two Digipagejr Systems
DigiPageJr. Use only DigiPageJr series paging stations with DigiPageJr and only DigiPage series paging stations with DigiPage. DigiPageJr is fully expandable to form a 16 zone paging system by the simple linking of two units. One DigiPageJr is then designated the master unit, driving zones 1-8, with the other slave unit driving zones 9-16. - Page 17 PROG LINKS Program sources can be sent to the slave DigiPageJr by connecting the PROG LINKS OUTPUT on the Master unit to the PROG LINKS INPUT on the Slave unit. This simplifies connection of sources as all 4 sources can be sent from the master to the slave via 1 CAT5 cable avoiding the need for Y-cables The PROG TRIM on the slave unit operates independently of the master unit.
-
Page 18: Paging Station
8 and 16 zone paging stations complete with a slimline gooseneck paging microphone. The Paging stations are designed to be used with the DigiPageJr Zone Paging & Source Selection System and will allow paging into any individual zone, any combination of zones or All Call to all zones. -
Page 19: Installation And Setup
7 TERMINATING In an RS485 network (of which the DigiPageJr is part of) it is important to terminate the last device in the network CAT5 RUN. A jumper is provided for the data/voice transmission to be terminated if that Paging Station is at the end of a CAT5 RUN (see diagram). -
Page 20: Accessories
Cat No. DPRMSMBW Cat5 Cable tester Cat No. ATC-C5CT NOTE: The paging stations for the DigiPageJr are different to the DigiPage and cannot be mixed. The same applies to DPRM’s which cannot be used with the DigiPageJr. 9. TROUBLESHOOTING GUIDE... -
Page 21: Block Diagram
10. BLOCK DIARGRAM MICROPROCESSOR Australian Monitor INSTALLATION SERIES... -
Page 23: Dimensions
Min Trim: -46dB -Sum Input: Input Sensitivity: 160mV (-13.5dBu) Threshold: -46dBu (at output, ind of input) -Frequency Response: 15Hz - 17kHz (0dB/-3dB) -THD: 0.005% -Noise: Page Mic: -84dB Other Inputs: -89dB All measurements are reference to 1.5V (+6dBu) Australian Monitor INSTALLATION SERIES...
Need help?
Do you have a question about the DigiPageJr and is the answer not in the manual?
Questions and answers