Fluke 771 Calibration Manual
Milliamp process clamp meter
Hide thumbs
Also See for 771:
- User manual ,
- Calibration manual (22 pages) ,
- Instruction sheet (13 pages)
Table of Contents
Advertisement
®
771
Milliamp Process Clamp Meter
Calibration Manual
November 2007
© 2007 Fluke Corporation, All rights reserved. Printed in USA. Product specifications are subject to change without notice.
All product names are trademarks of their respective companies.
Fluke-Direct
.ca
info@Fluke-Direct.ca
1.800.868.7495
Advertisement
Table of Contents

Related Manuals for Fluke 771


Summary of Contents for Fluke 771
- Page 1 ® Milliamp Process Clamp Meter Calibration Manual November 2007 © 2007 Fluke Corporation, All rights reserved. Printed in USA. Product specifications are subject to change without notice. All product names are trademarks of their respective companies. Fluke-Direct info@Fluke-Direct.ca 1.800.868.7495...
- Page 2 LIMITED WARRANTY AND LIMITATION OF LIABILITY This Fluke product will be free from defects in material and workmanship for 3 years (one year for cable and clamp) from the date of purchase. This warranty does not cover fuses, disposable batteries or damage from accident, neglect, misuse or abnormal conditions of operation or handling.
-
Page 3: Table Of Contents
Table of Contents Title Page Introduction......................1 Contacting Fluke....................2 Safety Information ..................... 2 Symbols ......................3 Specifications..................... 4 Getting Acquainted with the Meter..............5 Maintenance....................... 6 Cleaning the Meter ..................6 Battery Replacement ..................6 Performance Tests....................8 Required Equipment..................8 Testing the Batteries .................. - Page 4 Calibration Manual Fluke-Direct info@Fluke-Direct.ca 1.800.868.7495...
- Page 5 List of Tables Table Title Page Symbols........................3 Required Equipment....................8 Accuracy Tests ....................... 10 Error Messages....................... 12 Replaceable Parts ....................15 Fluke-Direct info@Fluke-Direct.ca 1.800.868.7495...
- Page 6 Calibration Manual Fluke-Direct info@Fluke-Direct.ca 1.800.868.7495...
-
Page 7: List Of Figures
List of Figures Figure Title Page The 771 Milliamp Process Clamp Meter ............... 5 Changing the Batteries ................... 7 Display Test ......................9 Accessing the Calibration Button................12 Phase Adjustment....................14 Replaceable Parts ....................16 Fluke-Direct info@Fluke-Direct.ca 1.800.868.7495... - Page 8 Calibration Manual Fluke-Direct info@Fluke-Direct.ca 1.800.868.7495...
-
Page 9: Introduction
This manual provides the complete verification and adjustment procedure for the 771 Milliamp Process Clamp Meter (referred to in this manual as the Meter). The Meter allows closed-case calibration using reference sources. It measures the reference signals, calculates the correction factors, and stores them in memory. The instrument should be calibrated after repair, or if it fails a performance test. -
Page 10: Contacting Fluke
1-800-363-5853 in Canada +31-402-675-200 in Europe +81-3-3434-0181 in Japan +65-738-5655 in Singapore +1-425-446-5500 from anywhere in the world Or, visit Fluke’s Web site at www.fluke.com To register your product, visit http://register.fluke.com Safety Information In this manual, a Warning identifies conditions and actions that pose hazard(s) to the user. -
Page 11: Symbols
Battery Low Battery Conforms to relevant European Union directives DC (Direct Current) Do not dispose of this product as unsorted municipal waste. Go to Fluke’s web site for recycling information. Conforms to relevant Australian standards N10140 Conforms to relevant Canadian and US standards... -
Page 12: Specifications
CAT II 300 V CAT II Equipment is designed to protect against transients from energy-consuming equipment supplied from the fixed installation, such as TVs, PCs, portable tools, and other household appliances. P, ), ;, FCC Agency Approvals N10140 Fluke-Direct info@Fluke-Direct.ca 1.800.868.7495... -
Page 13: Getting Acquainted With The Meter
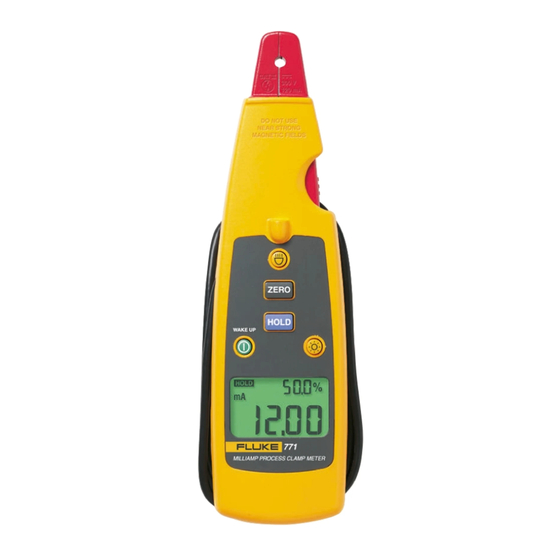
Captures and holds the current reading Removes interference and zeros the display Measurement spotlight LED button Measurement spotlight LED Detachable clamp Turns the backlight off and on Tactile Barrier docked and un-docked Figure 1. The 771 Milliamp Process Clamp Meter Fluke-Direct info@Fluke-Direct.ca 1.800.868.7495... -
Page 14: Maintenance
2. Use a flat head screwdriver to loosen the battery access door fastener, and remove the door from the case bottom. 3. Remove the batteries. 4. Replace the batteries with two new AA batteries. 5. Reattach the battery access door to the case bottom and tighten the fastener. Fluke-Direct info@Fluke-Direct.ca 1.800.868.7495... - Page 15 Milliamp Process Clamp Meter Maintenance ege02.eps Figure 2. Changing the Batteries Fluke-Direct info@Fluke-Direct.ca 1.800.868.7495...
-
Page 16: Performance Tests
The following tests are used to verify the functions of the Meter. If the Meter fails any of the verification tests, repair is necessary. For service, see Contacting Fluke. Required Equipment Required equipment for the performance tests is listed in Table 2. If the recommended models are not available, equipment with equivalent specifications may be used. -
Page 17: Testing The Display
18 °C to 28 °C. Allow the Meter to stabilize at room temperature prior to performing the accuracy tests. Table 3 lists the required performance test points for verifying Meter accuracy. A zero adjustment must be performed prior to completing each performance test point. Fluke-Direct info@Fluke-Direct.ca 1.800.868.7495... - Page 18 7. Complete steps 2-4 for each calibrator output setting in Table 3. 8. If the Meter fails to meet any of the Display Reading Limits, it requires calibration adjustment, or repair. See Calibration Adjustment or Contacting Fluke. Table 3. Accuracy Tests...
-
Page 19: Calibration Adjustment
• In the temperature subroutine, only H is valid for adjustment. • In the phase subroutine, H and L are used to adjust the phase of two sensor-excitation signals by increasing or decreasing a parameter. Fluke-Direct info@Fluke-Direct.ca 1.800.868.7495... -
Page 20: Calibration Error Messages
2. Clamp the current loop in the current flow direction where required. 3. Turn the meter on and wait at least 10 seconds for warming up. 4. Press the hidden calibration button with a probe to enter calibration mode. See Figure 4. Fluke-Direct info@Fluke-Direct.ca 1.800.868.7495... -
Page 21: Temperature Adjustment Procedure
10. Wait at least 15 seconds for the Meter’s internal circuits to stabilize. 11. Press H on the Meter to adjust the negative gain. Note The following procedure is not required unless the Meter’s current clamp has been replaced. Fluke-Direct info@Fluke-Direct.ca 1.800.868.7495... -
Page 22: Phase Adjustment Procedure
6. Use Land H, to adjust the difference between the minimum and maximum value recorded in Step 5, until the reading difference is less than 0.05 mA. 5520A CALIBR ATOR Rotate Meter clamp around current loop conductor fdp5.eps Figure 5. Phase Adjustment Fluke-Direct info@Fluke-Direct.ca 1.800.868.7495... -
Page 23: User Replaceable Parts
Screw,m3,13.5mm,pan,phillips,steel,zinc-black chromate, thread 2388412 form Battery,primary,mno2- 376756 zn,1.5v,2.24ah,15a,lr6,alkaline,aa,14x50mm,bulk Battery pad,urethane,adhesive-back,20.0mm l,20.0mm w,5.0mm 2687457 Battery door 2720304 (does not include fastener, order separately) Access door fastener 948609 LED housing 2720319 Soft case, black/yellow 2726174 2567301 771 Instruction Sheet Fluke-Direct info@Fluke-Direct.ca 1.800.868.7495... - Page 24 Calibration Manual fdp4.eps Figure 6. Replaceable Parts Fluke-Direct info@Fluke-Direct.ca 1.800.868.7495...
Need help?
Do you have a question about the 771 and is the answer not in the manual?
Questions and answers