Cateye Padrone Smart + CC-SC100B Online Manual
Hide thumbs
Also See for Padrone Smart + CC-SC100B:
- Quick setup manual (9 pages) ,
- Start manual (2 pages) ,
- Start manual (2 pages)
Table of Contents
Advertisement
Quick Links
To use Padrone Smart+, the "Cateye Cycling™" smartphone application (free of charge) is
required.
For the latest information on the smartphones that are compatible with Cateye Cycling™
operations, see
"Cateye Cycling™ Recommended
For troubleshooting related to the smart computers or to Cateye Cycling™, see
Asked
Questions".
* For explanatory purposes, in this manual red text/icons on the smart computer screen
represent flashing items.
* The display screens and illustrations used in this manual are provided for instructional
purposes only. Actual screens and illustrations may differ depending on devices used.
* The online manual and YouTube videos for this product are subject to change without
notice.
Devices".
Usage Instructions
"Frequently
Advertisement
Table of Contents

Subscribe to Our Youtube Channel
Related Manuals for Cateye Padrone Smart + CC-SC100B


Summary of Contents for Cateye Padrone Smart + CC-SC100B
- Page 1 To use Padrone Smart+, the “Cateye Cycling™” smartphone application (free of charge) is required. For the latest information on the smartphones that are compatible with Cateye Cycling™ operations, see “Cateye Cycling™ Recommended Devices”. Usage Instructions For troubleshooting related to the smart computers or to Cateye Cycling™, see "Frequently...
-
Page 2: Setup Flowchart
Setup Flowchart The setup procedure is as follows. 1. Checking package contents 2. Install Cateye Cycling™ 3. Pairing with smart computer 4. Pairing with a sensor (If you have sensors) 5. Mounting the bracket 6. Mounting the speed (cadence) sensor... - Page 3 * The Triple Wireless Kit includes an integrated speed (cadence) sensor (ISC-12) and a heart rate sensor (HR-12). 2. Install Cateye Cycling™ 3. Pairing with smart computer 4. Pairing with a sensor (If you have sensors)
- Page 4 6. Mounting the speed (cadence) sensor (ISC-12) (Optional) 7. Wearing the heart rate sensor (HR-12) (Optional) Usage Instructions...
- Page 5 Important When the smartphone's Bluetooth settings are turned on, it will search for devices, but do not configure settings at this stage. Switch to Cateye Cycling™ and follow the procedure below. Once basic settings are complete the Trip screen appears.
- Page 6 6. Mounting the speed (cadence) sensor (ISC-12) (Optional) 7. Wearing the heart rate sensor (HR-12) (Optional) Usage Instructions...
- Page 7 Setup Flowchart 1. Checking package contents 2. Install Cateye Cycling™ 3. Pairing with smart computer The following section explains how to format (initialize) the smart computer and then pair with a smartphone. Important • Pairing is necessary to use a smart computer or a sensor.
- Page 8 (MENU) at the top left of the screen, turn on [Connect] and tap [Device]. Tap [Pair to Device] to start pairing. When Cateye Cycling™ detects smart computer, a message is displayed on the smartphone. Tap [Pairing] to complete pairing. * If you are using an iPhone, a subsequent message will be displayed.
- Page 9 Smart computer pairing is now complete. If you have sensors, proceed to "Pairing with a sensor". If you do not have sensors, skip to "Mounting the bracket". 4. Pairing with a sensor (If you have sensors) 5. Mounting the bracket 6.
- Page 10 Tap [Pair]. The synchronized sensor is displayed on the [Device] screen and pairing is completed. * When pairing a sensor with Cateye Cycling™, an "A" is displayed after the sensor name. * If you have paired a sensor capable of speed measurement, proceed to step 3.
- Page 11 3. Set the tire circumference for a sensor capable of speed measurement. Tap [Device], and then tap [Sensor name] > [Tire Circumference] (the length of the outer circumference of the tire). Select the tire circumference according to the tire size written on the side of the tire. Determining tire circumference * Default value: 2096 mm (700x23c) * Requires to set tire circumference for each sensor.
- Page 12 Pairing with a sensor Switching to Sensor Direct Mode Switch from Mirror Mode to Sensor Direct Mode. Smartphone 1. Close Cateye Cycling™ or from (MENU), turn off [Connect]. Smart computer 2. From the smartphone search screen, press MODE for 1 second to switch to Sensor Direct Mode.
- Page 13 Pairing a smart computer with a sensor Tire circumference setting...
- Page 14 Pairing with a sensor Switching to Sensor Direct Mode Pairing a smart computer with a sensor Pair a sensor that you want to use with smart computer. Important • Pairing (sensor ID synchronization) must be performed in order to use a sensor. •...
- Page 15 • SP : Speed sensor • ISC : Speed/cadence sensor • CD : Cadence sensor • HR : Heart rate sensor • PW : Power sensor * When pairing a sensor with a smart computer, a "C" is displayed after the sensor name.
- Page 16 Pairing with a sensor Switching to Sensor Direct Mode Pairing a smart computer with a sensor Tire circumference setting Set the tire circumference for a sensor capable of speed measurement. Important • Pairing (sensor ID synchronization) must be performed first. Pairing a smart computer with a sensor •...
- Page 17 Move to next digit (1 second) * Sensors that can be selected are those that have been paired with Cateye Cycling™ or a smart computer. The letter that appears after the sensor name indicates how the sensor was paired. • A : Sensor paired with Cateye Cycling™...
- Page 18 Setup Flowchart 1. Checking package contents 2. Install Cateye Cycling™ 3. Pairing with smart computer 4. Pairing with a sensor (If you have sensors) 5. Mounting the bracket The bracket can be mounted on either the stem or the handlebar.
- Page 19 Bracket rubber pad 3. Loop the bracket band around the stem and tighten the dial to secure it. Dial Caution • Always tighten the dial by hand. Using a tool or other object to tighten the dial may crush the screw thread. •...
- Page 20 Dial Caution • Always tighten the dial by hand. Using a tool or other object to tighten the dial may crush the screw thread. • Trim bracket band carefully so the cut end will not cause injury (see step 3 above). ! Mounting and removing the smart computer unit Mounting Click...
- Page 21 Setup Flowchart 1. Checking package contents 2. Install Cateye Cycling™ 3. Pairing with smart computer 4. Pairing with a sensor (If you have sensors) 5. Mounting the bracket 6. Mounting the speed (cadence) sensor (ISC-12) (Optional) The speed (cadence) sensor can be mounted either on the top or bottom of the chain stay.
- Page 22 See illustrations 1. Temporarily attach the sensor to the left chain stay. (1) Loosen the sensor screw using a Phillips screwdriver and check that the sensor arm moves. Sensor screw Sensor arm (2) Attach the sensor rubber pad to the sensor. Sensor rubber pad (3) Refer to the illustration and temporarily attach the sensor to the left chain stay with...
- Page 23 Inside of the crank Cadence magnet Nylon tie Sensor zone Spoke Wheel magnet (1) Using a nylon tie, temporarily attach the cadence magnet to the inside of the left crank arm so that it faces the cadence sensor zone. (2) Rotate the sensor arm and temporarily attach the wheel magnet to a spoke facing the speed sensor zone.
- Page 24 pedal axle. In this case, remove the adhesive tape from the magnet and do not use the nylon tie. 7. Wearing the heart rate sensor (HR-12) (Optional) Usage Instructions...
- Page 25 Setup Flowchart 1. Checking package contents 2. Install Cateye Cycling™ 3. Pairing with smart computer 4. Pairing with a sensor (If you have sensors) 5. Mounting the bracket 6. Mounting the speed (cadence) sensor (ISC-12) (Optional) 7. Wearing the heart rate sensor (HR-12) (Optional) Heart rate measurement is performed by wearing a heart rate sensor around the chest.
- Page 26 Heart rate sensor HR strap 2. Wear the HR strap by sliding the hook over the other end of the strap. Wind the HR strap around your body and adjust the length to suit your chest (underbust). Overtightening the strap may cause discomfort during measurement. Hook Back side Electrode...
- Page 27 All activity summary Activity list Uploading Changing settings Cateye Cycling™ can be used to configure all settings for smart computer and connected devices. * Only sensor pairing settings can be configured with just the smart computer. Important Sensor information on the smart computer is overwritten with data from Cateye...
- Page 28 * Information on commercial sensors paired with the smart computer remains as it is. General Device Account...
- Page 29 These functions will become available through updates to the Padrone Smart+ firmware and the Cateye Cycling™ app. It is recommended that users update to the most recent version of Cateye Cycling™ and Padrone Smart+ firmware whenever possible. * Areas relevant to the above are described with the mark.
- Page 30 Usage Instructions Functions and details displayed in Mirror Mode and Sensor Direct Mode The following functions can be used in Mirror Mode and Sensor Direct Mode.
- Page 31 *1 Heart rate, cadence, and power measurements require pairing with each sensor. *2 Requires separate left and right power sensors. *3 Requires a smartphone with a built-in pressure sensor.
- Page 32 The Bluetooth word mark and logos are owned by the Bluetooth SIG, Inc. and any use of such marks by CATEYE Co., Ltd. is under license. Other trademarks and trade names are those of their respective owners.
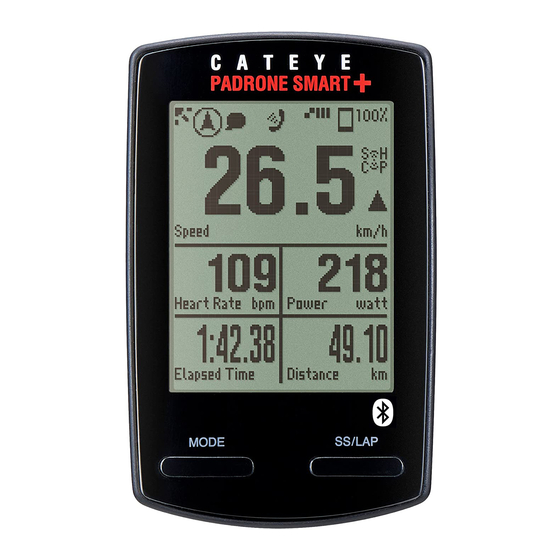
- Page 33 Usage Instructions What is Mirror Mode? Smart computer screen The screen segments and display functions to be displayed on the measurement screen can be assigned through screen customization. The following explains about customizable display, using the default screen as an example. Measurement screen Simple Navigation display * To customize the screen, tap...
- Page 34 Important Only incoming notifications for e-mail addresses registered through [Phone] and [Add Account] will be displayed. When an incoming notification is received, the display will not show the app name or the name of the sender. * Contact name registered with non-alphabet characters will be displayed as “Other”. * The incoming notification icons and count are reset when measurement is paused, reset, or finished.
- Page 35 Displays various measurement data. • Speed/cadence/heart rate flash: If using a CATEYE sensor, the values related to the sensor's battery replacement period start flashing to indicate that it is time to replace the battery. Battery replacement : Optional sensors • Power values flash: When using separate left and right power sensors, power values flash on and off to...
- Page 36 What is Mirror Mode? Smart computer screen Cateye Cycling™ screen This is the Cateye Cycling™ home screen. From this screen you can start, pause, and finish measurement. * Starting, pausing, and finishing measurement can be done remotely from the smart computer unit.
- Page 37 ・ (Cadence sensor) ・ (Power sensor) * A grayed-out icon indicates an unconnected sensor. * Speed (cadence) sensors (ISC) display both Quick Set The Quick Set function allows various measurement functions to be turned ON/OFF or a goal to be set in simple navigation quickly. GPS icon Indicates GPS signal reception status.
- Page 38 Displays the number of temporarily saved trips. Important The maximum number of trips that can be saved temporarily is 30. If this number is exceeded, the icon changes to [Full] and it is not possible to temporarily save any more trips.
- Page 39 Important • Smartphone use When measuring, turn the smartphone display off, and with Cateye Cycling™ running, store the smartphone in a safe place such as a bag or pocket. As measurement start/pause/resume and reset operations (finish trip) can be performed remotely from smart computer, there is no need to take out your smartphone until you want to save or upload trips.
- Page 40 Auto pause function Power-saving mode Button lock function If you have power sensors...
- Page 41 Smartphone search Measurement screen standby * If the connection is made when Cateye Cycling™ is already measuring, [PAUSE] and measured values are displayed. * The appearance of the smart computer screen depends on the state of Cateye Cycling™. Smartphone connection is now complete.
- Page 42 (reset operation) 6. Saving and uploading trips ! Functions during measurement Switching measurement data display Simple navigation function Lap function Auto lap function Countdown function Auto pause function Power-saving mode Button lock function If you have power sensors...
- Page 43 Start measurement 1. Connecting smart computer and smartphone 2. Performing pre-measurement preparation The following procedure shows how to turn various measurement functions ON/OFF and how to configure goal settings as desired. This section also explains the quick set feature for quickly configuring settings from the Trip screen.
- Page 44 • Goal Specifies a goal in simple navigation. Simple navigation function 3. Tap (back). The display returns to the Trip screen. 3. Starting measurement 4. Pausing/resuming measurement 5. Finishing measurement (reset operation) 6. Saving and uploading trips ! Functions during measurement Switching measurement data display Simple navigation function Lap function...
- Page 45 Start measurement 1. Connecting smart computer and smartphone 2. Performing pre-measurement preparation 3. Starting measurement Smart computer When smart computer is on the [READY] (measurement standby) screen, pressing SS/LAP for 1 second starts measurement. (1 second) Measurement Measurement standby starts * If the connection with the smartphone is interrupted during measurement, smart computer switches to the smartphone search screen.
- Page 46 Button lock function If you have power sensors...
- Page 47 Start measurement 1. Connecting smart computer and smartphone 2. Performing pre-measurement preparation 3. Starting measurement 4. Pausing/resuming measurement Smart computer Pressing SS/LAP for 1 second displays [PAUSE] and pauses measurement. Pressing SS/LAP again for 1 second resumes measurement. (1 second) During Paused measurement...
- Page 48 Start measurement 1. Connecting smart computer and smartphone 2. Performing pre-measurement preparation 3. Starting measurement 4. Pausing/resuming measurement 5. Finishing measurement (reset operation) Smart computer Pressing MODE for 3 seconds will end measurement and switch to the [READY] display. At this time, the trip data will be temporarily saved to the smartphone, and the measurements on the smart computer will be reset.
- Page 49 Auto lap function Countdown function Auto pause function Power-saving mode Button lock function If you have power sensors...
- Page 50 * You must have an account with the relevant site to upload data. Account * Cateye Cycling™ only allows you to post links of trips uploaded to CATEYE Atlas™ on Facebook™ and Twitter™. Links to other service sites cannot be posted.
- Page 51 Activity list * When not performing measurement, it is recommended that you turn off [Connect] from (MENU) to minimize smartphone battery drain. ! Functions during measurement Switching measurement data display Simple navigation function Lap function Auto lap function Countdown function Auto pause function Power-saving mode Button lock function...
- Page 52 Switching measurement data display Smart computer You can switch the display of data being measured in Cateye Cycling™ by pressing MODE. * The data displayed changes depending on the state of the sensor connection and the screen customization settings. The following gives an example of initial configuration of the...
- Page 53 * During initial configuration, screens 3 through 5 are undefined and thus not shown. To add screens or to change screen segments or measurement data, tap (MENU) > [Device] > [Smart computer name] > [Display Customization]. Changing the measurement screen * Heart rate, cadence, and power data will not be displayed unless each sensor is paired.
- Page 54 Start measurement Switching measurement data display Simple navigation function The Simple navigation function displays the direction and straight-line distance from a current location to a goal or a start point. Important • The simple navigation function shows the direction and straight-line distance. It does not provide route (street) guidance.
- Page 55 (1 second) Simple Navigation Measurement display (goal) screen * Performing the same operation will display the simple navigation (goal) again. * To go back to a start point, see "Back to start point". Back to start point Display the direction and straight-line distance to the start point. * Because a trip's start point is set automatically, this function can be used right away.
- Page 56 Lap function Auto lap function Countdown function Auto pause function Power-saving mode Button lock function If you have power sensors...
-
Page 57: Lap Function
Start measurement Switching measurement data display Simple navigation function Lap function Smart computer You can record a lap by pressing SS/LAP on the measurement screen during measurement. When the lap is recorded, the lap information is displayed temporarily before returning to the original measurement screen. - Page 58 *1 The sequential lap number, including auto laps, will be displayed. If the total number of laps exceeds 999, the following laps will not be recorded. *2 Measurement data will be displayed as [--] if the sensor signal cannot be received. *3 Requires a smartphone with a built-in pressure sensor.
-
Page 59: Auto Lap Function
Start measurement Switching measurement data display Simple navigation function Lap function Auto lap function Smart computer Laps can be recorded automatically without any button operation according to distances, times, or locations set in advance. When the lap is recorded, the lap information is displayed temporarily before returning to the original measurement screen. - Page 60 *1 A number that includes both the lap number and the auto lap number will be displayed. If the total number of laps exceeds 999, the following laps will not be recorded. *2 The display shows the measurement status of the auto lap being measured and the lap count.
- Page 61 Power-saving mode Button lock function If you have power sensors...
- Page 62 Start measurement Switching measurement data display Simple navigation function Lap function Auto lap function Countdown function Smart computer This function delivers a notification when a distance or time set as a goal is reached. When the goal is reached, [FINISH] flashes on the screen and an alarm sounds. •...
- Page 63 Start measurement Switching measurement data display Simple navigation function Lap function Auto lap function Countdown function Auto pause function Smartphone This function automatically pauses measurement when the connection between the smartphone and smart computer is broken. Measurement resumes automatically when the connection is reestablished. * The Auto Pause settings can be accessed by tapping (MENU) >...
- Page 64 Smart computer When smart computer is left on the [ready] (measurement standby) screen, [PAUSE] screen, or smartphone search screen for approximately 20 minutes; Cateye Cycling™ is closed; or [Connect] is turned off, the sleep display is activated. When any button is pressed, the smart computer returns to the smartphone search screen and then returns to the measurement screen when the connection with the smartphone is reestablished.
- Page 65 Button lock function If you have power sensors...
- Page 66 Start measurement Switching measurement data display Simple navigation function Lap function Auto lap function Countdown function Auto pause function Power-saving mode Button lock function Smart computer Pressing SS/LAP and OPTION simultaneously will lock the buttons, preventing accidental operation when the smart computer is stored in a pocket, etc. Repeating the same operation will unlock the buttons.
- Page 67 Start measurement Switching measurement data display Simple navigation function Lap function Auto lap function Countdown function Auto pause function Power-saving mode Button lock function If you have power sensors When a signal is received from a paired power sensor, power data is displayed as a value. Smart computer The power, average power, custom average power, maximum power, average lap power in real time, and power balance can be displayed on a smart computer.
-
Page 68: Activity List
Usage Instructions All activity summary It is possible to check total values for all activities saved in Cateye Cycling™ and maximum values for individual trips. Smartphone 1. Tap (MENU) and then [All Activity Summaryl]. Activity list Uploading... - Page 69 Usage Instructions All activity summary Activity list It is possible to check individual activities (trip data and summary data collectively) saved in Cateye Cycling™. Smartphone 1. Tap (MENU) and then [Activity List]. * The Activity List can be displayed in graph, list, or calendar format.
- Page 70 Usage Instructions All activity summary Activity list Uploading Multiple activities can be uploaded to service sites in one action. Smartphone 1. Tap (MENU) and then [Upload]. * Activities already uploaded to service sites are not displayed. 2. Select the activities you want to upload and tap (Upload) to upload them to the specified sites.
- Page 71 Usage Instructions General This section explains how to configure various measurement settings. Smartphone 1. Tap (MENU) and then [General]. • Recording Interval Selects the interval at which the log is recorded. • Units Selects the measurement unit. Important If the unit is changed with the smart computer unconnected, the settings will be applied the next time the smart computer is connected.
- Page 72 Usage Instructions General Device The following section explains how to pair a smart computer with a sensor and how to configure various settings. Important • Device settings are shared when smart computer is connected to your smartphone. • When using an iPhone, you cannot sync settings of commercial sensors. When measuring in Sensor Direct Mode, it is necessary to configure sensor settings separately via smart computer.
- Page 73 * Paired sensors are displayed with "A" or "C" after the sensor name. A : Sensor paired with Cateye Cycling™ C: Sensor paired with a smart computer • Notification Setting Configures settings for incoming call, email, and SMS app notifications and smartphone remaining battery notification.
- Page 74 If settings differ between devices, they will be overwritten with data from Cateye Cycling™ the next time the devices are connected. * Information on commercial sensors paired with the smart computer remains as it is. • Nickname Changes the name of the sensor.
- Page 75 Notifications from smartphone applications and the smartphone’s remaining battery can be displayed on the smart computer. Important • Cateye Cycling notification settings are applied to applications enabled in the smartphone's notification settings. • Email notifications are shown for e-mail accounts registered in the smartphone settings.
- Page 76 1. Tap [Notification Setting]. • Low Battery Notification When the smartphone battery reaches a specified amount, (remaining smartphone battery) flashes on the smart computer. • Phone / Messages / Email / Social Network When a notification arrives, [Application name] and [Contact name] (alphabetical), or [Phone number] or [Email address] flashes on the smart computer’s screen, with an audible alarm.
- Page 77 Device Designating a goal The following explains how to designate a goal in simple navigation. Smartphone (MENU) > [Device] > [Smart computer name], and then follow the procedure below. 1. Tap [Simple Navigation]. Under [Simple Navigation], there are four methods for designating a goal. •...
-
Page 78: Changing The Measurement Screen
Device Changing the measurement screen This section explains how to change the display of the measurement screen. Smartphone (MENU) > [Device] > [Smart computer name], and then follow the procedure below. 1. Tap [Display Customization]. Here, you can verify the current screen segments and functions (measurement data). •... - Page 79 Segments] is set to [8 segments]. • Selecting a function (measurement data): Tap [Function Names] or to select a function. • Reordering functions: Tap [Edit] and swipe the desired function to another location to change the display position. * Screen customization settings will be applied to both Mirror Mode and Sensor Direct Mode.
- Page 80 * You must have an account with the relevant site to upload data. Service sites ・ CATEYE Atlas™ ・ STRAVA™ ・ TRAINING PEAKS™ ・ Facebook™ ・ Twitter™ * When using an SNS, links to activities uploaded to Cateye Atlas™ are posted.
- Page 81 All activity summary Activity list Uploading Changing settings Cateye Cycling™ can be used to configure all settings for smart computer and connected devices. * Only sensor pairing settings can be configured with just the smart computer. Important • Sensor information on the smart computer is overwritten with data from Cateye Cycling™...
- Page 82 • When using an iPhone, you cannot sync settings of commercial sensors. When measuring in Sensor Direct Mode, it is necessary to configure sensor settings separately via smart computer. 1. Switching to Sensor Direct Mode 2. Pairing a smart computer with a sensor 3.
- Page 83 These functions will become available through updates to the Padrone Smart+ firmware and the Cateye Cycling™ app. It is recommended that users update to the most recent version of Cateye Cycling™ and Padrone Smart+ firmware whenever possible. * Areas relevant to the above are described with the mark.
-
Page 84: Sensor Direct Mode
Usage Instructions Functions and details displayed in Mirror Mode and Sensor Direct Mode The following functions can be used in Mirror Mode and Sensor Direct Mode. - Page 85 *1 Heart rate, cadence, and power measurements require pairing with each sensor. *2 Requires separate left and right power sensors. *3 Requires a smartphone with a built-in pressure sensor.
- Page 86 (speed, cadence, heart rate, and power). The Bluetooth word mark and logos are owned by the Bluetooth SIG, Inc. and any use of such marks by CATEYE Co., Ltd. is under license. Other trademarks and trade names are those of their respective owners.
- Page 87 Usage Instructions What is Sensor Direct Mode? Smart computer screen The screen segments and display functions to be displayed on the measurement screen can be assigned through screen customization. The following explains about customizable display, using the default screen as an example. Measurement screen * To customize the screen, tap (MENU) >...
- Page 88 Measurement screen Displays various measurement data. • Speed/cadence/heart rate flash: If using a CATEYE sensor, the values related to the sensor's battery replacement period start flashing to indicate that it is time to replace the battery. Battery replacement : Optional sensors •...
-
Page 89: Start Measurement
Usage Instructions Start measurement This section explains the measurement flow and the measurement functions. 1. Switching to Sensor Direct Mode 2. Starting/stopping measurement 3. Saving measurement data (reset operation) 4. Importing summary data ! Functions during measurement Switching measurement data display Power-saving mode Button lock function If you have power sensors... -
Page 90: Saving Measurement Data
1. Switching to Sensor Direct Mode Switch from Mirror Mode to Sensor Direct Mode. Smartphone 1. Close Cateye Cycling™ or from (MENU), turn off [Connect]. Smart computer 2. From the smartphone search screen, press MODE for 1 second to switch to Sensor Direct Mode. - Page 91 (reset operation) 4. Importing summary data !Functions during measurement Switching measurement data display Power-saving mode Button lock function If you have power sensors...
- Page 92 Start measurement 1. Switching to Sensor Direct Mode 2. Starting/stopping measurement Smart computer Measurement starts automatically when the bicycle moves. During measurement the measurement unit flashes. * The pause function is not available in Sensor Direct Mode. 3. Saving measurement data (reset operation) 4.
- Page 93 Start measurement 1. Switching to Sensor Direct Mode 2. Starting/stopping measurement 3. Finishing measurement (reset operation) Smart computer Reset Pressing and holding MODE when on the measurement screen generates measurement data as summary results and resets measurement data to 0. * When MODE has been pressed for 1 second, a smartphone search screen appears, but you should continue to hold down the button.
- Page 94 You cannot import data for which measurement has not finished. Saving measurement data (reset operation) Smartphone 1. Launch Cateye Cycling™, and from (MENU) turn on [Connect]. Smart computer 2. On the measurement screen, press MODE for 1 second to display the smartphone search screen and connect with your smartphone.
- Page 95 * The appearance of the smart computer screen depends on the state of Cateye Cycling™. * It is not possible to import data while measuring with Cateye Cycling™. Smartphone 3. Tap (MENU) and then [Activity List]. If there is summary data in smart computer, the (Import from CC) is displayed.
- Page 96 Start measurement Switching measurement data display Smart computer Pressing MODE switches the measurement data displayed at the bottom of the screen. * The data displayed changes depending on the state of the sensor connection and the screen customization settings. The following gives an example of initial configuration of the measurement screen.
- Page 97 * During initial configuration, screens 3 through 5 are undefined and thus not shown. To add screens or to change screen segments or measurement data, tap (MENU) > [Device] > [Smart computer name] > [Display Customization]. Changing the measurement screen * Measurement data and lap-related data that require use of the smartphone's GPS will not be displayed in Sensor Direct Mode.
-
Page 98: Power Saving Mode
Start measurement Switching measurement data display Power-saving mode Smart computer If there is no sensor signal nor button operation for 10 minutes, the power-saving screen is activated. If such a state continues for a further hour, the sleep display is activated. The power-saving screen returns to the measurement screen when the bicycle starts moving. - Page 99 Start measurement Switching measurement data display Power-saving mode Button lock function Smart computer Pressing SS/LAP and OPTION simultaneously will lock the buttons, preventing accidental operation when the smart computer is stored in a pocket, etc. Repeating the same operation will unlock the buttons. Lock/unlock buttons Button lock...
- Page 100 Device * To increase precision, it is recommended to perform calibration before power measurement. Perform calibration using Cateye Cycling™, making sure to first connect a smartphone. 1. Connecting smart computer and smartphone 2. Power sensor calibration...
-
Page 101: Activity List
Usage Instructions All activity summary It is possible to check total values for all activities saved in Cateye Cycling™ and maximum values for individual trips. Smartphone 1. Tap (MENU) and then [All Activity Summaryl]. Activity list Uploading... - Page 102 Usage Instructions All activity summary Activity list It is possible to check individual activities (trip data and summary data collectively) saved in Cateye Cycling™. Smartphone 1. Tap (MENU) and then [Activity List]. * The Activity List can be displayed in graph, list, or calendar format.
- Page 103 Usage Instructions All activity summary Activity list Uploading Multiple activities can be uploaded to service sites in one action. Smartphone 1. Tap (MENU) and then [Upload]. * Activities already uploaded to service sites are not displayed. 2. Select the activities you want to upload and tap (Upload) to upload them to the specified sites.
- Page 104 Usage Instructions General This section explains how to configure various measurement settings. Smartphone 1. Tap (MENU) and then [General]. • Recording Interval Selects the interval at which the log is recorded. • Units Selects the measurement unit. Important If the unit is changed with the smart computer unconnected, the settings will be applied the next time the smart computer is connected.
- Page 105 Usage Instructions General Device The following section explains how to pair a smart computer with a sensor and how to configure various settings. Important • Device settings are shared when smart computer is connected to your smartphone. • When using an iPhone, you cannot sync settings of commercial sensors. When measuring in Sensor Direct Mode, it is necessary to configure sensor settings separately via smart computer.
- Page 106 Updates the smart computer firmware to the most recent version. Changing sensor settings Important These settings can be configured even when your smartphone is not connected to smart computer. If settings differ between devices, they will be overwritten with data from Cateye...
- Page 107 Cycling™ the next time the devices are connected. * Information on commercial sensors paired with the smart computer remains as it is. • Nickname Changes the name of the sensor. • Tire Circumference (only with a sensor capable of speed measurement) Set the tire circumference for a sensor capable of speed measurement.
- Page 108 Notifications from smartphone applications and the smartphone’s remaining battery can be displayed on the smart computer. Important • Cateye Cycling notification settings are applied to applications enabled in the smartphone's notification settings. • Email notifications are shown for e-mail accounts registered in the smartphone settings.
- Page 109 1. Tap [Notification Setting]. • Low Battery Notification When the smartphone battery reaches a specified amount, (remaining smartphone battery) flashes on the smart computer. • Phone / Messages / Email / Social Network When a notification arrives, [Application name] and [Contact name] (alphabetical), or [Phone number] or [Email address] flashes on the smart computer’s screen, with an audible alarm.
- Page 110 Device Designating a goal The following explains how to designate a goal in simple navigation. Smartphone (MENU) > [Device] > [Smart computer name], and then follow the procedure below. 1. Tap [Simple Navigation]. Under [Simple Navigation], there are four methods for designating a goal. •...
- Page 111 Device Changing the measurement screen This section explains how to change the display of the measurement screen. Smartphone (MENU) > [Device] > [Smart computer name], and then follow the procedure below. 1. Tap [Display Customization]. Here, you can verify the current screen segments and functions (measurement data). •...
- Page 112 • Selecting a function (measurement data): Tap [Function Names] or to select a function. • Reordering functions: Tap [Edit] and swipe the desired function to another location to change the display position. * Screen customization settings will be applied to both Mirror Mode and Sensor Direct Mode.
- Page 113 * You must have an account with the relevant site to upload data. Service sites ・ CATEYE Atlas™ ・ STRAVA™ ・ TRAINING PEAKS™ ・ Facebook™ ・ Twitter™ * When using an SNS, links to activities uploaded to Cateye Atlas™ are posted.
-
Page 114: Battery Replacement
Speed (cadence) sensor (ISC-12) Important If using a CATEYE sensor, the values related to the sensor's battery replacement period start flashing to indicate that it is time to replace the battery. If smart computer's current speed or cadence display starts flashing, it is time to replace the battery. - Page 115 Heart rate sensor (HR-12) Important If using a CATEYE sensor, the values related to the sensor's battery replacement period start flashing to indicate that it is time to replace the battery. If smart computer's heart rate display starts flashing, it is time to replace the battery.
-
Page 116: Activating The Sensor
Activating the sensor Activate the sensor via the following method: • Speed sensor / Speed (cadence) sensor (ISC) / Cadence sensor Move the magnet through the sensor zone several times. (Within 3 mm) Sensor zone Magnet • Heart rate sensor Rub both electrode pads with thumbs to transmit heart rate signal. - Page 117 Determining tire circumference Determine tire circumference (L) by referring to the tire size chart or by measuring the actual circumference of your bicycle tire. Tire circumference reference table * The tire size or ETRTO code is indicated on the side of the tire.
- Page 118 Measure actual tire circumference With tire air pressure adjusted appropriately, apply a load to the bicycle. Using the valve, etc., as a marker, rotate the tire once and measure the distance traveled along the ground. When using front When using rear wheel for speed wheel for speed measurement...
- Page 119 Smartphone search Measurement screen standby * If the connection is made when Cateye Cycling™ is already measuring, [PAUSE] and measured values are displayed. * The appearance of the smart computer screen depends on the state of Cateye Cycling™. Smartphone connection is now complete.
- Page 120 Power sensor calibration When the power sensor is used continuously, slight variation may occur in its unloaded state. Correct this by calibrating it periodically. When making a particularly important measurement, it is recommended that you calibrate the sensor in advance. Caution •...
- Page 121 [Device]. Tap [Pair to Device] to start pairing. When Cateye Cycling™ detects a smart computer, the smart computer's name will be displayed on the screen, and pairing will be complete. * To continue, tap [Smart computer name] to display the settings configuration screen for the various smart computer settings.
- Page 122 Tap [Pair]. The synchronized sensor is displayed on the [Device] screen and pairing is completed. * When pairing a sensor with Cateye Cycling™, an "A" is displayed after the sensor name. * If you have paired a sensor capable of speed measurement, proceed to step 3.
- Page 123 * Requires to set tire circumference for each sensor. * You can also change sensor names and cancel pairing from this screen. Sensor pairing is now complete. * If you want to pair another sensor, repeat the same procedure again. Important Cadence, heart rate, and power data will not be displayed under the initial configuration.
- Page 124 Switching to Sensor Direct Mode Switch from Mirror Mode to Sensor Direct Mode. Smartphone 1. Close Cateye Cycling™ or from (MENU), turn off [Connect]. Smart computer 2. From the smartphone search screen, press MODE for 1 second to switch to Sensor Direct Mode.
- Page 125 Switching to Sensor Direct Mode Pairing a smart computer with a sensor Pair a sensor that you want to use with smart computer. Important • Pairing (sensor ID synchronization) must be performed in order to use a sensor. • Do not pair sensors at a race venue or in similar locations where there are a lot of other users.
- Page 126 • HR : Heart rate sensor • PW : Power sensor * When pairing a sensor with a smart computer, a "C" is displayed after the sensor name. Important When the smart computer displays [ID FULL] on the screen and returns to the sensor pairing screen, the maximum number of sensors have been paired.
- Page 127 Switching to Sensor Direct Mode Pairing a smart computer with a sensor Tire circumference setting Set the tire circumference for a sensor capable of speed measurement. Important • Pairing (sensor ID synchronization) must be performed first. Pairing a smart computer with a sensor •...
- Page 128 Move to next digit (1 second) * Sensors that can be selected are those that have been paired with Cateye Cycling™ or a smart computer. The letter that appears after the sensor name indicates how the sensor was paired. • A : Sensor paired with Cateye Cycling™...
- Page 129 Mounting the speed (cadence) sensor (ISC-12) The speed (cadence) sensor can be mounted either on the top or bottom of the chain stay. Caution If the speed (cadence) sensor is mounted on the bottom of the chain stay rather than on the top, the adjustment range between the sensor and the magnet will be narrower.
- Page 130 (1) Loosen the sensor screw using a Phillips screwdriver and check that the sensor arm moves. Sensor screw Sensor arm (2) Attach the sensor rubber pad to the sensor. Sensor rubber pad (3) Refer to the illustration and temporarily attach the sensor to the left chain stay with nylon ties.
- Page 131 (1) Using a nylon tie, temporarily attach the cadence magnet to the inside of the left crank arm so that it faces the cadence sensor zone. (2) Rotate the sensor arm and temporarily attach the wheel magnet to a spoke facing the speed sensor zone.
- Page 132 Wearing the heart rate sensor (HR-12) Heart rate measurement is performed by wearing a heart rate sensor around the chest. Before wearing the heart rate sensor Warning Never use this device if you use a pacemaker. • To eliminate measurement errors, it is recommended to moisten the electrode pads with water or apply electrolyte cream to the pads.
- Page 133 Hook Back side Electrode pads * Wear the heart rate sensor so that TOP faces up. * Ensure that the electrode pads are in close contact with your body. * If you have dry skin or are wearing the sensor over a shirt, measurement errors may result.
- Page 134 What does "completing measurement" mean? • "Completing measurement" refers to saving and uploading a trip or a series of trips from the save & upload screen in Cateye Cycling™. You can do this by tapping (Flag) on the trips screen in Cateye Cycling™.
- Page 135 Data cannot be uploaded Why can't I upload activities to a service site? • Have you completed login settings for each service site? From Cateye Cycling™, tap (MENU) > [Account], and then complete login settings by entering account information for each site.
- Page 136 Heart rate, cadence, and power data will not be displayed under the initial configuration of the measurement screen. On Cateye Cycling™, tap (MENU) > [Device] > [PADRONE SMART+] > [Display Customization] to change the measurement screen so that measured values from paired sensors can be displayed.
- Page 137 MEMORY FULL is displayed on the screen The smart computer's memory is full. If you are using the smart computer linked to a smartphone, connect to Cateye Cycling™ and import summary data. This will clear the memory and the message will disappear.
- Page 138 Frequently Asked Questions Abnormal display : Altitude Why is there variation in measurement values for ascending altitude? As altitude measurement relies on the smartphone's GPS function, it may be different from the actual altitude.
- Page 139 Simple navigation cannot be displayed Did you press and hold the OPTION on the back of the smart computer? • After specifying the destination using Cateye Cycling™, press and hold the OPTION on the smart computer to display the simple navigation function.
- Page 140 Frequently Asked Questions Abnormal display : Heart rate Why are heart rate readings still displayed even after I take off the sensor? When using a sensor made by another company, heart rate may continue to be displayed for a long time after the sensor has been removed. Heart rate display is unstable.
- Page 141 Abnormal display : Power Power display is not accurate. How can I fix it? Calibrate the power sensor. Power sensor calibration * Calibrate using Cateye Cycling™. In Sensor Direct Mode, connect to a smartphone and perform calibration. Connecting smart computer and smartphone...
- Page 142 Cateye Cycling™. Have you paired your smartphone with smart computer? • If you do not pair smart computer via Cateye Cycling™, smart computer cannot perform Mirror Mode measurement. Pairing with smart computer s [Connect] set to [ON] in the Cateye Cycling™...
- Page 143 (This is because the speed signal from the sensor has priority over GPS when measuring speed.) Why is the sensor signal not being received? Have you paired the sensor? • You must pair smart computer with your smartphone via Cateye Cycling™. Pairing with a sensor...
- Page 144 Press the reset button on the sensor. If this does not resolve the issue, restart your smartphone. If you cannot reconnect to the smart computer Cateye Cycling™ may have terminated abnormally. • Start Cateye Cycling™. If this does not resolve the issue, try the procedure below: •...
- Page 145 Confirm (1 second) The smart computer will restart and switch to the smartphone search screen. The smart computer shows a blank screen after leaving the bike and then coming back to it When the smartphone moves away from the bicycle even for a short time, the smart computer may automatically enter sleep mode and show a blank screen.
- Page 146 Smartphone search screen Why is the sensor signal not being received? Is [Connect] set to [ON] in the Cateye Cycling™ menu on your smartphone? • Set [Connect] to [OFF] or close Cateye Cycling™. Have you paired the sensor? • The sensor must be paired with smart computer.
- Page 147 Mounting the speed (cadence) sensor (ISC-12) Smart computer operation is abnormal. What should I do? The following procedure explains how to restart the smart computer. 1. Press the AC button on the smart computer. The initialization screen is displayed. 2. Press MODE once to cause [RESTART] to blink, and then press MODE for 1 second.
- Page 148 Cannot measure heart rate Why isn't the [H] icon flashing? Have you paired the sensor? • The sensor must be paired with Cateye Cycling™ or with smart computer. Pairing with a sensor The electrode pad may have slipped out of position.
- Page 149 Cannot measure power Why isn't the [P] icon flashing? Have you paired the sensor? • The sensor must be paired with Cateye Cycling™ or with smart computer. Pairing with a sensor The power sensor may not be attached correctly. • Refer to the power sensor instruction manual and attach the power sensor correctly.
- Page 150 • The LCD screen may be distorted when viewed through sunglasses with polarized lens. Cateye Cycling™ Smart computer can be used with the Cateye Cycling™ smartphone app for measurement and settings. Downloading and using applications involves communication charges. It is therefore recommended to use Wi-Fi.
- Page 151 Optional accessories The Bluetooth word mark and logos are owned by the Bluetooth SIG, Inc. and any use of such marks by CATEYE Co., Ltd. is under license. Other trademarks and trade names are those of their respective owners. 160 3970...
- Page 152 If the product fails to work due to normal use, CatEye will repair or replace the defect at no charge. Service must be performed by CatEye or an authorized retailer. To return the product, pack it carefully and enclose the warranty certificate (proof of purchase) with instruction for repair.
- Page 153 2-8-25, Kuwazu, Higashi Sumiyoshi-ku, Osaka 546-0041 Japan Attn: CATEYE Customer Service Section Phone : (06)6719-6863 Fax : (06)6719-6033 E-mail : support@cateye.co.jp URL : http://www.cateye.com [For US Customers] CATEYE AMERICA, INC. 2825 Wilderness Place Suite 1200, Boulder CO 80301-5494 USA Phone : 303.443.4595 Toll Free : 800.5.CATEYE...
- Page 154 Legal Notices Changes or modifications not expressly approved by the party responsible for compliance could void the user’s authority to operate the equipment. NOTE: This equipment has been tested and found to comply with the limits for a Class B digital device, pursuant to part 15 of the FCC Rules.
Need help?
Do you have a question about the Padrone Smart + CC-SC100B and is the answer not in the manual?
Questions and answers