
Subscribe to Our Youtube Channel
Related Manuals for Logik LBMULX11


Summary of Contents for Logik LBMULX11
- Page 1 Built-in Electric Oven Instruction / Installation Manual LBMULX11 LBMULX11_IB_final110520.indd 1 20/05/2011 4:46 PM...
- Page 2 LBMULX11_IB_final110520.indd 2 20/05/2011 4:46 PM...
-
Page 3: Table Of Contents
Contents Unpacking ............................. 4 Product Overview ......................... 5 Front View ...................................5 Control Panel ................................5 First Time Use of the Oven ......................6 Using the Controls ........................6 Oven On and Off ........................... 6 Setting the Clock .......................... 6 Settings of the Function Control ....................7 Manual Mode .......................... -
Page 4: Unpacking
Thank you on the purchase of your new Logik Built-in Electric Oven. We recommend that you spend some time to read this manual in order to fully understand how to install and operate it correctly. This oven must be installed by a competent person if in doubt contact a qualified electrician. -
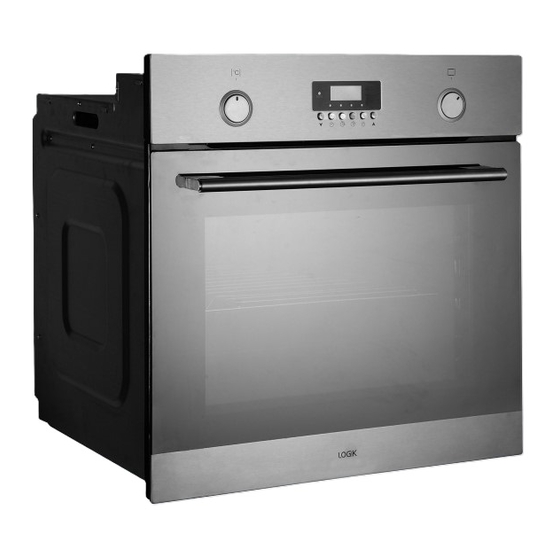
Page 5: Product Overview
Product Overview Front View ˚C Control Panel Oven Door Handle Oven Door Control Panel ˚C Temperature Control Programming Cooking Time Button Power Indicator Programming Delay Cooking Time Button Display Panel Manual Button Button Indicators 10. Increase Button Decrease Button 11. Function Control Clock Button LBMULX11_IB_final110520.indd 5 20/05/2011 4:46 PM... -
Page 6: First Time Use Of The Oven
First Time Use of the Oven Unpack the oven. Remove any insert cards or plastic bags. Use a damp cloth to carefully wipe the interior and exterior of the oven. Clean all the detachable parts in hot, soapy water before using. Heat the oven on maximum for 30mins. -
Page 7: Settings Of The Function Control
Settings of the Function Control This control used to select the available cooking functions, which are: Symbol Function Description Oven lighting Setting the Function Control to this position will switch on the top fan and the internal light. (During cooking the interior light will automatically turn on.) Fan and Light only Function Control... -
Page 8: Manual Mode
Manual Mode Turn the Function Control to select the heating mode. Set the Temperature Control to the required temperature, • First preheat the oven for approximately 10 mins, • Then put the tray with food into the oven. Press the Manual button to start the oven. The blue lamp above the button will illuminate and the power indicator will flash. -
Page 9: Use Of Oven
Use of Oven To save energy and to help protect the environment, we recommend these hints: • Use the oven efficiently, by cooking multiple trays of food at the same time. • Cook 2 trays of scones, small cakes or sausage rolls at the same time. • Select the correct shelf location for food being cooked. -
Page 10: Programming Your Cooking
Programming Your Cooking Select a cooking mode and temperature before programming. (refer to the "Manual Mode" section on pages 7-8). You do not need to press the Manual button when programming your cooking. Follow the procedure below. Programming Cooking Time You can use this function to set the cooking time. -
Page 11: Cleaning And Maintenance
Cleaning and Maintenance By ensuring proper cleaning and maintenance of your cooker you can have a significant influence on the continuing fault-free operation of your appliance. Before you start cleaning, the cooker must be switched off and isolated from the mains supply and you should ensure that all controls are set to the “0”... -
Page 12: Door Removal
Door Removal In order to obtain easier access to the oven chamber for cleaning , it is possible to remove the door. Follow the steps below to remove the door. Open the door completely. The swivel retainers of the right hand and left hand hinges are hooked onto the metal bar above them. -
Page 13: Specification
Specification Model LBMULX11 Voltage Rating 230V–240V ~ 50Hz Power Rating 2200 – 2450 W Cooker Dimensions H/W/D 595(W) x 575(D) x 595(H) (in mm) Usable Capacity Of The Oven 56 litres Energy Rating Weight Approx. 32kg Features and Specification are subject to change without prior notice. - Page 14 The mains connection for this product must have an all pole disconnection provided in the fixed wiring in accordance with the local wiring regulations. To avoid any potential hazard, you must follow these instructions when you install your appliance. • The kitchen area should be dry and aired and equipped with sufficient ventilation.
-
Page 15: Electrical Connection
Electrical Connection Fitting Guidelines The oven is manufactured to work with single-phase alternating current (230V – 240V/50Hz). The connection diagram is also found next to the cover of the connection box. • All electrical work should be carried out by a suitably qualified and authorised electrician. -
Page 16: Safety Warnings
Safety Warnings Installation General Warnings • The appliance must be installed by a competent • If the mains power cable is damaged, it must be person or a qualified electrician in compliance with replaced by the manufacturer, its service agent the instructions provided. - Page 17 • Accessible parts will also become hot when in use. • To avoid burns and scalds children should be kept away. Oven • During use the appliance becomes hot. Care should be taken to avoid touching the hot surfaces inside the oven. • Switch the appliance off before removing the oven lamp protective cover for lamp replacement.
- Page 18 There are separate collection systems for recycling in the EU. For more information, please contact the local authority or your retailer where you purchased the product. DSG Retail Ltd. • Maylands Avenue • Hemel Hempstead Herts • HP2 7TG • England (P.N.: LBMULX11-001) LBMULX11_IB_final110520.indd 18 20/05/2011 4:47 PM...
- Page 19 LBMULX11_IB_final110520.indd 19 20/05/2011 4:47 PM...
- Page 20 LBMULX11_IB_final110520.indd 20 20/05/2011 4:47 PM...
Need help?
Do you have a question about the LBMULX11 and is the answer not in the manual?
Questions and answers