Table of Contents
Advertisement
Advertisement
Table of Contents

Related Manuals for Logik LBPCKX12


Summary of Contents for Logik LBPCKX12
- Page 1 Electric Fan Assisted Oven Instruction / Installation Manual LBPCKX12...
-
Page 3: Table Of Contents
Contents Unpacking ............................. 4 Product Overview ......................... 5 Front View ...................................5 Control Panel ................................5 First Time Use of the Oven ......................6 Function Selector Control ......................6 Thermostat Control ........................6 Timer Control ..........................7 Using the Oven ..........................7 Replacing the Anti-tilting Oven Shelf .................. -
Page 4: Unpacking
Thank you for purchasing your new Logik Electric Fan Assisted Oven. You must read this manual in order to fully understand how to install and operate it correctly. Read all the safety warnings carefully before use and keep this manual for future reference. -
Page 5: Product Overview
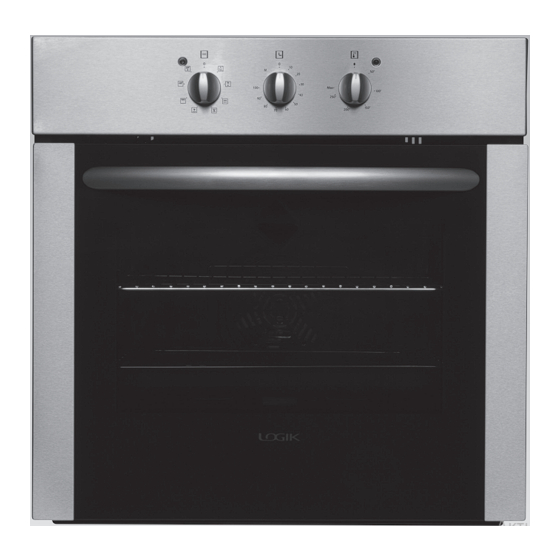
Product Overview Front View °C 50° 100° 250° 150° 200° Control Panel Shelf guide slots Control Panel °C 50° 100° 250° 150° 200° Function Selector Control Oven Indicator Lamp Timer Control Thermostat Lamp Thermostat Control * All images are for indication only; please refer to your individual unit for actual item. -
Page 6: First Time Use Of The Oven
First Time Use of the Oven Unpack the oven. Remove any insert cards or plastic bags. Use a damp cloth to carefully wipe the inner cavity wall and housing. Clean all the detachable parts in hot, soapy water before using. Heat the oven on maximum for 45 minutes. -
Page 7: Timer Control
Timer Control The timer can be set from 0-100min for timer operation or set to "M" for manual operation. (Please refer to the section "Using the Timer Control" for details.) 250° Using the Oven • Under no circumstances should the oven be lined with aluminium foil as overheating may occur. • Do not place dishes or baking trays directly onto the base of the oven as it becomes very hot and damage may occur. -
Page 8: Replacing The Anti-Tilting Oven Shelf
Replacing the Anti-tilting Oven Shelf • Insert the shelf at an angle with the vertical section to the rear to clear the stops at either side of the guide slot. Once past this stop the shelf can be placed level again. • To remove, completely angle the shelf upward so the shelf stop is cleared from the guide stop. -
Page 9: Using The Timer Control
Using the Timer Control Manual Operation To use the oven without the timer set you must turn the control counter clockwise to the "M" position, the oven can be operated continuously. The oven will not operate with the timer control in the "0" position. The timer will not be active and the oven will not automatically switch off. -
Page 10: Cleaning Tips
Cleaning Tips Ensure that the appliance is switched off and isolated before cleaning the oven to avoid the possibility of electric shock. Allow the oven to fully cool before cleaning. Remove the wire shelves, wash them separately in hot soapy water and dry thoroughly. -
Page 11: Replacing The Oven Lamp
Replacing the Oven Lamp Ensure that the appliance is switched off before replacing the light to avoid the possibility of electric shock. Turn off the oven and make sure that it is cold. Switch off its isolation switch. After removing the cover in front of the light, take out the bulb by turning anti-clockwise. -
Page 12: Taking Out The Glass From The Oven Door For Cleaning
Slightly close the door and lift. The notch on the bottom of the hinge will disengage. Now pull the door forward off the oven. Releasing both hinge sections from the slots. To replace the door, repeat the above steps on reverse order. Ensure to locate the hinge correctly, place the groove of the hinge directly on the edge of the door frame. -
Page 13: Specifications
Specifications Model LBPCKX12 (Oven) Rated Voltage 230 – 240 V Rated Frequency 50 Hz Power 2600 – 2800 W Current 11 – 12 A Bulb Specifications 230V~ 50Hz, 25W, E14 Top Element 1200 W Bottom Element 1100 W Grill 1400/2600 W Net Weight 30.2 kg... -
Page 14: Installation
Installation • The electrical connection of this oven should be carried out by a qualified electrician. Following the instructions in the installation section of this manual and in compliance with the current regulations. • The oven is intended for household use only. • This oven must be installed in compliance with local safety regulations. -
Page 15: Installing The Built-In Oven
Installing the Built-in Oven The space where the oven will be placed needs to be at least 60cm wide, 58cm deep and 59.5cm high. A minimum gap of 2.5cm between the work surface and the control panel, and a distance of 5cm between the work surface and top of the oven is needed, in order to be able to get to the back of the oven if necessary and for easy access when sliding the oven out. -
Page 16: Making An Electrical Connection
Making an Electrical Connection An approved suitable cable must be connected from the Consumer Unit (main fuse box)and be protected by its own 30amp fuse or Micro Circuit Breaker (MCB). The electrician must provide a fused double-pole isolation switch, which disconnects both the line (live) and neutral conductors, with a contact separation of at least 3 mm incorporated into the fixed wiring. -
Page 17: Safety Warnings
Safety Warnings Installation Operation and Maintenance General Warnings • The appliance must be installed only by an authorized person in compliance with the • If the mains cable is damaged, the cord must be instructions provided. Incorrect installation may replaced by a qualified electrician, manufactures cause harm to persons, animals or may damage service agent or similarly qualified persons in order property. - Page 18 Grill • During use this appliance becomes hot. Care should be taken to avoid touching hot surfaces, • Do not cover the grill insert with foil, as fat left e.g. oven door, heating elements. there may catch fire. • To avoid burns and scalds children should be kept • Always keep the grill pan clean as any fat there may away.
- Page 19 If you require a replacement for any of the items listed below, please quote their corresponding part numbers: Replacement Part Part Number Oven Shelf 37015286 Oven Pan 20612977 Grill Pan 20643831 Grill Rack 37006132 Grill Pan Handle 37004739 Fixing Screws 37002841 Visit Partmaster.co.uk today for the easiest way to buy electrical spares and accessories.
Need help?
Do you have a question about the LBPCKX12 and is the answer not in the manual?
Questions and answers