Table of Contents
Advertisement
Advertisement
Table of Contents

Related Manuals for HotSpring HOT SPOT Tempo


Summary of Contents for HotSpring HOT SPOT Tempo
- Page 1 HOT SPOT ® SPAS ® ® ® • SX • TX • Rhythm • Relay Tempo O W N E R ’ S M A N U A L...
- Page 2 Prior to registering, you will need the serial number that is located within the equipment compartment of your HOT SPOT spa. To register please go to http:/www.HotSpring.com/owners/product-registration or simply scan the QR code below: FOR YOUR RECORDS Spa Model/Serial Number:...
-
Page 3: Table Of Contents
TABLE OF CONTENTS SAFETY INFORMATION Audio Menu (Optional) ............ 25 JET MENUS Important Safety Instructions ..........1 TEMPO (Model TEM) ............. 28 Important Spa Instructions ..........3 RELAY (Model REL) ............29 INSTALLATION INSTRUCTIONS RHYTHM (Model RHY ) ..........30 Site Preparation .............. -
Page 4: Safety Information
SAFETY INFORMATION IMPORTANT SAFETY INSTRUCTIONS (Read and follow all instructions) AVOIDING THE RISK TO CHILDREN WARNING: • RISK OF CHILD DROWNING. Extreme caution must be exercised to prevent unauthorized access by children. To avoid accidents, ensure that children cannot use a spa unless they are supervised at all times. •... -
Page 5: Unclean Water
DANGER: RISK OF ELECTRICAL SHOCK • Install at least 5 feet (1.5 m) from all metal surfaces. A spa may be installed within 5 feet (1.5m) of a metal surface if each metal surface is permanently connected by a minimum No. 8AWG (8.4mm²) solid copper conductor attached to the wire ground connector on the terminal box that is provided for this purpose if in accordance with National Electrical Code ANSI/NMFPA70-1993. -
Page 6: Important Spa Instructions
WARNING: The use of alcohol, drugs, or medication can greatly increase the risk of fatal hyperthermia in hot tubs and spas. TO REDUCE THE RISK OF INJURY: • The water in the spa should never exceed 104°F (40°C) . Water temperatures between 100°F (38°C) and 104°F (40°C ) are considered safe for a healthy adult. -
Page 7: Installation Instructions
INSTALLATION INSTRUCTIONS SITE PREPARATION You probably have a spot picked out for your new spa, whether it’s indoors or outdoors, on a patio or on a deck. Just make sure you check the following: • Always put your spa on a structurally sound, level surface. A filled spa can weigh a great deal. Make certain that the location you choose can support the weight of your filled spa. -
Page 8: Spa Leveling Preparation
SPA LEVELING PREPARATION Concrete sloped at ½ inch (1.3 cm) per 10 feet (305 cm) is preferred so that rain water and water spillover will run off and not puddle underneath the spa (water under the spa for long periods of time may cause the wood to deteriorate). Other options are brick, stepping stone, or blocks. It is important to note that soft surfaces, even when stepping stones are used to evenly distribute the weight of the spa, will have a tendency to settle, thus resulting in an unleveled spa. -
Page 9: Volt 30 Amp Conversion (Sx & Tx Models)
ELECTRICAL REQUIREMENTS AND PRECAUTIONS Your HOT SPOT spa has been carefully designed to give you maximum safety against electrical shock. Connecting the spa to an improperly wired circuit will negate many of the spa’s safety features. Improper wiring may also cause electrocution, risk of fire, and other risks of injuries. Please read and follow the electrical installation requirements and instructions for your spa completely! 115 VOLT 30 AMP CONVERSION (SX &... -
Page 10: Volt Wiring Conversion 50 Amp (Sx & Tx Models)
5. Inside the control panel, locate the terminal block (TB-1). 6. Remove existing power cord. 7. Connect the #10 AWG, BLACK wire from the sub-panel 30 amp GFCI breaker [terminal L1] to TB-1 terminal L1. 8. Connect the #10 AWG, WHITE wire from the sub-panel 30 amp GFCI breaker [terminal N, load neutral] to TB-1 terminal N. 9. - Page 11 50 AMP SUB-PANEL WIRING INSTRUCTIONS (SX & TX MODELS) NOTE: The sub-panel must be placed within 100 feet (30.5m) of the main electrical service panel, and between 5 and 50 feet (1.5 and 15 meters) away from the spa. Refer to the wiring diagram above. 1.
-
Page 12: Volt Wiring Instructions (Tempo ® , Relay ® & Rhythm ® Models)
230 VOLT SUBPANEL WIRING INSTRUCTIONS EMPO ELAY & HYTHM NOTE: The subpanel must be placed within 100 feet (30.5m) of the main electrical service panel, and between 5 (1.5 m) and 50 feet (15 m) away from the spa. All electrical connections must be made in accordance with the wiring information contained in this manual and on the back of the field wiring access panel of the control box. -
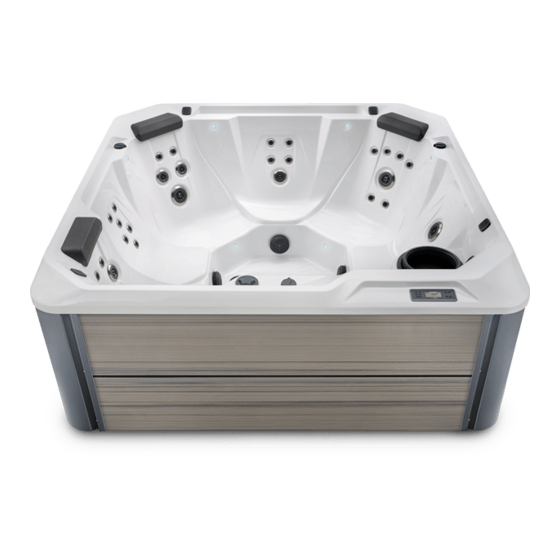
Page 13: Spa Specifications & Illustration
SPA SPECIFICATIONS & ILLUSTRATION TEMPO (MODEL TEM) HORIZONTAL DIMENSIONS: ... . . 89” (226 cm.) square HEIGHT (without cover): ....39” (99 cm.) EFFECTIVE FILTER AREA: . -
Page 14: Relay (Model Rel)
RELAY (MODEL REL) HORIZONTAL DIMENSIONS: ... . . 84” (213 cm.) square HEIGHT (without cover): ....36.75” (93 cm.) EFFECTIVE FILTER AREA: . -
Page 15: Rhythm (Model Rhy)
RHYTHM (MODEL RHY) HORIZONTAL DIMENSIONS: ... . . 84” (213 cm.) square HEIGHT (without cover): ....36.75” (93 cm.) EFFECTIVE FILTER AREA: . -
Page 16: Sx (Model Sx)
SX (MODEL SX) HORIZONTAL DIMENSIONS: ... . . 72” (183cm.) square HEIGHT (without cover): ....33” (83.8 cm.) EFFECTIVE FILTER AREA: . -
Page 17: Tx (Model Tx)
TX (MODEL TX) HORIZONTAL DIMENSIONS: ... . . 68.5" x 68.5" (174 cm x 174 cm) HEIGHT (without cover): ....29” (74 cm.) EFFECTIVE FILTER AREA: . -
Page 18: Operating Instructions
OPERATING INSTRUCTIONS START-UP AND REFILL PROCEDURES Your HOT SPOT spa has been thoroughly tested during the manufacturing process to ensure reliability and long-term customer satisfaction. A small amount of water may have remained in the plumbing after testing and, as a result, may have spotted the spa shell or the spa siding prior to delivery. -
Page 19: Heating And Hydromassage Systems
OPERATION NOTES: 1. Your spa is equipped with a ten-minute timer delay on the heating/maintenance mode. Whenever the jet pump has been turned off (a demand for heat has occurred) or the temperature control has been turned up, it will take ten minutes before the low speed of the jet pump and heater become activated. -
Page 20: Safety Equipment
SAFETY EQUIPMENT A. GFCI: The Ground Fault Circuit Interrupter, located on the end of the power cord (115 Volt models only), is a safety device that is designed to sense as little as 5 milliamps of electrical current leakage to ground. It is very important to protect a GFCI from rain and other moisture. Watkins Manufacturing Corporation recommends that the GFCI be tested before each use to ensure it is functioning correctly. -
Page 21: System Mode
POWER READY POWER To decrease the set temperature, press the (-) button, once for each degree of decreased temperature desired. If you hold the (-) button down, the set temperature will decrease by one degree every half second. JET PUMP CONTROL Pressing the JET button for the TEMPO, RELAY &... - Page 22 TEMPERATURE LOCK The TEMPERATURE LOCK feature deactivates the temperature control function of the control panel. TEMPERATURE LOCK is most often used by people who do not want others to tamper with or change the set temperature of the spa water. TEMPERATURE LOCK is a submenu of the TOOLS menu To activate the TEMPERATURE LOCK, press the MODE (...
-
Page 23: Audio Menu (Optional)
FILTER CYCLES When the spa is first powered up, the automatic filter cycle will wait 10 minutes before starting. Your spa will automatically turn the first filter cycle on for 60 minutes on low speed. The second filter cycle will activate for 30 minutes, 12 hours later. The filter cycle icon, F1 or F2 will be displayed in the control panel during the filter cycle. - Page 24 Press the (+) b utton to increase volume and the (-) b utton to decrease volume. POWER POWER POWER NOTE: Volume range is from 0-40. No number displayed indicates Volume is OFF. TO PAUSE/PLAY From the AUDIO screen: POWER POWER POWER POWER Press the the (+) ...
-
Page 25: Spa Control Panel Operations For The Sx & Tx Spas Only
POWER POWER POWER TO ADJUST BALANCE POWER From the SETUP screen: POWER POWER Press the (+) b utton to display one of four audio sources, IPOD,TV, AUX, BLUE. Press the MODE () button to display TRE. Press the MODE () button to display BAS. POWER Press the MODE () button to display BAL -5 to +5. -
Page 26: System Mode
READY Pressing the TEMP UP () button displays the spa’s set temperature. To increase the set temperature, press the TEMP UP () button again, once for each degree of increased temperature desired. If you hold the TEMP UP () button down, the set temperature will increase by one degree every half second. -
Page 27: Locking Features
LOCKING FEATURES The two locking features, SPA LOCK and TEMPERATURE LOCK, are enabled from the control panel by pressing the SET button until the TOOLS menu is displayed. Then press the TEMP b utton to enter the TOOLS submenus. Use the SET b utton to scroll through the submenus to get to the locking features. -
Page 28: Audio Menu (Optional)
SLEEP MODE (USED ON ALL MODELS WITHOUT A CIRCULATION PUMP) The Sleep Mode operation is a feature that minimizes pump operation during quiet evening hours. For example, if Filter Cycle 1 (F1) is set to activate at 8:00 a.m., by default, Filter Cycle 2 (F2) will activate at 8:00 p.m. (12 hours later). During 8:00 p.m. to 8:00 a.m., if the spa should call for heat, the pump and heater will activate to heat the spa under normal temperature demand. - Page 29 TO TURN AUDIO SYSTEM ON/OFF From the AUDIO menu: 4. Press the TEMP ▲ button to display POWR -. 5. Press the TEMP ▲ button to display POWR + and turn the audio system ON. Press the TEMP ▼ button to display PWR - and turn the audio system OFF.
- Page 30 TO ADJUST TREBLE From the SETUP menu: Press the TEMP ▲ to display one of four audio sources, IPOD,TV, AUX, BLUE. Press the SET button TEMP ▲ button to display TRE -5 to +5. Press the TEMP ▲ button to raise the Treble or press TEMP▼ button to lower the Treble. TO ADJUST BASS From the SETUP menu: Press the TEMP ▲...
-
Page 31: Jet Menus
TEMPO (MODEL TEM) JET SYSTEM MENU JET PUMP 1 A) 2 Directional PRECISION Jets and 1 Directional Hydromassage Jet B) 2 Directional Hydromassage Jets C) 1 Water Feature D) 6 Directional PRECISION Jets in Lounge (foot Jets) E) 4 Directional PRECISION Jets in Lounge (calf Jets) F) 1 Directional Hydromassage Jet, 2 Rotary Hydromassage Jets and 4 Directional PRECISION Jets... -
Page 32: Relay (Model Rel)
RELAY (MODEL REL) JET SYSTEM MENU JET PUMP 1 A) 2 Directional PRECISION Jets and 1 Directional Hydromassage Jet B) 8 Directional PRECISION Jets C) 2 Directional Hydromassage Jets D) 1 Water feature. E) 3 Directional PRECISION Jets F) 2 Directional PRECISION Jets JET PUMP 2 A) 4 Directional PRECISION Jets (calf Jets) B) 2 Directional Hydromassage Jets,... -
Page 33: Rhythm (Model Rhy )
RHYTHM (MODEL RHY) JET SYSTEM MENU JET PUMP 1 A) 3 Directional PRECISION Jets B) 8 Directional PRECISION Jets C) 6 Directional PRECISION Jets and 1 Directional Hydromassage Jet D) 1 Water feature. E) 4 Directional PRECISION Jets JET PUMP 2 A) 2 Directional Hydromassage Jets B) 2 Directional Hydromassage Jets, 1 Rotary Hydromassage Jet and 2 Directional PRECISION... -
Page 34: Sx (Model Sx)
SX (MODEL SX) JET SYSTEM MENU JET SYSTEM A) 8 Directional PRECISION Jets B) 1 MOTO-MASSAGE Jet C) 2 Directional PRECISION Jets D) 2 Directional Precision Jets Page 31 Jet Menu Page 31... -
Page 35: Tx (Model Tx)
TX (MODEL TX) JET SYSTEM MENU JET SYSTEM A) 8 Directional PRECISION Jets B) 1 MOTO-MASSAGE Jet C) 1 Rotary Hydromassage Jet Page 32 Page 32 Jet Menu... -
Page 36: Water Quality And Maintenance
WATER QUALITY AND MAINTENANCE It’s important to have clean water. Water maintenance is one of the least understood, yet most important areas of spa ownership. Your dealer can guide you through the process of achieving and maintaining perfect water in your spa, given your local conditions. Your program will depend on your water’s mineral content, how often you use your spa, and how many people use it. -
Page 37: Hot Spot Spa Water Maintenance Program
TO ADMINISTER SPA WATER CHEMICALS: 1. Fold back the spa cover. 2. Push the JET button twice to activate the jet pump’s high speed mode. 3. Carefully measure the recommended amount of chemical and slowly pour it into the filter compartment. Use care not to splash chemicals on your hands, in your eyes, on the spa shell surface or on the siding. - Page 38 BALANCING THE PH ADD pH A. The ideal pH level for your spa water is 7.2-7.6. ALKALINE DECREASER SPA WATER B. The pH level is the measure of acidity and alkalinity. Values above 7.6 are alkaline; TO LOWER pH (SCALING ZONE) those below 7.2 are acidic.
-
Page 39: Freshwater Ag+ Silver Ion System
FRESHWATER SILVER ION SYSTEM The Silver ion system is comprised of the following products: • FRESHWATERSodium Dichlor • FRESHWATERMonopersulfate (MPS) • FRESHWATER silver ion purifie Ag + • CLEAN SCREEN Pre-Filter CLEAN SCREEN Pre-Filter is used when filling a spa for the first time, at top off, or at refill. It attaches to a garden hose and filters out rust, dirt, detergents, algae and chemicals. -
Page 40: Hot Spot Water Treatment Guide
HOT SPOT WATER TREATMENT GUIDE At spa startup or refill Follow Start-Up and Refill Procedures section Prior to each use Add one-half (½) teaspoon of chlorine per Add one (1) tablespoon of monopersulfate 250-gallons (950 liters) (MPS)* per 250-gallons (950 liters). (Test before adding any chemicals;... - Page 41 • DO use MPS for spas only, such as HOT SPRING MPS chlorine-free oxidizer. • DO store all chemicals in a tightly sealed container in a cool, dry place. • DON’T use bromine, sodium bromide or biguanides. These are an active sanitizer and will combine with the silver ions to inactivate them. •...
-
Page 42: Ozone (Optional)
FOAM INHIBITORS Spa water requires changing due to the build-up of soap in the water. Typically, soap will cause the spa water to foam when the jets are used. Soap is introduced into the spa water from two sources; users’ bodies, which retain a soap residue after showering, and swimming apparel, which retains soap after washing. -
Page 43: Common Water Chemistry Questions
DO’S AND DON’TS • DO add all chemicals slowly into the filter compartment with the jet pump operating on high speed for ten minutes. • DO use special care if using baking soda to clean either the interior or exterior plastic surfaces. •... -
Page 44: Water Terminology
WATER TERMINOLOGY The following chemical terms are used in this Water Quality and Maintenance section. Understanding their meaning will help you to better understand the water maintenance process. Bromamines: Compounds formed when bromine combines with nitrogen from body oils, urine, perspiration, etc. Unlike chloramines, bromamines have no pungent odor and are effective sanitizers. -
Page 45: Care Of Spa Pillow
FILTER CARTRIDGE REMOVAL AND CLEANING 1. Disconnect the spa from the power supply by turning the power to the spa OFF. 2. Remove any floating items from within the filter compartment. RETAINER HANDLE 3. Turn the filter retainer handle (located on the top of the filter cartridge) counterclockwise until the retainer can be removed from the filter standpipe. -
Page 46: Care Of The Spa Cabinet
To clean and condition the vinyl cover: 1. Remove the cover from the spa and gently lean it against a wall or fence. 2. With a garden hose, spray the cover to loosen and rinse away dirt or debris. 3. Using a large sponge and/or a soft bristle brush, and using a very mild soap solution (1 teaspoon dishwashing liquid with 2 gallons (8 liters) of water) or baking soda (sodium bicarbonate), scrub the vinyl top in a circular motion. -
Page 47: Winterizing Your Spa
PREVENTION OF FREEZING Your spa has been designed and engineered for year-round use in any climate. In some areas, extremely cold temperatures (below 10°F) combined with strong wind, may cause partial freezing of the jet pump, even though the water inside the spa remains at the selected temperature. The energy efficiency of the spa may also decrease during these cold periods, as the heater will cycle more frequently. -
Page 48: Service Information
SERVICE INFORMATION GENERAL INFORMATION Your HOT SPOT spa has been designed to provide years of trouble-free use. As with any appliance, problems may occasionally occur that require the expertise of a qualified service person. Though such simple repairs as resetting a GFCI switch or breaker, high limit thermostat, or pressure switch, or replacing a light bulb may not require a service call, they may indicate that a more serious condition exists. -
Page 49: Acts Invalidating Warranty
ACTS INVALIDATING WARRANTY The limited warranty is void if the HOT SPOT Spa has been subjected to alteration, misuse or abuse, or if any repairs on the spa are attempted by anyone other than an authorized representative of Watkins Manufacturing Corporation. Alteration is defined as any component or plumbing change, electrical conversion, or the addition of any non-approved sanitation, or water purification device, or heating system which contributes to a component failure, unit failure, or unsafe operating condition. - Page 50 GENERAL OPERATION TROUBLESHOOTING GUIDE Problem Probable causes Solutions Entire spa is inoperative. • Power failure / not plugged in • Check power source • GFCI tripped • Reset GFCI; call for service if it will not reset. Spa does not heat; jets and light operate. •...
-
Page 51: Priming The Pumps
PRIMING THE PUMP(S) Upon filling or refilling the spa, if a pump is operating and water is not flowing from any of its jets, the pump may not be properly primed. To correct, refer to the illustration below and perform the following procedures: •... - Page 52 Precision, No-Fault, FreshWater, FreshWater Ag+ , EverFresh, Clean Screen and Vanishing Act are trademarks of Watkins Manufacturing Corporation. BaquaSpa is a trademark of Arch UK Biocides Limited. Brominating Concentrate is a trademark of Bio-Lab Inc. iPod is a trademark of Apple, Inc. Watkins Manufacturing Corporation Vista, California USA hotspring.com 303761.15 B (5/15)
Need help?
Do you have a question about the HOT SPOT Tempo and is the answer not in the manual?
Questions and answers