Cochlear Nucleus CR230 Quick Manual
Hide thumbs
Also See for Nucleus CR230:
- User manual (82 pages) ,
- Quick manual (40 pages) ,
- User manual (36 pages)

Related Manuals for Cochlear Nucleus CR230


Summary of Contents for Cochlear Nucleus CR230
- Page 1 Quick Guide to the Nucleus® CR230 Remote Assistant Getting started Quick reference...
- Page 2 About Use the Cochlear™ Nucleus® CR230 Remote Assistant to control and monitor your Cochlear Nucleus CP910 or CP920 Sound Processor. If you are a bilateral recipient, your remote assistant can control both processors. NOTE: More information and warnings in the...
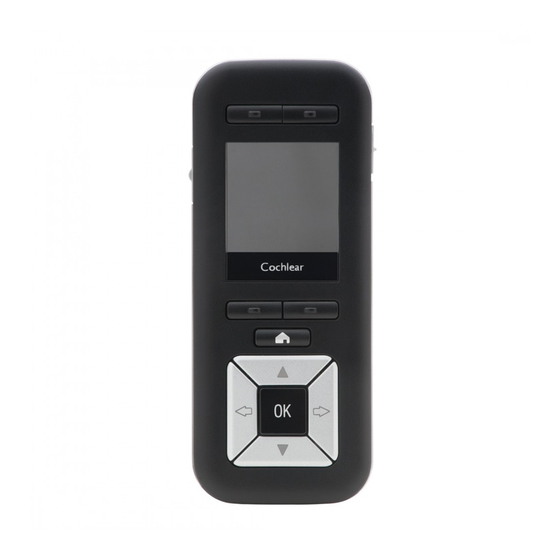
- Page 3 Program button Program button Telecoil button Lock-unlock slider Program button Program button Home button Up/Down buttons (Adjust settings) Left/Right buttons OK button (Navigate) (Select) USB cable socket QUICK GUIDE...
- Page 4 Navigate VOLUME SENSITIVITY SCAN NOTE Your remote assistant may show different Use the left or right screens, depending on arrow buttons to move how it is set up. between screens. nucleus® cR230 Remote AssIstAnt...
- Page 5 Home SCAN VOLUME SENSITIVITY Use the Home button to return to the Home screen. QUICK GUIDE...
-
Page 6: Check Status
Check status Use the sound meter to check whether a processor or accessory is working properly. STATUS SCAN Press Sound meter shows sound being “heard” by processor Processor battery level Green means Press the OK button from everything is the Home screen to display working processor status. - Page 7 Wake Your remote assistant will “go to sleep” when not in SCAN use. Press any button to “wake” it again. QUICK GUIDE...
-
Page 8: Charge Battery
Charge battery There are three options for charging: Use the Cochlear™ Use the Cochlear™ Nucleus® Battery Nucleus® CR200 Charger and the Series Charging Kit. Cochlear™ Nucleus® Battery Charging Kit. nucleus® cR230 Remote AssIstAnt... - Page 9 Use the USB port on a computer. QUICK GUIDE...
- Page 10 Turn on SCAN Press and hold the OK button to turn on. nucleus® cR230 Remote AssIstAnt...
- Page 11 Turn off Cancel Switch Off Reset Settings SCAN SELECT Press and hold Select Switch Off. the OK button. QUICK GUIDE...
-
Page 12: Lock And Unlock
Lock and unlock Lock-unlock slider Slide up to unlock, down to lock. Use the lock-unlock slider to show the battery level of your remote assistant. nucleus® cR230 Remote AssIstAnt... - Page 13 QUICK GUIDE...
-
Page 14: Change Programs
Change programs Up to four programs may be set up by your clinician. Use the program buttons to change between programs. Program button Program button SCAN Program button Program button nucleus® cR230 Remote AssIstAnt... -
Page 15: Adjust Settings
Adjust settings Use the up and down arrow buttons to adjust settings such as volume, sensitivity, bass and treble (as set up by your clinician). VOLUME Adjust volume (or sensitivity, if set up) directly from the home screen by pressing the Up button up or down buttons. -
Page 16: Scan Program
SCAN program SCAN program (if set up by your clinician) detects and automatically adjusts your processor to the current sound environment. SCAN SCAN program selected nucleus® cR230 Remote AssIstAnt... - Page 17 SCAN program icons SCAN program icons show your current sound environment. SCAN On Quiet Noise Speech Speech in noise Wind Music QUICK GUIDE...
-
Page 18: Use Telecoil
Use telecoil Listen to hearing loops and hear voices on the telephone with the telecoil. Your clinician can set up your processor with manual telecoil and also auto telecoil. Auto telecoil detects the telecoil signal automatically whenever you use a telecoil-compatible phone or are in range of a hearing loop. - Page 19 Turn on Telecoil Press the telecoil SCAN Telecoil button once to turn telecoil on. Auto telecoil Auto telecoil Press the telecoil button twice to turn auto telecoil on. QUICK GUIDE...
- Page 20 Telecoil on Telecoil is active on your processor. Auto telecoil on (receiving) Auto telecoil is on and your processor is in range of and detecting a hearing loop or telephone. Auto telecoil on (standby) Auto telecoil is on, but your processor is not detecting a hearing loop or telephone.
- Page 21 Turn off Press the telecoil button once to turn telecoil or SCAN auto telecoil off. QUICK GUIDE...
-
Page 22: Advanced Mode
Advanced mode Your remote assistant is set to Simple mode by default. If required, you can switch to Advanced mode to adjust settings on your processor and remote assistant. To enter Advanced mode: nucleus® cR230 Remote AssIstAnt... - Page 23 Practice Cancel Advanced Switch Off Advanced Mode Turn on Program Reset Settings Numbers SCAN SELECT SELECT Press and hold Press and hold When the menu Press the OK the OK button. the OK button. appears, press the button. down arrow to highlight Advanced Mode.
- Page 24 Adjust advanced settings If required, you can use Advanced mode to adjust advanced settings. To reset settings, see Reset processor on page 28. To adjust advanced settings: NOTE When adjusting settings, press the home button twice if you need to return to the home screen.
- Page 25 TELECOIL MIX SETTINGS SCAN Press to enter Use the right Press the Use the up and arrow button to OK button to down arrow navigate to the enter advanced buttons to Settings screen. settings. adjust settings. QUICK GUIDE...
- Page 26 Pair Pairing allows the remote assistant to communicate with the processor. Usually, your clinician will pair your remote assistant before first use, but there may be NO PROCESSOR PAIRED times when you have to pair it yourself (e.g. if you receive a Hold processor coil to back of remote replacement remote assistant).
- Page 27 NOTE If you are a bilateral user, you will need to repeat steps 1 and 2 for your second processor. PAIR PROCESSOR ? PAIR Place coil on the Press the back of your OK button. remote assistant. Make sure your processor is on.
- Page 28 Reset processor If required, you can use your remote assistant to reset your processor to the settings made by your clinician. To reset processor settings: nucleus® cR230 Remote AssIstAnt...
- Page 29 Cancel Switch Off Switch Off Reset Settings Reset Settings Practice Simple SCAN SELECT SELECT Press and hold Press and hold When the menu Press the the OK button. the OK button. appears, press OK button. the down arrow to highlight Reset Settings.
- Page 30 Notes nucleus® cR230 Remote AssIstAnt...
- Page 31 Notes QUICK GUIDE...
- Page 32 Karl-Wiechert-Allee 76A, 30625 Hannover, Germany Tel: +49 511 542 770 Fax: +49 511 542 7770 www.cochlear.com Cochlear, Hear now. And always, Nucleus, and the elliptical logo are either trademarks or registered trademarks of Cochlear Limited. © Cochlear Limited 2013 402635 ISS6 SEP13...
Need help?
Do you have a question about the Nucleus CR230 and is the answer not in the manual?
Questions and answers