
Related Manuals for Rockwell ShopSeries RK 713 6.1


Summary of Contents for Rockwell ShopSeries RK 713 6.1
- Page 1 10˝ MITER SAW WITH INTEGRATED STAND PAGE 9 SIERRA DE INGlETES coN bASE INTEGRADA DE 10PulG. PAGE 22 ESP ScIE A oNlGETS 10Po. AvEc SuPPoRT PAGE 35 FRE RK7136.1...
- Page 2 WARNING: some dust created by power sawing and other construction activities contains chemicals known to the State of california to cause cancer and birth defects or other reproductive harm. Some examples of these chemicals are: lead from lead-based paints, crystalline silica from bricks and cement and other masonry products, and Arsenic and chromium from chemically-treated lumber Your risk from these exposures varies, depending on how often you do this type of work.
- Page 3 RK7136.1...
- Page 4 RK7136.1...
- Page 5 RK7136.1...
- Page 6 RK7136.1...
- Page 7 RK7136.1 Blade/ Hoja /Lame Bolt-left hand thread/ Tornillo- Inner flange/ rosca izquierda/ Arandela Interior Boulon de /Rondelle serrage-filets intérieure à gauche Outer Flange/ Arandela exterior/Rondelle extérieure...
- Page 8 Please read carefully the user safety and operating instructions on how to operate this product correctly within safety norms and regulations. Gracias por su compra de un producto ROCKWELL . Estamos seguros de que apreciará ®...
-
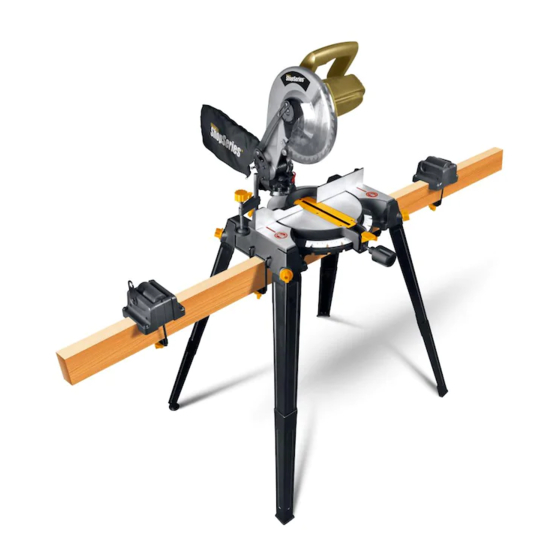
Page 9: Component List
10˝ MITER SAW WITH INTEGRATED STAND coMPoNENT lIST TRIGGER SWITCH HANDLE MOTOR HOUSING SAW BLADE RETRACTABLE SAFETY GUARD FENCE NO HAND ZONE MITER TABLE MITER DETENT LEVER MITER LOCK HANDLE KERF PLATE MITER SCALE MOUNTING HOLES (4) VERTICAL CLAMP LOCKING SCREW VERTICAL CLAMP MITER ARM LOCK PIN RETRACTABLE SAFETY GUARD ACTUATOR... - Page 10 10˝ MITER SAW WITH INTEGRATED STAND ROLLER SUPPORT (2) HOOK (4) UPPER LEG (4) LOWER LEG WITH FIXED FOOT (3) LOWER LEG WITH ADjUSTABLE FOOT LEG KNOB * NoT All THE AccESSoRIES IlluSTRATED oR DEScRIbED ARE INcluDED IN STANDARD DElIvERY. AccESSoRIES outlet that is properly installed and grounded in accordance with all local codes and ordinances.
- Page 11 10˝ MITER SAW WITH INTEGRATED STAND reverse the plug. If it still does not fit, contact a frees both hands to operate tool. qualified electrician to install the proper outlet. Do 13. DoN’T ovERREAcH. Keep proper footing and not change the plug in any way. balance at all times.
- Page 12 10˝ MITER SAW WITH INTEGRATED STAND SYMbolS Table 1 Minimum gage for cord To reduce the risk of injury, user must read instruction manual Volts Total length of cord in feet Ampere Rating 120 V 25 ft. 50 ft. 100 ft. 150 ft.
-
Page 13: Technical Data
10˝ MITER SAW WITH INTEGRATED STAND TEcHNIcAl DATA miter arm lock pin. Carefully lay the saw upside down on the ground (it can lie in any position, After you Voltage 120 V~60 Hz have fitted two legs, you will find it easy to just raise Rated current 14 A the saw and fit the remaining legs with one hand). -
Page 14: Electric Brake
10˝ MITER SAW WITH INTEGRATED STAND WoRK-PIEcE clAMP (See Fig. c, D) 5. TRIGGER SWITcH The vertical clamp can be fitted on either side of the To turn on the saw, squeeze the trigger switch (1). saw and is fully adjustable to suit the size of the work- Release switch to turn saw off. - Page 15 10˝ MITER SAW WITH INTEGRATED STAND i. Rotate the blade by hand and check the Blade-to- a. Unplug the saw. WARNING:To prevent personal injury, always Table squareness at several points. If the square is not flat up against the blade when squared to the disconnect the plug from power source before table, perform steps j through l.
- Page 16 10˝ MITER SAW WITH INTEGRATED STAND before reconnecting saw to the power source. Your c. Loosen (unscrew) the Miter Lock Handle compound miter saw has been adjusted at the factory approximately one-half turn. for making very accurate cuts. However, some of the d.
- Page 17 10˝ MITER SAW WITH INTEGRATED STAND blade from turning BEFORE removing the work-piece support the work-piece with a roller stand or other from the miter table. support to bring the work-piece level with the saw table. 11. bEvEl cuTTING (See Fig. I, J,K) m.
- Page 18 10˝ MITER SAW WITH INTEGRATED STAND To MAKE A coMPouND MITER cuT WITH YouR secure the work-piece when possible. WARNING: To avoid serious personal injury, MITER SAW (See Fig K) ALWAYS keep your hands outside the “no hands a. Unplug the saw. WARNING: To prevent personal injury, ALWAYS zone”(red lines);...
-
Page 19: Maintain Tools With Care
10˝ MITER SAW WITH INTEGRATED STAND correct length. MAINTAIN ToolS WITH cARE b. Lower the saw and lock down. Keep tools sharp and clean for better and safer c. Slide the sample work piece into position until it performance. Follow instructions for lubricating and touches the blade. -
Page 20: Troubleshooting
10˝ MITER SAW WITH INTEGRATED STAND TRoublESHooTING Problem Probable cause Suggested remedy 1. Switch in OFF position 1. Make sure saw is plugged in and switch is pressed 2. No electrical power at wall 2. Check circuit breaker or fuse at electrical panel. outlet motor will not run 3. -
Page 21: Warranty Statement
Series Helpline and you will need to submit a proof of purchase in the form of a valid receipt that displays date If your Rockwell Shop Series tool becomes defective due and place of purchase. to faulty materials or workmanship within a period of 2... -
Page 22: Lista De Partes
SIERRA DE INGlETES coN bASE INTEGRADA DE 10PulG. ESP lISTA DE PARTES GATILLO MANGO CAjA DEL MOTOR HOjA DE SIERRA PROTECTOR INFERIOR DE LA HOjA (RETRáCTIL) BORDE ZONA DE “NO TOCAR” MESA DE INGLETE PALANCA DE TRABA DE INGLETE MANGO DE TRABA DE INGLETE PLACA DE GARGANTA (ACCESORIO DE INSERCIóN PARA LA SEPARACIóN DE CORTE) ESCALA DE INGLETE EROS DE MONTAjE DE LA SIERRA (4) - Page 23 SIERRA DE INGlETES coN bASE INTEGRADA DE 10PulG. ESP SOPORTE DEL RODILLO (2) GANCHO (4) PERNO SUPERIOR (4) PIERNA INFERIOR CON PIé FIjO (3) PIERNA INFERIOR CON PIé AjUSTABLE BOTóN DE LA PIERNA * No todos los accesorios ilustrados o descritos se incluyen junto con el producto estándar. AccESoRIoS un conductor de conexión a tierra del equipo y un enchufe de conexión a tierra.
- Page 24 SIERRA DE INGlETES coN bASE INTEGRADA DE 10PulG. ESP b. PARA ToDAS lAS HERRAMIENTAS coN DoblE un prolongador lo suficientemente resistente AISlAMIENTo como para soportar la corriente que requiere su producto. Un cable pequeño causará una caída de 1. Piezas de repuesto corriente en la línea de voltaje, dando por resultado Deben utilizarse únicamente piezas idénticas recalentamiento y pérdida de potencia.
-
Page 25: Reglas De Seguridad
SIERRA DE INGlETES coN bASE INTEGRADA DE 10PulG. ESP compruebe la tuerca con regularidad y apriétela ocurrir una lesión grave si se cae la herramienta de si es necesario, especialmente tras la frenada. corte o si usted entra en contacto accidental con ésta. 19. -
Page 26: Datos Técnicos
SIERRA DE INGlETES coN bASE INTEGRADA DE 10PulG. ESP SÍMboloS DAToS TÉcNIcoS Voltios 120 V~60 Hz Advertencia–Para reducir el riesgo Amperios 14 A de lesiones, el usuario deberá leer el Velocidad sin carga 5200 rpm manual de instrucciones Capacidad de inglete 0º... -
Page 27: Freno Eléctrico
SIERRA DE INGlETES coN bASE INTEGRADA DE 10PulG. ESP FIJANDo loS PERNoS(vea Fig. A3, A4, A5) para el polvo en el conector de extracción. La sierra a. Fije el cabezote de la sierra a una posición de ingletes viene con una bolsa para el polvo. Para baja usando el pino fijador del brazo del instalarla, simplemente coloque la bolsa para el polvo inglete. - Page 28 SIERRA DE INGlETES coN bASE INTEGRADA DE 10PulG. ESP causar daños personales graves. c. Presione la traba y gire la mesa hasta que la guía quede en los 0º. 3. MANGo DE TRAbA PARA INGlETES d. Suelte la traba y ajuste bien el mango. El mango de traba (10) traba su sierra en el ángulo de e.
- Page 29 SIERRA DE INGlETES coN bASE INTEGRADA DE 10PulG. ESP AJuSTE DEl PIvoTE DE bISElADo k. Vuelva a colocar la arandela externa. El brazo de su sierra debe inclinarse fácilmente al aflojar Las marcas en “D” de las arandelas se alinean con la perilla de traba de biselado (22) e inclinar el brazo de las marcas del eje.
- Page 30 SIERRA DE INGlETES coN bASE INTEGRADA DE 10PulG. ESP coRTE TRANSvERSAl (ver Fig. F,G,H) ADvERTENcIA: Para evitar heridas graves, Un corte transversal es un corte realizado a través de mantenga SIEMPRE sus manos fuera de la las vetas de la pieza de trabajo. Un corte transversal zona de “no tocar”...
- Page 31 SIERRA DE INGlETES coN bASE INTEGRADA DE 10PulG. ESP hacer que se moviera el brazo de control o la mesa Este tipo de corte se usa para molduras, marcos de mientras esté cortando. cuadros y cajones con lados en pendiente. Para hacer h.
- Page 32 SIERRA DE INGlETES coN bASE INTEGRADA DE 10PulG. ESP pueden ajustar entre 0º y 45º. de la hoja. También, NUNCA corte a “mano alzada” i. Alinee el indicador con el ángulo deseado. (sin sostener la pieza contra el borde); la hoja podría j.
-
Page 33: Resolución De Problemas
SIERRA DE INGlETES coN bASE INTEGRADA DE 10PulG. ESP borde. Si coloca un material arqueado incorrectamente, están dañados hágalos reparar por un centro de servicio se enganchará con la hoja al final del corte. autorizado. cuIDADo: Para evitar contragolpes y heridas Su herramienta no requiere lubricación ni mantenimiento graves, NUNCA coloque el borde cóncavo de adicional. -
Page 34: Declaración De Garantía
SIERRA DE INGlETES coN bASE INTEGRADA DE 10PulG. ESP DEclARAcIÓN DE GARANTÍA Si desea realizar una reclamación, póngase en contacto con la línea de asistencia de Rockwell Shop Series. Si su herramienta Rockwell Shop Series presenta algún Deberá enviar una prueba de compra en forma de recibo problema derivado de un defecto de materiales o mano válido de venta en el que figure la fecha y el lugar de... -
Page 35: Interrupteur Marche/Arrêt
ScIE A oNlGETS 10Po. AvEc SuPPoRT lISTE DES ÉlÉMENTS INTERRUPTEUR MARCHE/ARRÊT POIGNéE BOÎTIER DE MOTEUR LAME DE SCIE GARDE LAME RéTRACTABLE (INFéRIEUR) GUIDE RALLONGES TABLE À ONGLETS LEVIER DE BLOCAGE/DéBLOCAGE D’ONGLET BOUTON DE VERROUILLAGE D’ONGLET PASSE-LAME (TRAIT DE SCIE) éCHELLE D’ONGLETS TROUS DE FIXATION DE LA SCIE (4) VIS DE SERRAGE DE LA SERRE DE MAINTIEN DE L’OUVRAGE SERRE DE MAINTIEN DE L’OUVRAGE... - Page 36 ScIE A oNlGETS 10Po. AvEc SuPPoRT SUPPORT À ROULEAU (2) CROCHET (4) PATTE SUPéRIEURE (4) PATTE INFéRIEURE AVEC PIED FIXE (3) PATTE INFéRIEURE AVEC PIED RéGLABLE BOULON DE PIED * les accessoires illustrés ou décrits ne sont pas tous compris dans le cadre de la livraison standard. AccESSoIRES La fiche doit être branchée dans une prise dont la configuration correspond à...
- Page 37 ScIE A oNlGETS 10Po. AvEc SuPPoRT b. PouR TouS lES ouTIlS A DoublE ISolATIoN de soutenir l’intensité du courant que tire votre produit. Un cordon prolongateur trop petit pour 1. Pièces de rechange le courant qu’il soutient va causer une baisse de Utilisez, pour les réparations, uniquement des pièces voltage de ligne d’alimentation, résultant en une de rechange identiques.
- Page 38 ScIE A oNlGETS 10Po. AvEc SuPPoRT 18. Ne vous mettez jamais debout sur l’outil. Des AvERTISSEMENT: le couple de serrage produit pendant le freinage peut relâcher blessures graves pourraient résulter si l’outil tombe l’écrou de fixation de la lame. cet écrou doit être ou si vous entrez en contact accidentellement avec vérifié...
-
Page 39: Données Techniques
ScIE A oNlGETS 10Po. AvEc SuPPoRT SÍMboloS DoNNÉES TEcHNIQuES Tension 120 V~60 Hz Avertissement - Afin de réduire les risques Ampères 14 A de blessure, l’utilisateur doit lire ce mode Vitesse à vide 5200 rpm d’emploi. Plage d‘onglets 0º - 45º (gauche/droit) Plage de chanfreins 0º... - Page 40 ScIE A oNlGETS 10Po. AvEc SuPPoRT sol (peu importe sa position, après avoir monté son ouverture sur le port d’échappement du garde les pattes la première fois, vous n’aurez aucune lame supérieur. Pour le vider, retirez le du port difficulté à soulever la scie et installer les pattes d’échappement et ouvrez la d’une seule main).
- Page 41 ScIE A oNlGETS 10Po. AvEc SuPPoRT 4. bouToN DE blocAGE DE l’ARbRE h. Placez maintenant une équerre sur la table et contre Le bouton de blocage de l’arbre (20) de votre scie le corps de la lame. NoTE: Assurez vous que l’équerre n’est pas en appui sur permet de bloquer l’arbre prévenant sa rotation lors du changement de lame.
- Page 42 ScIE A oNlGETS 10Po. AvEc SuPPoRT extérieure de serrage de s’engager sur les plats de n. Remettez en place le le cache boulon et le garde l’arbre. Des lames trop grandes ou trop épaisses lame escamotable. pourraient entraîner un accident et causer de graves o.
- Page 43 ScIE A oNlGETS 10Po. AvEc SuPPoRT PouR RÉAlISER uNE couPE TRANSvERSAlE: appuyant sur la gâchette de l’interrupteur. Laissez la a. Débranchez la scie lame atteindre sa vitesse maximale. ATTENTIoN : Afin d’éviter tout accident, retirez n. Descendez lentement la lame au travers de la pièce. TOUjOURS la fiche de sa prise de courant o.
- Page 44 ScIE A oNlGETS 10Po. AvEc SuPPoRT AvERTISSEMENT: Afin d’éviter tout accident, concave était placée contre le guide, le bois pourrait coincer la lame en fin de coupe. retirez TOUjOURS la fiche de sa prise de l. Lors de la coupe de longues pièces de bois ou moulures, courant électrique.
- Page 45 ScIE A oNlGETS 10Po. AvEc SuPPoRT AvERTISSEMENT: Pour éviter un accident longueur. grave, gardez TOUjOURS vos mains hors des b. Baissez la scie et verrouillez-la en position basse. zones interdites aux mains (lignes rouges), au moins c. Glissez l’échantillon en position jusqu’à ce qu’il à...
-
Page 46: Dépannage
ScIE A oNlGETS 10Po. AvEc SuPPoRT l’eau ou des nettoyants chimiques pour nettoyer l’outil. étincelles dans les ouvertures de ventilation, ceci est Essuyez-le avec un chiffon sec. Rangez toujours votre normal et n’endommagera pas votre outil. outil dans un endroit sec. Gardez propres les ouvertures votre outil dans un endroit sec. -
Page 47: Déclaration De Garantie
ScIE A oNlGETS 10Po. AvEc SuPPoRT DÉclARATIoN DE GARANTIE Pour des réclamations, contacter la ligne téléphonique Si votre outil Rockwell Shop Series devient défectueux de Rockwell Shop Series. Vous devrez présenter une suite à un défaut de matériaux ou de fabrication dans preuve d’achat sous la forme d’un reçu valide qui affiche...
Need help?
Do you have a question about the ShopSeries RK 713 6.1 and is the answer not in the manual?
Questions and answers