Advertisement
O W N E R ' S
TABLE OF CONTENTS:
Pg. 1
Pg. 2
Pg. 3 - Pg. 14
Pg. 15
Pg. 16
Pg. 17
Pg. 18
Pg. 18
Back Page
TDH-345
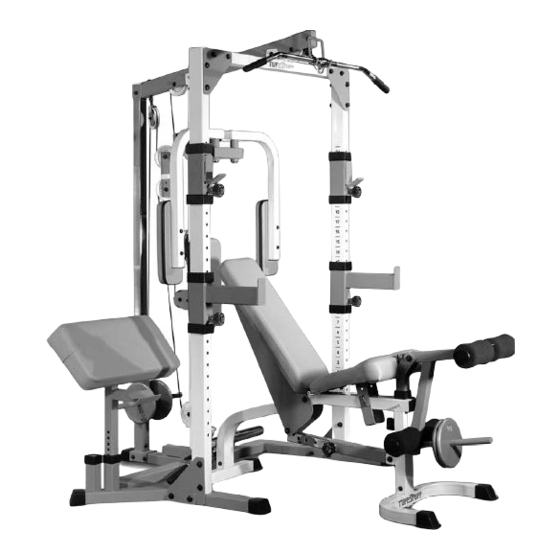
Half Cage Ensemble
A m e r i c a ' s
P r e m i u m
M A N U A L
7'- 0"
L 7'- 0" W 5'- 8" H 7'- 0"
E x e r c i s e
E q u i p m e n t
Revision Date 06-30-03
5'- 8"
Advertisement
Table of Contents

Related Manuals for TuffStuff TDH-345


Summary of Contents for TuffStuff TDH-345
-
Page 1: Table Of Contents
Pg. 18 Warranty Back Page Revision Date 06-30-03 7’- 0” TDH-345 Half Cage Ensemble 5’- 8” L 7’- 0” W 5’- 8” H 7’- 0” A m e r i c a ’ s P r e m i u m... -
Page 2: Introduction
TDH-345 Half Cage Ensemble rior to the Assembly of the TDH-345 Congratulations on your new purchase of the TDH-345 Half 1. We advise you to consult your local Tuff Stuff retailer if you Cage Ensemble. This gym is capable of a variety of different... -
Page 3: Safety Precautions
Safety Precautions afety irst Regardless of how enthusiastic you may be about getting on your equipment and exercising, take the time to ensure that your safety is not jeopardized. A moment’s ack of attention can result in an accident, as can failure to observe certain simple safety precautions. - Page 4 ig. 1 On a flat surface, lay the Base Frame (#11) down and, using a Fig. 2 Locate the Bottom Assembly Holder (#28) and, using a rubbe ubber mallet, insert two Plastic End Caps w/Groove 2 x 3 (#8) onto the mallet insert one Plastic End Cap w/Groove 2 x 3 (#8) onto the tube-end ube-ends.
- Page 5 ig. 5 Insert the two Selectorized Uprights (#6) onto the receptacles Fig. 6 Using a rubber mallet, insert one Plastic End Cap w/Groove 2 X cated on the Base Frame (#11), in the position as shown above with the (#8) onto the tube-end of the Accessory Rack (#7).
- Page 6 ig. 9 Next, attach the Decal Numbers 1-24 (#74) on the inside of the Fig. 10 Slide one Bar Safety (#5), in the position as shown above, ove electorized Uprights (#6). Center the number 24 with the top adjustment each one of the Selectorized Uprights (#6).
- Page 7 Caution: It is recommended to use another person in assisting with Fig. 14 Mount the Chrome Post Receptacle (#43) onto the Bottom As this assembly. sembly Holder (#28), in the position as shown above, and secure it int place using two Hex Head Cap Screws 3/8-16 x 4 (#32), four Flat Washer ig.
- Page 8 Caution: It is recommended to use another person in assisting with Fig. 18 Locate the Upper Swivel Bracket (#25) and thread a Regula this assembly. Hex Nut 1/2-13 (#73) and insert one Flat Washer SAE 1/2” (#10). Nex insert the Upper Swivel Bracket (#25) into the Top Pulley Housing (#1...
- Page 9 ig. 21 Locate the Pec Dec Arm Lt. (#38) and the Pec Dec Arm Rt. Fig. 22 Secure both Pec Dec Arms (#38, #39) to the Pec Dec Housin #39) and, using a rubber mallet, insert two Plastic Insert Caps 1 3/4” SQ. (#15) using two Exterior Retainer Rings (#42).
- Page 10 ig. 25 Begin routing the Pec Dec Cable (#40) by attaching it to the Fig. 26 Next, insert the Pec Dec Cable (#40) through the pulley bracke ec Arm Rt. (#38) using one Hex Head Cap Screw 3/8-16 X 1 (#47), two on the Pec Dec Housing (#15) and install one Nylon Pulley 4 1/2”...
- Page 11 ig. 29 Route the end of the Lat Cable (#53) through the Top Pulley Fig. 30 Insert one Nylon Pulley 4 1/2” Rd. (#20-Labeled B) into the slot o Housing (#1) tube. Next, pull gently the Lat Cable (#53) down through the Top Pulley Housing (#1), in the position as shown above, and secure lot on the bottom side of the...
- Page 12 ig. 33 Route the Lat Cable (#53) through the Double Pulley Plates Fig. 34 Next, route the Lat Cable (#53) down and secure the looped en #21) and under the Nylon Pulley 4 1/2” Rd. (#20-Labeled C). Next, insert to the bracket on the Weight Carriage (#37) using one Hex Head Ca he Cable and one Nylon Pulley 4 1/2”...
- Page 13 ig. 37 Next, insert the Low Row Cable (#54) and the Nylon Pulley 3 1/2” Fig. 38 Affix the Low Row Cable (#54) to the Pec Dec Floating Pulle Rd. (#24-Labeled G) into the Back Pad Pulley Bracket (#23) and secure Bracket (#22) using one Hex Head Cap Screw 3/8-16 X 1 (#47), and on hem into place using one Hex Head Cap Screw 3/8-16 X 1 3/4 (#30), two...
-
Page 14: Assembly Instructions
ig. 41 Insert two Hard Grips 1 X 6 (#56) onto each of the tube-ends of Fig. 42 Multiple starting exercise positions can be achieved by using th Lat Bar (#50). Coil Chain as an extension to connect the Lat Bar to the Lat Cable with ou loosing traveling range on the Weight Carriage. - Page 15 Once assembled or when not in use, the TLC-185 Leg Extension/ Fig. 46 This concludes the assembly of the TDH-345. url and the TPA-16 Preacher Curl can be stored on the Accessory Rack, Do a careful inspection of each and every assembly and make sure they ar s illustrated above.
-
Page 16: Cable Adjustment Diagram
CABLE ADJUSTMENT DIAGRAM Minor Cable Adjustment: Use the Upper Swivel Pulley Bracket (#25) 1. Loosen the bottom Finished Hex Nut 12-13 (#73). 2. Adjust the top Nylon Insert Lock Nut 1/2-13 (#52) to give the cable proper tension. 3. Re-tighten the bottom Finished Hex Nut 12-13 (#73) to complete the cable adjustment. -
Page 17: Maintenance
Maintenance aintenance Information 1. Lubrication of all moving parts is essential to the longevity 6. Chrome plated surfaces should be cleaned regularly to and optimal performance of your Half Cage Ensemble. prolong the life and luster of the finish. Wipe machine Initial lubrication of some parts of your gym have been down with a damp cloth and dry thoroughly each day or a done at the factory, but the... -
Page 18: Parts List
TDH-345 COLOR CHART COLOR CHART GRAY= SUB-ASSEMBLY PARTS GRAY= SUB-ASSEMBLY PARTS Parts List BLACK= HARDWARE BLACK= HARDWARE Item No. Description Part No. Item No. Description Part No. TOP PULLEY HOUSING UP0722 CHROME POST RECEPTACLE UP0730 TRIANGULAR CORNER PLATE UP0101 BRONZE BUSHING 1 X 1 1/4 X 3/4... -
Page 19: Exploded View Diagram
EXPLODED VIEW DIAGRAM BUTTONS PRE-INSTAL ON CARRIA CABLE MAPPING DIAGRAM FIG. A FIG. A PEC DEC TOP VIEW SIMPLIFIED VIEWS FIG. C (PEC DEC) FIG. B PEC DEC REAR VIEW FIG. B FIG. C VARIOUS PARTS CUT OUR FOR CLARITY TDH 345 Half Cage Ensemble... -
Page 20: Warranty
TuffStuff. Limitations: The foregoing shall constitute the sole remedy of the purchaser and the sole liability of TuffStuff with regard to warranty, whether express or implied by operation of law or otherwise, including but not limited to any implied warranties of merchantability or fitness.
Need help?
Do you have a question about the TDH-345 and is the answer not in the manual?
Questions and answers