suprema BioStation 2 User Manual
Hide thumbs
Also See for BioStation 2:
- Installation manual (24 pages) ,
- User manual (41 pages) ,
- User manual (48 pages)

Related Manuals for suprema BioStation 2


Summary of Contents for suprema BioStation 2
- Page 1 USER GUIDE BioStation 2 English Version 1.10 EN 102.00.BS2 V1.10A...
-
Page 2: Table Of Contents
Contents Safety Instructions ..................4 Getting Started ....................6 Components ..............................6 Parts ................................7 Cables and connectors ........................... 9 How to Enroll a Fingerprint ........................11 Choose Ideal Fingers to Enroll ......................11 How to Enroll Fingerprints ........................11 Administrator Menus ................... - Page 3 FCC Compliance Information ..............29 Appendix ......................30 Disclaimers ..............................30 Copyright Notice ............................30...
-
Page 4: Safety Instructions
Non-proper installation of the cable cover may cause device malfunction or damage from water and dust. It is recommended to install the product inside an enclosure when installing it in a completely open place. Be sure to use separate power source for Secure I/O 2, electrical lock, and BioStation 2. - Page 5 • This can cause a product failure. BioStation 2 uses the capacitive button. If there is much moisture (humidity) like a rainy weather or on the product, wipe with a soft and dry cloth. There is a risk of fire if batteries are replaced by an incorrect type.
-
Page 6: Getting Started
Diode Ferrite core Allen Key Drilling Template Quick Guide (For bracket) Notes • The components may differ depending on where the product is installed. • For more information on installation, visit the Suprema website (www.supremainc.com) to see the installation guide. -
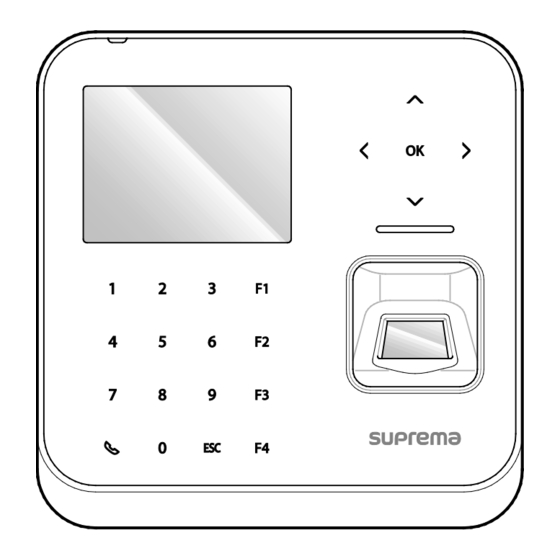
Page 7: Parts
Getting Started Parts Microphone Arrow keys/OK button LCD screen LED lamp Speaker Fingerprint sensor Numpad/Intercom/ESC button RF card reader Function buttons Mini-USB cable port USB memory port DIP switches Ethernet TTL input (4-pin) Wiegand input (4-pin) RS-485 (4-pin) Wiegand output (4-pin) TTL output (4-pin) Relay (3-pin) Intercom (5-pin) - Page 8 Getting Started RF card reader Reads RF cards. USB memory port Connects a USB memory stick. Mini-USB cable port To be supported later. TTL input (4-pin) Connects a TTL input/output cable. RS-485 (4-pin) Connects an RS-485 cable. TTL output (4-pin) Connects a TTL input/output cable.
-
Page 9: Cables And Connectors
Getting Started Cables and connectors Power Name Color Power +12 V Red (White stripe) Power GND Black (White stripe) Relay Name Color Normally Open White Common Blue Normally Closed Orange RS-485 Name Color TRX + Blue TRX - Yellow Black Shield GND Gray TTL input/output... - Page 10 Getting Started Intercom Name Color Power + Power GND Black Audio Orange Data Blue Shield GND Gray...
-
Page 11: How To Enroll A Fingerprint
Place your finger to completely cover the sensor with maximum surface. When the fingerprint recognition fails BioStation 2 can read fingerprints regardless of the change in seasons or condition of the fingers. However, the external environment or the finger's position can affect the recognition performance. -
Page 12: Administrator Menus
Administrator Menus Administrator Menus Full Menu Press the ESC button then authenticate as an administrator. Select the desired menu item. Notes • If there is no administrator on the device, anyone can access the menu just by pressing the ESC button. Quick Menu Press and hold the ESC button for more than one second and then release the button. -
Page 13: User Management
User Management User Management Add User Information You can register the user information and fingerprints. Press the ESC button then authenticate as an administrator. Go to USER > Add User and press OK. button. Press OK after configuring the item to register the user information. Select an item then press the •... -
Page 14: Edit User Information
User Management Edit User Information Users with the user level of Administrator and User Mgmt can change user information. They can add fingerprints or a card for a user, and also change PIN numbers and access levels. Press the ESC button then authenticate as an administrator. Go to USER >... -
Page 15: Authentication Configuration
Authentication Configuration Authentication Configuration Finger A schedule can be configured for each authentication method using fingerprints. Press the ESC button then authenticate as an administrator. Go to AUTHENTICATION > Finger, then press OK. Select an item and press the / buttons to set a schedule. •... -
Page 16: T&A Mode
Authentication Configuration Notes • You can configure a schedule with BioStar 2. You can select Never or Always if there is no configured schedule. • For more information on configuring schedules, see the BioStar 2 Administrator Guide. A schedule can be configured for each authentication method using IDs. Press the ESC button then authenticate as an administrator. -
Page 17: Fingerprint
1:N Fast Mode: Sets the fingerprint authentication speed. Select Auto On to have the authentication speed configured according to the total fingerprint templates enrolled on the device. • Template Format: Sets the fingerprint template format. The default format is SUPREMA. Be careful when changing the template format as it can render all previously stored fingerprints unusable. •... -
Page 18: System Setup
System Setup System Setup Display & Sound You can configure the display and sound settings on the device. Press the ESC button then authenticate as an administrator. Go to DISPLAY & SOUND, then press OK. Select an item and press the / buttons to change the settings. •... -
Page 19: Intercom
System Setup • Time Sync: Synchronizes the time with the server. To synchronize the time with the server, select Use. • Date Format: Selects the date format. You can select from among the YYYY/MM/DD, MM/DD/YYYY, or DD/MM/YYYY formats. • Time Format: Selects the time format. You can select from among the 24 hour or 12 hour (AM/PM) formats. Notes •... -
Page 20: Memory Info
System Setup Memory Info Shows the memory usage status. Press the ESC button then authenticate as an administrator. Go to DEVICE > Memory Info, then press OK. Check the memory information and press OK. USB Memory By connecting a USB memory stick, you can import or export the log, data and configurations data to or from the USB memory stick and upgrade the firmware. -
Page 21: Restart Device
System Setup Restart Device The user can restart the device. Press the ESC button then authenticate as an administrator. Go to DEVICE > Restart Device, then press OK. Press OK to restart the device. Press ESC to cancel. Restore Default You can reset all the device settings. -
Page 22: Network
System Setup Network TCP/IP Settings You can configure the network settings for the device. Press the ESC button then authenticate as an administrator. Go to NETWORK > TCP/IP then press OK. Press the / buttons to select a Type then select an item. You can select Ethernet or Wireless. •... -
Page 23: Rs-485 Settings
System Setup • Server Port: Enter the port address of the PC with BioStar 2 installed. You can enter the values when Device > Server is selected for Connection Mode. Press OK to save the settings. Notes • Press the number buttons to enter the values for Server IP and Server Port. Use the button to delete the values entered. -
Page 24: Check Event Log
Check Event Log Check Event Log Search Logs You can search logs after setting the condition. Press the ESC button then authenticate as an administrator. Go to EVENT LOG > Search then press OK. Select an item and press the / buttons to change the condition. If you press OK, matching logs will be displayed on the screen. Press ESC to return to the previous screen. -
Page 25: Check Log Usage
Check Event Log Check Log Usage Shows the status of the log usage. Press the ESC button then authenticate as an administrator. Go to EVENT LOG > Log Usage then press OK. Press OK after checking the log usage. -
Page 26: Troubleshooting
Door lock the door is closed. • Even though BioStation 2 includes an internal battery, the time could become The time displayed on the device Time incorrect due to the discharge of the internal battery if power has not been is not correct. -
Page 27: Product Specifications
Power 9V ~ 18V Optional Dimensions (W x H x D mm) 142 x 144 x 45(38) Certificates CE, FCC, KC, RoHS, REACH, WEEE * For detailed information on our supported card list, contact Suprema technical support team at support@supremainc.com. -
Page 28: Dimensions
Product Specifications Dimensions (Unit: mm) -
Page 29: Fcc Compliance Information
FCC Compliance Information FCC Compliance Information This device complies with Part 15 of the FCC Rules. Operation is subject to the following two conditions: (1) This device may not cause harmful interference, and (2) This device must accept any interference received, including interference that may cause undesired operation. Note: This equipment has been tested and found to comply with the limits for a Class B digital device, pursuant to Part 15 of the FCC Rules. -
Page 30: Appendix
Suprema makes no representations or warranties concerning infringement of patents, copyrights or other intellectual property rights as well as merchantability and fitness of the product for a particular purpose in regard to the sale or use of the Suprema product. - Page 31 www.supremainc.com www.supremainc.com...
Need help?
Do you have a question about the BioStation 2 and is the answer not in the manual?
Questions and answers