Table of Contents
Advertisement
Quick Links
Advertisement
Table of Contents

Related Manuals for suprema BioStation T2


Summary of Contents for suprema BioStation T2
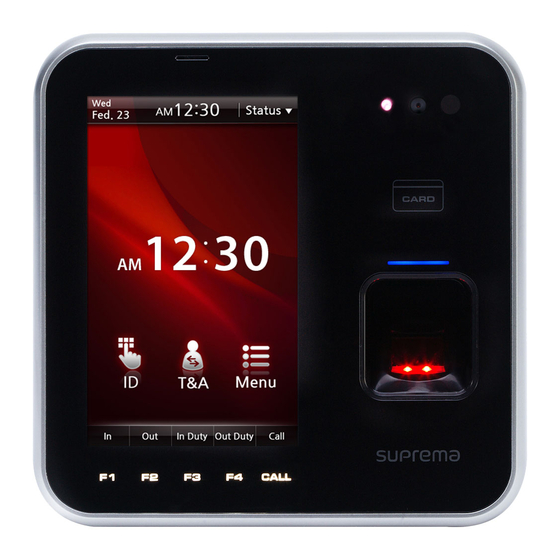
- Page 2 BioStation T2 is the IP network-based premium fingerprint verification terminal that delivers various authentication modes such as fingerprint, RFID, and PIN authentication for access control and time & attendance. Features An intuitive GUI provided on the high-durable 5 inch touchscreen LCD delivers easy user 5 inch management and displays various information and notices.
- Page 3 These safety instructions provided here are meant to guard your safety and prevent any possible damage or loss of property. Please carefully read these and keep them in mind when you use Suprema’s product. Safety Instructions Do not install the terminal in a place affected by direct Do not drop the terminal or cause any impact on the sunlight, humidity, dust, or soot.
-
Page 4: Table Of Contents
1 Before Getting Started ..............6 Components ................. 7 ■ Basic Components ..............7 ■ Optional Accessories ............9 Names and Functions of Parts ..........10 ■ Front ..................10 ■ Bottom ................. 11 ..................11 ■ Rear Dimensions ................12 Menu Screen ................ - Page 5 ■ RS485 CABLE (4-pin Connector) ........24 Access Authentication ..............43 Connection ................. 25 Fingerprint Authentication ............43 ■ Power Connection (2-pin Connector) ........25 ■ Fingerprint Only ..............43 ■ USB Cable Connection ............26 ■ Fingerprint + Pin Authentication .......... 43 ■...
- Page 6 ■ Entering into Admin Menu ........... 55 ■ T&A Mode ................80 ■ Configuration of Admin Menu ..........57 ■ T&A Event ................80 User Enrollment process ............59 ■ Camera Event ..............81 Registering User to Device (using CSN) ........60 Device Setup ................
-
Page 7: Before Getting Started
BioStation T2 User Guide http://www.supremainc.com Before Getting Started... -
Page 8: Components
BioStation T2 User Guide 1 Before Getting Started Please check the package and ensure that all of the components are prepared. Components ■ Basic Components CARD Software CD (1 copy) BioStation T2 Body Wall Bracket Screws and PVC Anchors (4 EA each) - Page 9 BioStation T2 User Guide 1 Before Getting Started...
-
Page 10: Optional Accessories
BioStation T2 User Guide 1 Before Getting Started ■ Optional Accessories Plastic Stand Secure I/O USB Mifare Reader/Writer USB fingerprint scanner (for enrollment on PC) Access Point RF Cards Analog Video Phone Power Adapter (For Wireless Model only) The product shown above is just an image to illustrate the product. Depending on Suprema’s internal changes, some of the components Note... -
Page 11: Names And Functions Of Parts
Used for interphone call. A sensor that detects objects around the device without any physical contact. To reduce power Proximity Sensor consumption, BioStation T2 lowers the brightness of the backlight when no input is made for a specified time. Camera Used for still image logs and video interphone. -
Page 12: Bottom
■ Rear Name Function A slot to connect the USB wireless LAN device. USB Wireless For the wireless LAN-supported BioStation T2 LAN port model, the wireless LAN device is mounted before released from the factory. RJ45 Socket Connects Ethernet cable... -
Page 13: Dimensions
BioStation T2 User Guide 1 Before Getting Started Dimensions ■ 155mm(W) x 155mm(H) x 40mm(D) 40 mm 135 mm 155 mm 134.2 mm 109 mm 155 mm Rear Side Bracket... - Page 14 BioStation T2 User Guide 1 Before Getting Started...
-
Page 15: Menu Screen
BioStation T2 User Gu uide 1 Before Getting Star rted enu S creen n Status Bar: Displa ays the current dat te, time, and statu cons. Displays w whether or not to use face D: Enters the use er ID for authentica ation. - Page 16 BioStation T2 User Guide 1 Before Getting Started...
-
Page 17: Standby Screen
BioStation T2 User Gu uide 1 Before Getting Star rted ■ Setting g the Backg ground Sc creen andby y Scre een ■ Sta art-up Scre Notic Slide ■ Other S Standby Sc creens Theme 1 eme 2 Them me 3 Theme When time ... -
Page 18: Authentication Mode
BioStation T2 User Guide 1 Before Getting Started Authentication Mode BioStation T2 supports various authentication modes using fingerprints, RFID card, and ID (PIN). Fingerprint Authentication Mode Card Authentication Mode ID Authentication Mode ■ ■ ■ Finger: Card Only: ID+Pin: Only fingerprints are used for authentication. -
Page 19: How To Place A Finger
(2) Thumb, ring or little finger is relatively more difficult to place in a correct position. Suprema’s fingerprint products are designed to scan fingerprint smoothly regardless of the conditions of a finger skin. However, if a ■ How to place a finger on a sensor fingerprint is difficult to scan due to other influences, please refer to the followings tips. - Page 20 BioStation T2 User Guide 1 Before Getting Started ■ Advices on fingerprint enrollment (1) In fingerprint recognition, enrollment process is very important. Therefore, when enrolling a fingerprint, please try to place a finger correctly with care. (2) In case of low acceptance ratio, the following actions are recommended.
-
Page 21: Installation
BioStation T2 User Guide http://www.supremainc.com Installation... -
Page 22: Installation
BioStation T2 User Guide 2 Installation Installation BioStation T2 has a camera for face detection and video interphone. Therefore, height of the product and its camera angle are very important factors in installation. For easy face detection and fingerprint authentication, determine the place where the product should be installed. -
Page 23: Connector/Cable Specifications
BioStation T2 User Guide 2 Installation it to the bracket using the screw located at the bottom of the wall mounted bracket. Connector/Cable Specifications ■ 232 CABLE (3-pin Connector) Name Cable Type Color 232RX GREEN 232TX AWG26 YELLOW BLACK ■ SWITCH CABLE (8-pin Connector) -
Page 24: Relay Cable (3-Pin Connector)
BioStation T2 User Guide 2 Installation ■ RELAY CABLE (3-pin Connector) Name Cable Type Color RELAY NORMAL WHITE OPEN RELAY COMMON AWG24 BLUE RELAY NORMAL ORANGE CLOSE ■ WIEGAND CABLE (5-pin Connector) Name Cable Type Color DATA0 GREEN DATA1 WHITE... -
Page 25: Video Phone Cable (7-Pin Connector)
BioStation T2 User Guide 2 Installation ■ VIDEO PHONE CABLE (7-pin Connector) Name Cable Type Color VOICE SIGNAL BLUE POWER YELLOW VIDEO SIGNAL WHITE AWG26 DOOR OPEN ORANGE SIGNAL BLACK SHIELD GND GRAY ■ RS485 CABLE (4-pin Connector) Name Cable Type... -
Page 26: Connection
BioStation T2 User Guide 2 Installation Connection ■ Power Connection (2-pin Connector) Recommended Power Specification ± Note ‐ You should use a 12V adapter which is covered by IEC/EN 60950‐1, providing voltage of 12V 10% and a current of 1500mA or above. ‐ It is recommended that the power of BioStation T2 shall not be shared with other devices such as Secure I/O and Lock. ... -
Page 27: Usb Cable Connection
BioStation T2 User Guide 2 Installation ■ USB Cable Connection... -
Page 28: Ethernet Connection (Ethernet Cable)
BioStation T2 User Guide 2 Installation ■ Ethernet Connection (Ethernet Cable) Connect the RJ45 socket on the rear of the product to the hub with an Ethernet (LAN) cable. -
Page 29: Ethernet Connection (Direct Connection To Pc)
BioStation T2 User Guide 2 Installation ■ Ethernet Connection (Direct connection to PC) -
Page 30: Poe Hub Connection
BioStation T2 User Guide 2 Installation ■ PoE hub connection PoE (Power over Ethernet) is an Ethernet connection of which power is provided by IEEE802.3af standard-compliant PSE (Power sourcing Equipment). Note If you use PoE, the length of a LAN cable should be within 100 m. ... -
Page 31: Wireless Connection
BioStation T2 User Guide 2 Installation ■ Wireless Connection Wireless connection is made by mounting the USB wireless LAN module. For the wireless LAN-supported BioStation T2, the wireless LAN device is mounted before released from the factory. The performance of a wireless LAN depends on the type of the AP (access point) and the environment. Some wireless APs will not be fully compatible with the terminal so that the wireless LAN connection may not be successful. Note The wireless APs listed below are fully compatible with the BioStation T2. ... -
Page 32: Usb Memory Connection
BioStation T2 User Guide 2 Installation ■ USB Memory Connection User data or log data can be downloaded/uploaded using a USB memory. Some USB memories will not be fully compatible with the terminal so that the connection may not be successful. The USB memories listed below are fully compatible with the BioStation T2. [IMATION] Flash Drive Nano 4GB [LG Electronics] X TICK M4 4GB [LG Electronics] X TICK MOBY J1 2GB [PQI] Traveling Disk U173 4GB Note [Samsung C&T Corporation] PLEOMAX PUB‐S100 4GB [IMATION] Flash Drive Nano 4GB [LG Electronics] X TICK M4 4GB [LG Electronics] X TICK MOBY J1 2GB [PQI] Traveling Disk U173 4GB [Samsung C&T Corporation] PLEOMAX PUB‐S100 4GB... -
Page 33: Rs485 Pc Connection (4-Pin Connector)
BioStation T2 User Guide 2 Installation ■ RS485 PC Connection (4-pin Connector) If the RS485 cable is too long, the signal may be weakened. In this case, you should install a terminating resistance at both ends of the bus by turning on the Dip Switch for normal signal transmission On the other hand, if the cable is too short, the resistance may interrupt signal Note transmission. Therefore, by considering the length of the cable and the signal status, select whether to turn on or off the terminating resistance switch. Only the devices at the both ends of the bus should be terminated. Caution! If you do not connect GND, the RS485 chip may be damaged or communication may not be successful. -
Page 34: Rs485 Connection To Secure I/O Or Other Terminals (4-Pin Connector)
BioStation T2 User Guide 2 Installation ■ RS485 Connection to Secure I/O or Other Terminals (4-pin Connector) Note One RS485 network can be connected to 8 terminals in maximum, including a Host. If you do not connect GND, the RS485 chip may be damaged or communication may not be successful. Caution! -
Page 35: Rs232 Connection
BioStation T2 User Guide 2 Installation ■ RS232 Connection... -
Page 36: Videophone Connection
BioStation T2 User Guide 2 Installation ■ Videophone Connection The only following videophone models are compatible with BioStation T2. COMMAX / CAV‐35N Note COMMAX / CAV‐50H COMMAX / CAV‐50P... -
Page 37: Relay Connection - Fail Safe Lock (3-Pin Connector)
BioStation T2 User Guide 2 Installation ■ Relay Connection - Fail Safe Lock (3-pin Connector) ■ Relay Connection - Fail Secure Lock (3-pin Connector) ‐Normally Open/N.O: When no control signal is received, the electricity does not flow. When control signals are received, the electricity continues flowing. Note ‐Normally Close/N.C: When no control signal is received, the electricity continues flowing. When control signals are received, the electricity does not flow. ... -
Page 38: Relay Connection - Automatic Door (3-Pin Connector)
BioStation T2 User Guide 2 Installation ■ Relay Connection – Automatic Door (3-pin Connector) -
Page 39: Ttl Switch Input Connection (8-Pin Connector)
BioStation T2 User Guide 2 Installation ■ TTL Switch Input Connection (8-pin Connector) -
Page 40: Wiegand Input (5-Pin Connector)
BioStation T2 User Guide 2 Installation ■ Wiegand Input (5-pin Connector) ■ Wiegand Output (5-pin Connector) Note There is only one Wiegand port. Select either of Wiegand Output and Wiegand Input using BioStar software. ... -
Page 41: System Configuration
BioStation T2 User Guide 2 Installation System Configuration ■ Standalone ■ Secured A terminal works both of door control and authentication functions. A terminal works as authentication function. Secure I/O works as a door controller. -
Page 42: Network Configuration
BioStation T2 User Guide 2 Installation ■ Network Configuration LAN and RS485 allow integrated management. -
Page 43: User Menu
BioStation T2 User Guide http://www.supremainc.com User Menu... -
Page 44: Access Authentication
BioStation T2 User Man nual 3 User M cess The auth entication success s screen is then displa ayed only when the e card authenticatio n has succeeded. ‐ If the user’s picture has b been registered: he u user’s picture uthent ticati ion is the n displayed on the a authentication succ cess screen. Note ‐ If the user’s picture has n not been registered: The recorded image e is displayed. If the e still image log has s not been BioStat tion T2 supports... -
Page 45: T&A Key+Fingerprint Authentication
BioStation T2 User Man nual 3 User M Card ■ ■ T&A A Key+Fingerprin nt Authentication ■ ■ Card Only Auth hentication Card Only authent tication is enabled d when the authen ntication mode <How t to Set> [Menu] > [Mode e] >... -
Page 46: Card + Password Authentication
BioStation T2 User Man nual 3 User M ■ Car ■ ■ Card + Fingerp rd + Password Au uthentication print Authenticat tion <How t to Set> < <How to Set> [Menu] > [Mode e] > [Card Auth M ode] > [Card+Pin [Menu] >... -
Page 47: Card + Fingerprint/Password Authentication
BioStation T2 User Man nual 3 User M ■ ■ Card + Fingerp print + Password d Authentication ■ Car rd + Fingerprint/P Password Authen ntication < <How to Set> <How t to Set> [Menu] > [Mode] > [Card A Auth Mode] >... -
Page 48: Id Authentication
BioStation T2 User Man nual 3 User M ■ ID ■ ■ ID + Fingerprin ■ ID + nt Authentication + Password Auth hentication < <How to Set> <How t to Set> [Menu] > [Mode] > [ID Auth h Mode] > [ID+Fin nger] [Menu] >... -
Page 49: Id + Fingerprint/Password Authentication
BioStation T2 User Man nual 3 User M ■ ID + ■ ■ ID + Fingerprin + Fingerprint/Pas ssword Authentic cation nt + Password Au uthentication <How t to Set> < <How to Set> [Menu] > [Mode e] > [ID Auth Mod e] >... -
Page 50: T&A Mode
BioStation T2 User Man nual 3 User M T& &A Mo ■ T&A A Mode Se etup ■ ■ Manual Fix(by [Menu] > [Mode] > [T&A Mode] key input) If the T&A mode e is set to [Manua al Fix] mode, Select a desired T&... -
Page 51: T&A Authenticate Methods
BioStation T2 User Man nual 3 User M T&A Auth enticate M Methods ■ Press the F 1 to F4 key or the corresponding T&A A button on the Sele ect [Disabled] mod de to use access screen and s select a desired T&... -
Page 52: Personal Entrance/T&A Record Check
B B ioStation T2 User Man nual 3 User M ■ Pe ersonal Entr rance/T&A A Record Chec You ca an check your ent trance/T&A record ds. To check it, fo ollow the proced ures below. On the Standby scre een, select [Menu]. -
Page 53: Authentication Failures
BioStation T2 User Manual 3 User Menu Authentication Failures Displayed when authentication is failed. Access denied Displayed when the authentication mode does not match up. Auth Mode Error Displayed when authentication is limited by authentication interval limit. Invalid time interval Displayed when the number of authentications exceeds the specified authentication count. -
Page 54: Admin Menu
BioStation T2 User Guide http://www.supremainc.com Admin Menu... -
Page 55: Registering An Admin
BioStation T2 User Gu uide 4 Admin M giste ring a an Ad dmin There i is no registered us ser data in the pro oduct delivered fro om the factory. User Info Ite Please register the adm inistrator immedia ately after the first installation of Bio oStation T2. -
Page 56: Entering Into Admin Menu
BioStation T2 User Gu uide 4 Admin M ■ En ntering into o Admin M Menu On the main scre een, press [Menu]. The [Enter Admi n menu] screen is d displayed. Place the card c close to the card rea ader on the terminal or press [ID] and e enter the ID. - Page 57 BioStation T2 User Guide 4 Admin Menu If no user has been registered and you press [Menu], you will enter into the Admin Menu without any authentication procedures. Note The general user, not the administrator, enters into his/her entrance/T&A log check screen. (See p.47) ...
-
Page 58: Configuration Of Admin Menu
BioStation T2 User Guide 4 Admin Menu ■ Configuration of Admin Menu... - Page 59 BioStation T2 User Guide 4 Admin Menu...
-
Page 60: User Enrollment Process
BioStation T2 User Guide 4 Admin Menu User Enrollment Process ... -
Page 61: Registering User To Device (Using Csn)
BioStation T2 User Gu uide 4 Admin M <Using CSN Card> giste ring U User t to De evice When a card reader rec cognizes a CSN c card, it compares s the unique ident tification number of the User Info Ite card to... -
Page 62: Enroll User
BioStation T2 User Gu uide 4 Admin M ■ En nroll User ■ Fingerprin ■ Fac uch the photo are ea and then the bu uilt- camera is turned on. On the LCD reen, your face w ill be seen. Press apture] to save th e face image. - Page 63 BioStation T2 User Gu uide 4 Admin M ■ Car ■ Administra ator he device reads th he card ID contain If this che eckbox is checked , the user is the card and regis sters the ID. registered d as an administra ator.
- Page 64 BioStation T2 User Gu uide 4 Admin M ■ Byp ■ Access Gr pass Card roup If required d, set the access g group. If r required, select [B Bypass Card]. Byp pass [Access G Group] is set to wh...
-
Page 65: Edit/Delete User
BioStation T2 User Gu uide 4 Admin M ■ Ed dit/Delete U User To delete a sp pecific user, follow w the procedure be elow. Select [Menu] > [User] > > [Edit User]. In the user list, sel lect a desired user. -
Page 66: Search User
BioStation T2 User Gu uide 4 Admin M ■ Se earch User Select [Menu] > [User] > > [Search], select the search metho od, and then press s [OK]. Search h by ID Search by N Name Search by CSN n ID search windo w appears. - Page 67 BioStation T2 User Guide 4 Admin Menu characters are searched.
-
Page 68: Checking The Registered User Info
BioStation T2 User Gu uide 4 Admin M ■ Ch ■ Deletin hecking th he Register red User In ng All User You can delete e all users registe ered in the termina Select [Menu] > [U User] > [User Capac city Info]. - Page 69 BioStation T2 User Guide 4 Admin Menu...
-
Page 70: Registering A User To A Card (Using Template Card)
BioStation T2 User Gu uide 4 Admin M <Using Template Car rd> giste ring a a Use er to a Car rd ■ Iss suing a Ca When the terminal reco ognizes a templa ate card, it reads s the user in formation and tem... - Page 71 BioStation T2 User Guide 4 Admin Menu...
-
Page 72: Formatting A Card
BioStation T2 User Gu uide 4 Admin M ■ Fo ormatting a a Card To use e a card as a Tem mplate Card, all d ata saved in the card should be deleted. Select [Menu] > [U User] > [Format Car rd]. -
Page 73: Network Setup
BioStation T2 User Gu uide 4 Admin M etwor rk Set tup Set the e network connec ction of BioStatio on T2. There are networ k connections: d direct connection that a BioStar c client connec cts to a terminal and server conne... - Page 74 BioStation T2 User Guide 4 Admin Menu mask address, please ask your network administrator.
-
Page 75: Server Setup
BioStation T2 User Gu uide 4 Admin M ■ Se ■ Serial C erver Setup Communic cation The te erminal can com mmunicate with t the BioStar softw ware Set the serial communication. T The serial commu unication uses either of RS48... -
Page 76: Usb
BioStation T2 User Gu uide 4 Admin M ■ US ■ USB Me emory Select [Menu] > [N etwork] > [USB]. Select [ Menu] > [Network] > [USB Memory]. USB: Check wheth her or not to permit USB connection to o PC. -
Page 77: Wireless Lan
BioStation T2 User Gu uide 4 Admin M ■ Wi ireless LAN You ca an select one of 4 4 wireless LAN se ettings (Preset) sa aved in adva ance through the B BioStar software. To set t the Preset, en... -
Page 78: Authentication Mode
BioStation T2 User Gu uide 4 Admin M password. thent ticatio on Mod de You ca an authenticate users in the ope eration mode set t for the specifie ed time schedule e. One time sche edule used for se etting the... -
Page 79: Card Auth Mode
BioStation T2 User Gu uide 4 Admin M ■ ID Auth M Mode ■ Ca ard Auth M Mode Select [Menu u] > [Mode] > [ID Au uth Mode]. ID + Pin: Au thenticated by ente ring the ID and then n the password. -
Page 80: Operation
BioStation T2 User Gu uide 4 Admin M Templ ate Card: User in nformation includin g user ID and ■ Op peration other identification inform mation is saved in th he card. When a card is s placed close to th... -
Page 81: T&A Mode
BioStation T2 User Gu uide 4 Admin M ■ T& ■ &A Mode T&A Even Set up the T&A mode to o apply to the term minal. BioStar software a allows you to chec ck automatic time and activation f T&A events w ith F1~F4 or the e additional T&A... -
Page 82: Camera Event
BioStation T2 User Guide 4 Admin Menu ■ Camera Event When a camera event occurs, the camera will start recording when the event begins and then save the still image log. Camera events can be set up through BioStar only. On the terminal, the events can only be checked. -
Page 83: Device Setup
BioStation T2 User Gu uide 4 Admin M evice S Setup p ■ Fin ngerprint S Setting astest/Auto): If 1 :N Recognition Fast Mode e (Normal/Fast/Fa Select [Menu] > [Device] ] > [Fingerprint]. Mode is use ed while hundreds o of users are saved... - Page 84 BioStation T2 User Guide 4 Admin Menu Note Generally, the default values are recommended. ...
-
Page 85: Door
BioStation T2 User Gu uide 4 Admin M ■ Do sec): Sets up the t ime for which the relay keeps the Duration (s Select [Menu] > [Device] ] > [Door]. door open a after an event. The r relay will close the... -
Page 86: Interphone Setting
BioStation T2 User Gu uide 4 Admin M ■ Int terphone S Setting Select [Menu] > [Device] ] > [Interphone]. : Select an interph hone to use and th hen press [OK]. Interphone (Not use/An nalog Interphone/IP Interphone) ver IP: If you have... -
Page 87: Date & Time Setup
BioStation T2 User Gu uide 4 Admin M ■ The only fo llowing videophone e models are compat t ible with Date & Ti me Setup BioStation T2. Set up the time dis splayed on the ter rminal. Set up the e accurate time No o te MMAX / CAV‐35N... -
Page 88: Device Info
BioStation T2 User Gu uide 4 Admin M ■ De ■ evice Info Touchscr reen Calib bration You ca an check the mo odel name, devic ce ID, H/W vers ion, F/W Select [Menu] > [D Device] > [Touchsc creen Calibration]... -
Page 89: Reset
Select [Menu] > [Device] > [Reset]. Press [OK] to reset the terminal. ■ Factory Default Initializes the BioStation T2 to the factory default. Select [Menu] > [Device] > [Factory Default]. Press [OK] to reset all settings to the factory default value. -
Page 90: Display Setup
BioStation T2 User Gu uide 4 Admin M splay Setu up Select [Menu] > [Display If [Notice] an nd [Slide Show] are selected, the logo sc creen will be displa ayed for authenticat tion or other operati ions and one of the e notice screen, the slide show screen, a and PDF screen w will appear when th he menu timeout has s passed (after 30 seconds if the m menu timeout has be en set to Unlimited) ). When you touch the screen in the [N Notice] or [Slide Show w] status, the LCD... -
Page 91: Log
BioStation T2 User Gu uide 4 Admin M p Time: Select h how long the me essage will be Pop-Up display yed on the screen during authenticati on (Values: 0.5 sec/1 s sec/2 sec/3 sec/4 se ec/5 sec) ght Timeout: If no... -
Page 92: Log Search
BioStation T2 User Gu uide 4 Admin M ■ Log Searc Event Log St t ill Image Log Select [Menu u] > [Log] > [Log Se earch]. Select a des sired item among S Start Date, Start Tim me, End Date, End Time, Event, T&A Event... -
Page 93: Delete All Log
BioStation T2 User Gu uide 4 Admin M ■ De ■ Log Info elete All Lo Select [Menu u] > [Log] > [Log Inf fo]. Select [Menu] > [Lo og] > [Delete All Log Press [OK] to delet te all saved logs. -
Page 94: Appendix
BioStation T2 User Guide http://www.supremainc.com Appendix... -
Page 95: Product Specifications
BioStation T2 User Guide 5 Appendix Product Specifications Item Specifications Card Options 125KHz EM, 13.56MHz ISO14443 A/B (MIFARE) Maximum Number of Users 200,000 Capacity Template Capacity 400,000(1:1), 20,000(1:N) Log Capacity Event Logs: 1,000,000 / Image Logs: 5,000 Ethernet, WLAN, RS485 x 1ch,... -
Page 96: Electrical Specification
BioStation T2 User Guide 5 Appendix Electrical Specification Min. Value Mean Value Max. Value Remark Power Use the power adapter which meets the Voltage (V) 10.8 13.2 specifications. Current (mA) 1500 Switch Input VIH(V) VIL(V) The input ports are pulled up with 4.7 KΩ... - Page 97 BioStation T2 User Guide 5 Appendix FCC Rules Caution Changes or modifications not expressly approved by the manufacturer responsible for compliance could void the user’s authority to operate the equipment. Warning This device complies with part 15 of the FCC Rules. Operation is subject to the following two conditions: (1) This device may not cause harmful interface, and (2) this device must accept any interface received, including interference that may cause undesired operation.
- Page 98 BioStation T2 User Guide 5 Appendix Font License Copyright (c) 2010, NHN Corporation (http://www.nhncorp.com), with Reserved Font Name Nanum, Naver Nanum, NanumGothic, Naver NanumGothic, NanumMyeongjo, Naver NanumMyeongjo. This Font Software is licensed under the SIL Open Font License, Version 1.1. This license is copied below, and is also available with a FAQ at: http://scripts.sil.org/OFL SIL OPEN FONT LICENSE Version 1.1 - 26 February 2007...
- Page 99 BioStation T2 User Guide 5 Appendix DEFINITIONS “Font Software” refers to the set of files released by the Copyright Holder(s) under this license and clearly marked as such. This may include source files, build scripts and documentation. “Reserved Font Name” refers to any names specified as such after the copyright statement(s).
- Page 100 BioStation T2 User Guide 5 Appendix DISCLAIMER THE FONT SOFTWARE IS PROVIDED “AS IS”, WITHOUT WARRANTY OF ANY KIND, EXPRESS OR IMPLIED, INCLUDING BUT NOT LIMITED TO ANY WARRANTIES OF MERCHANTABILITY, FITNESS FOR A PARTICULAR PURPOSE AND NONINFRINGEMENT OF COPYRIGHT, PATENT, TRADEMARK, OR OTHER RIGHT.
Need help?
Do you have a question about the BioStation T2 and is the answer not in the manual?
Questions and answers