Table of Contents
Advertisement
Quick Links
Advertisement
Table of Contents

Related Manuals for Aaeon SBC-357


Summary of Contents for Aaeon SBC-357
-
Page 2: Fcc Statement
FCC STATEMENT THIS DEVICE COMPLIES WITH PART 15 FCC RULES. OPERATION IS SUBJECT TO THE FOLLOWING TWO CONDITIONS: (1) THIS DEVICE MAY NOT CAUSE HARM- FUL INTERFERENCE. (2) THIS DEVICE MUST ACCEPT ANY INTERFERENCE RECEIVED INCLUDING INTERFER- ENCE THAT MAY CAUSE UNDESIRED OPERATION. THIS EQUIPMENT HAS BEEN TESTED AND FOUND TO COMPLY WITH THE LIMITS FOR A CLASS "A"... - Page 3 This document is copyrighted, 1998, by AAEON Technology Inc. All rights are reserved. AAEON Technology Inc. reserves the right to make improvements to the products described in this manual at any time without notice. No part of this manual may be reproduced, copied, translated, or transmitted in any form or by any means without the prior written permission of AAEON Technology Inc.
- Page 4 Dear Customer, Thank you for purchasing the SBC-357 board. The user manual is designed to help you to get the most out of the SBC-357, please read it thoroughly before you install and use the board. This product that you have purchased comes with a one-year limited warranty;...
-
Page 5: Table Of Contents
Introduction ................2 Features ................... 3 Specifications ................3 Board layout ................5 Card dimensions ..............6 Jumpers and connectors ............8 Locating jumpers and connectors ......... 9 Setting jumpers ..............10 Safety precautions ..............11 Installing DRAM (SIMMs) ..........12 Installing SIMMs .............. - Page 6 LCD SHF/ASHF clock select (JP4) ......... 25 System management Interrupt (JP5) ....... 26 Hardware Reset (JP6) ............26 COM3/COM4 IRQ select (JP7) ........27 DiskOnChip installation (U15, JP8)......... 27 LCD driving voltage select (JP9, JP10) ......29 DiskOnChip socket (U15) ..........30 General information ............
- Page 7 Windows 3.1 ................. 56 Driver installation - Windows Setup ........56 DOS ..................57 SOFTWARE UTILITIES ........... 59 The CHIPSCPL utility program ..........59 Installing the utility ..............59 How to use the utility .............. 59 Watchdog timer Demo Program ........62 Installing PC/104 modules ..........
-
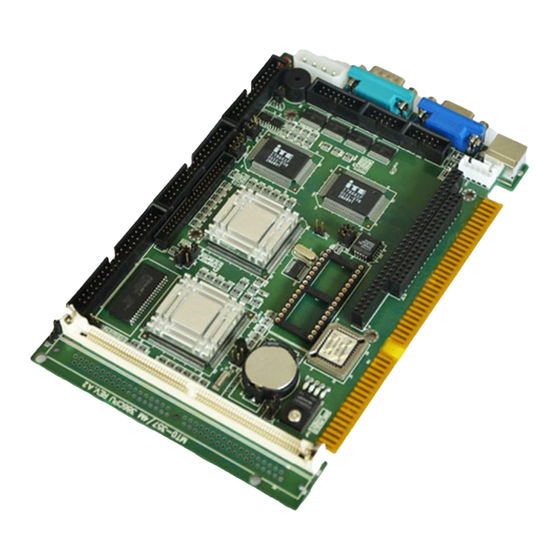
Page 9: Specifications
This chapter provides background information for the SBC-357. Sections include: · Card specifications · Board layout Chapter 1 General Information... -
Page 10: Features
You can change the display BIOS or install a boot ROM simply by programming the Flash chip. The SBC-357 supports 5 V EDO or FP DRAM. It also provides two 72-pin SIMM (Single In-line Memory Module) sockets for its onboard system DRAM. These sockets give you the flexibility to configure your system up to 32 MB of DRAM using the most economical combination of SIMMs. - Page 11 • 386SX-40 compatible CPU • DiskOnChip (SSD) up to 72MB • Can display both CRT and LCD simultaneously • Connector for PC/104 module expansion • Supports 4 serial ports: Three RS-232 ports and one RS-232/422/485 port CPU: Embedded in ALI M6117C Chipset Intel 80386SX-40 compatible Data bus: 16-bit BIOS: AMI Flash BIOS (Supports LBA mode HDD) Chipset: ALI M6117C...
- Page 12 Power supply voltage: +5V (4.75V to 5.25V) Max. power requirements: +5V @ 2A Operating temperature: 32 to 140 °F (0 to 60°C) Board Size: 7.3” (L) X 4.8” (W) (185mm x 122mm) Weight: 0.66 lb. (0.3Kg) 4 SBC-357 User Manual...
- Page 13 UM8663F 8 6 6 1 F Chapter 1 General Information...
- Page 14 19.00 80.645 98.50 121.00 19.60 6 SBC-357 User Manual...
- Page 15 This chapter describes how to set up the SBC-357 hardware, including instruc- tions on setting jumpers and connecting peripherals, switches, and indicators. Be sure to read all safety precautions before you begin the installation procedure. Chapter 2 Hardware Configuration...
-
Page 16: Jumpers And Connectors
KB/PS2 mouse connector IDE LED RS-232/422/485 select Buzzer or external speaker LCD SHF/ASHF clock select Green function select (SMI) Hardware reset COM3/COM4 IRQ select DOC address select LCD driving voltage select JP10 LCD voltage select (VGA CHIPSET) 8 SBC-357 User Manual... - Page 17 CN10 CN14 CN13 CN12 CN11 UM8663F 8661F JP10 Chapter 2 Hardware Configuration...
- Page 18 If you have any doubts about the best hardware configuration for your application, contact your local distributor or sales represen- tative before you make any changes. Generally, you simply need a standard cable to make most connections. 10 SBC-357 User Manual...
- Page 19 Warning! Always completely disconnect the power cord from your chassis whenever you are working on it. Do not make connections while the power is on because sensitive electronic components can be damaged by the sudden rush of power. Only experienced electronics personnel should open the PC chassis.
- Page 20 Memory Module) sockets and supports up to 32MB. When installing SIMMs, make sure that Bank 1 is filled first. * The SBC-357 CPU card supports single side F.P or EDO DRAM module only. Note: that the modules can only fit into a socket one way.
- Page 21 You can attach two Enhanced Integrated Device Electronics hard disk drives to the SBC-357's internal controller. The card comes with a 40-pin flat piggyback cable. This cable has three identical 40-pin flat-cable connectors. Wire number 1 on the cable is red or blue, and the other wires are gray.
- Page 22 The following table lists the pin numbers and their respective signals: Signal Signal Reset N.C. N.C. IORDY BALE N.C. IRQ 14 -I/O CS16 N.C. -ACT 14 SBC-357 User Manual...
- Page 23 You can attach up to two floppy disks to the SBC-357's onboard controller. You can use any combination of 5 1/4" (360 KB and 1.2 MB) and/or 3 1/2" (720 KB, 1.44 MB, and 2.88 MB) drives. The SBC-357 CPU card comes with a 34-pin daisy-chain drive connector cable.
- Page 24 Normally, the parallel port is used to connect the card to a printer. The SBC-357 includes an onboard parallel port, accessed through the CN3 connector, a 26-pin flat-cable connector. The CPU card comes with an adapter cable, which lets you use a traditional DB- 25 connector.
- Page 25 The SBC-357 CPU card's SVGA connector (CN10) supports monochrome displays as well as high resolution color displays. The card also features an LCD connector (CN4), which allows you to connect various flat panel displays. The following table lists their pin assignments:...
- Page 26 Signal Signal +12 V +12 V +5 V +5 V ENA VEE SHIFT CLK LATCH CL/C ENABKL N.C. N.C. N.C. N.C. 18 SBC-357 User Manual...
- Page 27 FIR_RX In single board computer (non-passive backplane) applications, you will need to connect the power directly to the SBC-357 board using CN6. This connector is fully compatible with the standard PC power supply connectors. See the following table for its pin...
- Page 28 The SBC-357 offers three RS-232 serial ports, and one RS-232/ 422/485 serial port. You can select or disable the address for each port with the BIOS Peripheral Setup program. The card mounting bracket holds COM1(CN8), the DB-9 serial port connector for the first port. The COM port connectors on the SBC-357 board are CN7 (COM2), CN9 (COM3), CN11 (COM4).
- Page 29 If COM2 (CN7) is assigned as RS-422/485, it's a dual-in line box header connector. Signal B485TXD+ B485TXD- B422RXD+ B422RXD- Chapter 2 Hardware Configuration...
- Page 30 The SBC-357 board provides two keyboard and one PS/2 mouse connectors. A 5-pin connector (CN9) supports passive backplane applications. A second 6-pin mini-DIN keyboard and PS/2 mouse connector (CN12) on the card mounting bracket supports single board computer applications. Function K.B.
- Page 31 You can use a switch (or a lock) to disable the keyboard. In this state the PC will not respond to any input. This is useful if you don’t want anyone to change or stop a running program. Simply connect the switch between Pins 4 and 5. The pin assignments appear in the following table: Function LED Power (+5 V)
- Page 32 JP2 to assign CN7 (COM2) as RS-422/RS-485 I/F, or otherwise assign CN7 (COM2) as RS-232 I/F. RS-232* 2 4 6 1 3 5 RS-422 2 4 6 1 3 5 RS-485 2 4 6 1 3 5 * default 24 SBC-357 User Manual...
- Page 33 The CPU card has its own buzzer. You can disable the internal buzzer and connect an external speaker to EXT SPK. Enabling the external speaker automatically disables the internal buzzer. Buzzer* External Speaker 1 2 3 4 5 1 2 3 4 5 * default Function N.C.
- Page 34 You can connect an external switch to easily reset your computer. This switch restarts your computer as if you turned off the power then turned it back on. The following table shows the pin assign- ments for JP6. Function Reset Ground 26 SBC-357 User Manual...
- Page 35 ® COM3 IRQ10 ® COM3 IRQ5 ® COM4 IRQ5 ® COM4 IRQ10 ® ® COM3 IRQ11 COM3 IRQ11 ® ® COM4 IRQ10 COM4 IRQ5 ® COM3 IRQ10 ® COM3 IRQ5 ® COM4 IRQ11 ® COM4 IRQ11 (default) Chapter 2 Hardware Configuration...
- Page 36 SW1 determines the memory adddress of the DiskOnChip memory. If you have another add-on card in the system that uses the same memory, neither the SBC-357 nor the add-on card will function normally. In this case, please change the memory address.
- Page 37 You can select LCD connector (CN4) driving voltage by setting JP9 & JP10. 5V * 3.3V JP10 * Default Chapter 2 Hardware Configuration...
- Page 38 Figure 1-MD2200 Pinout Note 1: Pins A13 through A16 are not used by the MD2200. They are kept for socket backward compatibility with ED 1100 (DiskOnChip 1000) Note 2: Pins 1 and 30 are not used by MD2200 30 SBC-357 User Manual...
- Page 39 This chapter describes how to set the BIOS configuration data.
-
Page 40: Cmos Ram
Auto Configuration with Optimal Settings Auto Configuration with Fail Safe Settings Save Settings and Exit Exit Without Saving Standard CMOS setup for changing time, date, hard disk type, etc. ESC: Exit :Sel F2/F3: Color F10: Save & Exit ¯- 32 SBC-357 User Manual... - Page 41 AMIBIOS Setup can be accessed via keyboard, mouse. The mouse click functions are: • single click to change or select both global and current fields • double click to perform an operation in the selected field AMIBIOS Setup has a built-in keyboard driver that uses simple keystroke combinations: Keystroke Function...
- Page 42 Sec Mode Mode Mode Mode Pri Master AUTO AUTO Off Pri Slave : AUTO AUTO Off Boot Sector Virus Protection Disabled Month: Jan - Dec Esc: Exit :Sel ¯- Day: 01-31 PgUp/PgDn: Modify Year: 1901 -2099 F2/F3: Color 34 SBC-357 User Manual...
- Page 43 Select the Date and Time icon in the Standard CMOS setup. The current values for each category are displayed. Enter new values through the keyboard or hit the "+" or "-" key to change values. Select the appropriate specifications to configure the type of floppy drive that is attached to the system: 360 KB 5¼", 1.2 MB 5¼", 720 KB 3½", and/or 1.44 MB 3½".
-
Page 44: Advanced Cmos Setup
Hard disk Delay Disabled C000, 32k Shadow Enabled C800, 32k Shadow Disabled D000, 32k Shadow Disabled D800, 32k Shadow Disabled ESC: Exit :Sel ¯- E000, 32k Shadow Disabled PgUp/PgDn: Modify E800, 32k Shadow Disabled F2/F3: Color 36 SBC-357 User Manual... - Page 45 Set this option to Enabled to instruct AMIBIOS to boot quickly when the computer is powered on. This option replaces the old "Above 1 MB Memory Test" Advanced Setup option. Setting Description Disabled AMIBIOS tests all system memory. AMIBIOS waits up to 40 seconds for a READY signal from the IDE hard disk drive.
- Page 46 The settings are Mono, CGA40x25, CGA80x25, VGA/EGA, or Absent. The default setting is EGA/VGA. This option allows user to select the display device. The settings are CRT, LCD, and Both. The default setting is Both. 38 SBC-357 User Manual...
- Page 47 This option allows the user to select the LCD type. t i b t i b t i b t i b t i b t i b t i b t i b This option enables password checking every time the computer is powered on or every time AMIBIOS Setup is executed.
- Page 48 BIOS ROM to system RAM for faster execution. The settings are Enabled or Disabled. The default setting is Disabled. This option allows you to select the hard disk delay time from 5 sec to 15 sec. The default setting is Disabled. 40 SBC-357 User Manual...
- Page 49 C000, 32K Shadow C800, 32K Shadow D000, 32K Shadow D800, 32K Shadow E000, 32K Shadow E800, 32K Shadow These options control the location of the contents of the 16KB of ROM beginning at the specified memory location. If no adapter ROM is using the named ROM area, this area is made available to the local bus.
- Page 50 ISA Memory High Speed :Disabled ESC: Exit :Sel ¯- ISA Write cycle end Insert Wait :Enabled PgUp/PgDn: Modify Memory Hole at 15-16M :Disabled F2/F3: Color I/O Recovery :Enabled I/O Recovery Period :0.50 us 16Bit ISA Insert Wait :Enabled 42 SBC-357 User Manual...
- Page 51 Function option At Bus Clock 14.318/2 PCLK 2/3 PCLK 2/4 PCLK 2/5 PCLK 2/6 PCLK 2/8 PCLK 2/10 PCLK 2/12 DRAM Refresh Type CAS/RAS RAS only DRAM Self-Refresh Disabled Enabled Slow Refresh 15 µs 60 µs 120 µs RAS Precharge Time 2.5T 1.5T 3.5T...
- Page 52 0 µs 0.25 µs 0.50 µs 0.75 µs 1.00 µs 1.25 µs 1.50 µs 1.75 µs 2.00 µs 2.25 µs 2.50 µs 2.75 µs 3.00 µs 3.25 µs 3.50 µs 16 Bit ISA Insert Wait Enabled Disabled 44 SBC-357 User Manual...
-
Page 53: Chapter 3 Amibios Setup
The Power management setup offers options to help reduce power consumption. To see the options in this group, choose the Power management setup icon from the AMIBIOS setup main menu. AMIBIOS SETUP — BIOS SETUP UTILITIES (C) 1995 American Megatrends, Inc. All Rights Reserved Standard CMOS Setup Advanced CMOS Setup Advanced Chipset Setup... - Page 54 10 seconds to 2 hours and can be set manual- ly when power management is in SMI. The default setting is Disabled. When the system goes into power saving mode, power management will skip to the next mode in the sequence if this is disabled. 46 SBC-357 User Manual...
- Page 55 This sets the period of system inactivity after which the system goes into Standby mode, the intermediate power saving state. The settings range from 10 seconds to 2 hours and can be set manually when power management is in SMI. The default setting is Disabled.
- Page 56 F2/F3: Color This option specifies the onboard IDE controller channels that will be used. The settings are Disabled or Enabled. This option enables the floppy drive controller on the mother- board. The settings are Enabled, or Disabled. 48 SBC-357 User Manual...
- Page 57 This option enables the parallel port on the motherboard and specifies the parallel port base I/O port address. The settings are Disabled, 278, 378, and 3BC. The default setting is Enabled. This option specifies the parallel port mode. ECP and EPP are both bidirectional data transfer sechemes that adhere to the IEEE P1284 specification.
- Page 58 Auto Configuration with Optimal Settings Auto Configuration with Fail Safe Settings Save Settings and Exit Exit Without Saving Standard CMOS setup for changing time, date, hard disk type, etc. ESC: Exit :Sel F2/F3: Color F10: Save & Exit ¯- 50 SBC-357 User Manual...
- Page 59 You can load the optimal default settings for the AMIBOIS setup options by selecting it from the main menu. The optimal default settings are best case values that should optimize system perfor- mance. If CMOS RAM is corrupted, the optimal settings are loaded automatically.
- Page 60 Auto Configuration with Optimal Settings Auto Configuration with Fail Safe Settings Save Settings and Exit Exit Without Saving Standard CMOS setup for changing time, date, hard disk type, etc. ESC: Exit :Sel F2/F3: Color F10: Save & Exit ¯- 52 SBC-357 User Manual...
- Page 61 If you select this option and press <Enter>, the values entered in the setup utilities will be recorded in the chipset's CMOS memory. The microprocessor will check this every time you turn your system on and compare this to what it finds as it checks the system.
- Page 62 Auto Configuration with Optimal Settings Auto Configuration with Fail Safe Settings Save Settings and Exit Exit Without Saving Standard CMOS setup for changing time, date, hard disk type, etc. ESC: Exit :Sel F2/F3: Color F10: Save & Exit ¯- 54 SBC-357 User Manual...
- Page 63 The SBC-357 features an onboard flat panel/SVGA interface. This chapter provides instructions for installing and operating the software drivers on the included display driver diskette.
- Page 64 Windows Program Manager, choose File from the Options Menu. Then from the pull-down menu, choose Run. At the Command Line prompt, type cd-rom drive: \CD ROM\model name\sbc-357\vga driver \Oemsetup.inf. "cd-rom": the drive letter of your CD-ROM drive "model name": the model number of your product Press the <ENTER>...
- Page 65 2. Place the Supporting CD-ROM into yur CD-ROM drive. Type cd-rom drive: <ENTER> to make this the default drive. 3. Type "\CD ROM\model name\sbc-357\357\vga driver\setup" <ENTER> to run the driver SETUP program. Press any key to get to the applications list.
- Page 66 CRT. These drivers will show a section of a larger screen, and will automatically pan or scroll the screen horizontally and vertically when the mouse reaches the edge of the display. SBC-357 User Manual...
- Page 67 This chapter describes the operation and installation of the display drivers supplied on the Supporting CD-ROM that are shipped with your product. • CHIPSCPL Ò This utility program is designed to work with Microsoft Win- dowsÔ Version 3.1. CHIPSCPL.CPL is a WindowsÔ based utility to select resolutions and color depth.
- Page 68 DPI<ALT P> allows you to select a large or small font. DISPLAY<ALT D> allows you to select the display type from the following: • CRT only • LCD (Flat Panel) only • Both CRT and LCD (flat Panel) SBC-357 User Manual...
- Page 69 The following sample programs illustrates the programming steps required to enable, set, and disable the watchdog timer.
- Page 70 NMI or IRQ may happen to be decided by user’s programming. Configuration register The watchdog timer of SBC-357 is located on the chipset - ALI M6117C. If you want to use it, you have to know how to read/ write the configuration register of M6117C. Following is the basic procedure.
-
Page 71: Watchdog Timer Demo Program
1. Set index 37h bit 6 = o to disable the timer. 2. Write the desired counter value to 3Bh, 3Ah, 39h. 3. Set index 37h bit 6 = 1 to enable the timer. 4. When counter reaches the setting value, the timer will generate signal setting by index 38h bit [7:4] Appendix A Watchdog Timer Demo Program... - Page 72 22h,al IO_Delay al,0c5h 23h,al IO_Delay ENDM Close_Chip MACRO push al,13h 22h,al IO_Dealy al,0 23h,al IO_Delay ENDM Write_To_Chip PROC ;;Input: ah - Data al - Index# Open_Chip 22h,al IO_Delay xchg ah,al 23H,AL IO_Delay Close_Chip ENDP 64 SBC-357 User Manual...
- Page 73 Read_From_Chip PROC ;;Input: al - Index# ;;Output al - Data Open_Chip 22h,al IO_Delay al,23h IO_Delay Close_chip ENDP Watchdog_Timer_Program: Open_Chip al,37h call Read_From_Chip bl,al ;;save register data al,10111111b ;;set bit6=0 to disable timer ah,al al,37h call Write_To_Chip ah,33 ;;1 msec=33x30.5u sec al,39h call Write_To_Chip...
- Page 74 66 SBC-357 User Manual...
-
Page 75: Installing Pc/104 Modules
This appendix gives instructions for installing PC/104 Modules. Appendix B Installing PC/104 Modules B-67... - Page 76 The SBC-357's PC/104 connectors give you the flexibility to attach PC/104 expansion modules. These modules perform the functions of traditional plug-in expansion cards, but save space and valuable slots. Modules include: • PCM-3110B PCMCIA Module (one-slot) • PCM-3115B PCMCIA Module (two-slot) •...
- Page 77 Installing these modules on the SBC-357 is a quick and simple operation. The following steps show how to mount the PC/104 modules: Step1 Remove the SBC-357 from your system, paying particular attention to the safety instructions already mentioned above. Step2 Make any jumper or link changes required to the CPU card now.
- Page 78 0.300 3.250 3.775 3.575 3.575 0.200 0.200 3.350 0.200 3.550 B-70 SBC-357 User Manual...
Need help?
Do you have a question about the SBC-357 and is the answer not in the manual?
Questions and answers