Table of Contents
Advertisement
Advertisement
Table of Contents

Related Manuals for Free Spirit 30518


Summary of Contents for Free Spirit 30518
- Page 1 30518 T R EADMILL US ER’ S GUID E...
-
Page 3: Table Of Contents
I N T RO DU CT I O N CONGRATULATIONS and THANK YOU for your purchase of this Freespirit treadmill! Whether your goal is to win races or simply enjoy a fuller, healthier lifestyle, a Freespirit treadmill can help you attain it – adding club-quality performance to your at-home workouts, with the ergonomics and innovative features you need to get stronger and healthier, faster. -
Page 4: Important Precautions
I M P OR TAN T P RECAUT I ON S SAVE THESE INSTRUCTIONS Read all instructions before using this treadmill. When using an electrical product, basic precautions should always be followed, including the following: Read all instructions before using this treadmill. It is the responsibility of the owner to ensure that all users of this treadmill are adequately informed of all warnings and precautions. - Page 5 To reduce the risk of burns, fire, electrical shock or injury to persons: WARNING • Never use the treadmill before securing the safety tether clip to your clothing. • If you experience chest pains, nausea, dizziness, or shortness of breath, stop exercising immediately and consult your physician before continuing.
-
Page 6: Assembly
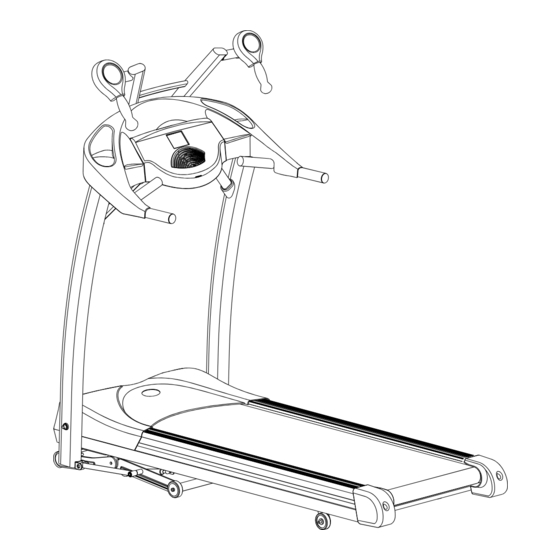
A S S E M B LY IMPORTANT: READ THESE SAFETY INSTRUCTIONS BEFORE USE! WARNING During the assembly process of the treadmill there are several areas that special attention must be paid. It is very important to follow the assembly instructions correctly and to make sure all parts are firmly tightened. - Page 7 V-BRACKET CORE PODS CONSOLE TOUCH PAD PANEL WITH BLUE/GREEN BACK-LIT DISPLAY READING RACK WATER BOTTLE HOLDER SUPPORT BARS GRIP PULSE HANDRAILS SAFETY KEY PLACEMENT CONSOLE MAST MOTOR COVER ON/OFF SWITCH FOOT LOCK LATCH CIRCUIT BREAKER RUNNING BELT / RUNNING DECK POWER CORD SIDE RAIL ROLLER END CAP...
- Page 8 PR E - ASS E M BLY DO NOT CUT STRAPS UNTIL STEP 1-E!* Disassemble box and remove the WARNING cardboard packaging that is not beneath the treadmill. Do not attempt to lift the treadmill at this time. Remove plastic wrap from console masts. NOTE: It is recommended that you apply grease to the threads of each bolt as you assemble your treadmill, to prevent loosening and noise.
- Page 9 A S S E M BLY ST E P 2 HARDWARE BAG FOR STEP 2 CONTENTS : A Open HARDWARE BAG FOR STEP 2. B With running deck in lowered position, place CONSOLE on upright masts. Slide the brackets that are underneath the console into the top holes of the upright masts.
- Page 10 A S SE MB LY S T E P 3 HARDWARE BAG FOR STEP 3 CONTENTS : A Open HARDWARE BAG FOR STEP 3. B Slide SUPPORT BARS into side MOUNTING BRACKETS and line up with top MOUNTING BRACKETS. C Insert 2 BOLTS (E) into the tops and 2 BOLTS (E) into the bottoms of each SUPPORT BAR.
- Page 11 A S S E M BLY ST E P 4 HARDWARE BAG FOR STEP 4 CONTENTS : A Open HARDWARE BAG FOR STEP 4. B Attach V BRACKET to CONSOLE BRACKET using 2 BOLTS (F) and 2 SCREWS (G). C Attach V BRACKET COVER to V BRACKET using 2 BOLTS (H).
-
Page 12: Before You Begin
B E F O R E YO U BEGI N CONGRATULATIONS! on choosing your treadmill. You’ve taken an important step in developing and sustaining an exercise program! Your treadmill is a tremendously effective tool for achieving your personal fitness goals. Regular use of your treadmill can improve the quality of your life in so many ways. HERE ARE JUST A FEW OF THE HEALTH BENEFITS OF ExERCISE: •... -
Page 13: Proper Usage
PROPER USAGE Your treadmill is capable of reaching high speeds. Always start off using a slower speed and adjust the speed in small increments to reach a higher speed level. Never leave the treadmill unattended while it is running. When not in use, remove the safety key, turn the on/off switch to off and unplug the power cord. -
Page 14: Tensioning The Running Belt
TENSIONING THE RUNNING BELT The running belt has been properly adjusted at the factory before it was shipped. At times the belt can move off-center during shipment. CAUTION: Running belt should NOT be moving during tensioning. Over-tightening the running belt can cause excessive wear on the treadmill as well as its components. -
Page 15: Treadmill Operation
TR E A DM IL L O PE R AT ION START ENTER QUICK START CHANGE DISPLAY TOUCH TOUCH ™ ™ INCLINE SPEED INCLINE ADJUST SPEED ADJUST STOP HOLD TO RESET Note: There is a thin protective sheet of clear plastic on the overlay of the console and should be removed. A) COLOR-CHANGING MONITOR DISPLAY: Speed, Time, Pulse, Distance, Incline, Calories and Program Profiles. - Page 16 M O N IT OR DI S PL AY SPEED • Shown as MPH. Indicates how fast your walking or running surface is moving. TIME • Shown as Minutes:Seconds. View the time remaining or the time elapsed in your workout. PULSE •...
- Page 17 GE TTI NG STA RT ED / S EL E C T I NG A PRO GRA M Check to make sure nothing is on or will hinder the movement of the treadmill. Plug in the power cord and turn the treadmill ON. Stand on the side rails of the treadmill.
- Page 18 USIN G T HE C OR E P OD PR O G RA MS 1) After you have selected a program, a level, time and speed press START and begin walking. 2) After several minutes, the CORE POD ICON will start to flash in the middle of the screen and ‘GET READY!’...
- Page 19 ROLLING CUSTOM 1 WEIGHT LOSS CUSTOM 2 GOLF COURSE P R OGRA M I N FO R M AT I ON THR ZONE 1 RACE THR ZONE 2 PR OG R A M 1: M A N U AL MANUAL CUSTOM 1 VALLEY User defines SPEED and INCLINE changes.
- Page 20 VALLEY TOUR P R OG RA M 4 : C OR E A DVA NCE D 2 CORE DISTANCE BASED with INCLINE changes. Screen will cycle between green and blue at various intervals depending on level chosen by user. User is advised to use core pods while the screen is green. 4 minute warm-up and 4 minute cool-down.
- Page 21 MANUAL INTERVALS ROLLING PR OG R A M 6: W E I GH T L O S S WEIGHT LOSS GOLF COURSE TIMED INTERVALS with SPEED and INCLINE changes. Time-based goal with 10 difficulty levels to choose from. 4 minute warm-up and 4 minute cool-down. RACE WEIGHT LOSS PROGRAM SEGMENTS (all segments last 30 seconds) WARM-UP...
-
Page 22: Conditioning Guidelines
C ON DI T IO N IN G GUI DE L I NE S ALWAYS CONSULT YOUR PHYSICIAN BEFORE BEGINNING AN ExERCISE PROGRAM. HOW OFTEN? (Frequency of Workouts) The American Heart Association recommends that you exercise at least 3 to 4 days per week to maintain cardiovascular fitness. - Page 23 TAR GET HE AR T R AT E Z ON E CH A R T What is Target Heart Rate Zone? Target Heart Rate Zone tells you the number of times per minute your heart needs to beat to achieve a desired workout effect. It is represented as a percentage of the maximum number of times your heart can beat per minute.
- Page 24 STRETCHING STRETCH FIRST Before using your product, it is best to take a few minutes to do a few gentle stretching exercises. Stretching prior to exercise will improve flexibility and reduce chances of exercise related injury. Ease into each of these stretches with a slow gentle motion.
- Page 25 T IP S THE IMPORTANCE OF WARM UP & COOL DOWN WARM UP The first 2 to 5 minutes of a workout should be devoted to warming up. The warm-up will limber your muscles and prepare them for more strenuous exercise. Make sure that you warm-up on your product at a slow pace.
- Page 26 W E E K LY L O G SH EETS W EEK # WEEKLY GOAL D AY DAT E D I STA NC E C ALO RI ES T I M E COM ME NT S SUN DAY MO N DAY T UE S DAY W E D NE S DAY T HU RS DAY...
- Page 27 MO N TH LY L O G SH E ETS M ON T H MONTHLY GOAL W EEK # DIS TA NCE CALORIES TIME M ON T HLY TOTA LS : M ON T H MONTHLY GOAL W EEK # DIS TA NCE CALORIES TIME...
-
Page 28: Troubleshooting & Maintenance
TR O UB L E SH O OTI NG COMMON PRODUCT qUESTIONS ARE THE SOUNDS MY TREADMILL MAKES NORMAL? All treadmills make a certain type of thumping noise due to the belt riding over the rollers, especially new treadmills. This noise will diminish over time, although may not totally go away. Over time, the belt will stretch, causing the belt to ride smoother over the rollers. - Page 29 PROBLEM: The treadmill circuit breaker trips during a workout. SOLUTION: Verify the following: • Make sure the treadmill is plugged into a dedicated 20-amp circuit. • Verify that you do not have the machine on an extension cord or surge protector. •...
- Page 30 MA I NT E N AN C E Cleanliness of your treadmill and its operation environment will keep maintenance problems and service calls to a minimum. For this reason, we recommend that the following preventive maintenance schedule be followed. AFTER EACH USE (DAILY) Clean and inspect, following these steps: •...
-
Page 31: Limited Warranty
LI M I TE D H OM E-U S E WARRANT Y FRAME • 10 YEARS Sears warrants the frame against defects in workmanship and materials for a period of ten years from the date of purchase, so long as the device remains in the possession of the original owner. DRIVE MOTOR/ELEVATION •... -
Page 32: Parts List
P A RT S L I ST SP0003081AB Support Tube - Left MC0403014A Reed Switch SP0004066AB Support Tube - Right MZE0107023 Screw SP0016004AB Crossbar MZE0107021AB Screw, oval-tapping SP0017009BF Incline Motor Frame MB1124011AA LCD Screen SP0018022AE Fold Frame MC0712021B Pulse Grip - Single SP0022013AE Lower Link Arm MB0609092AB... -
Page 33: Exploded Drawing
E xPLO D E D D RAWI N G... - Page 36 Get it fixed, at your home or ours! ® 30518 Core Training Treadmill. Rev. 1.1 | Designed & Engineered in the U.S.A. | Made in China...
Need help?
Do you have a question about the 30518 and is the answer not in the manual?
Questions and answers