
Subscribe to Our Youtube Channel
Related Manuals for Rumble Tuff PA201S


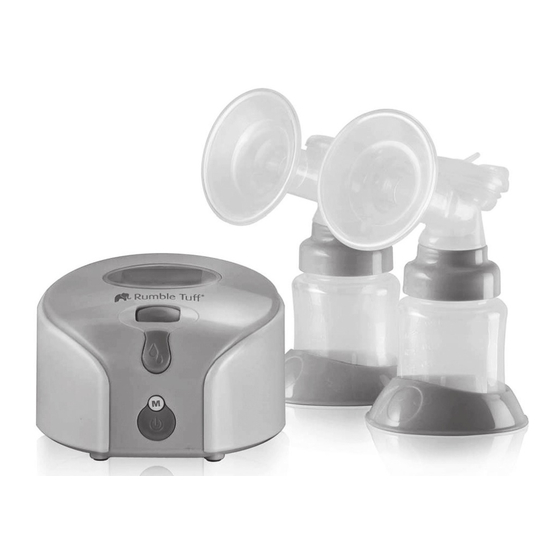
Summary of Contents for Rumble Tuff PA201S
- Page 1 PA201S/203S Rumble Tuff Electric Breast Pump Instructions & Assembly C2.indd 1 2011/11/25 下午 05:01:36...
- Page 2 C2.indd 2 2011/11/25 下午 05:01:36...
-
Page 3: Congratulations
Congratulations ® ® Congratulations on your new Rumble Tuff Electric Breast Pump! The Rumble Tuff Electric Breast Pump is perfect for many occasions. ● Collecting breast milk while you're away from your baby ○ for example: when you're at work ●... -
Page 4: Table Of Contents
Table of Contents Congratulations ........................Important Safeguards ................................................● DANGER ..........................● WARNING Parts Guide ................................................● Electrical Pump Main Unit ● LCD Screen Guide ..............................................● Expression Collection Kit ......................● Manual-Pump Diaphragm Kit Electric Pump Assembly Instructions .................. - Page 5 ........................● Cleaning Instructions Breastmilk Storage Guidelines ............................................● Important Notes Tips ..................................................... ● Pumping Tips ......................... ● Battery Storage ........................● Breastfeeding Tips Troubleshooting ............................................● Interruption of Electrical Service ......................● Radio Frequency Energy ........................●...
-
Page 6: Important Safeguards
Electric Breast Pump, then into the electrical outlet. ® ● Only use the electrical cord and/or Li-Ion battery pack that comes with your Rumble Tuff Electric Breast Pump. ● If you are infected with Hepatitis A, Hepatitis B, or have HIV (Human Immunodeficiency Virus): pumping breast milk does not reduce or remove the risk of transmitting the virus to your baby through breast milk. -
Page 7: Parts Guide
Parts Guide AC Adapter Vacuum Tube with Adaptor Breast Pump Main Unit Bottle Adapter Kit Electric-Pump Diaphragm Kit English 4 C2.indd 7 2011/11/25 下午 05:01:36... -
Page 8: Electrical Pump Main Unit
● Electrical Pump Main Unit TOP VIEW BOTTOM VIEW LCD Screen Vacuum Adjusting Wheel Let-Down Button M Button On/ Off Button & Power LED Battery Cover Tubing Adapter Inlet AC Adapter Inlet ● LCD Screen Guide Suction level indicator Power indicator Stimulation Cycle indicator Memory function indicator Alarm... -
Page 9: Expression Collection Kit
● Expression Collection Kit Diaphragm Cup with O-Ring Breastshield Body Let-down Silicone Cushion One-Way Valve Bottle Adapter Bottle Bottle Base ● Manual-Pump Diaphragm Kit Valve Stem Handle Manual Diaphragm English 6 C2.indd 9 2011/11/25 下午 05:01:36... -
Page 10: Electric Pump Assembly Instructions
Electric Pump Assembly Instructions ® Your Rumble Tuff Electric Breast Pump comes pre-assembled; however, you will need to re-assemble after each cleaning. (For cleaning instructions, see page 35) Below is a step-by-step guide for assembling the Expression Collection Kit: 1. Hold the "horn" of the Breastshield Body in one hand. Make sure the bottle-thread side opening is facing up. - Page 11 3. With your thumb and fore-finger, gently seal any openings on the tip of the One-Way Valve and shape into a straight line. Note: This is critical to the optimal performance of the Pump. 4. Carefully twist the Bottle Adapter to the Breastshield Body for a secure fit. Note: Be sure not to bump the One-Way Valve when twisting the Breastshield Body &...
- Page 12 Assembly Instructions Continued (Electric Pump) 6. With the Cup in one hand, place the Silicone Diaphragm in the Cup (matching the shape of the Cup). Press around the edges of the Diaphragm for a secure fit. Make sure the Diaphragm is evenly mounted on the Cup and there are no gaps in between them.
- Page 13 8. Twist the Cup clockwise into the Breastshield Body until it locks. English 10 C2.indd 13 2011/11/25 下午 05:01:39...
- Page 14 9. With the assembled Expression Collection Kit in one hand (Cap on top, Bottle on bottom), take the open-end of tubing and connect to the Tubing Connector (on the Cap). Push together firmly for a tight seal. Note: Make sure there is no moisture in the tubing. Tubing Connector 10.
-
Page 15: Manual Pump Assembly Instructions
Manual Pump Assembly Instructions ® Your Rumble Tuff Manual Breast Pump comes pre-assembled; however, you will need to re-assemble after each cleaning. (For cleaning instructions, see page 35) Below is a step-by-step guide for assembling the Expression Collection Kit: 1. Hold the "horn" of the Breastshield Body in one hand. Make sure the bottle-thread side opening is facing up. - Page 16 3. With your thumb and fore-finger, gently seal any openings on the tip of the One-Way Valve and shape into a straight line. Note: This is critical to the optimal performance of the Pump. 4. Carefully twist the Bottle Adapter to the Breastshield Body for a secure fit. Note: Be sure not to bump the One-Way Valve when twisting the Breastshield Body &...
- Page 17 Assembly Instructions Continued (Manual Pump) 1. With the Cup in one hand, place the Manual Silicone Diaphragm in the cup (matching the shape of the Cup). Press around the edges of the Diaphragm for a secure fit. Make sure the Diaphragm is evenly mounted on the Cup and there are no gaps in between them.
- Page 18 3. Place the "U" shape slot of the Handle onto the recess of the Valve Stem. (There are 2 recesses on the Valve Stem. The upper one replicates Stimulation setting, and the bottom one replicates Expression setting.) Stimulation Expression 4. Push down the Handle onto the hinge of the Cup until it snaps into place. 5.
-
Page 19: Power Options
Power Options Your Electric Breast Pump may be operated under any of the following power supply modes: Using your AC Adaptor (included): ● Electrical safety can only be achieved when using the AC Adaptor which was provided with the Pump. Use of any another Adaptors causes concern for the safety of the product and/or user and voids the warranty. -
Page 20: Using The Li-Ion Rechargeable Battery (For Pa201 Only)
Using the Li-Ion Rechargeable battery (for PA201 only): Li-on Battery Compartment Li-on Battery ● Prior to first use, charge the battery for 24 hours. If necessary, your Electric Breast Pump can be used during this period with the power cord only. For best results, allow the Pump to initially charge uninterrupted for 24 hours. ●... -
Page 21: Install The Battery: (Li-Ion Rechargeable)
Install the Battery: (Li-Ion Rechargeable) 1. Open the Battery Cover. 2. Remove the old Li-Ion Rechargeable battery by releasing the locking hook. The Battery pops out automatically. 3. Insert the new Li-Ion Rechargeable battery and push the Battery into compartment until the Battery is locked. - Page 22 4. Close the Battery Cover, making sure it "snaps" into place. English 19 C2.indd 22 2011/11/25 下午 05:01:46...
-
Page 23: Using 4 Aa Alkaline Batteries (For Pa203 Only) (Batteries Not Included)
(not included) ● Always replace all 4 batteries at the same time. ® ● Remove all batteries from the Electrical Pump Base if the Rumble Tuff Electric Breast Pump is not going to be used for extended periods of time. -
Page 24: Install The Batteries(Aa Alkaline)
Install the Batteries(AA Alkaline): 1. Open the Battery Cover. 2. Remove the old batteries if you are replacing them. 3. Insert 4 new AA Alkaline batteries. Note: Make sure the polarity is correct as indicated. English 21 C2.indd 24 2011/11/25 下午 05:01:47... - Page 25 4. Close the Battery Cover, making sure it "snaps" into place. English 22 C2.indd 25 2011/11/25 下午 05:01:47...
-
Page 26: Pumping Instructions
Pumping Instructions 1. Make sure the tubing connector is properly inserted into the Electric Pump Base. 2. Hold the Expression Collection Kit to your breast so that your nipple(s) are centered inside the Breast Shield. 3. Press the On/Off Button to begin pumping. - Page 27 4. The LCD screen shows the time of your last pumping session for a few seconds, The Pump will automatically begin in the Stimulation Cycle 5. Adjust the suction in the Stimulation Cycle to your comfort level while pumping by rolling the Vacuum Adjusting Wheel Vacuum Adjusting Wheel...
- Page 28 Stimulation Cycle 7. After two minutes, the Stimulation Cycle will be ended and automatically switches to the Expression Cycle . The Expression icon will appear to indicate that you are in the Expression Cycle. Expression Cycle Vacuum Adjusting 8. Adjust the suction in the Expression Cycle to the most comfortable and effective level while Wheel pumping by rolling the Vacuum Adjusting Wheel up (+) or down (-) .
- Page 29 Breast Shield and the breast, similar to the way you break away from your baby's suction. ® Note: If the Rumble Tuff Electric Breast Pump is left on, but unattended for more than 30 minutes, the Pump will automatically shut-off.
-
Page 30: Using The Manual Pump
Using the Manual Pump Note: There are two recesses for attaching the handle to the Manual Pump. You can toggle between these two settings by pressing the Valve Stem away from the “U” shape tip of the Handle to dislocate the connection. Then reattach the Tip to the Stem in different recess. - Page 31 2. You can adjust the suction level by turning the round knob on the top of the Valve Stem. Turning Emişi artır clockwise to increase the suction and counter-clockwise to reduce it. Emişi azalt English 28 C2.indd 31 2011/11/25 下午 05:01:52...
-
Page 32: Suction Level
Suction Level ® Whenever you select a Suction Level (in both Stimulation & Expression Cycle), your Rumble Tuff Electric Breast Pump remembers until you change it next time. This feature becomes useful after you are familiar with this pump. Your Rumble ®... - Page 33 3. Your pump automatically switches from Stimulation Cycle to Expression Cycle at your personal Let-down time. NOTE: You CANNOT adjust the suction level or switch between Stimulation Cycle and Expression Cycle while in Custom Mode. If you have to, stop My Favorite Mode by pressing the M Button. English 30 C2.indd 33 2011/11/25 下午...
-
Page 34: Setting The Time
Setting the Time How to Adjust the Clock: 1. While in the Clock/Standard by Mode, press and hold the M Button for 3 seconds to go into Clock Setting mode. A beep will sound and the AM/PM icon will flash. 2. - Page 35 Press Memory Press Button Let-down Clock for more Button than 3 sec ** Roll Adjusting Wheel to adjust. Press Press Let-down Let-down Button Button AM / PM Adjusting "Hour" Adjusting "Min" Adjusting English 32 C2.indd 35 2011/11/25 下午 05:01:52...
-
Page 36: Alarm Clock Mode
Alarm Clock Mode It is advised to pump regularly in order to maintain a good milk supply from your body. The Alarm Clock Mode is designed to maintain a regular Expression Cycle, by reminding you when it's time for your next pumping cycle. After setting the time interval between each pumping, the alarm countdown will automatically start after the previous pumping cycle has stopped. - Page 37 Press Press Memory Let-down Button Button Clock ** Roll Adjusting Wheel to adjust. alternative Time period adjusting Alarm On shows Press Let-down Button Alarm time display Alarm Off English 34 C2.indd 37 2011/11/25 下午 05:01:52...
-
Page 38: Cleaning Instructions
Unless otherwise instructed by your healthcare provider, follow these sanitizing and cleaning instructions. Sanitize Prior to First Use: ® Before you use your Rumble Tuff Electric Breast Pump for the first time, disassemble and boil all parts of the Expression Collection Kit in water for 10 minutes. -
Page 39: Breastmilk Storage Guidelines
Breastmilk Storage Guidelines Check with your healthcare provider or an International Board Certified Lactation Consultant for specific storage instructions. This information is based on current research and applies to mothers who have healthy, full-term babies who are storing their milk for home use. Important Notes: ●... - Page 40 Refrigerator Style Deep Freeze Freezer Refrigerator 32°F to Room Temperature (Self-contained 39°F 66°F to 78°F freezer) approx. 0°F 6 months - ideal 72 hours - ideal 4 hours - ideal Fresh Breastmilk 6 months - acceptable 12 months - acceptable Up to 8 days - 6 hours - acceptable acceptable...
-
Page 41: Tips
Tips Pumping Tips: The most important and successful part of pumping is the let-down reflex. The let-down reflex is when your milk begins to flow freely. ● Try relaxing with a warm, wet compress on your breast. ● Sometimes a light circular massaging of the breast prior to and/or during a pumping session will help your let-down reflex start/continue. -
Page 42: Battery Storage
Breastfeeding Tips: ® ● The Rumble Tuff Electric Breast Pump helps you maintain a healthy supply of milk and can help you prepare for planned events such as "Date Night" or unexpected events such as surgery, thrush, or relief from tender nipples. -
Page 43: Troubleshooting
○ Inspect the one-way valve for any tears or pinholes. This component is critical to achieving proper suction. If ® damaged, replace the One-Way Valve with one of the spare valves that is provided with your Rumble Tuff Electric Breast Pump. -
Page 44: Breastmilk Buildup In The Breast Shield Body
Electric Breast Pump to allow the milk to drain before gradually increasing. Where to get Replacement Parts: If you are missing a part or a part was damaged in the shipping/packaging process, please contact Rumble Tuff® customer service by calling toll-free (855) 228-8388 for a return authorization number. -
Page 45: Technical Data
Technical Data Power Requirements: ● AC Adapter (included) North American Plug configuration: 100V ~ 240V AC, 50/60 Hz, 0.4A, wall plug type AC adaptor with DC 12V/1A output. ● Batteries: Li-Ion Rechargeable battery; 7.4V 2000mAh, compatible with BN-V214(for PA201 only) 4 AA batteries;... -
Page 46: Warranty
® replacement parts or labor. The purchaser shall bear all expenses related to returning this product to Rumble Tuff This warranty does not apply to any part of the product that has been subject to misuse, abuse, or alteration. Only Rumble Tuff ®... - Page 47 If you wish to make a claim under this warranty, you will need the following: ® ● The Rumble Tuff product ● The original receipt showing date of purchase ● Return Authorization Number (RA#) ● Detailed description of the problem You, the purchaser, are responsible for all shipping charges.
- Page 48 ® Rumble Tuff is the trademark owned and operated by A Cute Baby, Inc. 865 N 1430 W Orem UT 84057-6402 Tel. 801.609.8168 Fax. 801-796.2688 www.acutebaby.com www.rumbletuff.com C2.indd 48 2011/11/25 下午 05:01:53...
Need help?
Do you have a question about the PA201S and is the answer not in the manual?
Questions and answers