Table of Contents
Advertisement
Quick Links
Advertisement
Table of Contents

Related Manuals for Lumens PS400


Summary of Contents for Lumens PS400
- Page 1 PS400 Digital Visualizer Quick Start Guide English -...
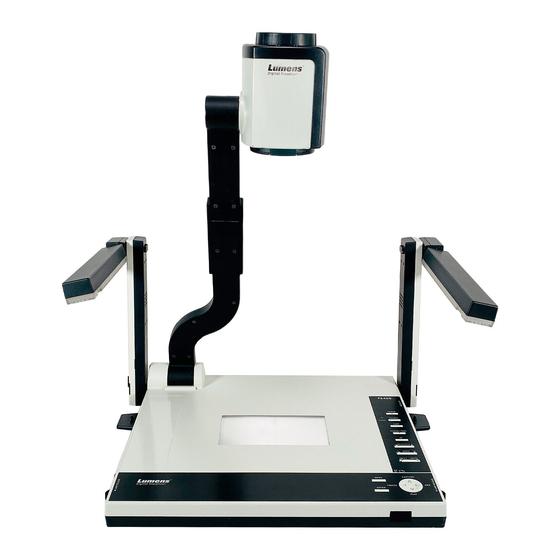
- Page 2 1. Product Content Main Unit Quick Start Guide User Manual Power Cord USB Cable Download Card C-Video Cable VGA Cable Remote 2. Product Overview 1. Camera Head 2. Camera arm 3. Lamp 4. Backlight 5. Remote controller slot 6. CF card slot 7.
- Page 3 3. Installation Process 3.1 Input /Output Connection 3.1.1 Connecting VGA out to Monitor or Projector Monitor Projector 3.1.2 Connecting DVI out to Monitor or Projector Monitor Projector 3.1.3 Connecting S-Video/C-Video to TV DIP switch setting NTSC 【Notice】1. The DIP setting will be taken effect after restarting the device. 2.
- Page 4 3.1.4 Connecting VGA in to Computer Notebook 3.1.5 Connecting USB to Computer Connect to USB port then install the supplied queue program. Please refer to queue installation Instruction for more information. Notebook 【Notice】Don’t connect the Digital Visualizer to PC Until USB Driver has been installed properly.
- Page 5 3.2 Initial Setup 3.2.1 Setup the Digital Visualizer Pull up the arm and camera head then turning the camera head toward the platform Press and slide the latches (Lamp release) to release the lamp lock then Pull up the lamp arms. Rotate the folded lamp to face the platform as the arrow shows.
- Page 6 4. Start to use 4.1 Select Input Source The default input source is set as "Digital Visualizer", press 『Source』to switch. Remote Keypad Monitor Notebook Projector 4.2 Zoom in/ out Zoom in / out by pressing continuously Remote Keypad English -...
- Page 7 4.3 Auto Focus Auto Focus by pressing once Remote Keypad 4.4 Brightness Adjustment Keypad 4.5 A4/A5 Size The default shooting area is A4 size, please『A5』to change. Keypad English -...
-
Page 8: Osd Menu
* Please refer to the Button Function Guide pasted on the front panel for simple operation. * More detail functions of OSD menu, please read the user manual. * The updated information will be regularly released on Lumens web site, please visit our web site http://www.lumens.com.tw for the most updated.
Need help?
Do you have a question about the PS400 and is the answer not in the manual?
Questions and answers