
Subscribe to Our Youtube Channel
Related Manuals for Lumens PS753


Summary of Contents for Lumens PS753
- Page 1 PS753 Document Camera User Manual - English [Important] To download the latest versions of the Quick Start Guide, multilingual user manual, software, driver, etc., please visit Lumens https://www.MyLumens.com/support...
-
Page 2: Table Of Contents
Table of Contents Chapter 1 Package Contents........................2 Chapter 2 Product Overview........................3 Relative Operation Position ..........................3 Chapter 3 Installation and Connections ....................4 System diagram ................................ 4 Installing Application Software ........................... 5 Chapter 4 Start Using ..........................6 Chapter 5 Control Panel/Remote Control and Setting Menu ............ -
Page 3: Chapter 1 Package Contents
Chapter 1 Package Contents Quick 4-Step PS753 Installation Power Adapter Instruction Card Guide Power Cord VGA cable USB 2.0 cable HDMI cable * 2 Appearance may vary depending on country/region Microscope Remote Control Audio Cable Remote Control Adapter Holder... -
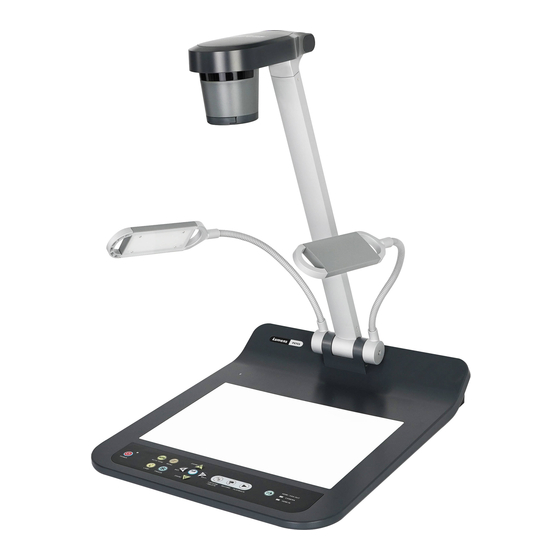
Page 4: Chapter 2 Product Overview
Chapter 2 Product Overview Remote sensor Lens Camera arm Remote Control Holder Auxiliary floodlight and lamp arm DIP Switch Setting Input/output port Backlight Control panel 2.1 Relative Operation Position Projector English... -
Page 5: Chapter 3 Installation And Connections
Chapter 3 Installation and Connections 3.1 System diagram Press the [SOURCE] button to switch between PS753 real-time image and HDMI IN image sources English... -
Page 6: Installing Application Software
3.2 Installing Application Software The Lumens Ladibug application software installed on the computer enables you to: Control the PS753. Capture and record images. Annotate the image, highlight important details and save it. Support the full screen function. -
Page 7: Chapter 4 Start Using
When using the remote control, aim at the remote sensor on the PS753, and press the power button. Once PS753 is turned on, the LED on the control panel will flash a few times and stay lit. Please contact your distributor if the LED does not light up. -
Page 8: Chapter 5 Control Panel/Remote Control And Setting Menu
Chapter 5 Control Panel/Remote Control and Setting Menu 5.1 Functions of control panel and remote control <Remark> The below functions are listed alphabetically Icon Name Function Descriptions Operation Remote Power on and off control/ Press and hold for 5 ~ 10 seconds to turn Power Control panel... - Page 9 Remote control/ Activate the setting menu/exit the menu MENU Control panel Remote Enable/Disable the partial enlarged mode Control Image comparison (to compare live images Remote with stored image files) Control Remote Read files in the USB disk (priority) or control/ PLAYBACK internal memory card Control...
-
Page 10: Setting Menu
5.2 Setting Menu 5.2.1 Main menu Press [MENU] on the remote control or control panel to display the setting menu. Auto Tune Playack Automatically adjust the image Preview the photos or videos to have the best brightness and stored in the USB disk (priority) or focusing performance. - Page 11 5.2.2 Setting menu 1st Level 2nd Level Major Function Descriptions Minor Items Items Use the left and right arrow keys to select the capture mode Capture Mode Single Capture/Time Lapse/Record/Off Use the left and right arrow keys to select the capture time.
- Page 12 Regardless of outside environment, the machine will adjust the brightness to the Auto Exposure optimal condition Regardless of outside light or color, the machine will adjust the color to the optimal Auto White Balance condition; Press [ENTER] to execute Use the left and right arrow keys to adjust the Audio Out Volume volume Use the left and right arrow keys to adjust the...
- Page 13 5.2.3 Mask Mode setting menu Function Items Function Descriptions Live Press [ENTER] to return to the live image. Use the left and right arrow keys to adjust the Transparency transparency of the mask. Use the left and right arrow keys to select the Step step of the mask.
- Page 14 5.2.6 Annotation Tools After connecting the mouse via USB, right-click to activate the drawing function of the setting menu When the mouse stays at the right side of the screen, the mouse annotation menu can be activated Choose either USB screen or Mouse Annotation. If you want to use Mouse Annotation function, please remove the USB cable.
-
Page 15: Chapter 6 Descriptions Of Major Functions
To change the quality of images, go to the setting menu [Settings] > [Capture] > [Image Quality] to do the setting. 6.6 Record Connect USB disk to PS753 to start recording images. You may not be able to capture or record images when [Capture Image] mode is set to [Disable]. -
Page 16: View Captured/Recorded Images
3. Press [RECORD] again to stop recording. 6.7 View captured/recorded images 1. Press [PLAYBACK] to show the thumbnails of all stored files. 2. Select the thumbnail you want to play and press [ENTER] to play. 3. When playing the video, press [FREEZE] to pause/play the video or press [ENTER] to stop playing. -
Page 17: Play The Slides (Slide Show)
6.14 Use a USB disk Insert the USB disk and a [Copy To USB disk] dialog box will appear, and you are asked whether to copy files from PS753 to the USB disk. Press [] or [] to select. Copy To USB Disk... -
Page 18: Image Comparison (To Compare Live Images With Stored Image Files (Pip))
6.15 Image comparison (to compare live images with stored image files (PIP)) This function will compare and contrast a live image with a stored image. Live image Stored image 1. Open the thumbnail screen. Remote control: Press [Playback] to access the thumbnail screen, and select the image files to be compared. -
Page 19: Chapter 7 Network Function Settings Description
E.g.: The factory-preset default IP address of PS753 is 192.168.100.100. The computer IP address must be set with the same network segment, such as 192.168.100.101, so that the computer can be connected... - Page 20 2. Open the browser, and enter the IP address in the address bar (If it is not connected to a router, the default IP is 192.168.100.100) 192.168.4.28 3. Enter the account and password to view the images and control PS753 Account: admin Password: 9999...
- Page 21 7.3 Using RTSP Player to View the Images RTSP connections can be made using free software, e.g.: VLC, Quick Time, PotPlayer, etc RTSP connection address formats are as follows: rtsp://camera 8557/h264 Example: Open the VLC software, select [Media] > [Open Network Streaming], and enter the URL: rtsp://192.168.4.28:8557/h264 rtsp://192.168.4.28:8557/h264...
- Page 22 7.4 Web Page Menu Function Description 7.4.1 Login Screen ➊ ➋ ➍ ➌ Item Function Descriptions User Login Account Enter user login account (default: admin) Enter user password (default: 9999) * For the first-time login, please refer to 7.4.4 User Password System Settings to change the default password...
- Page 23 Camera ID Display the device name Mute Turn on/off web audio output Enlarge Switch the preview window to full screen Preview window Display the screen currently captured by PS753 Zoom Zoom in/out images Brightness Brightness Focus Tune the focus Power...
- Page 24 7.4.3 Live View-2 ➍ ➎ ➋ ➌ ➊ ➏ ➐ ➑ ⓬ ➒ ➓ ⓫ Item Function Descriptions Automatic Image Optimization; automatically adjust the image to have the best brightness and Auto Tune focal length Click lamp mode toggle switch: off / brightness 1 / Lamp brightness 2 / brightness 3 Execute Auto White Balance once...
- Page 25 7.4.4 System settings ➊ ➋ Item Function Descriptions Display the current device name of PS753 and web login settings. You can change the device name, user account and password, click [Save] to save the settings, Device and and click [Cancel] to cancel the changes.
- Page 26 7.4.5 Date/Time Settings ➊ ➋ ➌ ➍ ➎ Item Function Descriptions Device Current Display the current system time Date and Time Time Zone Set the Time Zone. Select NTP Service/Manually Set Turn on Manually Set and choose to synchronize with the computer or set the date/time manually. Setting Mode NTP service to display this item NTP Server URL...
- Page 27 7.4.6 Streaming Setting ➊ ➋ ➌ ➍ ➎ ➏ ➐ ➑ Item Function Descriptions Switch Ethernet or USB function Ethernet/USB may only choose one, because Stream they cannot be output at the same time Video Resolution Show or set the RTSP output resolution and fps Bitrate Display or set the bit rate of RTSP Turn on/off RTSP audio...
- Page 28 7.4.7 Maintenance ➊ ➋ ➌ ➍ ➎ Item Function Descriptions Select the firmware file, and click [Upgrade] to update the firmware Update takes about 1 - 2 minutes Firmware Upgrade Please do not operate or turn off the power of the device during the update to avoid firmware update failure Factory Reset...
-
Page 29: Chapter 8 Connecting To Microscope
Please choose an appropriate microscope adapter for eyepieces size of Ø 28 mm, Ø 31 mm, Ø 33 mm, and Ø 34 mm. 2 The lens of PS753 connects with the microscope adapter For eyepieces of Ø 33 mm or Ø 34 mm, only... -
Page 30: Chapter 9 Packing The Machine
Chapter 9 Packing the Machine 1. Put the remote control back to the holder. 2. Fold back the camera head to align with the arm. 3. Turn the two lamp arms and the arm of camera head down and adjust them to be parallel with the platform. 4. -
Page 31: Chapter 10 Dip Switch Setting
Chapter 10 DIP Switch Setting You should unplug and reconnect the power cord, and then restart the PS753 for all DIP switching to take effect. 1. Description of DIP Function Descriptions Output Resolution OFF (Normal mode): 30 fps, applicable to general scene... -
Page 32: Chapter 11 Troubleshooting
Chapter 11 Troubleshooting This chapter describes problems you may encounter while using PS753. If you have questions, please refer to related chapters and follow all the suggested solutions. If the problem still occurred, please contact our distributors or service center. - Page 33 Check to see if the Firmware version The operating steps of your machine is up-to-date. in the manual are Please go to Lumens official website to check not applicable to whether the latest version is available for update. the machine https://www.MyLumens.com/support...
-
Page 34: Chapter 12 Safety Instructions
Chapter 12 Safety Instructions Always follow these safety instructions when setting up and using the Document Camera: 1 Operation 1.1 Please use the product in the recommended operating environment, away from water or source of heat. 1.2 Do not place the product on a tilted or unstable trolley, stand or table. 1.3 Do not block the slots and openings in the case of the product. - Page 35 Precautions This symbol indicates that This symbol indicates this equipment may contain that there are important dangerous voltage which operating and could cause electric shock. maintenance Do not remove the cover (or instructions in this User back). No user-serviceable Manual with this unit.
-
Page 36: Supplier's Declaration Of Conformity 47 Cfr § 2.1077 Compliance Information
Supplier's Declaration of Conformity 47 CFR § 2.1077 Compliance Information Manufacturer:Lumens Digital Optics Inc. Product Name:PS753 Model Number:Document Camera Responsible Party – U.S. Contact Information Supplier:Lumens Integration, Inc. 4116 Clipper Court, Fremont, CA 94538, United States e-mail :support@mylumens.com FCC Compliance Statement This device complies with Part 15 of the FCC Rules. -
Page 37: Appendix 1 Power Frequency For Each Country In The World
Appendix 1 Power frequency for each country in the world Region or Country Region or Country Region or Country Chinese English Chinese English Chinese English 阿 富 汗 Afghanistan 大 陸 China 50 關 島 Guam 阿 爾 及 利 亞 Algeria 哥... - Page 38 Region or Country Region or Country Region or Country Chinese English Chinese English Chinese English 錫 蘭 Ceylon 直 布 羅 陀 Gibraltar 50 科 威 特 Kuwait 查 德 Chad 大 不 列 顛 Great Britain 50 黎 巴 嫩...
-
Page 39: Appendix 2 Resolution Comparison
Appendix 2 Resolution Comparison RTSP HDMI Dip Switch Mode FPS Output H264 H264 MJPEG 3840x2160 3840x2160 NA 1920x1080 1920x1080 1920x1080 1920x1080 (Default) Normal 1280x720 1280x720 1280x720 60Hz 640x360 640x360 640x360 3840x2160 3840x2160 NA 1920x1080 1920x1080 1920x1080 1920x1080 (Default) Normal 1280x720 1280x720 1280x720 50Hz... - Page 40 RTSP HDMI Dip Switch Mode FPS Output H264 H264 MJPEG 60 Hz 640x360 640x360 640x360 3840x2160 3840x2160 NA 1920x1080 1920x1080 1920x1080 1280x720 Normal 1280x720 1280x720 1280x720 50 Hz 640x360 640x360 640x360 640x360 1920x1080 1280x720 1280x720 High 1920x1080 1920x1080 1920x1080 NA 60 Hz Speed 1280x720...
-
Page 41: Copyright Information
Inc. Copying, reproducing or transmitting this file is not allowed if a license is not provided by Lumens Digital Optics Inc. unless copying this file is for the purpose of backup after purchasing this product. In order to keep improving the product, Lumens Digital Optics Inc. hereby reserves the right to make changes to product specifications without prior notice.
Need help?
Do you have a question about the PS753 and is the answer not in the manual?
Questions and answers