
Related Manuals for Ferris 41031301


Summary of Contents for Ferris 41031301
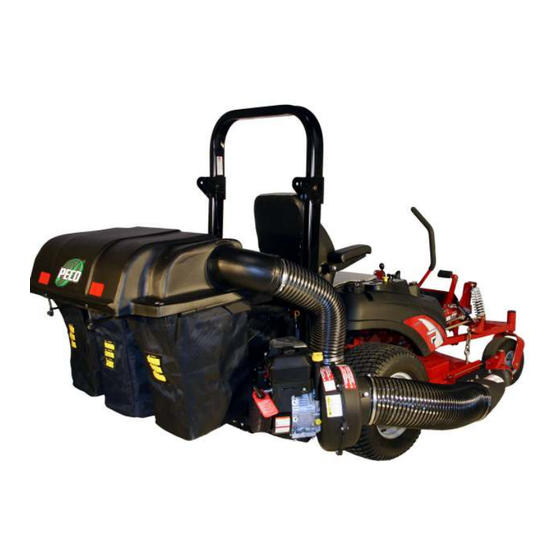
- Page 1 P P P PRO 3 BAGGER PECO PECO PECO PECO PECO GRASS COLLECTION SYSTEM MODEL#: 41031301 & 41031302 FERRIS IS 3100Z SERIES MOWER OPERATOR’S MANUAL ASSEMBLY OPERATION MAINTENANCE MANUAL PART#: Q0407 REV: 0...
-
Page 2: Table Of Contents
RESIDENTIAL BAGGING SYSTEM TABLE OF CONTENTS SECTION PAGE SECTION PAGE Safety - - - - - - - - - - - - - - - - - - - - - - - - - - - - - - 2 2-13 Impeller Blade Removal/Replacement - - - - - - - 8 Safety Alert Symbols - - - - - - - - - - - - - - - - - - - - - - 3 2-14 Throttle Cable Installation - - - - - - - - - - - - - - - 9... -
Page 3: Safety Alert Symbols
SAFETY WARNING! NEVER operate the mower unless the discharge guard and either the deflector assembly or the vacuum collector adapter are fastened securely in place. WARNING! Do not work around the mower deck boot or the blower area until you are certain that the mower blades and the blower impeller have stopped rotating. -
Page 4: Warranty
PECO LIMITED WARRANTY FOR NEW PRODUCTS A. WHAT IS WARRANTED? PECO extends the following warranties to the original purchaser of each new PECO consumer product subject to the following limitations: 1. PRODUCT WARRANTY: Any part of any consumer product, which is defective in material or workmanship as delivered to the purchaser will be repaired or replaced, as PECO elects, without charge for parts or labor, if the defect appears within 12 months (90 days for commercial use) from the date of delivery of the product to the original purchaser. -
Page 5: Introduction And Description
Section I Rear Guard Removal INTRODUCTION & Figure 2-1a DESCRIPTION 1-1 Introduction Your grass collection system has been designed to give you a low maintenance, simple, and effective way to collect the grass clippings from your mower. This manual is provided to give you the necessary instructions to properly mount and operate the collection system on your mower. -
Page 6: Lower Stiffener Installation
2-3 Lower Stiffener Installation 2-6 Lower Mount Tube Assembly Attach the lower stiffener P#(B0611) to the left and right Installation lower main frame legs, using (4) 3/8”-16 x 1-1/4” HHCS P#(K1192) and (4) 3/8”-16 nyloc nuts P#(K1216). Refer Fasten the lower mount tube assembly P#(A1400) to the to Figure 2-3. -
Page 7: Engine/Blower/Blade Assembly Installation
2-8 Engine Blower Blade Assembly 2-10 Top Assembly To Upper Frame Installation Assembly Installation Position the engine/blower/blade assembly on top of the Align the pivot brackets of the top assembly P#(A0551) engine mount arm assembly and secure using (4) 5/16”- to the pivot point on either side of the upper frame 18 x 1-1/2”... -
Page 8: Blower Cone Installation
2-12 Blower Cone Installation 2-13 Impeller Blade Removal/Replacement To Remove: First remove the 3/8”-16 x 1-1/2” HHCS Thread (1) 5/16”-18 jam nut P#(K0120) onto each end of P#(K1211) (#1), taper lock bushing washer P#(K0278) (2) 5/16”-18 x 2-1/2” HHCS P#(K0125). Now partially (#3) and spacer bushing P#(S3242) (#4) from the taper- thread the bolts into each of the two tabs located on the lock bushing (#5). -
Page 9: Throttle Cable Installation
2-14 Throttle Cable Installation Throttle Figure 2-14c To install the throttle cable kit to the ROPS (roll over protection system), place the 3/8” U-Bolt P#(K0136) onto the ROPS with the threads facing the front of the Throttle mower. Next slide on the throttle mount plate assembly Cable P#(A0666) with the rivets also facing toward the front of the mower. -
Page 10: Boot To Mower Deck Installation
2-18 Lower Hose Installation 2-15 Boot To Mower Deck Installation Slide a lower hose clamp P#(J1000) onto both ends of Attach the boot plate P#(B0612) to the aluminum boot the lower hose. Slide one end of the lower hose onto P#(E2502), using (2)) 3/8”-16 x 1”... -
Page 11: Installation And Removal Of Collection Bags
2-20 Installation/Removal Of Collection Bags Figure 2-20b Plastic Top To install the bag onto the bag ring, first make sure the bag ring end caps are fastened to the bag ring. Place the seam openings of the bag onto the bag ring openings and turn the bag until the slot bracket in the bag ring is protruding from the opening in the bag (Figure 2-20a). -
Page 12: Operating Instructions
SECTION III E. Once the parking brake has been engaged, then and OPERATING INSTRUCTIONS only then, walk behind the mower and check the collection bags by lifting the plastic hood. Load in 3-1 General Safety bags should not exceed the height of the installed bag. -
Page 13: Parts And Service
SECTION V PARTS AND SERVICE 5-1 Parts And Service Information PECO collection system owners should record the name and telephone number of their Service Center. Your Service Center will be happy to supply replacement parts, accessories, and do any service or repairs to your collection system. -
Page 14: Exploded Views/Parts List And Pack Drawing
Exploded View Of The A0551 - Bagger Assembly (2) K1144 - 5/16”-18 x 1” CARRIAGE BOLT (6) K1142 - 5/16”-18 x 3/4” CARRIAGE BOLT (4) K1010 - 1/4”-20 x 5/8” CARRIAGE BOLT (1) V0002 - PLASTIC TOP (2) K1126 - 1/4”-20 (1 LEFT, 1 RIGHT) FLANGE NUT B0237 - PIVOT... - Page 15 MODEL#: 41031301 MOWER NAME: FERRIS MOWER MODEL: IS 3100Z MOWER DECK SIZE: 61” VAC NAME: 13 CUBIC FOOT PRO BAGGER FOR YEAR: 2010 5.5HP BRIGGS & STRATTON ENGINE REVISED: MANUAL: Q0407 A1783 UNIT ASSEMBLY A0619 THROTTLE KIT A0060 HB0249 A0666...
- Page 16 MODEL#: 41031302 MOWER NAME: FERRIS MOWER MODEL: IS 3100Z MOWER DECK SIZE: 61” VAC NAME: 13 CUBIC FOOT PRO BAGGER FOR YEAR: 2010 6 H.P. KOHLER ENGINE REVISED: MANUAL: Q0407 A1783 UNIT ASSEMBLY A0620 THROTTLE KIT A0294 HB0249 A0666 70” THROTTLE...
-
Page 17: Safety Decals
SAFETY DECALS To promote safe operation, PECO supplies safety decals on all products manufactured. Damage can occur to safety decals either through shipment, use or reconditioning. Contact your local Service Center for replacement decals. Part #: R4027 Part #: R1057 Part #: R1069 Part #: R2007 Part #: R2008... - Page 19 NOTES...
- Page 20 P P P PECO PECO PECO PECO PECO 100 Airport Road Arden, North Carolina 28704 (800) 438-5823 OR (828) 684-1234 FAX: (828) 684-0858 EMAIL: peco@lawnvac.com WEBSITE: www.lawnvac.com...
Need help?
Do you have a question about the 41031301 and is the answer not in the manual?
Questions and answers