Table of Contents
Advertisement
Quick Links
Advertisement
Table of Contents

Related Manuals for Digital Watchdog Nexus


Summary of Contents for Digital Watchdog Nexus
- Page 2 (including without limitation, damages for loss of business profits, business interruption, or loss of business information), even if DIGITAL WATCHDOG has been advised of the possibility of such damages or whether in an action, contract or tort, including negligence.
-
Page 3: Safety Information
Object and Liquid Entry Points. Never insert foreign objects into the NVR unit, as they may touch dangerous voltage points or short-out parts that could result in a fire or electrical shock. Only insert the media types approved by Digital Watchdog. Never spill liquid of any kind on the product. - Page 4 WARNING To reduce the risk of electrical shock, do not expose this appliance to rain or moisture. Dangerous high voltages are present inside the enclosure. Do not open the cabinet. Refer servicing to qualified personnel only. SYMBOLS The following words and symbols mark special messages throughout this guide: WARNING: Text emphasized in this manner indicates that failure to follow directions could result in bodily harm or loss of life.
-
Page 5: Table Of Contents
NETWORK VIDEO 2.2.1 CONNECTING A NETWORK DEVICE MANUALLY 2.2.2 CONNECTING A NETWORK DEVICE USING CAMERA FINDER 2.2.3 ASSIGNING A NETWORK DEVICE TO A CHANNEL 2.2.4 ASSIGNING AUDIO CHANNELS TO A NETWORK DEVICE 2.2.5 CAMERA CONFIGURATION Nexus Manual 022012 | 5... - Page 6 2.2.6 ACCESSING THE CONFIGURATION MENU 2.2.7 DISPLAYING MORE COLUMNS MOTION 2.3.1 CREATING A MOTION AREA GENERAL 2.4.1 VOICE WARNING 2.4.2 VOLUME 2.4.3 AUTO SEQUENCE SETTING 2.4.4 CREATING CUSTOM AUTO SEQUENCE SCHEDULE 2.5.1 RECORDING SCHEDULE 2.5.2 CREATING A RECORDING SCHEDULE 2.5.3 SENSOR SCHEDULE 2.5.4 CREATING A SENSOR SCHEDULE...
- Page 7 4.1.3 CLOSING THE WEB VIEWER EMERGENCY AGENT 4.2.1 CONFIGURING THE NVR 4.2.2 CONFIGURING THE CLIENT PC 4.2.3 SETUP WINDOW 4.2.4 EMERGENCY AGENT WINDOW 4.2.5 FILTER EVENT LIST 4.2.6 SEARCH ALARM WINDOW 4.2.7 VIEW RECORDED VIDEO Nexus Manual 022012 | 7...
- Page 8 4.2.8 EXPORTING VIDEO REMOTE SOFTWARE 4.4.1 REMOTE CLIENT MINIMUM REQUIREMENTS 4.4.2 RECOMMENDED REQUIREMENTS 4.4.3 REMOTE SOFTWARE SETUP DIGITAL VERIFIER 4.5.1 INSTALLING DIGITAL VERIFIER 4.5.2 USING THE DIGITAL VERIFIER BACKUP VIEWER 4.6.1 INSTALLING BACKUP VIEWER 4.6.2 LOADING VIDEO FROM DVD OR HARD DRIVE DW VIDEO MANAGEMENT SOFTWARE 4.7.1 CONFIGURING THE SERVER...
-
Page 9: Chapter 1: Introduction
Nexus is a cutting-edge Network Video Recording (NVR) device that has been designed to support most major brands of IP cameras, megapixel cameras, and video encoders. It can record up to 32 IP cameras both locally and globally via the internet. Nexus enables you to configure, view, search, export, remotely upgrade, and monitor alarms simultaneously. -
Page 10: Controls And Connections
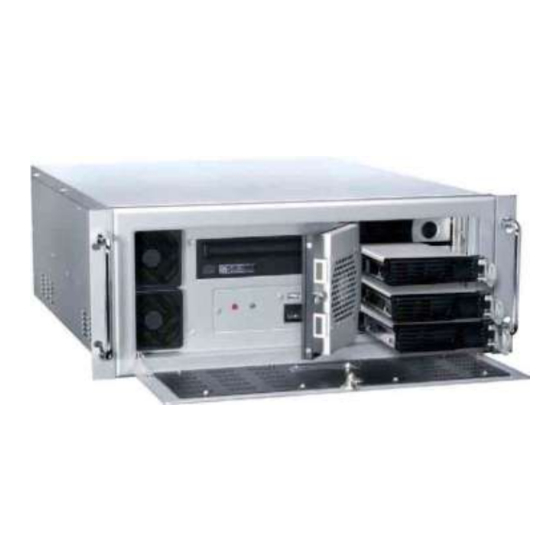
Digital Watchdog® state-of-the-art High Definition Network Video Recorders are housed in a high performance and versatile AU aluminum rack mount case allowing easy storage of multiple NVRs for enterprise applications. Every Digital Watchdog NVR unit comes equipped with the latest technology. -
Page 11: Rear Panel Connectors
1.1.3 REAR PANEL CONNECTORS RJ-45 Network Jack & USB Ports 2.0 USB Ports 3.0 Network Card IEEE AC Power Connector & USB DVI-I & DVI-D Outputs Audio In/ Out 110V/ 220V Switch E-SATA Port HDMI Outputs VGA Output Nexus Manual 022012 | 11... -
Page 12: Components
1.2.1 INCLUDED HARDWARE Digital Watchdog® NVRs come with a mouse, keyboard, and select software and cables. Identify the following components to make sure everything has been included with your new NVR unit. If any of the following items are missing, contact your dealer to arrange a replacement. -
Page 13: Keyboard Setup
Refer to your monitor manual for detailed information on how to setup and use it. Note: The monitor must be capable of having a screen resolution of 1024 x 768 and display colors of at least 32 bits. Nexus Manual 022012 | 13... -
Page 14: Setting The Date And Time
Select Restart in Windows Mode. (See the Screen Display and Live Options section.) Click Start > Programs > Digital Watchdog > VFormat. Click Export in the System Settings Tool section. Select a location to save the settings file and click Save. The DVR settings will automatically be exported. -
Page 15: Importing Settings
Exit to Windows by clicking the red Exit button on the Display Screen. Select Restart in Windows Mode. (See the Screen Display and Live Options section.) Click Start > Programs > Digital Watchdog > VFormat. Click the Import button in the System Settings Tool section. -
Page 16: Screen Display And Live Options
SCREEN DISPLAY AND LIVE OPTIONS Each time the NVR starts, the program defaults to the Display Screen. The following diagram outlines the buttons and features used on the Display Screen. You should become familiar with these options, for this is the screen that will be displayed the majority of the time. Displays current date and time. -
Page 17: Loop
Select a camera. Double-click on image until it goes to single channel view mode. Right-click on the screen. Select Digital Zoom. Using the mouse’s wheel, scroll forward to zoom in or backwards to zoom out. Select a Screen Division button to resume viewing multiple channels. Nexus Manual 022012 | 17... -
Page 18: Instant Recording
1.5.4 INSTANT RECORDING The Instant Recording feature allows users to initiate recording manually on a specific camera, overriding the current schedule. When Instant Recording is activated, the NVR flags the clip as an event. Instant Recording instances can be found using the Index Search. Instant Recording can be used when a suspicious object or person is detected and the user wants to flag that section of video for easy retrieval in the future. -
Page 19: Camera View
Displayed when the camera is currently being recorded to the NVR. Motion Detection Displayed when a camera that is set for motion detection detects motion. Display Displayed when the camera is currently not being recorded to the NVR. Nexus Manual 022012 | 19... -
Page 20: Special Recording
1.6.2 SPECIAL RECORDING There are two types of special recordings. When each of these is activated, a text will be displayed on the camera’s video to indicate what type of special recording has been activated. SENSOR Sensor is displayed when a sensor associated with the given camera is activated. INSTANT Instant Recording manually activates recording for a selected camera. -
Page 21: Chapter 2: Setup Options
NVR Access controls the type of access that other users may have. This ensures the security and integrity of the NVR unit. Camera Naming names each camera so the location can be easily identified and will include any other pertinent information that may be helpful when viewing it on the Video Display Area. SETUP SCREEN Nexus Manual 022012 | 21... -
Page 22: Camera Setup
2.1 CAMERA SETUP Use this Setup menu to adjust the camera’s name and assign a specific sensor. -
Page 23: Network Video
In the Network Setup menu, you can add/edit/delete IP cameras. You can manually enter each camera’s information or use the Find Cameras tool. This feature will enable the NVR to search and register every camera connected to the same network. The Nexus NVR supports most major IP camera brands, including: Digital Watchdog... -
Page 24: Connecting A Network Device Manually
2.2.1 CONNECTING A NETWORK DEVICE MANUALLY From the Display Screen, select Setup. Click the Network Video tab. Click the Add/Remove Device tab. Select your network device from the Device Type list. Under Device Properties, type a Device Name. Type the IP/URL address, Port, User ID and Password of the device. Click Add. -
Page 25: Assigning Audio Channels To A Network Device
To record the network audio, select the Record Network Audio checkbox. The audio channel will be available on the search screen. To access the audio channel from the Live View screen, select the Enable Network Audio in Live View checkbox. Nexus Manual 022012 | 25... -
Page 26: Camera Configuration
2.2.5 CAMERA CONFIGURATION The Camera Configuration tab displays information on all cameras connected to the NVR. The Camera Configuration tab can be customized to display only the information you use most. Click the Select Column button to add or remove specific columns. The following columns are available: Capture FPS Record FPS... -
Page 27: Accessing The Configuration Menu
2.2.6 ACCESSING THE CONFIGURATION MENU Use the Digital Watchdog interface to access basic network device menu functions. From the Display Screen, select Setup. Click Network Video. Select the Camera Configuration tab. Highlight the desired camera. Select the Setup Network Device button. -
Page 28: Motion
2.3 MOTION Select Camera Select the camera you wish to set to motion detection. Screen Display Displays the camera’s current view, and which regions are set to motion detection. Notification Options Select which notifications will appear if motion is detected. Choose from Full Screen Pop-up on Motion/ Beep on Detect/ Full Screen Pop-up on Sensor. -
Page 29: Creating A Motion Area
11. Define the pre-alarm and post-alarm recording time for a motion event. Pre Alarm: 0~50 Seconds (number of seconds the NVR records before motion is detected). Post Alarm: 0~50 Seconds (number of seconds the NVR records after motion is detected). Nexus Manual 022012 | 29... -
Page 30: General
Allows the video-out picture to cycle through channels automatically at s set speed. For example, it can cycle through channels 1-6 at four seconds intervals. 4. Use Full Screen Stretch the Digital Watchdog interface to use the full monitor screen. 5. Display Size Select from available monitor display sizes. Use to correctly display video on wide screen monitors. -
Page 31: Voice Warning
Slider Controls – Used to adjust the literal volume for the respective devices listed. Mute Checkbox – Select the Mute checkbox to mute volume on any of the device columns or select the Mute All check box to mute all audio on the NVR. Nexus Manual 022012 | 31... -
Page 32: Auto Sequence Setting
2.4.3 AUTO SEQUENCE SETTING Auto Sequencing is available either on the display screen when Auto Sequencing has been enabled or on a spot monitor when a Spot-Monitor out signal is used. Auto Sequencing conveniently displays video channels at a specified interval and sequences through each selected channel. -
Page 33: Schedule
Once the desired Time Blocks are highlighted, click a Recording Mode button. The Time-Blocks should now appear Blue for Motion, Yellow for Continuous, and White for No Recording Note: Leave cameras recording with Sensor Detection set to No Recording for the specified time block(s). Nexus Manual 022012 | 33... -
Page 34: Sensor Schedule
2.5.3 SENSOR SCHEDULE The Sensors will supersede all other types of recording modes (Motion and Continuous). Regardless of the recording schedule of a particular camera, if a sensor event occurs the associated cameras will begin recording as a Sensor Event. Sensor Recordings will be flagged and searchable using the Index Search Mode. -
Page 35: Scheduling Alarm Events
Select the checkbox next to the IP Address to enable it. Only one IP Address is supported at a time. Enter the recording duration (in seconds) in the Emergency Time box. Tip: See the Emergency Agent chapter for more information on setting up the Emergency Agent software. Nexus Manual 022012 | 35... -
Page 36: Special Day Schedule
2.5.7 SPECIAL DAY SCHEDULE The user can create days that have a unique recording schedule, such as Holidays, Special Events, Vacations, etc. To create/edit a “Special Day” Schedule: Click Normal Day Mode to enable the Special Day Mode. Select a day by typing the date or clicking the arrow to the right of the Date Bar. Highlight the time-blocks within the Recording Schedule window for the camera(s) selected. -
Page 37: Creating A System Restart Schedule
Note: This step alone does not trigger the NVR to restart, only to shut down. Specify the time of day to schedule the system restart. Select the Restart option. Note: If Off is selected, the NVR will shut down at the specified time but not restart. Nexus Manual 022012 | 37... -
Page 38: Network
Used to connect to the Alarm Monitor software. Center Port Used to connect to the Digital Watchdog Remote Software. This port must be specified in the Remote Software to connect to the NVR. Note: Center Port 1025 is not available for remote connections. It is used by the ATI VGA Management Suite. -
Page 39: Administration
Enable/Disable two-way audio. This will allow you to communicate with whoever is in the scene where the camera is located. 2.7 ADMINISTRATION Use the Administration Setup menu to manage & modify users, file information, log reports, and disk management Nexus Manual 022012 | 39... -
Page 40: Disk Management
2.7.1 DISK MANAGEMENT The Disk Management window is a native Windows feature that displays the partition scheme and health status of the Hard Disk Drives in the NVR. This window is often used to troubleshoot an NVR or verify the amount of Hard Drive storage installed. For more information about Disk Management, consult a Windows 7 manual. -
Page 41: Adding A New User
2.7.4 CHANGING ADMINISTRATOR PASSWORD Inside Administrative setup, click User Management. When the prompt appears, select Change Password. Enter the new password and click OK. 2.7.5 DEFAULT ADMINISTRATOR PASSWORD The default administrator login is: User: Administrator Password: <blank> Nexus Manual 022012 | 41... -
Page 42: Setup Log Management Options
2.7.6 SETUP LOG MANAGEMENT OPTIONS The Log Management window provides the user the options to overwrite log files or schedule log deletion. From the Administration setup display, click the Log Management button. Select the Log File Overwrite Option checkbox to enable the feature. Set Log Options: Select Overwrite and define the size of the log file cache. -
Page 43: Storage Check
Set the General and Users tabs first. Note: See previous page. Select Storage Check tab. Select the Use Storage Check checkbox. Define the number of Minute(s). If desired, select an Alert Option—Beep or Popup Message. Click Apply. Nexus Manual 022012 | 43... -
Page 44: Recording Data Check
RECORDING DATA CHECK Set the General and Users tabs first. Select Recording Data Check tab. Select the Recording Data Check checkbox. Define the number of hours(s) between data checks. Select the Action Method. Click Apply. SMART INFORMATION The SMART Information tab displays hard drive (HDD) information. SMART ALERT Set the General and Users tabs. -
Page 45: Information
Click Close to return to the Administrative tab 2.8 INFORMATION The Information tab allows users to define the site code necessary for connecting to remote software, save comments relative to the NVR, and store tech support and contact number information. Nexus Manual 022012 | 45... -
Page 46: Pan / Tilt / Zoom (Ptz)
2.9 PAN / TILT / ZOOM (PTZ) The PTZ controls within the NVR are extremely beneficial by increasing the usefulness of the recorded video. With the PTZ Controls, user can create custom preset configurations that allow you to continuously sweep across large areas. 2.9.1 PTZ SETUP TAB The PTZ Setup tab allows users to enable PTZ cameras, create Presets, create Tours, and adjust camera speed settings. -
Page 47: Supported Ptz Protocols
ERAESEEDS (CRX-1401) SAMSUNG (DRX-502A) VIDEOTREC LG (LVC-A70X'S) ERNITEC SAMSUNG (MRX-1000) VISION TECH LG (LVC-M300/310) EVERFOCUS EPTZ1000 SAMSUNG (SCC-641) WONWOO LG MULTIX FASTRAX II SAMSUNG (SCC-C6407) YUJIN SYSTEM EPT6000 LG SPEED DOME FASTRAX IIE SAMSUNG (SPD-3300P) Nexus Manual 022012 | 47... -
Page 48: Advanced Ptz Camera
2.9.4 ADVANCED PTZ CAMERA Selected PTZ Channel Displays the channel assigned to a PTZ camera. PTZ Signal Type Select from RS-485 and RS-232. Protocol Select the matching protocol to enable control of the PTZ camera. Camera view Displays the camera’s view and any changes in location and movement made by the PTZ setup. Speed Modify the speed of the camera when being remotely controlled. -
Page 49: Ptz Address Settings
Zoom, Focus, Iris Increase/decrease the camera’s zoom, or adjust focus and iris remotely. Wiper, Light, Tour Enable/Disable the camera’s Wiper, Light and Tour. Presets Select a preset to move the camera to that set location. Nexus Manual 022012 | 49... -
Page 50: Controlling A Ptz Camera
2.9.7 CONTROLLING A PTZ CAMERA The Digital Watchdog NVR provides two different ways of controlling a PAN/TILT/ZOOM camera. The first method is to use the Graphical PTZ Controller that appears when the PTZ button is clicked on the live display screen. The second method is to use the mouse to control the camera directly from the Live Display Screen. -
Page 51: Understanding Tours
Enables the Vertical Guard Tours Runs the selected Pan or Tilt Tour Stop Stops the selected Pan or Tilt Tour. 2.9.9 PTZ TOUR SCHEDULE Camera Selected Hours 0-23 (24 hours) Days Sun-Sat Preset Tour Mode Options Nexus Manual 022012 | 51... -
Page 52: Creating A Ptz Tour Schedule
CREATING A PTZ TOUR SCHEDULE On the Display Screen, select Setup. Click PTZ. Select the Tour Schedule button to open the PTZ Tour Schedule window. Highlight the hours of the days you wish to setup a tour schedule for. You can select individual blocks of time, or click ALL to select all days and all 24 hours of the day. -
Page 53: Chapter 3: Search Options
Displays the date and time of the current video being viewed, and Calendar button allows selection of a new date to be searched. Speed Move the slide bar to increase and decrease the playback speed of the video. Nexus Manual 022012 | 53... -
Page 54: Playback Controls
Playback Controls These buttons allow you to control the playback video being viewed. Storage Capacity The Storage Capacity Usage Indicator displays the total free storage space available to the DVR unit. Camera Enable /Disable selected cameras to perform searches on. Zoom Increase the size of the image. -
Page 55: Backup Search
Select the Calendar, followed by the desired date / time of the image. Select OK. Click the Video / Time Sync button to highlight. Press Play on the Play Controls. The video will now playback in real time. Nexus Manual 022012 | 55... -
Page 56: Clean Image
3.1.7 CLEAN IMAGE The NVR is capable of recording video using one of three different resolutions. When using the D1 (720 x 480) resolution, de-interlacing feature is required for a smooth playback of the recorded video. The NVR allows the user to de-interlace the images. Just click the Clean Image button. 3.1.8 BOOKMARKS Use the Bookmark feature to mark a video clip during a search. -
Page 57: Printing An Image
AVI is used to export a video clip. On the Display screen, select Search. Select a video (see Performing a Basic Search). Press Stop to freeze the desired frame. Nexus Manual 022012 | 57... -
Page 58: Single Clip Backup
3.5 SINGLE CLIP BACKUP Along with the Save option, a single camera backup option is also included with the Digital Watchdog software. The single camera backup, also known as Clip Backup, allows the user to back-up a single camera at a given time. The Clip Backup option allows the user to choose a backup time frame, choose a specific camera, add a memo, and even include the Backup Viewer if needed. -
Page 59: Single Clip Backup Using Bookmark Data
Select the Index Search button. Select the Camera(s) and Sensor(s) to include in the search. Click the Select Time checkbox to define a specific period. Select an event type (Sensor, Motion, and Instant Record) to search or select the Nexus Manual 022012 | 59... - Page 60 All Event option. Click OK. Results will be displayed in a column that appears on the right side of the screen. There may be a delay when the NVR searches for the results. Each line represents a segment of video. If no results are found, NO IMAGE FOUND will appear in the column. Once the results are displayed, double-click any one of the results and press Play to view the associated video.
-
Page 61: Preview Search
10 image view by right-clicking on the image. Use the Play Controls to play the video of the selected one minute segment. To exit out of the Preview Search with the current image still selected, deselect the Preview Search button. Nexus Manual 022012 | 61... -
Page 62: Status Search
3.8 STATUS SEARCH The Status Search option displays recorded video in graph format. Blue areas indicate that recorded data exists, and White areas indicate that recorded data does not exist. 24 hours (0-23) Cameras Recording Block 3.8.1 PERFORMING A STATUS SEARCH On the Display Screen, select Search. -
Page 63: Object Search
3.9 OBJECT SEARCH Object Search is a powerful search utility that is used to search a region on the video for any motion changes. Results are neatly displayed and can be viewed quickly. Nexus Manual 022012 | 63... -
Page 64: Performing An Object Search
3.9.1 PERFORMING AN OBJECT SEARCH On the Display Screen, go to Search. Select a single camera either by turning off all cameras but one or by double-clicking a displayed image. See Performing a Basic Search. Click the Object Search button. Click and drag the mouse on the video display to define a motion region area. -
Page 65: Search In Live
The Search in Live Controls will display at the bottom of the image. Use the controls to pause, rewind, fast forward, move frame-by-frame, or resume playing. To exit Search In Live mode, right-click on image and select Search In Live to remove checkmark. Nexus Manual 022012 | 65... -
Page 66: Backing Up Video Data
3.12 BACKING UP VIDEO DATA The Backup Center allows you to back up recorded video data from multiple dates and times to one or more locations including the DVD-RW drive, Network Storage Locations, and External Hard Drives. The NVR can easily backup important video data to an internal or external media location. The most commonly used devices or locations are CD-R/RWs, External USB or FireWire Hard Drives, and Network Drives. -
Page 67: General Screen Overview
Check the Include Viewer box to include the Backup Viewer Application. Click the Start Backup button to begin the backup process. A progress bar will display in the lower right corner of the display screen. Nexus Manual 022012 | 67... -
Page 68: Clip Screen Overview
3.12.3 CLIP SCREEN OVERVIEW The Clip Backup window is where video recorded by individual cameras is copied to a specified storage system. PERFORMING A CLIP BACKUP On the Display Screen, select Backup. Select the Clip tab at the top of the Backup Center window. Set the backup Start Time and End Time in the Time Setup box. -
Page 69: Chapter 4: Included Software
For example, a user can be granted access to view only cameras 4, 8 and 16. Screen Division Enable/ Disable Activate Camera Display Commands Nexus Manual 022012 | 69... -
Page 70: Configuring Server
4.1.1 CONFIGURING SERVER On the Display Screen, select Setup. Click the Network Setup tab. Clear the Disable Remote Control option. Select the Web Viewer box. You should now be able to adjust the port settings. Note: If you are using a Firewall, it may be necessary to adjust the port settings on both the NVR and the Firewall. Contact the Network Administrator for more information. -
Page 71: Emergency Agent
Click the Schedule tab. Enter the IP Address of the computer running the Emergency Agent software. Check the box next to the IP Address to enable it. Select the Sensor Radio button. Create a schedule for the appropriate sensor. Click Apply. Nexus Manual 022012 | 71... -
Page 72: Configuring The Client Pc
All configurations take place in the Emergency Agent window on the Client PC. For descriptions and locations of the Emergency Agent window buttons and features, refer to the Emergency Agent window section in this chapter. Open the Emergency Agent window on the Client PC. Start >All Programs > Digital Watchdog > Emergency Agent > Emergency Agent. -
Page 73: Emergency Agent Window
Select an NVR from the NVR list in the Filter Options section. Select the Date to include. Select the type of Event(s) to include. Select the event status type (Read, Unread, All) from the Read list. Click the Filter button to display filtered event listings. Nexus Manual 022012 | 73... -
Page 74: Search Alarm Window
4.2.6 SEARCH ALARM WINDOW Export Quality- Reduces the overall size of an AVI file by reducing the image quality. However, reducing the image quality causes the AVI video to appear more pixilated. When size is not an issue, setting quality to 100 is highly recommended. Digital Signature- Adds a digital signature to the exported JPG image. -
Page 75: Exporting Video
The NVR was specifically designed to be fully operated and maintained remotely. It connects using the standard TCP/IP protocol thorough connection types such as DSL, Cable Mode, T1, ISDN, 56K Modem, LAN, and more. The Digital Watchdog Remote Software allows you to view live video, search through archived video, export images and video clips, and have full Setup control. -
Page 76: Remote Client Minimum Requirements
4.4.1 REMOTE CLIENT MINIMUM REQUIREMENTS Remote Software operates virtually the same way as the NVR itself. The appearance of it matches the NVR almost identically; however, there are a few minor differences. Some Search features, such as the Index and Object Search, and some Setup features are not available. ... -
Page 77: Remote Software Setup
When the software finishes installing, close any open installation windows. CREATING A NEW REMOTE CONNECTION Select Start > Programs > Digital Watchdog > Remote > Digital Watchdog Remote Center. The Digital Watchdog Remote Software opens, and the Local Connection window opens. -
Page 78: Configuring The Server For Remote Connection
To access the NVR remotely, the NVR Server must be setup to allow remote connections. Time Out Value Specifies a time (in seconds) to wait for a signal from the Digital Watchdog Remote Client. If a signal is not received by that time, the connection is dropped. Center Port Transfers the connection data. -
Page 79: Digital Verifier
4.5.2 USING THE DIGITAL VERIFIER Open the Digital Verification program, by selecting Start > Programs > Digital Watchdog > Digital Verifier > Digital Signature Verifier. Click the Browse button to load the JPG image. Enter the Site Code of the NVR that the image was originally extracted from. -
Page 80: Backup Viewer
When the Install Shield Wizard Complete window appears, click Finish. Setup is now complete. 4.6.2 LOADING VIDEO FROM DVD OR HARD DRIVE Open the Backup Viewer program by selecting Start > Programs > Digital Watchdog > Backup Viewer > Backup Viewer. -
Page 81: Dw Video Management Software
Refer to the Setup section of the Video Management Software Manual for information on how to use the Video Management Software. The Video Management Software Manual can be found on the Digital Watchdog Software CD or the Digital Watchdog website. -
Page 82: Chapter 5: Lan / Isdn / Ptsn Connections
Since connecting the NVR to a network can be extremely complex (depending on the network), this Digital Watchdog NVR manual will cover only the basics. It is suggested that the NVR administrator consult the Vendor or IT Administrator before attempting to create or connect to a LAN. - Page 83 © 2012 Digital Watchdog All rights reserved. No part of this publication may be reproduced by any means without written permission from Digital Watchdog. The information in this publication is believed to be accurate in all respects. However, Digital Watchdog cannot assume responsibility for any consequences resulting from the use thereof.
Need help?
Do you have a question about the Nexus and is the answer not in the manual?
Questions and answers