
Related Manuals for Sartorius LE series


Summary of Contents for Sartorius LE series
- Page 1 Operating Instructions Sartorius Expert Series LE Models Electronic Micro-, Analytical and Precision Balances 98648-011-40...
-
Page 2: Table Of Contents
Contents Warnings and Safety Generating a Printout Precautions ISO/GLP-compliant Getting Started Printout/Record Installation Interface Port Data Input Format Operation Pin Assignment Charts Overview of Display and Operating Elements Cabling Diagram Basic Weighing Function Below-Balance Weighing Troubleshooting Guide Calibration and Adjustment Care and Maintenance Configuration Instructions for Recycling... -
Page 3: Warnings And Safety Precautions
On The balance housing may be opened only by Sartorius service technicians request, Sartorius will be happy to pro- who have been trained at the factory. vide information on operating specifica- tions (in accordance with the Standards Make sure you disconnect the balance for defined immunity to interference). -
Page 4: Getting Started
K. The control seal – AC adapter – Dust cover consists of a sticker with the “Sartorius" logo. If the seal is broken, the verifica- Additional equipment for models tion becomes null and void and the bal- with readabilities <... -
Page 5: Installation
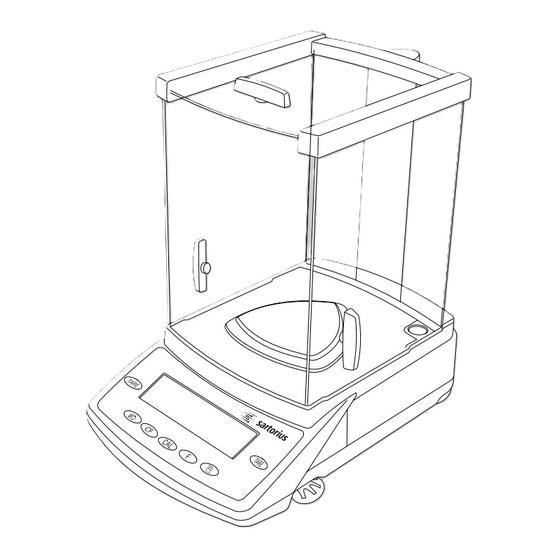
Installation Balances with an Analytical Draft Shield Check the sliding lock device on the back of the draft shield; make sure it is in the “open" position (to the right). § Position the draft shield carefully on the balance § Secure the draft shield by pressing lightly on the draft shield base and moving the sliding lock device to the left §... - Page 6 Connecting Model LE26P, LE225D(-0CE) to the Electronics Box – Plug the male connector on the cable into the female connector on the electronics box !Do not exchange the balance or electronics box with a component of a different balance! Balances with a 3-Sided Draft Shield §...
- Page 7 Balances with a Rectangular Weighing Pan and a Weighing Capacity up to 10 kg § Place the weighing pan on the balance Balances with a Rectangular Weighing Pan and a Weighing Capacity over 10 kg § Place the weighing pan on the balance...
- Page 8 Connect the power cord to the AC adapter (on bal- ances with weighing capacities up to 10 kg) $ Use an original Sartorius AC adapter with a wide input voltage range (100 to 240 V~), order no. 6971966, and replaceable...
- Page 9 Balances with a Weighing Capacity over 10 kg: Insert the right-angle plug into the jack and tighten the screw. Safety Precautions Plug-in AC Adapter: The AC adapter rated to Class 2 can be plugged into any wall outlet without additional safety precautions.
- Page 10 If you have a Class A digital device, you need to comply with the FCC statements as follows: “Operation of this equipment in a residential area is likely to cause harmful interference in which case the user will be required to correct the interference at his own expense.”...
- Page 11 Connecting Electronic Peripheral Devices Make sure to unplug the balance from AC power before you connect or disconnect a peripheral device (printer or PC) to or from the interface port. Warmup Time To deliver exact results, the balance must warm up as listed below after initial connection to AC power or after a relatively long power outage.
- Page 12 Leveling Balances with a Weighing Capacity over 10 kg Adjust the leveling feet until the air bubble is centered within the circle on the level indicator. Antitheft Locking Device on Balances with a Weighing Capacity up to 10 kg To secure the balance at the place of installation, fasten a chain or a lock to the lug located on the rear panel of the balance.
-
Page 13: Operation
Operation Overview of Display and Operating Elements Tare Tare Position Designation Position Designation Weight units Delete (Clear Function) Taring This key is generally used to Symbol: “GLP printing mode cancel functions. active" – Quit application program Symbol: “Printing mode active" –... -
Page 14: Basic Weighing Function
Basic Weighing Function Purpose Working with LE26P… Models: The basic weighing function can be Working with the microbalance requires a used alone or in combination with steady hand and a smooth, uninterrupted an application program (counting, technique. weighing in percent, etc.). Use forceps or other suitable utensil to Features place the sample on the weighing pan. - Page 15 Preparation A circle in the upper right-hand corner of the display indicates that the balance was disconnected from power. This symbol is shown, for example, the first time the balance is put into operation, or after a power outage. Switch on the balance: Press e. >...
-
Page 16: Below-Balance Weighing
Using the built-in hanger (1): Attach the sample (e.g., using a suspension wire) to the hanger. $ Bore hole (2): Carefully fasten the special hanger, or order a hanger directly from Sartorius. $ If necessary, install a shield for protection against drafts. - Page 17 Example Simple Weighing Step Key (or instruction) Display/Data Output 1. Switch on the balance. Self-test is performed, followed by automatic initial tare function. 11.5 2. Place container on the balance (in this example, 11.5 g). 3. Tare the balance. + 132.0 4.
-
Page 18: Calibration And Adjustment
Calibration and Adjustment Purpose The weight displayed for the sample Calibration is the determination of the on the balance must not differ from the nominal weight by more than 2%. difference between the weight readout and the true weight (mass) of a sample. Calibration does not entail making any You can use any of the following weight units to calibrate/adjust the balance:... - Page 19 Internal Calibration/Adjustment Calibration and Adjustment Sequence The menu code setting 1 9 3 In the Setup menu, you can configure must be selected in the Setup menu. whether: – calibration is always followed automati- cally by adjustment (1 10 1; factory Inside the balance housing is a motori- zed calibration weight which is applied setting), or...
- Page 20 isoCAL: – The weight on the pan is no more than Automatic Calibration and Adjustment 2% of the maximum capacity of the The menu code setting 1 15 3 must be balance selected in the Setup menu. – Then let the balance perform the –...
- Page 21 Internal Calibration Step Key (or instruction) Display 1. Tare the balance. 2. Start calibration. The internal weight is applied automatically. 3. The balance is calibrated – (displayed only if menu ± code 1 10 2 is set). Adjust* 4. If the “Calibrate, then auto adjust"...
- Page 22 External Calibration Step Key (or instruction) Display 1. Tare the balance. + 5000.0 2. Start calibration. 3. Apply the prompted calibration weight (in this example, 5000 g). – 4. The balance is calibrated (displayed only if menu ± code 1 10 2 is set). Adjust 5.
-
Page 23: Configuration
Configuration Purpose Printing the Parameter Settings To adapt the balance to individual – At the 3rd menu level (lowest level; requirements by choosing from parameters see also the next page): Press and hold r (> 2 sec.) options in the Setup menu. Features >... -
Page 24: Setting The Parameters (Menu Codes)
Setting the Parameters (Menu Codes) Example: Adapting the balance to “very unstable" ambient conditions (menu code 1 1 4). Step Key (or instruction) Display 1. Switch off the balance. 2. Switch the balance on; while all segments w briefly are displayed: $ Scroll upward within a menu level;... -
Page 25: Parameter Settings (Overview)
Parameter Settings (Overview) o Factory setting √ User-defined setting Setup Weighing 1 1 Adapt filter 1 1 1 Very stable conditions 1 1 2 Stable conditions 1 1 3 Unstable conditions 1 1 4 Very unstable conditions 1 2 Application filter 1 2 1 Final readout 1 2 2... - Page 26 Menu Weighing through 1 7 see previous page Display accuracy 1 * 1 8 1 All digits 1 8 5 Reduced by 1 digit* q key function 1 9 1 External cal./adj. 1 9 3 Internal cal./adj. q key blocked 1 9 7 1 10 Calibration/ 1 10 1...
- Page 27 Menu through 2 see previous page Application 3 1 Weight unit 2 3 1 1 Grams (display: o)* parameters 3 1 2 Grams (display: g) 3 1 3 Kilograms 3 1 4 Carats 3 1 5 Pounds* 3 1 6 Ounces* 3 1 7 Troy ounces*...
- Page 28 Menu through 3 see previous page Data interface 5 1 Baud rate 5 1 1 150 baud 5 1 2 300 baud 5 1 3 600 baud 5 1 4 1200 baud 5 1 5 2400 baud 5 1 6 4800 baud 5 1 7 9600 baud...
- Page 29 Menu through 6 see previous page Printing with 7 1 Print 7 1 1 application application 7 1 2 On; all parameters programs parameters 7 1 3 On; main parameters only 7 2 Line format 7 2 1 For raw data of printout (16 characters) 7 2 2...
-
Page 30: Setting Ids, Time, Date And Display Brightness
Setting IDs, Time, Date and Display Brightness Purpose – Configuring measurement environment parameters for ISO/GLP-compliant data records. – Setting date and time (for ISO/GLP-compliant records only). – Adapting display to ambient lighting conditions. Features – Enter up to 8 characters to identify a measurement series. - Page 31 Example: Setting the time, date and display brightness Step Key (or instruction) Display 1. Switch off the balance. 2. Switch the balance on; while all segments -------- v briefly are displayed: -------- $ To move the cursor within ID number: repeatedly -3------ $ To set or change ID:...
- Page 32 Step Key (or instruction) Display 9. Set display brightness. lamp 7 repeatedly 10. Save changes and exit Press and hold w (2 sec.) the menu $ Exit menu without saving changes.
-
Page 33: Application Programs
Application Programs Function Keys v key: Start application program/ store component c key: Toggle between component press and weight and total weight hold for (net-total formulation); 2 seconds change reference quantity (counting), reference percentage (weighing in percent) or number of measurements (animal weighing) c key: End application program;... -
Page 34: Net-Total Formulation
Net-total Formulation Menu code: 2 1 6 Display symbol: R Purpose With this application program you can weigh in different components up to a defined total. Features – Weigh up to 99 components from “0" to a defined total component weight. –... - Page 35 Preparation Set parameters for net-total formulation: § Set parameters for automatic printout when component stored 2 Application programs 2 1 Program selection 2 1 6 Net-total 7 Print for application 7 1 Print application parameters 7 1 1 7 1 2 ο On; all parameters 7 1 3 On;...
- Page 36 Example: Counting parts into a container Settings: Application program: Net-total formulation 2 1 6; Print application parameters: On, print all 7 1 2; Automatic printout of last net value 7 3 1 Step Key (or instruction) Display/Data output 65.0 1. Place empty container on the balance.
- Page 37 Step Key (or instruction) Display/Data output 12,5 9. Add last component. 10. Store component data. COMP 3+ 12.5 g + 203,5 11. Display total weight. T COMP+ 203.5 g...
-
Page 38: Counting
Reference Sample Updating § Please order the required connecting Automatic reference sample updating optimizes the counting accuracy. cables directly from Sartorius. You can activate or deactivate this function in the Setup menu. The following settings must have the same configurations in both... - Page 39 Preparation Set parameters for the Counting program: $ Select the application program in the Setup menu § Set the following parameters: 2 Application programs 2 1 Program selection 2 1 4 Counting 3 Application parameters 3 5 Storage parameter 3 5 1 Standard resolution (internal resolution) 3 5 2 ο...
- Page 40 Example: Counting parts of equal weight Settings: Menu: Counting program (menu code 2 1 4) Step Key (or instruction) Display/Data output 22.6 1. Place empty container on the balance/scale. 2. Tare the balance. 3. Add reference sample quantity to container (in this example: 10 pcs).
-
Page 41: Weighing In Percent
Weighing in Percent Menu code: 2 1 5 Preparation Display symbol: % Set parameters for the Weighing in Percent program: Purpose $ Select the application program in the This application program allows you to obtain weight readouts in percent which Setup menu are in proportion to a reference weight. - Page 42 Example: Determining residual weight in percent Settings: Menu: Weighing in percent program (menu code 2 1 5), Print application parameters: On; all parameters (menu code 7 1 2), Reference percentage: ref 100% Step Key (or instruction) Display/Data output 22.6 1. Place empty container on balance 2.
-
Page 43: Animal Weighing/Averaging
Animal Weighing/Averaging Menu code: 2 1 7 Preparation Display symbol: V Set parameters for the Animal Weighing program: Purpose $ Select the application program in the Use this program to determine the weights of unstable samples (e.g., live animals) Setup menu or to determine weights under unstable §... - Page 44 Example: Determining animal weight with automatic start of 20 subweighing operations Settings: Menu: Animal weighing program (menu code 2 1 7), Print application parameters: On; all parameters (menu code 7 1 2) Step Key (or instruction) Display/Data output 1. Switch on the balance. 22.6 2.
-
Page 45: Toggling Between Weight Units
Toggling between Weight Units Menu code: 2 1 2 With this application program you can switch the display of a weight value back and forth between two weight units. Configure the “Toggle Weight Units" application in the Setup menu: see “Configuration" Menu code: 2 1 2 Menu code Unit Conversion... -
Page 46: Generating A Printout
Generating a Printout Purpose Factory settings: You can generate printouts that include Print manual/automatic: Individual weights, other measured values and printout dependent on stability: identification codes for documentation Manual at stability (menu code: 6 1 2) purposes. You can format the printout to meet individual requirements. - Page 47 Printout without Data ID Codes: Examples The value currently Weight in grams 1530.0 g displayed is printed Weight in Troy ounces 58.562 ozt (weight or calculated Piece count 253 pcs value with unit) Percentage 88.23 % Printout with Data ID Codes: The current value displayed Identification* 12345678...
-
Page 48: Iso/Glp-Compliant Printout/Record
Function Keys Press r to output header and first – Field for operator signature measured value. The record is output to a Sartorius data > Header is output the first time r printer or a computer. is pressed Press v to include output header... - Page 49 The ISO/GLP-compliant printout can contain the following lines: Dotted line -------------------- Date/time (beginning of measurement) 17-Jan-2003 10:15 Balance manufacturer SARTORIUS AG Balance model Mod. LE10001 Balance serial number Ser. no. 10105355 Software version Ver. no. 00-13-46 2690 923 Dotted line -------------------- Measurement series no.
-
Page 50: Interface Port
Interface Port Purpose Factory settings: Your balance is equipped with an interface Transmission rate: port for connection to a computer or other peripheral device. 1200 baud (5 1 4) Parity: Odd (5 2 3) You can connect a computer to change, Stop bits: 1 stop bit (5 3 1) start and/or monitor the functions of the balance and the application programs. - Page 51 Output Format with 16 Characters Display segments that are not activated are output as spaces. The following characters can be output, depending on the characters displayed on the balance: Normal Operation Position 10 11 12 13 14 15 16 CR LF –...
- Page 52 Data output example: +123.56 g Position CR LF CR LF Position 1: Plus or minus sign or space Position 2: Space Positions 3-10: Weight with a decimal point; leading zeros = space Position 11: Space Positions 12-14: Unit symbol or space Position 15: Carriage return Position 16:...
- Page 53 Special Codes 9 10 11 12 13 14 15 16 17 18 19 20 21 22 * CR LF Space Overload Underload Error Codes 9 10 11 12 13 14 15 16 17 18 19 20 21 22 * CR LF Space # # #: Error code number ID code...
-
Page 54: Data Input Format
Data Input Format You can connect a computer to your balance to send commands via the balance interface port to control balance functions and applications. The commands sent are control commands and may have different formats. Control commands consist of up to 13 characters. Each character must be transmitted according to the settings configured in the operating menu for data transmission. - Page 55 Synchronization Handshake During data communication between the The balance interface (Sartorius Balance balance and a connected device (comput- Interface = SBI) has transmit and receive er), messages consisting of ASCII characters buffers. You can define the handshake are transmitted via the interface. For error-...
- Page 56 Faster Output Speeds The print command can be transmitted by If you require output speeds faster than pressing r or by a software command 10 Hz, please contact Sartorius for (Esc P). information. Automatic Data Output In the “auto print" operating mode, data is output to the interface port without a print command.
-
Page 57: Pin Assignment Charts
Warning When Using Pre-wired RS-232 Connecting Cables: RS-232 cables purchased from other manufacturers often have incorrect pin assignments for use with Sartorius weighing systems. Be sure to check the pin assignments against the chart below before connecting the cable, and disconnect any lines identified differently from those specified by Sartorius (e.g., pin 6). -
Page 58: Cabling Diagram
Cabling Diagram – For connecting a computer or other peripheral device to the balance using the RS-232C/V24 protocol and cables up to 15 m (50 ft.) long. Balance Peripheral device 25-pin 9-pin Cable type: AWG 24 specification... -
Page 59: Troubleshooting Guide
Increase the weight on the when using an appli- balance cation program, there is no sample on the balance err 30 Interface port for printer Reset the menu output is blocked factory settings, or Contact your local Sartorius Service Center... - Page 60 The balance was not Tare or zero the balance tared/zeroed defore weighing before weighing If any other errors occur, contact your local Sartorius Service Center! Contact information: Please point your Internet browser to: http://www.sartorius.com...
-
Page 61: Care And Maintenance
Care and Maintenance Service Cleaning § Unplug the AC adapter from the wall On request, Sartorius can offer you an individual service contract. outlet (mains supply). If you have an interface cable connected to the Repairs balance port, unplug it from the port. - Page 62 AC power immediately > Lock the equipment in a secure place to ensure that it cannot be used for the time being. Notify your nearest Sartorius Service Center. Repair work must be performed by trained service technicians. We recommend having the power supply inspected...
-
Page 63: Instructions For Recycling
In Germany and many other countries, our service addresses to contact if you plan Sartorius AG takes care of the return to send your equipment in for repairs or and legally compliant disposal of its proper disposal. -
Page 64: Overview
Overview Specifications Model LE26P LE225D LE324S LE244S Weighing capacity 5/21 40/100/220 Readability 0.002/0.01 0.01/0.01/0.1 Tare range (subtractive) –21 –220 –320 –240 <±mg 0.004 Repeatability (std. deviation) 0.02/0.05/0.1 Linearity <±mg 0.008 0.03/0.1/0.2 Response time (average) < 6/3 < 3 < 2 Operating temperature range °C 10°... - Page 65 Model LE1003S LE1003P LE623S LE323S LE623P Weighing capacity 1010 500/1010 120/240/620 Readability 0.001 0.001/0.01 0.001 0.001 0.001/0.002/0.005 Tare range (subtractive) –1010 -1010 –620 –320 –320 Repeatability (std. deviation) <± g 0.001 0.001/0.01 0.001 0.001 0.001/0.001/ 0.003 Linearity <± g 0.002 0.002/0.02 0.002 0.002 0.002/0.002/0.005...
- Page 66 Model LE6202S LE5202S-DS LE4202S LE6202P LE2202S LE2202S-DS Weighing capacity 6200 5200 4200 1500/3000/ 2200 6200 Readability 0.01 0.01 0.01 0.01/0.02/ 0.01 0.05 Tare range (subtractive) –6200 –5200 –4200 –6200 –2200 Repeatability (std. deviation) <± g 0.01 0.01 0.01 01/0.01/ 0.01 0.03 <±...
- Page 67 Model LE10001 LE5201 LE2201 LE34001S LE34001P LE16001S Weighing capacity Readability (scale interval) 0.1/0.2/0.5 0.1 Tare range (subtractive) –10 –5.2 –2.2 –34 –34 –16 Repeatability (std. deviation) <±g 0.1 0.05/0.05/ 0.05 Linearity <±g 0.2 Response time (average) < 1 Operating temperature range °C 10°...
- Page 68 Verified models with EC type-approval Model LE26P-OCE LE225D-OCE LE324S-OCE LE244S-OCE Type BC BL 100 BC BL 100 BD BL 100 BD BL 100 Accuracy class Weighing capacity, Max 5/21 100/220 Scale interval d mg 0.002/0.01 0.01/0.1 Tare range (subtractive) < 100% of the maximum capacity Verification scale interval e 0.0001 0.001...
- Page 69 Model LE623S-OCE LE323S-OCE LE623P-OCE Type BD BL 200 BD BL 200 BD BL 200 Accuracy class Weighing capacity, Max 120/240/620 Scale interval d 0.001 0.001 0.001/0.002/0.005 Tare range (subtractive) < 100% of the maximum capacity Verification scale interval e 0.01 0.01 0.01 Minimum capacity, Min...
- Page 70 Model LE6202S-OCE LE4202S-OCE LE6202P-OCE LE2202S-OCE Type BD BL 200 BD BL 200 BD BL 200 BD BL 200 Accuracy class Weighing capacity, Max 6200 4200 1500/3000/6200 2200 Scale interval d 0.01 0.01 0.01/0.02/0.05 0.01 Tare range (subtractive) < 100% of the maximum capacity Verification scale interval e Minimum capacity, Min Response time (average)
- Page 71 Model LE10001-OCE LE5201-OCE Type BD BL 200 BD BL 200 Accuracy class Weighing capacity, Max 10,000 5200 Scale interval d Tare range (subtractive) < 100% of the maximum capacity Verification scale interval e Minimum capacity, Min Response time (average) < 1 Range of use according 5–10,000 5–5200...
- Page 72 Model LE34001S-OCE LE34001P-OCE LE16001S-OCE Type BF BL 500 BF BL 500 BF BL 500 Accuracy class Weighing capacity, Max 8/16/34 Scale interval d 0.1/0.2/0.5 Tare range (subtractive) < 100% of the maximum capacity Verification scale interval e Minimum capacity, Min Response time (average) <...
-
Page 73: Accessories (Options)
Accessories (Options) Product Order No. Data printer YDP03-0CE with date, time, statistics evaluation and transaction counter functions and LCD Remote display ), reflective YRD02Z (data interface required) External rechargeable battery pack – for models with weighing capacities YRB05Z under 10 kg –... - Page 74 Product Order No. SartoConnect ) software for direct transfer of weighing data to an YSC01L application program (e. g. Exel) from the LE balance to a computer YSC01L – with RS-232C adapter cable; length: 1 m – with RS-232C adapter cable; length: 5 m YSC01L5 –...
- Page 75 Product Order No. Draft shield cover with opening (d 30 mm) YDS02CP – for LE623S, LE323S and LE623P Data cable 7357312 – for PC connection, 25-pin – for PC connection, 9-pin 7357314 Adapter: D-Sub 25-pin male connector to 6965619 D-Sub 9-position, length: 0.25 m Universal remote control switch for remote control of the following functions (configured in the balance menu): r, w, c or v...
-
Page 76: Declaration Of Conformity
For the respective Declaration of Type – Installation Conformity for weighing instruments that – Startup have been verified by Sartorius for use as – Inspection legal measuring instruments and that have – Training an EC Type-Approval Certificate, see the –... - Page 84 Sartorius AG Weender Landstrasse 94–108 37075 Goettingen, Germany Phone +49.551.308.0 Fax +49.551.308.3289 www.sartorius.com Copyright by Sartorius AG, Goettingen, Germany. All rights reserved. No part of this publication may be reprinted or translated in any form or by any means without the prior written permission of Sartorius AG.
Need help?
Do you have a question about the LE series and is the answer not in the manual?
Questions and answers