Nespresso Lattissima Instruction Manual
Hide thumbs
Also See for Lattissima:
- User manual (74 pages) ,
- Manual (58 pages) ,
- Instruction manual (40 pages)
Table of Contents
Advertisement
Quick Links
Instructions – Mode d'emploi
DE'LONGHI America, Inc.
Park 80 West, Plaza One
Saddle Brook, NJ 07663
IMPORTANT INSTRUCTIONS! SAVE THESE INSTRUCTIONS!
Note all safety instructions contained in this operating manual!
MODE D'EMPLOI IMPORTANT! CONSERVEZ LES PRESENTES INSTRUCTIONS!
Ne mettez l'appareil en marche qu'après avoir pris connaissance
de ce mode d'emploi et des consignes de sécurité!
07
Advertisement
Table of Contents

Related Manuals for Nespresso Lattissima


Summary of Contents for Nespresso Lattissima
- Page 1 Instructions – Mode d‘emploi DE’LONGHI America, Inc. Park 80 West, Plaza One Saddle Brook, NJ 07663 IMPORTANT INSTRUCTIONS! SAVE THESE INSTRUCTIONS! Note all safety instructions contained in this operating manual! MODE D’EMPLOI IMPORTANT! CONSERVEZ LES PRESENTES INSTRUCTIONS! Ne mettez l‘appareil en marche qu‘après avoir pris connaissance de ce mode d‘emploi et des consignes de sécurité!
-
Page 2: Table Of Contents
Utilisation conforme ..........7 Important instructions for use and disposal ..........Consignes importantes lors de l’utilisation ..............7 Your contact at Nespresso Club ..... Votre service au club Nespresso ......7 Overview ..............Vue d’ensemble .............8 First use or after a longer period of non-use Mise en service ou après une période... - Page 3 Do not over ll water tank. nearest authorized service facility ap- 5. The appliance is not intended for use proved by Nespresso Club Hotline for by persons (including children) with examination, repair or adjustment. reduced physical, sensory or mental 11.
-
Page 4: Short Cord Instructions
22. Do not touch the milk nozzle immedi- 18. If the machine is out of use for a longer period (holidays etc.) unplug it ately after use. It will still be very hot. from the mains. 23. Always use the milk container with lid and milk nozzle that are included for 19. -
Page 5: Proper Use
Only use capsules authorized for the Nespresso system. Any other use is not in accordance with the instructions. Any use that is not in accordance with the instructions may cause personal injury and leads to a loss of any rights to claim under the guarantee. -
Page 6: Precautions Importantes
Ne remplissez pas trop le immédiatement. Retourner l‘appareil réservoir à eau. au centre de service agréé Nespresso 5. Cet appareil n’est pas conçu pour être le plus proche, pour un contrôle, une utilisé par des personnes (y compris les réparation ou une modi cation. -
Page 7: Instructions Spéciales Pour Câble D'alimentation Court
N‘utilisez exclusivement que boisson des capsules Nespresso. La respon- sabilité du fabricant ne sera engagée 22. Ne touchez pas la buse lait immédi- atement après l‘utilisation. Elle sera que dans le cadre d‘une mauvaise... -
Page 8: Attention Aux Instructions • Symboles
Cette machine est conçue pour la préparation de boissons à base de café ou pour chau er de l’eau. Cet appareil est destiné à l’usage domestique, conformément à ce mode d’emploi. N’utilisez exclusivement que des capsules Nespresso. Toute autre utilisation n’est pas conforme avec les instructions. -
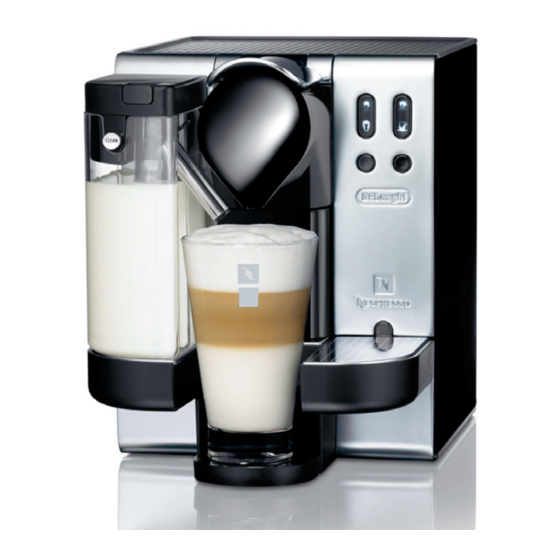
Page 9: Vue D'ensemble
Overview Vue d’ensemble Cup Plate Main Switch (Cup Warmer only for Model EN680.M) Interrupteur principal Plateau repose-tasses (Chau e-tasses pour modèle EN680.M) Lever Poignée Hot water nozzle Buse eau chaude Co ee outlet Capsule container Sortie café Réservoir à capsules Drip tray level indicator Flotteur du bac récolte-gouttes Water tank (41 oz.) - Page 10 Rapid Cappuccino System Système Rapid Cappuccino Rinsing button Froth regulator Bouton de rinçage Régulateur de mousse No froth Pas de mousse Max. froth Milk container (17 oz.) Mousse maximale (Must be placed in the refrigerator) Réservoir à lait (0.5L) Milk spout (Peut être mis au réfrigérateur) Buse lait Backlit buttons...
-
Page 11: Mise En Service Ou Après Une Période De Non-Utilisation Prolongée
First use or after a longer period of non-use Mise en service ou après une période de non-utilisation prolongée Remove plastic lm from the Fill water tank with fresh Insert hot water nozzle. drip tray grid and from the side water up to maximum level. - Page 12 Plug machine into mains. Switch machine on. System is heating up (blinking standby button). Brancher la machine. Allumer la machine. Préchau age (bouton veille clignotant). sortie > If no water ows: see chapter «Troubleshooting». > Pas d’eau: voir chapitre «Pannes». After one minute system After 2 minutes, system is ready to is ready to make co ee.
-
Page 13: Instructions Pour Toutes Les Préparations
Instructions for all types of beverages Instructions pour toutes les préparations Once the preparation starts Cancel preparation Dès que la préparation commence Pour stopper la préparation > activated button blinks To stop preparation press the same button for the required quantity again. >... - Page 14 If water tank is empty during preparation Si le réservoir est vide pendant la préparation Milk recipes and co ee buttons Remove milk container. Press desired button ash for 5 seconds Fill water tank with fresh > preparation is starting >...
-
Page 15: Préparation D'un Cappuccino Ou D'un Latte Macchiato
Preparing Cappuccino and Latte Macchiato Préparation d’un Cappuccino ou d’un Latte Macchiato WARNING AVERTISSEMENT Risk of scalding if milk container is Remove lid of milk Close milk container. 1. O not inserted properly > Always container. Fill container Insert it into the machine. 2. - Page 16 1. Open lever. Adjust the froth regulator Place a Cappuccino cup or 2. Insert capsule. according to the quantity of a Latte Macchiato glass under 3. Close lever. froth you want and to the the co ee outlet and adjust kind of milk you use.
-
Page 17: Préparation D'eau Chaude
Preparing hot water Préparation d’eau chaude Insert hot water nozzle. Place a su ciently large cup Press hot water button under nozzle. > hot water ows into cup. Placer la buse eau chaude. Mettre une tasse Appuyer sur le bouton su samment grande eau chaude >... -
Page 18: Standby Mode
Standby mode Exit from Standby mode rgie Sortie du mode veille 4 hours after last use Mode veille 4 heures après la dernière utilisation > Standby button light on (red). Press Standby button ng). > Appliance is in standby mode >... -
Page 19: Programmation De La Quantité D'eau Chaude/D'espresso/De Lungo
Adjusting quantity for hot water/Espresso/Lungo Programmation de la quantité d’eau chaude/ d’Espresso/de Lungo Possible volumes: For co ee: Place an appropriate cup • Co ee 0.65–6.5 oz. 1. Open lever. under co ee outlet or hot • Hot water 1.7–13 oz. 2. - Page 20 Press and hold espresso, After 3 seconds For Co ee: Lungo or hot water button > the button blinks 3 times to 1. Lift lever to eject capsule. and release at desired volume con rm the new volume. 2. Close lever. level.
-
Page 21: Revenir À La Programmation Initiale
> Milk frothing starts. Press and hold the same > Co ee preparation starts. Once the button is released, the button. Once the button is released, the > t milk volume is stored. co ee volume is stored. Appuyer et maintenir appuyé... - Page 22 After 3 seconds 1. Lift lever to eject capsule. d, the 2. Close lever. > the button blinks 3 times to con rm the new volume. 1. Lever la poignée pour éjecter la capsule. ne fois Après 3 secondes 2. Fermer. >...
-
Page 23: Nettoyage Après La Préparation D'une Recette Lait
Rinsing after milk recipe preparation Nettoyage après la préparation d’une recette lait NOTICE NOTIFICATION You can leave the milk in the Place a container Press and hold container during this process. under milk spout. rinsing button. This rinsing function is Placer un récipient sous Appuyer et maintenir appuyé... - Page 24 WARNING AVERTISSEMENT The milk nozzle gets hot. Risk of > Rinsing process starts. Keep pressing the rinsing scalding. Use with care. Milk recipe buttons are button for additional rinsing blinking for 12 seconds. or release. yé La buse lait est chaude. Danger de brûlure.
-
Page 25: Nettoyage Au Quotidien
Daily cleaning Nettoyage au quotidien Empty water residue. When drip tray level indicator Remove lid of water tank. Empty capsules and rinse. is showing: Remove grid. Empty and rinse water tank. Empty and rinse. The water tank and its lid Vider l’eau résiduelle. - Page 26 Remove grid of side panels. Use a damp cloth and mild Insert hot water nozzle. Clean side panels. cleaning agent to clean the To rinse the pipes, press either surface of the machine. Lungo or hot water button Enlever les grilles des bacs (without capsule inside).
- Page 27 Place one container each 1. Open lever. Press Macchiato and Lungo (min. 20 oz.) under both the 2. Insert lter provided with buttons simultaneously for > L co ee outlet and under the descaling kit. 5 seconds hot water nozzle. 3.
- Page 28 Press Lungo button > Descaling product ows Wait until only the Lungo button is alternately through co ee outlet still ashing. Continue in order to > Lungo and Macchiato and hot water nozzle. remove the rest of the descaler. buttons will blink aster.
-
Page 29: Vider La Machine
Emptying machine Vider la machine WARNING AVERTISSEMENT If not using the machine for a Empty water tank. Press Cappucino and Espresso long time, it is necessary to buttons simultaneously for Vider le réservoir à eau. empty the machine. Liquids may 5 seconds >... - Page 30 > La machine est en mode détartrage. No light > Check mains > In case of problems, call Nespresso Club. Pas de lumière > Véri er la che secteur > En cas de problème, appeler le Club Nespresso. English | Français...
-
Page 31: Spéci Cations Techniques
17 oz. / 0,5 l 41°F/5°C ... 113°F/45 °C 8 in / 20,5 cm 13.5 in / 34,2 cm 10 in / 25,8 cm Optional accessory Accessoire optionnel Nespresso descaling kit Kit de détartrage Nespresso Art. 3035/CBU English | Français... - Page 32 5713210081/06.07...
Need help?
Do you have a question about the Lattissima and is the answer not in the manual?
Questions and answers