Table of Contents
Advertisement
Quick Links
Oricom P900 Series
1.8GHz DECT Cordless phone with answering system
Keep this user guide
for future reference.
WARNING
DO NOT USE STANDARD/ALKALINE BATTERIES IN THIS
PRODUCT, AS THERE IS A RISK OF EXPLOSION AND/OR INJURY.
USE ONLY Ni-MH RECHARGEABLE BATTERIES AS SPECIFICED IN
THIS USER GUIDE. CONTACT ORICOM FOR REPLACEMENT
BATTERIES
Advertisement
Table of Contents

Related Manuals for Oricom P900 Series


Summary of Contents for Oricom P900 Series
- Page 1 Keep this user guide for future reference. WARNING DO NOT USE STANDARD/ALKALINE BATTERIES IN THIS PRODUCT, AS THERE IS A RISK OF EXPLOSION AND/OR INJURY. USE ONLY Ni-MH RECHARGEABLE BATTERIES AS SPECIFICED IN THIS USER GUIDE. CONTACT ORICOM FOR REPLACEMENT BATTERIES...
-
Page 2: Table Of Contents
Content SAFETY INFORMATION .................... 4 Pack Contents ......................6 GETTING STARTED....................7 Your handset ....................... 7 Basic steps to install ....................9 Charging the handset ....................9 BASIC OPERATIONS....................10 During standby ......................10 Answering an incoming external call ................. 10 Making an external call.................... - Page 3 Reset ......................... 19 INTEGRATED DIGITAL ANSWERING MACHINE ........... 20 Display........................21 Getting started......................21 Turning the answering machine on/off ..............21 Outgoing messages (OGM)..................22 Recording an OGM....................23 Listening to the current OGM................23 Deleting an OGM ....................23 Incoming messages (ICM)..................
-
Page 4: Safety Information
ENVIRONMENT AND SAFETY INFORMATION SAFETY INFORMATION • Avoid exposure of this telephone to moisture or liquid. • To prevent electric shock, do not open the handset or base cabinet. • Avoid metallic contact (e.g. metal clips, keys) between the battery contacts and charging conductors. - Page 5 CAUTION This telephone is not designed for making emergency telephone calls when the mains power fails. Always have a corded phone available to be able to make and receive calls to emergency services if the mains power fails. Do not use your telephone during an electrical storm thunderstorm as it is possible to get an electric shock.
-
Page 6: Pack Contents
Handset Rechargeable AAA Ni-MH Batteries (1.2V 650mAh) If any of these items are missing, please contact Oricom directly. Purchasing additional handsets You may expand your P900 by adding more handsets (P8050HS). These may be purchased separately from the retailer where you purchased the product from, or direct from Oricom (Australia). -
Page 7: Getting Started
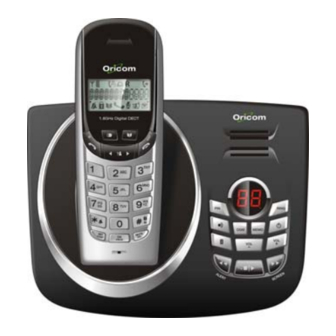
GETTING STARTED GETTING STARTED Your handset LCD Display Redial Phonebook Talk / Recall Off / Exit CID / CID / Scroll forward Scroll backward Ringer On-Off # / Keylock / Pause Intercom / OK / Mute / Conference Program Delete... - Page 8 LCD display on the handset Base Ringer Handset Setting Recall Ringer Registration duration Setting Ringer programming Battery Signal Menu up/down Character Display Left Arrow Right Arrow Ringer Off Message Phonebook Key lock Off hook Mute New CID waiting The handset is linked to the base Displays the current battery level.
-
Page 9: Basic Steps To Install
Basic steps to install 1. Connect the output plug of the mains adapter to the adapter socket on the back of the base unit and the mains adapter to the wall mains supply. 2. Connect the telephone lead to the phone cord socket on the back of the base unit and to the wall phone socket. -
Page 10: Basic Operations
BASIC OPERATIONS BASIC OPERATIONS During standby Oricom When the phone is in standby, the LCD displays the handset name. The handset number related to the connected base will also be displayed right justified. The battery icon reflects the current battery level and the signal icon indicates the handset is linked to the base. -
Page 11: Pre-Dialling
Pre-dialling Pre-dial allows you to enter a telephone number and verify it on the screen before you place the call. The screen displays the last 12 digits dialled but you can enter up to 20 digits. 1. Enter the phone number. 2. -
Page 12: Adjusting The Volume
When you end a call, the timer will be displayed for 5 seconds before the screen returns to the handset label. Adjusting the volume During a call you can adjust the earpiece volume. Press to adjust the receiver volume. The display shows the volume level of high “OOO”, medium “OO”... -
Page 13: Take Two Different Calls At The Same Time
Take two different calls at the same time If you have subscribed to your telephone network operators Call Waiting Caller ID service, your phone will display the number of the second incoming call for around 60 seconds while you are talking on the phone. During a call, you will hear two loud beeps periodically to notify you of another incoming call. -
Page 14: Call Back From A Cid Record
Call back from a CID record While you are viewing a CID record, you can return the call provided that it contains a valid phone number by pressing Saving a CID record to phonebook You can save a CID record into the phonebook provided that it contains a valid phone number and the phonebook is not full. -
Page 15: Storing A Previously Dialled Number Into Phonebook
Storing a previously dialled number into phonebook While you are reviewing a previously dialled number that you would like to save, 1. Press 2. Use the number keys to enter the name. If you make a mistake, use to do the editing. A name can contain up to 8 characters. If there’s already a phonebook record matching the number, that phonebook name will appear and you can edit it. -
Page 16: Editing Phonebook Records
to do the editing. A name can contain up to 8 characters. 4. Press to confirm the name. You will be alerted to edit the name if it is a duplicated name in the existing phonebook records. 5. You are now prompted with the phone number that you just entered. Edit the number if necessary. -
Page 17: Deleting A Phonebook Record
Deleting a phonebook record 1. During standby mode, press 2. Press to search for the record that you would like to delete. Or you can use the number keys to jump directly to the record starting with the corresponding letters of that key. 3. -
Page 18: Base Ringer Melody & Volume
Base ringer melody & volume 1. Press during standby and press until you see PROG flashing. 2. Press to select. 3. Press to listen to and select from the 5 melodies. 4. Press to confirm your selection and you will be prompted to volume Setting. -
Page 19: Deregister
4. Enter the PIN of the base and press You will hear a confirmation tone if the registration is successful. The handset label and the handset number will be displayed. If the registration is not successful, you will see NOT REG on the handset. -
Page 20: Integrated Digital Answering Machine
INTEGRATED DIGITAL ANSWERING MACHINE 7-Segment Display Memo Ring Answer Machine On / Off Volume Up / Scroll Up Call Screening / Next Message Delete Volume Down / Stop / Play Page Scroll Down Message Alert / Previous Message... -
Page 21: Display
Display There is a display on the answering machine. The following table describes what the symbols mean. Display Meaning Memory is full. No new messages can be recorded. The answer machine is being accessed from an external touch tone phone. Memo 2 rings 3 rings... -
Page 22: Outgoing Messages (Ogm)
1. Press during standby mode. The 7-segment LCD displays the answering machine is activated or if the answering machine is deactivated. The 7-segment LCD will be when the answering machine is turned When the answering machine is on, it will answer the call after a certain number of rings depending on the ring delay setting (See page 26 for adjusting the ring delay setting). -
Page 23: Recording An Ogm
When memory is full, no incoming message will be recorded. The answering machine will announce the following outgoing message (OGM) and release the line. “Hello, we’re sorry your call cannot be taken at the moment, and you cannot leave a message, so please call later.” Recording an OGM The maximum OGM length is 40 seconds. -
Page 24: Incoming Messages (Icm)
Incoming messages (ICM) The answering machine can record up to 60 messages each message can be up to 2 minutes long. When a new message is saved, the 7-segment LED will blink to indicate the number of new messages being stored in the answering machine. During ICM recording, if the call is answered by a registered handset or a parallel phone, the recording will stop. -
Page 25: Deleting All Icms
Deleting all ICMs To delete all ICMs, during standby, 1. Press for 2 seconds. The answering machine emits 2 short beeps. 2. Press again within 5 seconds to permanently delete all new and old messages or press to cancel deletion. NOTE: Deleted messages cannot be recovered. -
Page 26: Deleting The Memo
Deleting the memo 1. Press while listening to the memo. The memo will be deleted. NOTE: Memo will also be deleted by deleting all function. (See the Section: Deleting All ICMs function) Call screening Call screening allows you to hear the caller before you pick up the call by turning on the answering machine’s speaker during the recording of incoming messages. -
Page 27: Security Pin
To review the current ring delay setting, 1. Press during standby. The 7-segment LCD displays the RING current setting such as for 2 rings. To change the ring delay setting, 1. Press for 2 seconds. The 7-segment LCD displays the current RING setting such as for 2 rings. -
Page 28: Remote Access
Remote access You can access your answering machine when you are away from home by using any touch tone phone. You security PIN protects unauthorised access to your answering machine from a remote location. To access the answering machine remotely, 1. -
Page 29: Other Features
During message playback, To play the previous message At the beginning of the message, Press 1. During the message playback, Press 1 twice. To repeat the current message Press 2 To play the next message Press 3 To stop the message play back Press 5 To delete the current message Press 0... -
Page 30: Message Waiting Indication
Message waiting indication You have to subscribe to a voice message service (eg Telstra Message Bank) from your local service provider to use this feature. When you receive a voice message, will appear on the display. When you retrieve your messages the message will turn off. -
Page 31: Making An Internal Call
Making an internal call When the phone is in standby, 1. Press turns on and you’ll hear an internal dial tone. 2. Press the number of the handset that you want to call. (Or you can press the handset number first, followed by You will hear a busy tone if the other handset is not available. -
Page 32: Troubleshooting
TROUBLESHOOTING TROUBLESHOOTING Are you having trouble with your phone? Here are some of the most commonly asked questions and solutions. Problems Solutions The phone does not work • Make sure that adaptor and phone cord are at all connected properly. •... -
Page 33: Notes For Operation In New Zealand
Unable to record a • Check to see if there is already a memo. If memo. so, delete the old one. • Check to see if the answering machine is full. If so, delete some or all messages. Unable to perform remote •... -
Page 34: Default Ting
Caller ID Customers using non Telecom toll services should not use the dial back feature for local calls as this will incur a charge only the 7 digit number should be dialled. Some of the CID services listed may not be available in New Zealand. -
Page 35: Warranty Information
Australia New Zealand NFORMANCE TO REGULATION Atlas Gentech (NZ) Limited Oricom International Pty Ltd Private Bag 14927, Locked Bag 658 Panmure, Auckland South Windsor NSW 2756...
Need help?
Do you have a question about the P900 Series and is the answer not in the manual?
Questions and answers