Sign In
Upload
Manuals
Brands
Sony Manuals
Camcorder
PDW-F800
Sony PDW-F800 Manuals
Manuals and User Guides for Sony PDW-F800. We have
9
Sony PDW-F800 manuals available for free PDF download: Operation Manual, Maintenance Manual, Brochure & Specs, Product Information
Sony PDW-F800 Operation Manual (295 pages)
PROFESSIONAL DISC CAMCORDER
Brand:
Sony
| Category:
Camcorder
| Size: 12.28 MB
Table of Contents
Table of Contents
6
Foreword
12
Before Use
12
Marks for Model-Specific Functions
12
Using the CD-ROM Manual
12
Chapter 1 : Overview
13
Features
13
Locations and Functions of Parts and Controls
16
Power Supply
16
Accessory Attachments
17
Lens Cable Clamp
17
Lens Mount Securing Rubber
17
Shoulder Pad
17
Shoulder Strap Fitting
17
Viewfinder Fitting Shoe
17
Viewfinder Left-To-Right Positioning Ring
17
Lens Locking Lever
18
Lens Mount Cap
18
Operating and Connectors Section
18
Shutter Selector
18
Tripod Mount
18
Gain Selector
21
Lcd Monitor
22
Menu On/Off Switch
22
Monochrome Lcd
23
Next Button
23
Prev Button
23
Stop Button
23
Warning Indicator
23
Display Switch
24
Status Display
25
System Frequency
25
Video Format
25
Time Counter Display
26
Warning Indicator Area
26
Remaining Battery Capacity Indicator
27
Remaining Disc Capacity Indicator
27
Menu Button
28
Shift Button
28
Sub Clip Indicator
28
Sub Clip/Disc Menu Button
28
Thumbnail Indicator
28
Lid of the Disc Compartment
29
Usb Connector
30
HDVF-20A Viewfinder (Optional)
32
Microphone Holder
33
Peaking Control
33
Status Display on the Viewfinder Screen
33
Tally Switch
33
Viewfinder Cable
33
Color Temperature
34
Viewfinder Screen
34
Vtr Save Indicator
34
System Frequency and Frame Rate
35
Wireless Microphone Reception Level
35
Gain Value
37
Operation/Alarm Message Display Area
37
White Balance Memory
37
Remaining Disc Capacity
38
Chapter 2 : Preparations
39
Preparing a Power Supply
39
Using a Battery Pack
39
Using AC Power
40
Attaching the Viewfinder
41
Adjusting the Viewfinder Position
41
Attaching the HDVF-20A/C35W
41
Vf Connector
41
Moving the Viewfinder Shoe up
42
Detaching the Eyepiece
43
Using the BKW-401 Viewfinder Rotation Bracket
43
Adjusting the Viewfinder Focus and Screen
44
Setting the Area of Use
45
Setting the Date/Time of the Internal Clock
46
Mounting the Lens
47
Adjusting the Flange Focal Length
48
Preparing the Audio Input System
49
Connecting a Microphone to the MIC in Connector
49
Connecting Microphones to the AUDIO in Connectors
49
Attaching a UHF Portable Tuner (for a UHF Wireless Microphone System)
51
Connecting Line Input Audio Equipment
52
Tripod Mounting
53
Connecting a Video Light
54
Using the Shoulder Strap
55
Adjusting the Shoulder Pad Position
56
Connecting the Remote Control Unit
56
Functions
56
Power of the Camcorder off
56
Functions
57
Functions
58
Chapter 3 : Adjustments and Settings for Shooting
59
Setting the Recording Format
59
Setting the System Frequency
59
Mixed Recording of Clips in Different Formats on the same Disc
60
Setting the Video Recording Format
60
Adjusting the Black Balance and the White Balance
61
Adjusting the Black Balance
61
Adjusting the White Balance
62
Setting the Electronic Shutter
67
Shutter Modes
67
Selecting the Shutter Mode and Shutter Speed
68
Changing the Reference Value for Automatic Iris Adjustment
71
Adjusting the Audio Level
73
Manually Adjusting the Audio Levels of the Audio Inputs from the AUDIO in CH1/CH2 Connectors
73
Manually Adjusting the Audio Level of the MIC in Connector
74
Recording Audio on Channels 3 and 4
74
Setting the Time Data
76
Setting the Timecode
76
Setting the User Bits
76
Synchronizing the Timecode
77
Chapter 4 : Shooting
80
Handling Discs
80
Discs Used for Recording and Playback
80
Notes on Handling
80
Write-Protecting Discs
80
Loading and Unloading a Disc
81
Formatting a Disc
82
Functions
82
Handling of Discs When Recording Does Not End Normally (Salvage Function)
82
Basic Procedure for Shooting
84
Functions
85
Playing Back the Recorded Clip
86
Deleting the Recorded Clip
87
Functions
88
Using the Focus Assist Function
88
Using the Freeze MIX Function
88
Advanced Operations for Shooting
89
Recording Essence Marks
89
Functions
90
Setting Clip Flags with Switches
90
Setting the Thumbnail Image at Recording Time
90
Starting a Shoot with a few Seconds of Pre-Stored Picture Data (Picture Cache Function)
90
Functions
91
Time-Lapse Video (Interval Rec Function)
92
Shooting with Slow & Quick Motion
96
Exchanging Discs While Recording (Disc Exchange Cache Function)
97
Functions
98
Recording with the Clip Continuous Rec Function
98
Retaking the most Recent Clip
98
Assigning User-Defined Clip Titles Automatically
99
Assigning User-Defined Names to Clips and Clip Lists
102
Using Planning Metadata
103
Planning Metadata
105
Recording Video from External Devices
106
Functions
107
Using the Live Logging Function
107
Functions
108
Recording Proxy Data
108
Functions
109
Functions
110
Chapter 5 : Operations in GUI Screens
112
Overview
112
Switching between GUI Screens
112
Information and Controls in Thumbnail Screens
114
Recording Format
114
Index Picture
115
Clip Name
116
Expand Thumbnail Screen
116
Displaying Menus
117
GUI Screen Operations
121
Thumbnail Operations
122
Searching with Thumbnails
122
Selecting Thumbnails
122
Playing the Scene You Have Found
125
Selecting Clips by Type (Filter Clips Function)
125
Changing Clip Index Pictures
127
Functions
127
Selecting the Information Displayed on Thumbnails
127
Checking Clip Properties
128
Functions
129
Functions
130
Locking (Write-Protecting) Clips
131
Setting Clip Flags
131
Deleting Clips
132
Scene Selection (Clip List Editing)
133
What Is Scene Selection
133
Creating and Editing Clip Lists
134
Managing Clip Lists
139
Disc Operations
140
Checking Disc Properties
140
Using Planning Metadata
141
Checking User-Defined Essence Marks
142
Displaying Disc and Clip Properties in a Web Browser
143
Formatting Discs
143
Transferring Clips (Direct FTP Function)
147
Preparations for Clip Transfers
148
Uploading Clips
148
Copying Clips Directly between XDCAM Devices
152
Downloading Clips
152
Shortcut List
154
Functions
154
Chapter 6 : Menu Displays and Detailed Settings
155
Menu Organization
155
TOP Menu and Top-Level Menus
156
User Menu
156
User Menu Customize Menu
157
Menu List
158
OPERATION Menu
158
Functions
162
Functions
172
PAINT Menu
172
Functions
179
MAINTENANCE Menu
181
Functions
195
FILE Menu
200
DIAGNOSIS Menu
204
Menu Operations
206
Basic Menu Operations
206
Displaying Menus
206
Advertisement
Sony PDW-F800 Operation Manual (295 pages)
PROFESSIONAL DISC CAMCORDER
Brand:
Sony
| Category:
Camcorder
| Size: 11.47 MB
Table of Contents
Table of Contents
5
Foreword
11
Before Use
11
Marks for Model-Specific Functions
11
Chapter 1 : Overview
12
Features
12
Locations and Functions of Parts and Controls
15
Power Supply
15
Accessory Attachments
16
Lens Cable Clamp
16
Lens Mount Securing Rubber
16
Shoulder Pad
16
Shoulder Strap Fitting
16
Viewfinder Fitting Shoe
16
Viewfinder Left-To-Right Positioning Ring
16
Lens Locking Lever
17
Lens Mount Cap
17
Operating and Connectors Section
17
Shutter Selector
17
Tripod Mount
17
Gain Selector
20
Lcd Monitor
21
Menu On/Off Switch
21
Monochrome Lcd
22
Next Button
22
Prev Button
22
Stop Button
22
Warning Indicator
22
Display Switch
23
Status Display
24
System Frequency
24
Video Format
24
Time Counter Display
25
Warning Indicator Area
25
Remaining Battery Capacity Indicator
26
Remaining Disc Capacity Indicator
26
Menu Button
27
Shift Button
27
Sub Clip Indicator
27
Sub Clip/Disc Menu Button
27
Thumbnail Indicator
27
Lid of the Disc Compartment
28
Usb Connector
29
HDVF-20A Viewfinder (Optional)
31
Status Display on the Viewfinder Screen
32
Color Temperature
33
Viewfinder Screen
33
Vtr Save Indicator
33
System Frequency and Frame Rate
34
Wireless Microphone Reception Level
34
Gain Value
36
Operation/Alarm Message Display Area
36
White Balance Memory
36
Iris Setting/Auto Iris Override
37
Remaining Clips Display
37
Remaining Disc Capacity
37
Chapter 2 : Preparations
38
Preparing a Power Supply
38
Using a Battery Pack
38
Using AC Power
39
Attaching the Viewfinder
39
Attaching the HDVF-20A/C35W
39
Adjusting the Viewfinder Position
40
Moving the Viewfinder Shoe up
40
Using the BKW-401 Viewfinder Rotation Bracket
41
Adjusting the Viewfinder Focus and Screen
42
Detaching the Eyepiece
42
Setting the Area of Use
43
Setting the Date/Time of the Internal Clock
44
Mounting the Lens
45
Adjusting the Flange Focal Length
46
Preparing the Audio Input System
47
Connecting a Microphone to the MIC in Connector
47
Connecting Microphones to the AUDIO in Connectors
48
Attaching a UHF Portable Tuner (for a UHF Wireless Microphone System)
49
Connecting Line Input Audio Equipment
51
Tripod Mounting
52
Connecting a Video Light
53
Using the Shoulder Strap
53
Adjusting the Shoulder Pad Position
54
Connecting the Remote Control Unit
55
Chapter 3 : Adjustments and Settings for Shooting
58
Setting the Recording Format
58
Setting the System Frequency
58
Mixed Recording of Clips in Different Formats on the same Disc
59
Setting the Video Recording Format
59
Adjusting the Black Balance and the White Balance
60
Adjusting the Black Balance
60
Adjusting the White Balance
61
Setting the Electronic Shutter
66
Shutter Modes
66
Selecting the Shutter Mode and Shutter Speed
67
Changing the Reference Value for Automatic Iris Adjustment
70
Adjusting the Audio Level
72
Manually Adjusting the Audio Levels of the Audio Inputs from the AUDIO in CH1/CH2 Connectors
72
Manually Adjusting the Audio Level of the MIC in Connector
73
Recording Audio on Channels 3 and 4
73
Setting the Time Data
75
Setting the Timecode
75
Setting the User Bits
75
Synchronizing the Timecode
76
Chapter 4 : Shooting
79
Handling Discs
79
Discs Used for Recording and Playback
79
Notes on Handling
79
Write-Protecting Discs
79
Loading and Unloading a Disc
80
Formatting a Disc
81
Handling of Discs When Recording Does Not End Normally (Salvage Function)
81
Basic Procedure for Shooting
83
Playing Back the Recorded Clip
85
Deleting the Recorded Clip
86
Using the Focus Assist Function
87
Using the Freeze MIX Function
87
Advanced Operations for Shooting
88
Recording Essence Marks
88
Setting Clip Flags with Switches
89
Setting the Thumbnail Image at Recording Time
89
Starting a Shoot with a few Seconds of Pre-Stored Picture Data (Picture Cache Function)
89
Time-Lapse Video (Interval Rec Function)
91
Shooting with Slow & Quick Motion
95
Exchanging Discs While Recording (Disc Exchange Cache Function)
96
Recording with the Clip Continuous Rec Function
97
Retaking the most Recent Clip
97
Assigning User-Defined Clip Titles Automatically
98
Assigning User-Defined Names to Clips and Clip Lists
101
Using Planning Metadata
102
Planning Metadata
104
Recording Video from External Devices
105
Using the Live Logging Function
106
Recording Proxy Data
107
Chapter 5 : Operations in GUI Screens
111
Overview
111
Switching between GUI Screens
111
Information and Controls in Thumbnail Screens
113
Recording Format
113
Index Picture
114
Clip Name
115
Expand Thumbnail Screen
115
Displaying Menus
116
GUI Screen Operations
120
Thumbnail Operations
121
Searching with Thumbnails
121
Selecting Thumbnails
121
Playing the Scene You Have Found
124
Selecting Clips by Type (Filter Clips Function)
124
Changing Clip Index Pictures
126
Selecting the Information Displayed on Thumbnails
126
Checking Clip Properties
127
Locking (Write-Protecting) Clips
130
Setting Clip Flags
130
Deleting Clips
131
Scene Selection (Clip List Editing)
132
What Is Scene Selection
132
Creating and Editing Clip Lists
133
Managing Clip Lists
138
Disc Operations
139
Checking Disc Properties
139
Using Planning Metadata
140
Checking User-Defined Essence Marks
141
Displaying Disc and Clip Properties in a Web Browser
142
Formatting Discs
142
Transferring Clips (Direct FTP Function)
146
Preparations for Clip Transfers
147
Uploading Clips
147
Copying Clips Directly between XDCAM Devices
151
Downloading Clips
151
Shortcut List
153
Chapter 6 : Menu Displays and Detailed Settings
154
Menu Organization
154
TOP Menu and Top-Level Menus
155
User Menu
155
User Menu Customize Menu
156
Menu List
157
OPERATION Menu
157
PAINT Menu
171
MAINTENANCE Menu
180
FILE Menu
199
DIAGNOSIS Menu
203
Menu Operations
205
Basic Menu Operations
205
Displaying Menus
205
Sony PDW-F800 Operation Manual (279 pages)
PROFESSIONAL DISC CAMCORDER
Brand:
Sony
| Category:
Camcorder
| Size: 11.81 MB
Table of Contents
Table of Contents
6
Foreword
12
Before Use
12
Marks for Model-Specific Functions
12
Using the CD-ROM Manual
12
Chapter 1 : Overview
13
Features
13
Locations and Functions of Parts and Controls
16
Power Supply
16
Light Switch
16
Power Switch
16
Accessory Attachments
17
Lens Mount Securing Rubber
17
Shoulder Pad
17
Shoulder Strap Fitting
17
Light Fitting Shoe
17
Lens Cable Clamp
17
Viewfinder Left-To-Right Positioning Ring
17
Viewfinder Fitting Shoe
17
Operating and Connectors Section
18
Tripod Mount
18
Lens Locking Lever
18
Lens Mount Cap
18
Shutter Selector
18
Gain Selector
21
Lcd Monitor
22
Menu On/Off Switch
22
Warning Indicator
23
Monochrome Lcd
23
Display Switch
24
Video Format
25
Status Display
25
System Frequency
25
Time Counter Display
26
Warning Indicator Area
26
Remaining Disc Capacity Indicator
27
Remaining Battery Capacity Indicator
27
D Menu Button
28
Thumbnail Indicator
28
Sub Clip Indicator
28
Sub Clip/Disc Menu Button
28
Shift Button
28
Lid of the Disc Compartment
29
Usb Connector
30
HDVF-20A Viewfinder (Optional)
32
Status Display on the Viewfinder Screen
33
Viewfinder Cable
33
Microphone Holder
33
Peaking Control
33
Tally Switch
33
Viewfinder Screen
34
Color Temperature
34
Vtr Save Indicator
34
System Frequency and Frame Rate
35
Wireless Microphone Reception Level
35
Electric Color Temperature Filter
36
Shutter Speed
37
White Balance Memory
37
Remaining Disc Capacity
37
Gain Value
37
Operation/Alarm Message Display Area
37
Remaining Clips Display
38
Iris Setting/Auto Iris Override
38
Chapter 2 : Preparations
39
Preparing a Power Supply
39
Using a Battery Pack
39
Using AC Power
40
Attaching the Viewfinder
41
Attaching the HDVF-20A/C35W
41
Adjusting the Viewfinder Position
41
Vf Connector
41
Moving the Viewfinder Shoe up
42
Using the BKW-401 Viewfinder Rotation Bracket
43
Detaching the Eyepiece
43
Adjusting the Viewfinder Focus and Screen
44
Setting the Area of Use
45
Setting the Date/Time of the Internal Clock
46
Mounting the Lens
47
Adjusting the Flange Focal Length
48
Preparing the Audio Input System
49
Connecting a Microphone to the MIC in Connector
49
Connecting Microphones to the AUDIO in Connectors
49
Attaching a UHF Portable Tuner (for a UHF Wireless Microphone System)
51
Connecting Line Input Audio Equipment
52
Tripod Mounting
53
Connecting a Video Light
54
Using the Shoulder Strap
55
Adjusting the Shoulder Pad Position
56
Connecting the Remote Control Unit
56
Functions
57
Functions
58
Chapter 3 : Adjustments and Settings for Shooting
59
Setting the Recording Format
59
Setting the System Frequency
59
Setting the Video Recording Format
60
Mixed Recording of Clips in Different Formats on the same Disc
60
Adjusting the Black Balance and the White Balance
61
Adjusting the Black Balance
61
Adjusting the White Balance
62
Setting the Electronic Shutter
67
Shutter Modes
67
Selecting the Shutter Mode and Shutter Speed
68
Changing the Reference Value for Automatic Iris Adjustment
71
Adjusting the Audio Level
73
Manually Adjusting the Audio Levels of the Audio Inputs from the AUDIO in CH1/CH2 Connectors
73
Manually Adjusting the Audio Level of the MIC in Connector
74
Recording Audio on Channels 3 and 4
74
Setting the Time Data
76
Setting the Timecode
76
Setting the User Bits
76
Synchronizing the Timecode
77
Chapter 4 : Shooting
80
Handling Discs
80
Discs Used for Recording and Playback
80
Notes on Handling
80
Write-Protecting Discs
80
Loading and Unloading a Disc
81
Formatting a Disc
82
Handling of Discs When Recording Does Not End Normally (Salvage Function)
82
Basic Procedure for Shooting
84
Functions
85
Playing Back the Recorded Clip
86
Deleting the Recorded Clip
87
Using the Focus Assist Function
88
Advanced Operations for Shooting
89
Recording Essence Marks
89
Setting Clip Flags with Switches
89
Setting the Thumbnail Image at Recording Time
90
Starting a Shoot with a few Seconds of Pre-Stored Picture Data (Picture Cache Function)
90
Time-Lapse Video (Interval Rec Function)
91
Shooting with Slow & Quick Motion
95
Exchanging Discs While Recording (Disc Exchange Cache Function)
96
Recording with the Clip Continuous Rec Function
97
Retaking the most Recent Clip
97
Assigning User-Defined Clip Titles Automatically
98
Assigning User-Defined Names to Clips and Clip Lists
101
Planning Metadata
104
Recording Video from External Devices
105
Recording Proxy Data
106
Functions
107
Chapter 5 : Operations in GUI Screens
109
Overview
109
Switching between GUI Screens
109
Information and Controls in Thumbnail Screens
111
Index Picture
112
Clip Name
113
Expand Thumbnail Screen
113
Displaying Menus
114
GUI Screen Operations
118
Thumbnail Operations
119
Selecting Thumbnails
119
Searching with Thumbnails
119
Playing the Scene You Have Found
122
Selecting Clips by Type (Filter Clips Function)
122
Selecting the Information Displayed on Thumbnails
124
Changing Clip Index Pictures
124
Checking Clip Properties
125
Functions
126
Setting Clip Flags
127
Locking (Write-Protecting) Clips
128
Deleting Clips
129
Scene Selection (Clip List Editing)
130
What Is Scene Selection
130
Creating and Editing Clip Lists
131
Managing Clip Lists
136
Disc Operations
137
Checking Disc Properties
137
Using Planning Metadata
138
Checking User-Defined Essence Marks
139
Formatting Discs
140
Displaying Disc and Clip Properties in a Web Browser
140
Transferring Clips (Direct FTP Function)
143
Preparations for Clip Transfers
144
Uploading Clips
144
Downloading Clips
148
Copying Clips Directly between XDCAM Devices
148
Shortcut List
150
Chapter 6 : Menu Displays and Detailed Settings
151
Menu Organization
151
TOP Menu and Top-Level Menus
152
User Menu
152
User Menu Customize Menu
153
Menu List
154
OPERATION Menu
154
Functions
158
PAINT Menu
168
Functions
174
MAINTENANCE Menu
176
Functions
187
FILE Menu
189
DIAGNOSIS Menu
193
Menu Operations
195
Displaying Menus
195
Basic Menu Operations
195
Using the USER Menu (Example Menu Operation)
198
Editing the USER Menu
199
Resetting USER Menu Settings to the Standard Settings
203
Setting the Status Display on the Viewfinder Screen and the LCD Monitor
203
Selecting the Display Items
203
Change Confirmation/Adjustment Progress Messages
204
Setting the Marker Display
205
Setting the Viewfinder
206
Recording Shot Data Superimposed on the Color Bars
207
Setting the Shot ID
207
Displaying the Status Confirmation Screens
208
Functions
209
Adjustments and Settings from Menus
210
Setting Gain Values for the GAIN Selector Positions
210
Selecting the Output Signals
210
Assigning Functions to ASSIGN Switches
211
Functions
212
Functions
213
Setting Power Saving Functions
214
Setting the Color Temperature Manually
214
Specifying an Offset for the Auto White Balance Setting
214
Selecting the Lens File
215
Setting the UMID Data
215
Chapter 7 : Saving and Loading User Setting Data
218
Handling the "Memory Stick
218
Advertisement
Sony PDW-F800 Maintenance Manual (300 pages)
PROFESSIONAL DISC CAMCORDER; HD/SD SDI INPUT BOARD; ANALOG COMPOSITE INPUT BOARD
Brand:
Sony
| Category:
Camcorder
| Size: 13.56 MB
Table of Contents
Table of Contents
5
Manual Structure
9
Purpose of this Manual
9
Related Manuals
9
1 Service Overview
11
Locations of Main Parts
11
Locations of the Printed Wiring Boards
11
Locations of Main Mechanical Parts
13
Circuit Description
14
Camera System
14
CCD Block
15
Video Signal System
15
System Control
16
Digital Audio System
22
Audio System
22
Audio DSP Operation Processing
24
Optical Drive System
26
Power Supply Systems
27
LCD System
28
Others
28
Matching Connectors
30
Signal Inputs and Outputs
30
On-Board Switch and LED Function
34
How to Take out a Cartridge Manually
44
Taking out a Cartridge at Power-Off
44
When You Cannot Take out a Cartridge Even if Pressing the EJECT Button at Power-On
44
Removing/Installing
45
Removing Outside Panel
45
Reinstalling Outside Panel
45
Inside Panel
45
Handle Assembly
46
Front Panel
47
SW Guard Assembly
48
Shoulder Pad, Connector Cover
48
Connector Panel Assembly
49
Rear Panel Assembly
50
Battery Connector
50
Removing/Installing LCD Block
51
LCD Block
51
LCD Hinge
53
LCD Backlight and LCD Panel
54
Replacing the Flat Cables, Flexible Card
55
Wires/Boards
55
Service Tools/Measuring Equipment List
56
Service Tools
56
Measuring Equipment
57
Firmware/Software
58
EEPROM/FRAM List
58
Firmware Update Using the USB Memory
59
Software Option Registration Method
61
By Using USB Memory
61
Other Overview
62
Notes on Handling Optical Block Assembly
62
Standard Torque for Screws
63
Stop Washer
63
Description of CCD Block Number
64
Memory Backup Battery
64
IC Link Replacement
64
Circuit Protection Element
64
Precautions for Use of Condensation Sensor
65
Precautions for the Battery Connector
65
Notes on Repair Parts
65
Unleaded Solder
65
2 XDCAM Web Site
67
XDCAM Web Site Overview
67
Status Menu
69
Device Information
69
Hours Meter
70
Software Version
71
Disc Menu
73
Disc Properties
73
Thumbnails
73
Maintenance Menu
74
Software Update
74
Account
79
Network
80
License Registration
81
3 Error Messages
83
Error Messages Overview
83
Error Code List
84
Main Code and Sub Code
84
Error 0X
85
Error 20
86
Error 3X
87
Error 5X
87
Error 6X
87
Error 91
88
Error 92
89
4 Setup Menu
91
Setup Menus
91
Basic Operations of Setup Menus
91
How to Display the SERVICE Menu
91
TOP Menu
92
USER Menu
93
OPERATION Menu
94
PAINT Menu
117
MAINTENANCE Menu
128
FILE Menu
146
DIAGNOSIS Menu
155
SERVICE Menu
159
Drive Maintenance
175
Basic Operation on Drive Maintenance
175
Menus
175
Temperature Sensor
175
Dew Sensor
176
Fan Motor
176
Acceleration Sensor
177
Loader
178
Slider-Auto Test
181
In-Lim Test
181
Out-Lim Test
182
Spindle Motor-Auto Test
182
Focus Actuator
183
Tracking Actuator
184
Sa Actuator
184
Laser
185
Nd Filter
185
Skew
186
Lens Cleaning
187
Servo_1
187
Skew
187
Servo_2
187
Acceleration Offset
188
Error Logger
189
Version
190
Serial no
190
Clear Media Log
190
Upload to Eeprom
190
AUDIO A/D Error Correction
191
AUDIO D/A Error Correction
192
AUDIO LEVEL Volume Compensation
192
Adjusting Battery End Detection Voltage
193
SERVICE SUPPORT Menu
194
Setup Menu List
195
5 File System
217
Structure of File System
217
Data Structure
218
Operating the Files and the Data Flow
219
User File
219
All File
221
Reference File
223
Other FILE (SCENE FILE and LENS FILE)
225
Service File
226
Other RESET
227
Special Items to Save
228
White Gain
228
Master Gain
229
Shutter
229
6 Periodic Maintenance and Inspection
231
Periodic Check/Replacement Parts List
231
Cleaning
232
General Information for the Use of Cleaning
232
Cloth
232
Cleaning Loader Assembly
232
Cleaning Spindle Motor
233
Cleaning Pickup Lens
233
Cares after Using under Special Environment
234
Digital Hours Meter
235
Display Method and Reset Methods
235
Recommended Replacement Parts
236
Precautions for the Battery Connector
238
Precaution on Hanging Bracket of Handle
238
7 Replacement of Main Parts
239
Optical Drive Assembly
239
Removing/Reinstalling Loader Assembly
239
Removing/Reinstalling Drive Sub Assembly
243
Replacing Cleaner Assembly
245
Replacing Loading Motor Assembly
246
Replacing Optical Block Assembly
247
Replacing No.2/No.3 Gear Assemblies
250
Replacing Seek Motor Assembly
252
Replacing Spindle Motor
253
Removing/Reinstalling Lock Release Assembly
254
Removing/Reinstalling LD Motor
255
Removing/Reinstalling Mounted Circuit Board of the Optical Drive
256
Board
256
SE-857 Board
257
Board
259
Replacing Fan Motor (Drive)
261
Replacing Fan Motor (Rear)
262
Removing/Reinstalling CCD Unit
263
Removing CCD Unit
263
Reinstalling CCD Unit
264
Service Action after Replacing the CCD Unit
265
Removing/Installing Boards
266
CN-2947 Board and TG-260 Board
266
Board and DCP-44 Board
266
Board and SY-355 Board
267
SW-1391 Board
267
Board
268
CN-2946 Board and CN-3026 Board
269
Board
270
CN-3025 Board and SW-1425 Board
270
CN-3001 Board
271
Board
271
Board
272
SW-1352 Board and RM-216 Board
272
Board and PS-708 Board
273
CN-3005 Board and SW-1426 Board
273
Board
274
Board
275
MB-1111 Board
276
Service Action after Replacing or Repairing
277
Optical Block Assembly
277
Board
277
CN-3005 Board
277
The Board
277
Board
278
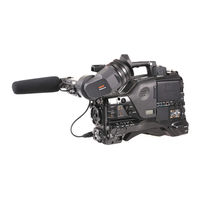
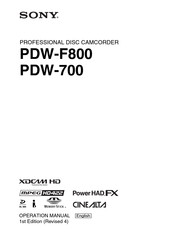
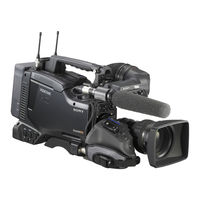
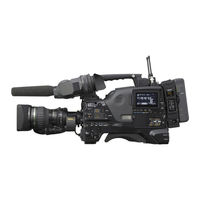
Sony PDW-F800 Operation Manual (318 pages)
PROFESSIONAL DISC CAMCORDER
Brand:
Sony
| Category:
Camcorder
| Size: 5.84 MB
Sony PDW-F800 Brochure & Specs (28 pages)
Family Brochure (New XDCAM HD422 Family (PDW-F800/700/F1600/HD1500/HR1-MK1/U2/U1/XDS-1000/PD1000/PD2000/Archive))
Brand:
Sony
| Category:
Camcorder
| Size: 5.68 MB
Table of Contents
Proxy Data
6
Focus Assist Function
8
Interval Recording
10
Slow Shutter
10
Affordable MPEG TS Option for Field and Satellite Transmission
11
Top View
14
Connector Panel
14
Optional Accessories
24
Common Options
25
Specifications
27
Sony PDW-F800 Brochure & Specs (8 pages)
Power Supply Systems
Brand:
Sony
| Category:
Power Supply
| Size: 0.88 MB
Sony PDW-F800 Brochure & Specs (4 pages)
Sony XDCAM HD422 Camcorder/Recording Deck
Brand:
Sony
| Category:
Camcorder
| Size: 0.65 MB
Sony PDW-F800 Product Information (2 pages)
Product Information Document (DWX and WL800 Camcorder Combo Chart)
Brand:
Sony
| Category:
Camcorder
| Size: 0.49 MB
Advertisement
Related Products
Sony PDW-F335KL
Sony PDW-F335L
Sony PDW-F330K
Sony PDW-F330L
Sony PDW-F350L
Sony PDW-F355L
Sony PDW-F335K
Sony XDCAM PDW-F355
Sony PDW-F335
Sony XDCAM PDW-850
Sony Categories
Laptop
TV
Camcorder
CD Player
Digital Camera
More Sony Manuals
Login
Sign In
OR
Sign in with Facebook
Sign in with Google
Upload manual
Upload from disk
Upload from URL