Table of Contents
Advertisement
Quick Links
Advertisement
Table of Contents

Related Manuals for Chauvet Rogue


Summary of Contents for Chauvet Rogue
- Page 1 User Manual...
- Page 2 Copyright Notice CHAUVET® owns the content of this User Manual in its entirety, including but not limited to pictures, logos, trademarks, and resources. © Copyright 2014 CHAUVET®. All rights reserved.
-
Page 3: Table Of Contents
DMX Personality ..................................16 Auto Test ....................................16 Manual Test ....................................16 Setup ................................... 17 Pan Reverse ....................................17 Tilt Reverse ....................................17 Screen Reverse ..................................17 Pan Angle ....................................17 Tilt Angle ....................................17 Rogue™ R2 Beam User Manual Rev. 2... - Page 4 DMX Values (Cont.) ..............................24 DMX Values (Cont.) ..............................25 DMX Values (Cont.) ..............................26 5. Technical Information ..........................27 Product Maintenance ..............................27 6. Technical Specifications ......................... 28 Returns ..................................29 Contact Us ..............................29 -ii- Rogue™ R2 Beam User Manual Rev. 2...
-
Page 5: Before You Begin
If the box or the contents (the product and included accessories) appear damaged from shipping or show signs of mishandling, notify the carrier immediately, not CHAUVET®. Failure to report damage to the carrier immediately may invalidate your claim. In addition, keep the box and contents for inspection. -
Page 6: Product At A Glance
This product contains no user-serviceable parts. Any reference to servicing in this User Manual will only apply to properly trained CHAUVET® certified technicians. Do not open the housing or attempt any repairs. -
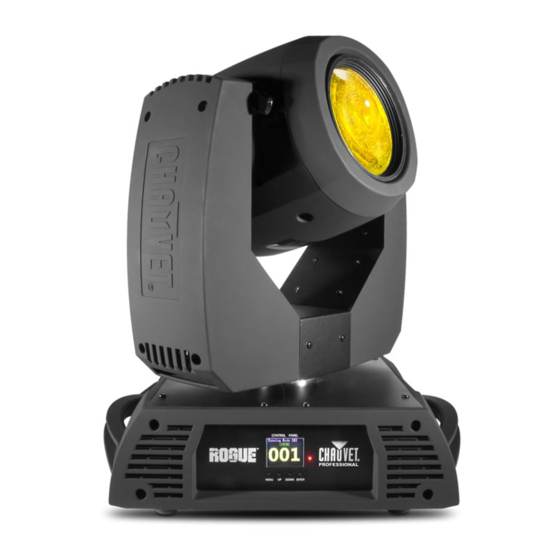
Page 7: Introduction
Introduction 2. I NTRODUCTION The Rogue™ R2 Beam is a compact, electronic, moving yoke beam product equipped with a Description 230-watt HRI lamp. It includes a color wheel with 14 colors plus white. It also includes a rotating 8-facet prism, frost, remote focus, and one gobo wheel with 17 static gobos plus open. -
Page 8: Overview
Introduction Overview Fuse Power Switch DMX In Data In Data Power In Control Panel Front View Rear View Handle Top View Side View Rogue™ R2 Beam User Manual Rev. 2... -
Page 9: Dimensions
409 mm 14.09 in 358 mm 8.27 in 210 mm 8.23 in 209 mm 12.87 in 327 mm 11.26 in 286 mm 12.13 in 308 mm 18.66 in 474 mm 4.53 in 115 mm Rogue™ R2 Beam User Manual Rev. 2... -
Page 10: Setup
Make sure to disconnect the product’s power cord before replacing a blown fuse. Always replace the blown fuse with another of the same type and rating. You can link the Rogue™ R2 Beam to a DMX controller using a 3- or 5-pin DMX connection. If DMX Linking using other DMX-compatible products with the Rogue™... -
Page 11: Gobo Wheel
Setup The Rogue™ R2 Beam includes one gobo wheel with 17 fixed gobos plus open. The diagram Gobo Wheel shows the gobo number on the wheel, as numbered in the DMX Values tables. Open The Rogue™ R2 Beam includes one color wheel with 14 fixed colors plus open (white), as Color Wheel indicated below. -
Page 12: Lamp Replacement
Setup The Rogue™ R2 Beam is equipped with an Osram Sirius 230-W lamp. Follow the Lamp Replacement procedure below to safely change the lamp. Disconnect the product from power before opening. Procedure 1. Turn the product off and disconnect it from power. Wait at least 15 minutes for the lamp to cool down. -
Page 13: Procedure (Cont.)
7. Remove the 2 wires connected to the lamp by the spade terminals. 8. Reverse the steps above to install the new lamp. Do not touch the glass with bare hands. Do not turn product on without a lamp! Rogue™ R2 Beam User Manual Rev. 2... -
Page 14: Increasing The Lamp's Life
· ALWAYS change the lamp when it has reached its recommended lifespan to avoid the risk of lamp explosion. The Rogue™ R2 Beam allows for lamp adjustment or “bench focusing”. Follow the Lamp Adjustment procedure below to safely adjust the lamp. -
Page 15: Mounting
When hanging this product, always secure to a fastening device using a safety cable (such as CH-05 from CHAUVET®). The Rogue™ R2 Beam comes with a preinstalled mounting surface to which you will be able to Procedure attach the 2 included omega brackets. Make sure the clamps (such as CLP-15 from CHAUVET®) are capable of supporting the weight of this product. -
Page 16: Operation
Navigates downward through the menu list or decreases the numeric value when in a function Control Options You can set the Rogue™ R2 Beam starting address in the 001–512 DMX range. This enables control of up to 28 products in the 18-channel 18CH personality. Programming... -
Page 17: Menu Map
P/T Speed Dimmer Dimmer Fine Shutter Run Mode Color Allows manual control of all settings from the Gobo Manual Test 000–255 control panel Prism R–Prism Zoom Focus Frost P/T Macro Ma.Speed Special Function Rogue™ R2 Beam User Manual Rev. 2 -13-... -
Page 18: Menu Map (Cont.)
Low Power Selects the duration of delay when shutter is 000–255 Delay closed and lamp enters lower power state Resets lamp timer to 0 Reset Lamp Time Leaves lamp time unchanged -14- Rogue™ R2 Beam User Manual Rev. 2... -
Page 19: Menu Map (Cont.)
Displays the amount of time the lamp has been Lamp On Time: on (provided the counter has been reset upon installation of new lamp) Shows amount of time remaining in Remain Time: maintenance cycle Rogue™ R2 Beam User Manual Rev. 2 -15-... -
Page 20: Address
Set the attribute value (000–255), press <ENTER>. 3. Repeat step 2 for the other attributes. When exiting the Manual Test level, the values of all tested channels will go back to zero. -16- Rogue™ R2 Beam User Manual Rev. 2... -
Page 21: Setup
Gobo Movement This option engages the shutter to block all light output whenever the product’s gobo wheel is in motion. BlackOut 1. Highlight BL.O.GoboMove, press <ENTER>. 2. Select YES or NO, press <ENTER>. Rogue™ R2 Beam User Manual Rev. 2 -17-... -
Page 22: Lamp Settings
· DO NOT power cycle the product unless it is necessary. · DO NOT re-strike the lamp immediately after turning it off. CHAUVET® recommends waiting 5 minutes before trying to re-strike the lamp. -
Page 23: Maintenance Timer
This reverts the product back to its original factory settings. Factory Reset 1. Starting from the Setup screen level, select Factory Settings, press <ENTER>. Function 2. Select YES or NO, press <ENTER>. Rogue™ R2 Beam User Manual Rev. 2 -19-... -
Page 24: System Information
1. Highlight ZOOM, press <ENTER>. Zoom 2. Select 000–255, press <ENTER>. 1. Highlight FOCUS, press <ENTER>. Focus 2. Select 000–255, press <ENTER>. 1. Highlight FROST, press <ENTER>. Frost 2. Select 000–255, press <ENTER>. -20- Rogue™ R2 Beam User Manual Rev. 2... -
Page 25: Dmx Values
049ó052 CTO 5600 K (12) 053ó056 CTO 6500 K (13) 057ó060 UV (14) 061ó127 Split colors 128ó189 Clockwise color scroll, fast to slow 190ó193 Stop 194ó255 Counter-clockwise color scroll, slow to fast Rogue™ R2 Beam User Manual Rev. 2 -21-... -
Page 26: Dmx Values (Cont.)
005ó255 Prism insert 000ó127 Prism index 128ó189 Counter-clockwise rotation, fast to slow Prism Rotate 190ó193 Stop 194ó255 Clockwise rotation, slow to fast Prism Zoom 000ó255 0–100% Focus 000ó255 0–100% Frost 000ó255 0–100% -22- Rogue™ R2 Beam User Manual Rev. 2... -
Page 27: Dmx Values (Cont.)
Effect 21 176ó183 Effect 22 184ó191 Effect 23 192ó199 Effect 24 200ó207 Effect 25 208ó215 Effect 26 216ó223 Effect 27 224ó231 Effect 28 232ó239 Effect 29 240ó247 Effect 30 248ó255 Effect 31 Rogue™ R2 Beam User Manual Rev. 2 -23-... -
Page 28: Dmx Values (Cont.)
Fast close, slow open from slow to fast Shutter 168ó203 Slow close, fast open from slow to fast 204ó239 Pulse effect from slow to fast 240ó247 Random effect from slow to fast 248ó255 Open -24- Rogue™ R2 Beam User Manual Rev. 2... -
Page 29: Dmx Values (Cont.)
Counter-clockwise gobo scroll, slow to fast 000ó004 No function Prism 005ó255 Prism insert 000ó127 Prism index 128ó189 Counter-clockwise rotation, fast to slow Prism Rotate 190ó193 Stop 194ó255 Clockwise rotation, slow to fast Rogue™ R2 Beam User Manual Rev. 2 -25-... -
Page 30: Dmx Values (Cont.)
All reset 200ó219 Blackout all function during pan/tilt 220ó229 Disable blackout all functions during pan/tilt 230ó239 Lamp off 240ó247 Pan/Tilt movement ramp speed, increase on 248ó255 Pan/Tilt movement ramp speed, increase off -26- Rogue™ R2 Beam User Manual Rev. 2... -
Page 31: Technical Information
7. Gently polish the lens surfaces until they are free of haze and lint. Always dry the external surfaces thoroughly and carefully after cleaning them. Do not spin the cooling fans while blowing compressed air into them. Rogue™ R2 Beam User Manual Rev. 2 -27-... -
Page 32: Technical Specifications
I/O Connectors Connector Type Channel Range 3- and 5-pin XLR Sockets 15 or 18 Ordering Product Name Item Code UPC Number Rogue™ R2 Beam 08010831 781462211790 Rogue™ R2 Beam x2 08010881 781462212292 -28- Rogue™ R2 Beam User Manual Rev. 2... -
Page 33: Returns
Be prepared to provide the model number, serial number, and a brief description of the cause(s) for the return. Clearly label the package with an RMA number. CHAUVET® will refuse any product returned without an RMA number.