
Related Manuals for Hitachi DZ-HS3OOA


Summary of Contents for Hitachi DZ-HS3OOA
- Page 1 Inspire I-IDD V_D_O hard disk DZ-HS303A/DZ-HS3OOA Instruction manual To obtain the be st performance and e nsu re years of trouble4ree use, please read this instruction manual completely. HITACHI Next...
- Page 2 Important Information For Your Safety The power switch turns the DVD video camera/recorder on and off, leaving the date/time feature unaffected. If the camera/recorder is to be left unattended for a long period of time, turn it off. EXPOSE THIS UNIT TO RAIN OR MOISTURE. WARNING: TO PREVENT FIRE OR SHOCK HAZARD, DO NOT WARNING:...
- Page 3 Warning: This device complies two conditions: (1) This device may not cause harmful any interference received, including Note: This equipment has been tested and found device, pursuant to Part 15 of the FCC Rules. These limits are designed )rotection against harmful interference Lnd can radiate radio frequency...
- Page 4 IMPORTANT SAFETY INSTRUCTIONS In addition to the careful attention devoted to quality standards major factor in the design of every instrument. This page lists important information recorder and accessory equipment. Read these instructions. Keep these instructions, Heed all warnings. Follow all instructions. Do not use this apparatus near water.
- Page 5 • If you so, recording, playback Please note in advance that Hitachi will not accept any liability or make compensation for loss of data, or direct or indirect damage when recording or playback is not performed normally due to a fault in this DVD video camera/recorder. This also applies to repairs on this DVD video camera/recorder (including repair of components other than HDD).
- Page 6 Liquid crystal display (LCD) • The LCD screen and viewfinder number of pixels (approx. 120,000 pixels for LCD monitor for viewfinder), 0.01% or less pixels may be missing (red, blue, green). This shows the limitations fault that will interfere with recording. •...
- Page 7 DVD lens is not necessary vv'ay. • Using 8 cm CD lens cleaner could cause this DVD video canrera/recorder • If you have to clean the lens, use a Hitachi Be careful of moisture condensation: • When you move tire DVD video camera/recorder temperatures...
- Page 8 Do not turn the DVD video camera/recorder CARD ACCESS indicator is lit or blinking: • The ACCESS/PC or CARD ACCESS blinking to show that data is being,,-written or being read from it. At this time, do not do any of the following, so as not to damage Remove...
- Page 9 Cautions When Storing Do not leave the DVD video very high for a long period • The temperature inside a closed vehicle or trunk can become very high in a hot season. the DVD video camera/recorder damaged. Also, do not expose heatel_ Do not store the DVD video or in a dusty...
-
Page 10: Cleaning
CLEANING Be sure to set the power switch to "OFF" before cleaning this DVD video camera/recorder. OCleaning LCD screen and camera lens Use dr}; soft cloth to wipe dirt off. When cleaning the LCD screen, be careful not to use force, scratch it, or subject it to impact: Doing such could cause a defect in the screen,... -
Page 11: Disc Cleaning
• A detailed explains the specific information Get to know your DVD video camera/recorder images using this manual, and get to know Hitachi. We explains appreciate your business. Refer to this Quick Index Available Discs ... Recording Movie ... - Page 12 About This Manual • Displays in this manual Understand that tile displays are different the LCD screen. • Notation of cancel button Press the STOP/EXIT button to stop your operation preceding one. The expression • _, Some functions of this DVD video camera/recorder to the marks at right above each function the function.
- Page 13 Introduction • Recording is possible on both HDD and DVD: In FINE mode, recording for up to 3 hours is possible on HDD; up to 30 minutes on DVD (p. 43, 156). eDubbing to an 8 cm DVD can be performed on this DVD video camera/recorder using only one button: Simple dubbing without a DVD recorder or PC (p.
-
Page 14: Table Of Contents
Table of Contents Important Information ... For Your Safety ... Precautions ... IMPORTANT SAFETY INSTRUCTIONS Cautions on HDD ... Cautions When Using ... Cautions When Storing ... Suggestions and Restrictions ... CLEANING ... 10 HANDLING DISCS... 10 DISC CLEANING... 11 NOTE WHEN TRANSFERRING OR DISCARDING DISCS AND SD MEMORY CARDS ... - Page 15 Setting Up Camera Functions SELECTING SHOOTING MODE TO MATCH THE SUBJECT (SWITCHING PROGRAM AE MODE) ... 60 RECORDING DARK SUBJECTS MONITOR LIGHT ... ADJUSTING COLOR (WHITE BALANCE) ... 61 USING THE ELECTRONIC IMAGE STABILIZER (EIS) ... RECORDING SUBJECT USING LARGE MAGNIFICATION (DIGITAL ZOOM) ...
-
Page 16: Introduction
FINALIZING DVD-RW/DVD-R/+RW (FINALIZE DVD) ... ADDITIONALLY RECORDING DVD-RW (VF-MODE)/+RW (UNFINALIZE DVD) ... Others DISPLAYING MOVIES OR STILLS INDEPENDENTLY (CATEGORY) PLAYING BACK SCENES REPEATEDLY (REPEAT PLAY) ... PLAYING BACK WIDE-MODE 4:3 DISPLAY TV (TV TYPE) ... SLIDE SHOW (CONTINUOUS OF STILLS) ... Viewing on TV Screen CONNECTING... -
Page 17: Recorder
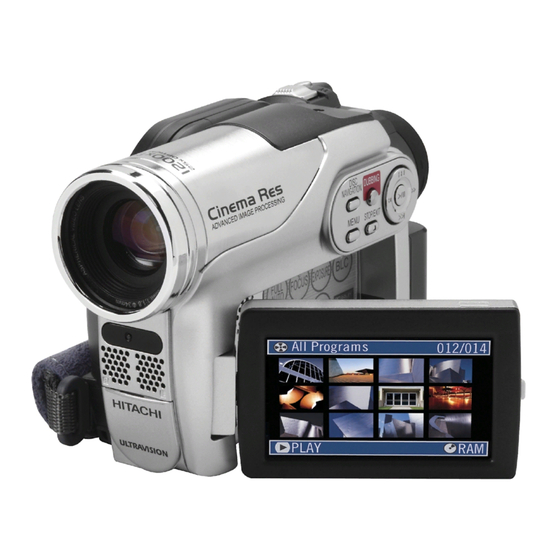
Checking Provided Make sure that you have all the following accessories Battery (model DZ-BP14S): For DZ-HS303A only. Portable power supply for this DVD vide<) camera/recorder. Charge it before use. DC power cord: When powering the DVD video camera/ recorder from household AC outlet, this cord to connect the DVD video camera/recorder... - Page 18 Names of Parts (Inside the cover) Flash (for OZ-HS303A only) (p. 59) Light receiving sensor (for DZ-HS303A only) This sensor controls the amount emitted from the built-in flash. Take care not to block with hand, etc. during Lens cap string attachment Stereo microphone Take care that the microphone by a hand,...
- Page 19 15 Viewfinder(p. 16 Diopter control (p. 34) To adjust the focus of image appearing viewfindel= (Pull out the viewfinder.} 17 SLEEP/RESTART button (p. 45) To switch the sleep/restart status between ON and OFF. 18 ACCESS/PC indicator (p. 8, 43) Will [)link or light when the HDD/DVD accessed (write or read), or the DVD video camera/recorder...
- Page 20 28 FULL AUTO button (p. 58) To switch the DVD video camera/recorder to full automatic. 29 FOCUS button (p. 55) To switch bet_ een manual focus and auto- focus. 30 MENU button (p. 35, 51,86) Press this button to display setting camera functions and Disc...
- Page 21 45 PHOTO button (p. 44) 46 REC button (p. 43) 47 MENU button (p. 35, 51,86) 48 SELECT button (p. 79, 93) 49 Reverse search button (p. 75) 50 DELETE button {p. 85) 51 DISC NAVIGATION button (p. 71) 52 DISPLAY button (p. 46, 78) * The buttons on remote control...
-
Page 22: Attaching Shoulder
REC button Pass the shoulder strap through the shoulder strap attachments. function. start the demonstration approx, ten is turned on and I_VI_HI_I_ HITACHI up to the base of your thumb. and the Zoom lever. is stable when you press the... -
Page 23: Attaching Lens Cap
ATTACHING LENS CAP Attach the shorter end of lens cap string to the lens cap. Attach the longer end of lens cap string to the attachment hole of DVD video camera/ recorder. Push the both sides of cap inward it over the lens. Note: •... -
Page 24: Removing Battery From Remote Control
(5 m). • The DVD video camera/recorder is not remote control code of Hitachi VCRs. If you use a Hitachi VCR, etc. with remote control code set to "VCR2", a VCR placed near the DVD video camera/ recorder will also be operated by the remote control: To prevent this, change the remote control code of the VCR. -
Page 25: Hdd/Dvd/Cards
HDD/DVD/Cards The following table lists the storage camera/recorder and the functions To record video (p. 43) To record photo (p. 44) To delete image just recorded (p. 74) To select image and delete it (p. 85) To edit image (p. 86 - 87) To play on other DVD players and DVD recorders... -
Page 26: Hdd, Discs
• It is recommended that you use Hitachi Maxell HG type single-sided discs, since their compatibility with this DVD video camera/recorder has been confirmed. When using an HG type double-sided disc, take great care with handling it. -
Page 27: Recorder
EXAMPLES OF DISCS THAT CANNOT BE USED ON THIS DVD VIDEO CAMERA/RECORDER • CD • CD-R • CD-RW • CD-ROM • DVD-ROM • DVD-Video • DVD-R (4.7 GB) for Authoring AVAILABLE CARDS SD memory cards can be used on this DVD video camera/recorder (incompatible When using an exclusive... -
Page 28: Preparations For Power Supply
Preparations for Power USING DVD VIDEO CAMERA/RECORDER It is recommended that you use tire AC adapter/charger from household AC outlet when you perform indoors. Note: Be sure to use the specified AC adapter/charger AC adapter/chargers could cause electric shock or result in fire. Connect the power cable to AC adapter/... -
Page 29: Setting Up The Battery
When charging a battery, unplug the DC power cord from the DC output jack on AC adapter/charger. Battery AC adapter/charger DC output terminal battery provided with DZ-HS3OOA the DVD video camera/recorder. DZ-BP14SW (optional) or DZ-BP7SW Using other batteries could could cause electric indicator still does not to AC adapter/charger. - Page 30 • Battery charged status You can find the charged status charger: During charge Charge complete Note: See "Troubleshooting" on page 146 when the CHARGE • Reference for time required to charge battery (at approx. 77°F (25°C)) DZ-BP14S (provided with DZ-HS303A)/DZ-BP14SW DZ-BP07PW (provided with...
-
Page 31: Camera/Recorder
95 rnin approx. 125 rnin approx. 105 min approx. 115 rnin approx. 95 rnin approx. 125 rnin approx. 115 min approx. 115 rnin approx. 105 min with DZ-HS3OOA)/DZ-BP7SW* approx. 105 min approx. approx. 95 min approx. approx. 105 min approx. -
Page 32: Efficient Use Of Battery
BATTERY REMAINING LEVEL INDICATOR When the battery is used to power appears in the viewfinder o1: on the LCD screen as follows: Fully charged White portion shows remaining level EFFICIENT USE OF BATTERY • The battery will slightly discharge detached from the DVD video camera/ recorder. - Page 33 Turning DVD Video Camera/Recorder While holding down the gray button of power s_x itch, set the switch according each recording function: Set to "OFF": The DVD video camera/ recorder _xil] turn off Set to "SD": To record photos oil an SD nremory card and play them back...
-
Page 34: Diopter Control
Viewing Images VIEWING IMAGE ON LCD MONITOR SCREEN If you open tile LCD monitor, you can monitor subject image on the LCD screen. Open the LCD monitor. The LCD monitor has a portion can hook your finger. Hook the finger there to open the monitol: •... -
Page 35: Setting Date
Setting Date Set the current date and time so that the date and time you make a recording can be recorded correctly. The following procedure can also be used to correct the date and time you have already seL 1 Press the MENU button, use the 141_/_1_/ /lid)"... -
Page 36: Changing
Initial Settings Press the MENU button, and then use I_I_/IN_I/,qHI/I_I_/I_/II menu screen. See page 51 for detailed operation procedure. setting. SWITCHING OPERATING SOUND ON OR OFF (BEEP) Select "On" or "Off", and then press the I_/1| button. On: Beep will be heard when the power switch is changed ovel;... -
Page 37: Resetting
RESETTING MENU SETTINGS TO DEFAULTS (RESET) You can restore menu settings the date/time will not be reset.) Choose "Reset" on the "Initial Setup" menu screen, and then press the I_/11 button. The screen for verifying reset will appeal_ TURNING RECORD LED ON OR OFF (RECORD LED) You can switch off the recording recording. -
Page 38: Lcd/Evf Setup
LCD/EVF Setup ADJUSTING BRIGHTNESS OF LCD SCREEN (LCD BRIGHTNESS) VIEWFINDER (EVF BRIGHTNESS) Press the MENU button, use the I_I_/IN_ • _'q/l'l_/l_/ll buttons to choose "LCD/EVF Adjust" on the "LCD/EVF Setup" menu screen, and then choose "LCD Brightness"or "EVF Brighhaess'. The brightness adjustment bar will appear the screen. -
Page 39: Color Density
ADJUSTING COLOR DENSITY (COLOR LEVEL) You carl adjust the color density Press the MENU button, use the I_1_/ )'l_l / ,4_1/ II'I) / I1"/II buttons to choose "LCD/EVF Adjust" the "LCD/EVF Setup" menu choose "Color Level". The color density adjustment on the screen. -
Page 40: And Removing Disc
Inserting and Removing 1 Set the power switch to "DVD" or "OFF" When the power swik'h is set to "HDD" "SD', the cover of disc insertion not open. When "Please insert DVD." appears during dubbing, however; the cover of disc insertion block will open even when power... - Page 41 Note: • If the cover of disc insertion block is open, the ACCESS/PC monitor screen: In this case, the DVD video camera/recorder If the cover remains open after a while, the DVD video camera/recorder • Disc cannot be inserted or removed unless a charged battery or AC adapter/charger video camera/recorder.
- Page 42 Inserting Removing 1 Open tile LCD monitor. Turn the DVD video camera/recorder Open the cover of card insertion Inserting Card: Insert card with its terminal locks. Removing Card: Push the center of card edge. The card will come so that by fingers.
-
Page 43: Recording
• The minimum recordable time of movie is approximately goes out, • Hitachi cannot be responsible cannot be recorded or edited because of any defect. • Each time the DVD video camera/recorder recording pause status, the counter display will be reset to "O:OO:OO". -
Page 44: Recording
Recording Stills Note: Recording of still images is possible on card. CARD ACCESS indicator Remove the lens cap, and then point the DVD video camera / recorder at subject. 2 Turn the DVD camera/recorder Set the power switch to "SD". After the CARD ACCESS indicator perform the subsequent... -
Page 45: Swift Restart
Swift Restart of Recording button) If you press the SLEEP/RESTART video camera/recorder off, the status second. Setting to the sleep/restart status: Press the SLEEP/RESTART button recording pause status. The SLEEP/RESTART button will video camera/recorder will sleep/restar t standby status. In the following eases, pressing RESTART... - Page 46 On.Screen Information Various types of information will appear INFORMATION DISPLAY DURING RECORDING See the next page for details. 2. Program AE "_: 3.White balance _(_)_ 4. EIS 5. Backlight compensation 6.16;9 mode 1. Recording mode 12. Zoom 13. Exposure correction 14.Manual Focus 15.
- Page 47 Recording mode (p. 43, 44, 68) : Movie (HDD/DVD) : Still ((ard) [_'1 : External input still (field) [_]'1 : External input still (frame) 2. Program AE (only in movie recording (p. 6O) No display : Auto : Sports : Portrait : Spotlight : Sand &...
- Page 48 SD men_ory No display "1 Not displayed on DZ-HS3OOA. EIS cannot be used when recording photos on DZ-HS303A. When no disc or card is in the DVD video camera/recorder disc or locked card, or a disc or card with no remaining has no remaining free space.
- Page 49 OSwitching the information display mode You carl switch the display mode of on-screen Press the DISPLAY button. The full and minimum display • Full display mode: All types of information appear. • Minimum display mode: The recording i on page 46) and recording status (see 11 on page 46) will appear.
- Page 50 facing the same direction as the lens Olnterpreting symbols on LCD screen when recording with the screen • Status in which • An attempt to record a photo on HDD was made. • An attempt to record a still is being used.
- Page 51 Checking Flow The following two on-screen menu modes are available with this DVD video camera/recorder: • Full Menu: To display all menu items for experts • Ouick Menu: To display only the fundamental • Operating Menu The Full M[enu will appear if you You can use the I_1,I/_t_!/_1/11_...
- Page 52 OFIow of Full Menu _: The shaded menu item also Refer to page indicated for details Camera Functions Setup Not displayed when external input is being selected. Program AE (p. 60) White balance (p. 61) EIS .I (p. 63) Digital zoom (p.
-
Page 53: Zooming
• When a subject is zoomed, it may be momentarily of focus. • When digital zoom is engaged, the image quality will be rougher. "1 "lOOx" on DZ-HS3OOA. "1200x" on DZ-HS3OOA. a small object from close-up position: 13/16" (2 cm) from the lens surface, at the Note: •... -
Page 54: Or Telephoto Effect
RECORDING SUBJECTS FOR STRONGER WIDE-ANGLE EFFECT Use the tele-conversion lens or wide-conversion pitch to record subjects for stronger Filter diameter: 37 mm for DZ-HS303A; Thread pitch: 0.75 rnm for DZ-HS303A; When attaching the optional DZ-TL1 tele-conversion optional step-up ring: DZ-SR3437 Remove the lens hood fi:orn DVD video camera/recordei_... - Page 55 Manually Focusing The DVD video camera/recorder manually focus a subject depending on the recording conditions. FOCUSING DURING RECORDING Normally, the DVD video camera/recorder can also manually focus a subject, Focusing range: You can switch the display mode of on-screen • On T (tele) side: approximately •...
- Page 56 o , t notin iO , Manually focus the following objects, _l_toro, Objects moving rapidly Object behind glass with water droplets, dirt on it which not be automatically in brightness, ,i,t,eva_ia,ion such as white wall Objects lit by neon sign, spotlight, etc.
-
Page 57: Brightness Of Image To Be Recorded
Adjusting Brightness (Exposure) The DVD video camera/recorder adjust the exposure depending on the recording conditions. 1 Press the EXPOSURE button recording. The exposure adjustment bar will appear the screen. Exposure adjustment bar-- Use the _/)"_ buttons to adjust exposure, while viewing the image viewfinder... -
Page 58: Function
Using Full Auto Pressing the FULL AUTO button will fully automate the camera functions. 1 Press the FULL AUTO button. "FULL AUTO" will be displayed of DVD video camera/recorder seconds. The following settings will reset to defaults: Focus Auto Backlight compensation Exposure Auto... -
Page 59: Flash (For Dz-Hs303A Only)
Built.in Video Flash When recording photos in a dark place, or if the subject is lit from rear, the DZ-HS303A the builtqn Video Flash for automatic brightening: light is always being emitted, or Off when you wish to record without using the flash even in a dark )lace. -
Page 60: Setting Up Camera Functions
Setting Up Camera Begin Before You • see page 51 for how to set. • No menu screen appears with external input. SELECTING SHOOTING MODE TO MATCH THE SUBJECT (SWITCHING PROGRAM AE MODE) This DVD video camera/recorder situation and records the optimum conditions, clearer images will be recorded. -
Page 61: Recording Dark Subjects
RECORDING DARK SUBJECTS USING LCD MONITOR LIGHT When Program AE is set to Low Light, you can use the light from L CD monitor to record a subject. Press the MENU button, use the [_1_/_1_/ _HI/II_ buttons to choose "Program the "Camera Functions Setup"... - Page 62 1 Press the MENU button, use the I_1_/1_1_1/ • _._/11._ buttons to choose "White Bal." on the "Camera Functions Setup" menu screen, and then press the _'/11 button. 2 Choose the desired option, and then press the )_/11 button. 3 Press the MENU button to end the setting.
-
Page 63: Using The Electronic Image Stabilizer (Eis)
USING THE ELECTRONIC IMAGE STABILIZER (EIS) When you use zoom (see page 53) to record a magnified recorded image. Press the MENU button, use the 141_/_t_1/ 'IHI/lld_ buttons to choose "EIS" "Camera Functions Setup" menu then press the II,./|| button. Choose the "On"... -
Page 64: Setting Up Record Functions
Setting Up Record SWITCHING MOVIE QUALITY (VIDEO MODE) Choose the movie quality from Press the MENU button, use the 1_I'4/IN_ / _l_I/li"ll'/ll'/ll buttons to choose "VIDEO Mode" on the "Record Functions menu screen, and then press the I_/1| button. 2 Choose the desired quality mode, and then... -
Page 65: Setting To Wide Tv Screen Mode (16:9 Mode)
_xide-screen mode is "on" and "off". "16:9 On" specified (aspect ratio 16:9) When using DZ-HS303A I... When using DZ-HS3OOA , ... Press the MENU button, use the _/1_1_/ 'qHI/10d_ buttons to choose "16:9" on the "Record Functions Setup" menu screen, and then press the ll../|| button. - Page 66 Display on LCD monitor screen An image recorded with "16:9 On" specified Images recorded with "16:9 Off" specified Display on LCD monitor screen Note: • The 16:9 setting will be kept even after the DVD video camera/recorder • The 16:9 mode cannot be used with photo recording, external input .1 , S-VIDEO •...
-
Page 67: Switching Quality Of Still Image (Quality)
SWITCHING QUALITY OF STILL IMAGE (QUALITY) You carl switch the still recoMing Press the MENU button, use the 1411/_1"1/ illll41"lll'ill buttons to choose "Quality" the "Record Functions Setup" and then press the I,./1| button. Choose the option you want, and then press the l'/ll button. -
Page 68: Self-Timer
SWITCHING EXTERNAL INPUT RECORDING METHOD (PHOTO INPUT) When "Input Source: LINE or S LINE" is specified, on a card. The DVD video camera/recorder specifying "Frame", but "Field" The DZ-HS300A cannot receive any externally for_a Does not suit recording of frequently moving video Frame subjects, despite high image quality. -
Page 69: Setting On-Screen Display
SETTING ON-SCREEN DISPLAY OUTPUT ON OR OFF (OSD OUTPUT) If you com_ect this video switch off the on-screen information screen. 1 Press the MENU button, use the I_1/_1/ /I"1_/1_111 buttons to choose "OSD Output" on the "Record Functions menu screen, and then press tire I_/11 button. 2 Choose "On"... -
Page 70: Using External Microphone
• Depending on the shape of its plug, an external microphone in the AV/S input/output terminal. • This DVD video camera/recorder DVD video camera/recorder.) • Connecting an external microphone • The DZ-HS3OOA cannot use any external microphone. Microphone available) to the external Turn on the switch microphone, see "Major Specifications"... -
Page 71: Disc Navigation
Using Disc Navigation STARTING OR TERMINATING Disc Navigation is a tool for editing Here is an explanation on "scene" Navigation function. The screens in this instruction manual Some items will not appear _xhen a DVD-RAM/DVD-RW/DVD-R/+RW operation is the same. • Turn the DVD video camera/recorder •... - Page 72 • In the following cases, the Disc Navigation - HDD or disc is write-protected - Finalized DVD-RW (VF-mode)/DVD-R/+RW - DVD-RW (VF-mode)/DVD-R recorded on a Hitachi DVD video camera/recorder HS303A/HS300A, and not finalized - Locked card • Do not leave the Disc Navigation Doing so could damage the TV screen, possibly by burning.
-
Page 73: Playing Back From Disc Navigation Screen
PLAYING BACK FROM DISC NAVIGATION SCREEN Press the DISC NAVIGATION Use the 141_/_l/_ql/ll_ buttons the desired scene. The selected scene will be Dame& This is called a "cursor". ADJUSTING VOLUME DURING PLAYBACK If the LCD monitor is open during movie, playback sound will be heard from the speaker. -
Page 74: Scene
Before You Begin back scenes Turn • Insert PLAYING BACK LATEST RECORDED SCENE Press the I,/11 button in the recording status. The DVD video camera/recorder tile playback mode, and the scene you have recorded last will be played back. When playback is finished, the DVD video camera/recorder... - Page 75 CAPTURING PHOTO You can record an image displayed Press the MENU button at a scene you wish to capture during playback. Choose "Edit", "PHOTO Capture", press the I_/|| button. The screen for verifying capture Choose "YES", and then press the I_/ll button.
- Page 76 SKIP PLAYBACK OF MOVIE During playback, press the _ locate the start of desired scene. Press _ once: To skip to the first image of the scene following the one being played back, and start playback. Press _ once: To return to the first image of the scene being played back, and start playback.
-
Page 77: Point (Go To)
JUMPING TO SPECIFIED POINT (GO TO) 1 Press the MENU button during playback. 2 Choose the option (point you want to go to), and then press the 1_/11 button. OSpecifying the point to view Choose "Specify" in step 2 above, press the 1_/|| button. - Page 78 INFORMATION DISPLAY DURING PLAYBACK Various types of information on recording No display OSwitching the information display mode Press the DISPLAY button: You can switch display mode of on-screen information. When using HDD/DVD: Recording mode -Repeat play.4 -- HDD, Disc type .3 -Program No.
-
Page 79: Scenes
SELECTING MULTIPLE SCENES Press the DISC NAVIGATION Use the I,ql_/_'l/'_l/ll_ buttons the desired scene. Press the PHOTO/SELECT button The selected scene will be framed yellow. SELECTING CONSECUTIVE Press the DISC NAVIGATION 2 Use t he I,ql_/_'l/,_l/ buttons to point cursor at the first scene in the range... -
Page 80: Hdd/Dvd/Card
The Disc Navigation mode will FUNCTIONS AVAILABLE WITH DISC NAVIGATION Editing of scenes • • • Setting special • • • effects to scenes Copy from disc to • card Scenelock Scene • • • information display Changing title • •... - Page 81 UNDERSTANDING FLOW OF DISC NAVIGATION MENU Press the MENU button on the Disc Navigation menu screens for HDD/DVD/Card Shaded items will also appear in Quick Menu display Refer to pages indicated for details @When using HDD/DVD-RAM/DVD-RW Scene Select Detail (p. 94) .1 HDD only *2 DVD-RAM only Play list --...
- Page 82 OWhen using DVD-RW (VF-mode)/DVD-R/+RW Scene Select (p. 93) Detail (p. 94) Program _ Select (p. 95) £_ Play (p. 96) GoTo --T--Top (p. 105) (p. 105) Others _ OWhen using card Scene Lock (p. 92) Select (p. 93) Detail (p. 94) GoTo --T--Top (p.
-
Page 83: Dubbing On Dvd
Dubbing on DVD You can dub the images recorded • Set the power switch to "HDD". • Prepare a recordable disc. • The recording time for a scene that can be dubbed on one disc is approx. 30 minutes ( in FINE mode). If the HDD contains a scene exceeding the length that is recordable on one disc, it cannot be Before You Begin dubbed: Divide the scene (see p. - Page 84 If the number of scenes on HDD is too large, or the temperature high, the required recording time may be longer than the display time on screen. • Please note in advance that Hitachi will not accept any responsibility direct or indirect damage when dubbing is not performed...
-
Page 85: Menu
OList of dubbing possible/impossible * You cannot specify the combination of "VIDEO Mode: STD" and "16:9 On". Scene DELETING SCENES (EDIT - DELETE) You may want to delete unwanted Scenes on DVD-RW (VF-mode)/DVD-R _xith DVD-RW (VF-mode)/DVD-R. When using +RW, no scene can be deleted Press the DISC NAVIGATION Place the cursor on the scene to be deleted. -
Page 86: Movies (Edit - Divide)
• Editing using submenu Press MENU button before appear. Edit iii_ Delete*' Exit ... Select IITI-- Start Current Current _ End ... To select All ... Go To _ Top ... L..I End ... Pressing the • button will restore ,1 The menu item to be displayed Note;... -
Page 87: Order Of Scenes
COMBINING MULTIPLE SCENES (EDIT - COMBINE) If you have recorded numerous Navigation. Be sure to select consecutive multiple possible only when "Category: Press the DISC NAVIGATION Press the MENU button, choose "Scene", "Edit", "Combine", and then press 1_/|| button. The "Combine Scenes"... - Page 88 DIRECTING SCENES EFFECTIVELY (EFFECT - FADE) You can add fadin_o to the beginning There are three types of special effects: Fade Out Fade In White: Fades in from white screen Fades out to white screen Press the DISC NAVIGATION Place the cursor on the scene to _ hich fade is to be added.
-
Page 89: Playing Back By Skipping Scenes (Effect - Skip)
PLAYING BACK BY SKIPPING SCENES (EFFECT - SKIP) You can specify "Skip" for scenes you do not want to play back: The selected Press the DISC NAVIGATION 2 Place the cursor on the scene to which skip is to be set. Multiple scenes can be selected (p. -
Page 90: (Effect - Thumbnail)
CHANGING IMAGES FOR THUMBNAILS N_rmallv,, the first image,- of the recorded image of the scene for thumbnail. recorded from a glance at the Disc Navigation Press the DISC NAVIGATION 2 Place the cursor on the scene whose thumbnail you wish to change. 3 Press the MENU button. - Page 91 COPYING STILLS ON DVD-RAM TO CARD (COPY) • Set a DVD-RAM (recorded on a Hitachi DVD video camera/recorder marketed before DZ-HS303A/HS300A) Before You Begin wish to copy, and a card with recordable space, in this DVD video camera/recorder. Set the power switch to "DVD".
-
Page 92: Scenes On Card (Lock)
LOCKING SCENES ON CARD (LOCK) You can lock each photo recorded Set the power switch to "SD". 2 Press the DISC NAVIGATION 3 Place the cursor on the scene to be locked. You can also select multiple Press the MENU button. - Page 93 SELECTING SCENES USING MENU SCREEN (SELECT) You call use this "Select" function This function is useful when there are numerous 1 Press the DISC NAVIGATION 2 Point the cursor at the first or last scene to be selected: When selecting all scenes, simply proceed with step 3.
- Page 94 DISPLAYING INFORMATION You can display various information length, special effects and movie quality Press the DISC NAVIGATION Place the cursor on the scene information you wish to know. Press the MENU button. Choose "Scene", "Detail", _','11 button. The detailed information on the scene appear.
-
Page 95: Program
Program WHAT IS "PROGRAM"? Program refers to an assembly of scenes movie or still. Scene No, 1 Scene No. 2 SWITCHING TO THUMBNAIL Since the scenes recorded on this DVD video camera/recorder recording date, selecting a program Press the DISC NAVIGATION Press the MENU button. -
Page 96: Playing Back Program (Play)
PLAYING BACK PROGRAM (PLAY) You can play back only the selected 1 Press the DISC NAVIGATION 2 Press the MENU button. 3 Use the I_1_/1_/_1_/1_.'/_'/|| choose "Play" on the "Progranr" screen, and then press the I_/|| CHANGING TITLE OF PROGRAM (TITLE) The recording date/time has initially been attached... - Page 97 Note: • If you wish to delete the letter for title, button once: input letter will be deleted. down the • button will delete all letters column. • You can also use the DELETE button on remote control to delete any input letters. •...
-
Page 98: List
Play List WHAT IS "PLAY LIST"? You can create a play list on this DVD video camera/recorder recorded scenes. Since the play list is not created by making a play list. On the other hand, deleting HDD/DVD capacity for recording. Example: Play list of up to No. -
Page 99: Playing Back A Play List (Play)
SWITCHING TO DISPLAY OF EACH PLAY LIST (SELECT) Select the desired one of multiple appear. 1 Press the DISC NAVIGATION Press the MENU button, 1('4/I)1)1/((I/))1)/I)/11 Use the choose "Select" on the "PlayList" screen, then press the I_/|| OEditing on play list When making settings on play list, such as... -
Page 100: Scenes To Play List Play List)
ADDING SCENES TO PLAY LIST (EDITING PLAY LIST) Press the DISC NAVIGATION Press the MENU button. 3 Use the I'_/1_1/_1_ li,tl'/ll,/ll buttons choose "Edit" on the "PlayList" menu screen, then press the ll,q|| button. 4 Use the "Edit Playlist" screen to select the play list to which you wish to add scenes, and then... -
Page 101: Scenes From Play List Play List)
DELETING SCENES FROM PLAY LIST (EDITING PLAY LIST) Press the DISC NAVIGATION then press the MENU button. 2 Display the editing screen of the play list to be edited. Perform steps 3 - 4 on page 100. Move the cursor to the play list in lower ro_5 and place the cursor on scene to be deleted. -
Page 102: Editing (Editing Play List)
DELETING SCENES USING SUBMENU FOR EDITING (EDITING PLAY LIST) You can delete scenes from play list on the editing Press the DISC NAVIGATION then press the MENU button. 2 Display the editing screen of the play list to be edited. Perform steps 3 - 4 on page 100. -
Page 103: Order Of Scenes (Move)
ARRANGING ORDER OF SCENES (MOVE) Press the DISC NAVIGATION Press the MENU button. Use the I_l_l/l_.'l/'_l/Dd_/l_/l| choose "Select" on the "PlayList" screen, and then press the I_/|| button. Select the play list to be edited, and then press the I_/|1 button. Place the cursor on the scene... -
Page 104: Title Of Play List (Title)
CHANGING TITLE OF PLAY LIST (TITLE) The play lists have serial numbers times: You can change this title at any time. 1 Press the DISC NAVIGATION Press the MENU button. Use the 144/1_,'1/<1</IH_/_'/11 choose "Title" on the "PlayList" and then press the 1_/11 button. the "Playlist Title"... -
Page 105: Go To
Go To From the Disc Navigation screen, you can jump to the first scene or last scene, and playback start from that point. MOVING TO BEGINNING (END) OF HDD/DVD/CARD Press the DISC NAVIGATION 2 Press the MENU button, HDD/DVD/Card INITIALIZING HDD/DVD/CARD Initializing the HDD, a DVD-RAM/DVD-RW/+RW... -
Page 106: Disc Or Card (Capacity)
PROTECTION You can protect the HDD and a DVD-RAM/DVD-RW images from being erased o1: edited by mistake. disc until the protection is released. Press the DISC NAVIGATION 2 Press the MENU button. Use the I'ql,I/l,!,'l/_l_/l,'l,'/l,/ll choose "Protect HDD'or "Protect DVD" on tire "HDD setting"... -
Page 107: Info,)
UPDATING CONTROL INFORMATION OF HDD/DVD-RAM/DVD-RW MODE) (UPDATE CONTROL INFO.) Disc Navigation in this DVD video camera/recorder thumbnail, skip, fade, in a particular DVD video camera/recordel, and then use the data again with Disc Navigation camera/recordeb the Disc Navigation Control lnfo function to update recorder for updating control information, Before You Begin... -
Page 108: Finalizing Dvd-Rw/Dvd-R/+Rw
FINALIZING DVD-RW/DVD-R/+RW • Be sure to use the AC adapter/charger recorder when finalizing a DVD-RW/DVD-R/+RW. Before You Begin executed using a battery. If the DVD video camera/recorder during finalization and the finalization is interrupted, finalization will result, and at worst, the disc may be damaged. If you want to play back a DVD-RW/DVD-R recorded/dubbed recorder, using a device conforming to 8 cm DVD disc - such as a DVD recorder/player, must finalize the disc on this DVD video camera/recorder. -
Page 109: Additionally Recording
ADDITIONALLY RECORDING ON FINALIZED DVD-RW (VF-MODE)/+RW (UNFINALIZE DVD) You can unfinalize the DVD-RW (VF-mode)/+RW that additional recording can be done on it. 1 Press the DISC NAVIGATION 2 Press the MENU button. Use the I'_I/IN_I/'_I/I_/I_lll choose "Unfinalize DVD" on the "DVD Setting"... -
Page 110: Playing Back Scenes Repeatedly
Others DISPLAYING MOVIES OR STILLS INDEPENDENTLY If you insert a DVD-RAM than DZ-HS303A/HS300A, regardless of whether they are movies Scenes recorded on this DVD video camera/recorder regardless of whether they are movies display to stills only or movies onl)_ DZ-HS303A/HS300A cannot record any photos on a HDD/DVD. -
Page 111: Playing Back Wide-Mode
PLAYING BACK WIDE-MODE IMAGES ON 4:3 DISPLAY TV (TV TYPE) If you connect the DVD video camera/recorder display only and play it back, vertically display 4:3 images on the TV. 1 Press the DISC NAVIGATION 2 Press the MENU button. 3 Use the I'_/I)1)1/'_1/I'_/I)111 choose "TV type"... -
Page 112: Viewing On Tv Screen
Viewing on TV Screen CONNECTING TO A TV Use the provided AV/S input/output follows: AV/S input/output (provided) * If your TV has an S-VIDEO input jack, you can connect the S-VIDEO plug to it. Note: • Using S-VIDEO will deliver clearer playback •... -
Page 113: Viewing On Tv Screen
• The infrared remote control is useful when operating the DVD video camera/recorder for how to image on TV screen. However, if you use a Hitachi VCR, the remote control may inadvertently the VCR if it is near the DVD video camera/recorder, To prevent this set the remote control code of the VCR to a position other than "VCR2",... -
Page 114: Playing Back Dvd-Ram/Dvd-Rw
Playback on DVD Recorder/Player PLAYING BACK DVD-RAM/DVD-RW You can use a DVD recorder or DVD player that conforms to DVD-RAM/DVD-RW back 8 cm DVD-RAM/DVD-RW Insert the disc into the DVD recorder/player and play it back. See the instruction manual for DVD recorder/player. -
Page 115: Recording (Dubbing)
• If you use a Hitachi VCR, it will be operated by the remote control* provided with the DVD video camera/recorder. image from a Hitachi VCR, change the remote control code of the VCR to other than "VCR2". - Page 116 DVD video, LD, recorded video tapes, some parts of digital satellite broadcasts, • If a video signal that cannot be read by this DVD video camera/recorder recorded on camcorder without copy-guard be recorded • If the input signal is interrupted...
- Page 117 RECORDING (DUBBING) You can record (dub) images played back on this DVD video camera/recordel, devices. Use the AV/S input/output cable (provided) video device as shown in the following * If the video device to be connected recorder. Press the DISC NAVIGATION 2 Select a scene to be played back.
-
Page 118: Software Provided
Software Provided You can utilize on PC the videos and photos PC connection cable and software The provided CD-ROM contains Windows hnageMixer This allows you to import You can cut-edit imported switching effect. You can also create a DVD-Video importing the images recorded Macintosh Pixe VRF Browser EX... -
Page 119: Requirements Of Available
Requirements [When using Windows] • OS: Windows _r 2000 Professional *The provided software cannot be used on Windows ;> 98 or Windows 4_ Me. • Computer: IBM PC/AT compatible • CPU: Intel _ Pentium _>II1800 MHz or higher *Operation is not guaranteed Pentium c°... -
Page 120: Installing Software
Installing Software [When using Windows] Turn the PC on. ]f you have been using the PC, terminate running software programs. Insert the provided CD-ROM ROM drive of PC. The installer will automatically "Choose Setup Language" screen will automatically appeal_ If the "Choose Setup Language"... - Page 121 7 Choosing video system: The screen for setting the video system appear, and then click "Next". Select _etup type _hal your needs, Executing installation: The setups for installation are now Click "]nstall" to execute installation. mh__rd r_ _e_dy_o b_,_ ;n_l _ on.
- Page 122 [When using Macintosh] 1 V.rn theMacintosh on, _ ndinsert the provided CD-RONI into the CD-RONI drive of Macintosh. Double-click the DVDCAM3HS displayed on desktop. Double-click the icon of "hnageMixer DVDCAM.pkg" displayed on screen. The installer will start: Click "Continue". Checking license agreement: The license agreement screen will appear.
-
Page 123: Connecting To Pc Via Pc Connection
Connecting to PC Use the provided PC connection be]o%\\ To PC connection terminal Note: • The PC connection cable does not supply power to the DVD video camera/recorder: to power the DVD video camera/recorder. • Before connecting the DVD video camera/recorder video flash, external microphone, •... - Page 124 When connecting the DVD video camera/recorder recognized as a drive. The drive will appear [When using Windows] If the DVD video camera/recorder "DVD', it will be recognized as an optical disc drive, and a disc set in the DVD video camera/ recorder can be accessed.
-
Page 125: Using Disc In Dvd Drive Built Into Pc
• When removing disc [When using Windows] Use Windows Explorer or My Computer Right-click the mouse. Choose "Eject". The cover of disc insertion Insert another disc and close the cover: The disc will be recognized. [When using Macintosh] Place the drive icon of this DVD video camera/recorder cover of disc insertion block on DVD video camera/recorder close the cover: The disc will be recognized. -
Page 126: Before Terminating
BEFORE TERMINATING CONNECTION CABLE)/CHANGING [When using Windows] Before un _lug ing the PC connection from PC, terminate the application click the "Hardware Removal" tray at the bottom right of Windows Cli :k [When using Macintosh] When removing the DVD video camera/recoMer camera/recorder (HDD, disc or card), and choose "Eject"... -
Page 127: Using Software
Using Software See page ]32 when using Macintosh. [When using Windows] USING IMAGEMIXER 3 lmageMixer 3 allows you to capture PC, edit the video file, and create a DVD-Video The following shows the basic operation Refer to the electronic instruction lmageMixer 3: While ImageMixer display... - Page 128 5 The screen for choosing the device to be imported will appear: Choose DVDCAM (HDD)" when the power set to "HDD', "Hitachi DVDCAM" set to "DVD', and then click "Import". If you wish to change the import continue import, unplug...
- Page 129 CREATING DVD-VIDEO USING IMAGES RECORDED ON HDD/DISC You can use the images recorded viewed on DVD recorders/players. * A DVD-RW/DVD-R/+RW recorded DVD video camera/recorder If the file system of HDD in your PC is FAT32, no video restrictions of file system. When using a large video file, handle Connect this DVD video camera/recorder...
- Page 130 5 On the "Importing Device" screen, choose "Hitachi DVDCAM (HDD)" when the power switch is set to "HDD'; and "Hitachi DVDCAM" when the power "DVD". If you wish to change the import continue import, unplug the PC connection cable from the PC, and then change over the _ower switch (see page 123).
- Page 131 Click "Authoring" create FrienD. Clicking "Authoring" will display screen of DVD-Video menu. The video previously imported into PC will appear "Source". Choose the desired video "Add titles": The video file will be registered. When using a video file imported using [mageMixer 3, click "File"...
-
Page 132: [When Using Macintosh]
"Pixe VRF Browser EX HD (startup disk) - INTO PC to create a disc that can be must be finalized the "Drive" icon will display Choose "HITACHI when the power switch is set to "Hitachi DVD-RAM DZ-GBX3" and then click "OK". - Page 133 3 Select the video file to be imported The scenes recorded on HDD, disc will appear. Select the scene to be inrported Macintosh and click "Save": screen will appeal_ Clicking "Save" after setting destination, etc. will start import Macintosh. If you wish to import the contents...
- Page 134 6 Creating a DVD-Video menu: Then edit the DVD-Video menu: up the menu style, change the thumbnail be displayed, and add a menu After editing the menu screen, click "Next". 7 Checking playback: The playback check screen will appear so that you can confirm the DVD images to be created.
-
Page 135: Viewing Images Recorded On Disc
Viewing Images • Playing back DVD-RW (VF-mode)/DVD-R/+RW You can use tile DVD playback mode)/DVD-R/+RW recorded 1. Load the DVD-RW (VF-mode)/DVD-R/+RW recorder. 2. Connect the DVD video camera/recorder 3. Start up the DVD playback Note: • When connecting the DVD video camera/recorder to Macintosh for playback on a DVD playback software, etc., the screen for setting the drive region code will appear: Set the region code that matches your local area. -
Page 136: Uninstalling Software
PC Software Support Center number PIXELA C()RPORAT]ON +1-800-458-4029 (Toll-free) +1-213-341-0163 URL:http://www.pixela.co.jp/oem Applications", choose tile application list of applications, and then click the "Change/Remove" installed to Recycle VRF Browser EX for DVDCAM.plist for DVDCAM.pkg the following / hitachi/e/index.html to be button. Bin: for inquiries... - Page 137 PC. recorded on this DVD video camera/ the DVD video camera/recorder but Hitachi does not guarantee the may not be recognized: cannot be simultaneously etc. that conform to each individual disc, but playback on...
-
Page 138: To Optional Accessories
(DZ-TL1) .2 (p. 54) Step-up ring (DZ-SR3437 for DZ-HS300A) • When using camera accessories, .1 Unavailable for DZ-HS3OOA. *2 You will need the optional step-up ring when attaching these lenses to the DZ-HS3OOA. POWER SUPPLY Battery (DZ-BP7SW)* Battery (DZ-BP14SW) Unavailable for DZ-HS303A. •... - Page 139 Trouble Messages A message may appear while you are operating the DVD video camera/recorder. appears, refer to the following table and take appropriate Messages are arranged in alphabetical (1) Data error in a part It is possible that the system cannot normally complete writing of of image file.
-
Page 140: Power Switch
Cannot combine scene Scenes of multiple programs, be combined. Create PlayList first, scenes and then combine scenes. Cannot combine. Select Deselect PHOTO scenes. Cannot combine. Select Select multiple scenes, combine Cannot delete scenes. This may occur when scene that was edited for division, be deleted. - Page 141 Card error has • The c ard t erminals occurred, again, oruse another • Data o ther than s till image may b eincluded: Card error has Was the card f ormatted occurred, midway? Format the card n ow? recorder, Card error has The c ard m ay b e damaged: occurred.
- Page 142 DVD error has occurred. The disc may be dirty. Formatting is not Remove complete, reusing This message formatting DVD error has occurred. Disc error could have occurred Keep DVD inside & Turn off the DVD video camera/recorder restart, in it, connect camera/recorder DVD error has occurred.
- Page 143 DVD-R*, Input Source Once a DVD-RW cannot be changed. 16:9 mode, the input source will not be changeable. * "DVD-RW (VF)" will appear when using a DVD-RW (VF-rnode). DVD-R *, Video mode With DVD-RW and 16:9 mode cannot 16:9 mode once used for recording be changed.
- Page 144 HDD error HDD error probably occurred.Restart. Turn off this DVD video camera/recorder, AC adapter/charger again: The video file will be repaired. NO DVD This message or disc is moved from a cold place to a warm place. Condensation DVD drive. Do not remove the disc; leave the DVD video camera/ recorder The disc has not been inserted.
- Page 145 This DVD cannot A disc that cannot used. Please replace has been loaded. DVD. This DVD is finalized. This message finalized Finalize is not required. recorder. This DVD is recorded This DVD video camera/recorder the PAL system. Please the NTSC system. used on this DVD video replace DVD.
- Page 146 Troubleshooting Check to see the following before video camera/recorder to normal, Power supplies Battery cannot be Is the ambient charged. Charge Is the battery Remove the battery, leave it for a while to cool down, then charge Is the DC power cord connected Has the battery Remove •...
- Page 147 Power cannot be turned Detach the battery or AC adapter/charger off. RESET button of DVD video camera/recorder: supply to DVD video camera/recorder Even if the DVD video The DVD video camera/recorder camera/recorder is off, recognize opening the cover will DVD video camera/recorder cause the ACCESS/PC indicator to blink.
- Page 148 An error message for Perform repair following repair appears. Repair is possible when the DVD video camera/recorder by the AC adapter/charger. detected repair (except when the remaining It will take from a few minutes wish to start recording insert another connecting During playback Recognition of disc is...
- Page 149 Photos on card cannot This DVD video camera/recorder be played back. recorded to the DCF (Design range of image camera/recorder vertical outside the figure), Even when playback of the digital cameras DCF (Design file format digital devices It will take some time to When playing back a still, "Playback."...
- Page 150 Transfer of images Connect stops, of PC. If your PC is a desktop use USB terminal extended version Is disc scratched Clean the disc. DVD drive built into PC This problem cannot be used after the creating 3rovided software been installed. Error appears when Make sure that your...
- Page 151 Miscellaneous No DVD video camera/ Is a fully charged recorder operation. Is the DVD video Power does not come Execute on, or no operation Has the DVD video camera/recorder occurs by pressing The DVD video camera/recorder button. dealer. The date and time are Has the DVD video camera/recorder period incorrect.
- Page 152 Disc cover cannot Is disc correctly closed. Was disc inserted Remove Connect turn the DVD video camera/recorder Operating sound is This sound does not indicate heard cyclically. Some vibrations are felt These or slight sound is heard does not indicate from mechanism.
- Page 153 System Reset If the DVD video camera/recorder does not operate normally, perform "System Reset": The DVD video camera/recorder may recover to normal. "System Reset" will reset all settings to factory defaults. The date and time will also be reset: Set the date and time again before using the DVD video camera/recorde_ 1 Set the power switch to "OFF"...
- Page 154 Initial Setup Beep Power Save Record Language Demo Mode "1 "100x" will appear on DZ-HS300A. *2 Not displayed on DZ-HS300A. • Some items will not appear depending Major Specifications Lens Focus Zoom Required minimum illumination Viewfinder LCD monitor Electronic image stabilizer Shutter speed Self-timer recording External microphone jack...
-
Page 155: Hand Strap
Recording mode Maximum recordable time DVD-RAM/DVD-RW/ DVD-R/+RW (per side) Maximum SD memory card number of (when using 32 MB recordable card) stills Recording DVD-RAM/DVD-RW format (VR-mode) DVD-RW (VF-mode)/ DVD-R Card Audio playback format Recordable discs Recordable card Jacks Battery system Power consumption Dimensions (WxHxD) - Page 156 Total weight when recording Provided accessories STORAGE CAPACITY OF HDD/DVD/CARD Recordable Time On HDD ua. y XTRA Approx. FINE Approx. Approx. Recordable Time On Disc Movie recordable time on one disc" (on single side) (when recording XTRA Approx. 18 min *r FINE Approx.
- Page 157 RECORDABLE STILLS (PHOTOS) ON CARD For DZ-HS303A FINE Approx. 18 Approx. 38 NORM Approx. 24 Approx. 50 Approx. 37 Approx. 75 For DZ-HS300A FINE Approx. 180 Approx. 380 NORM Approx. 240 Approx. 500 Approx. 370 Approx. 750 With external input (DZ-HS303A) FINE Approx.
- Page 158 Operation is subject to the following two conditions: (1) this device may not cause harmful interference, and (2) this device must accept any interference received, including interference that may cause undesired operation. Responsible Party: HITACHI AMERICA, LTD. HOME ELECTRONICS 900 Hitachi Way Chula Vista, CA 91914-3556...
- Page 159 Index Numerics 16:9 ... 8 cm bare disc ... AC adapter/charger ACCESS/PC indicator Add (edit) ... All programs Auto (program AE) ... Autofocus AV input/output jack ... Backlight correction Battery Attaching to DVD video camera/recorder Charging Recordable time on DVD video camera/ recorder Removing from DVD video camera/ recorder...
- Page 160 Linear PCM ... Lock ... LOCK switch ... Low Light (Program AE) ... Manual Focus MENU button MIC.Filter Move Optical 10x zoom lens ... Optical 25x zoom lens ... OSD Output ... PHOTO capture PHOTO Input ... PHOTO/SELECT button Play (play list) ... Play (program) Play list ...
- Page 161 This License Agreement certifies that you were granted • Grant of License • Hitachi, Ltd. nonexdusively grants cannot be transferred to a third party. • You can duplicate on_ copy of this program and under the condition that the display •...
- Page 162 Warranty Limitations The Limited Warranty provided by Hitachi does not cover: A. Cabinet (exterior finish items), Battery packs, Accessories, Lens Cleanings, Cleanings, DVD Disc Damage, Video Tape Damage, or Software Modifications. B. Any defect, malfunction, or failure caused by or resulting from improper service,...
- Page 163 . CAMCORDER Products . A C ADAPTER CHARGER Conditions Hitachi Limited Warranty These Hitachi Products are warranted of defects in parts and workmanshi_ purchase by the original owner. If thi found to be defective, replace defective parts at original owner. Parts used...
- Page 164 HITACHI.COMrTV OR MAiL iN TO ADDRESS ON THIS CARD, HITACHI "In order to allow Hitachi to better serve customer needs, please complete this card and return it to Hitachi America, Ltd., Home Electronics Division. Completion to validate your Hitachi limited warranty, but would assist us in developing better services and programs for our customers."...
- Page 165 _> _" F--O cA Q © <...
- Page 166 HITACHI CANADA LTD DIGITAL MEDIA DIVISION 1!1IACI{[ VID[!O PRODUCTS are guaranleed or material defect shouM occur under normal and proper usage within the perked stated hereunder lailure should be repaired al no co_l Io the buyer, provided the delective Canada¸...
- Page 167 IMPORTANT NOTICE: This warranty will _to Canada OR sold by any organization AViS iMPORTANT: Notre garantie ne couvre pas les produits achetes & I'exterieur du Canada OU vendus par toute organisation autre que HITACHI CANADA LTD inspirer HITACHI CANADA MEDIA DIVISION Blvd., Mississauga,...
- Page 168 WWW.HITACHI.CA iMPORTANT ENREGISTREZ VOTRE PRODUIT WWW. HITACHI.CA HITACHI lnspire the Ne×_ "In order to allow Hitachi to better serve our customers' complete this card and return it to Hitachi Canada card is not required in order to validate your Hitachi...
- Page 169 >0_ o_<...
- Page 170 Nt_meros de tel_fono del Centro de soporte para el software suministrado: Num_ros de t_14phone de I'Assistance PIXELA CORPORATION +1-800-458-4029 (Toll-free) +1-213-341-0163 URL:http://www,pixela. HITACHI AMERICA, LTD. HOME ELECTRONICS 900 Hitachi Chula Vista, CA 91914-3556 Service Hotline: 1-800-HITACHI (1-800-448-2244) QR68132 ©Hitachi, Ltd. 2006...