
Related Manuals for MicroBoards Technology MX


Summary of Contents for MicroBoards Technology MX
- Page 1 MX Disc Publisher ® For Microsoft Windows Vista, XP, and 2000 Users Manual Microboards Technology LLC Version 1.02...
- Page 2 • Introduction...
-
Page 3: Table Of Contents
RINTHEADS Printhead Maintenance ..............................16 ..................................16 EVEL ...................................17 EALTH USING SURETHING DISC LABELER ........................17 Creating New Labels ..............................17 Printing Labels ................................17 THE MX DISC PUBLISHER AND ZULU2 ........................18 ............................19 RINT ............................20 RINT ............................20 OBOTICS TILITIES Enable Configure Dialog............................20 Exercise Belts ................................20 Unload the Drive ................................20... - Page 4 • Introduction...
-
Page 5: Introduction
Flexibility and Speed for Any Application While the MX Disc Publisher was designed to fill a need in the high-volume arena, it also has the ability to print at 4800 x 1200 dpi on both DVD and CD media. With the included design software, users can enjoy its benefits whether making a few discs or a few hundred. -
Page 6: System Requirements
Remove the MX Disc Publisher system from the shipping box and confirm you received all of the items. Place the MX Disc Publisher on a stable, flat surface. You will need room both in front and behind the system, as discs will be accessed from both locations. -
Page 7: Installing Ink Cartridges And Print Heads
Loading / Replacing Ink Cartridges Cartridges can be changed while the MX Disc Publisher is on, but it should never be turned on without an ink cartridge in place. An LED will light above any cartridge that needs to be replaced. -
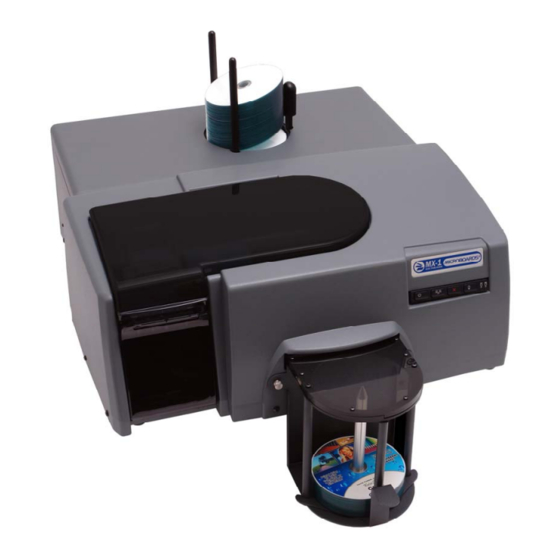
Page 8: Loading Discs
Loading Discs The next step is to load your MX Disc Publisher with output discs. The system will accept CD or DVD 120 mm (12 cm) inkjet printable discs. If the disc does not have an inkjet printable surface, the ink will not adhere to the surface of the disc. -
Page 9: Mx Disc Publisher Installation
1. Confirm that the power is turned OFF on the MX Disc Publisher and on your PC. 2. Plug in the AC power cord to the back of the MX Disc Publisher. Do not turn on power to the MX Disc Publisher until all 4 ink cartridges and both printheads have been installed. -
Page 10: Windows Vista Hardware Installation
Insert the Microboards MX Disc Publisher CD into a drive in your computer. Follow the instructions provided by the installer. Connect the MX Disc Publisher to the PC only when you are prompted to. The operating system will next display the following windows: 1. - Page 11 MICROBOARDS TECHNOLOGY, LLC MX DISC PUBLISHER 8. Select No, not this time and click Next. The following screen will appear: 5. Select No, not this time and click Next. 9. Click the Next button and the files will be copied from the CD.
-
Page 12: Printing Preferences
Printing Preferences Access the Printing Preferences by clicking the Start Button on your Windows computer. Select Settings and then select Printers. Right click on the Microboards PF-Pro icon, then select Printing Preferences. There are 5 tabs across the top of the window. Click each tab to see the available settings. -
Page 13: Color Tab
MICROBOARDS TECHNOLOGY, LLC MX DISC PUBLISHER Color Tab The Color Tab allows you to specify that the entire image should be printed in grayscale, or printed in sepia. You also have access to the Advanced color settings from this Photo - Best tab. -
Page 14: Diameter Settings Tab
The Outer and Inner Diameters will change the size of the area to be printed. To avoid excessive ink buildup, these values should never be set so that the MX Disc Publisher is printing off the media. The Parameter Unit should remain on the 0.1mm setting for maximum precision. -
Page 15: The Microboards Printer Toolbox
To confirm the computer is communicating with the MX Disc Publisher, print a Test Page. This can be done with one of the inkjet printable CD’s included with your MX Disc Publisher, or an inkjet compatible disc you may already have. To print the Test Page: •... -
Page 16: Clean The Printheads
Clean the Printheads The printheads may require cleaning if the printed images show streaks of color. This may occur if the MX has been idle for an extended period of time. • Click the Clean the Printheads button on the main Toolbox window. -
Page 17: Pen Health
Using SureThing Disc Labeler SureThing Disc Labeler is included with the MX Disc Publisher and will be installed during the PF-Pro Installation. For more information on using SureThing, please refer to the SureThing Help menu. Creating New Labels Any label you create in SureThing must use the Microboards template to print correctly. -
Page 18: The Mx Disc Publisher And Zulu2
SureThing. The Print Only feature under the Robotics menu will launch SureThing. The first time the user launches Zulu2, the software will ask you to configure the MX Disc Publisher system. This only needs to be done the first time the software is used. - Page 19 Click the OK button. The system will now initialize the MX Disc Publisher. The belts will be cleared of any discs and any discs in the recorders will be removed and rejected. Once initialization is complete, the system is ready for use.
-
Page 20: Zulu2 And Print Only Mode
Zulu2 and Print Only Mode While the MX Disc Publisher was designed to be operated in Burn and Print mode, you can also use the MX as a disc printer. SureThing Disc Labeler software is included with the MX Disc Publisher, but you can print using many applications. -
Page 21: Software Re-Installation
The information in this section will only apply to a manual re-installation of the individual software packages. If you have not yet installed the MX Disc Publisher using the Installer, it is recommended that you do so. Installing the MX Disc Publisher in an incorrect order could result in an unsuccessful installation. -
Page 22: Surething Labeler Software Re-Installation
There are 3 methods of reinstalling SureThing should the need arise: A. (Recommended) Insert the Microboards MX Disc Publisher Installation CD into the CD/DVD ROM drive on your computer and select the Repair option when the installer starts. Click the SureThing Disc Labeler button to reinstall SureThing. -
Page 23: Zulu2 Software Re-Installation
ROM drive on your computer and select the Repair option when the installer starts. Click the Prassi Zulu2 button to reinstall Zulu2, then select the correct MX model. Clicking the Install All Applications button will reinstall Zulu2, SureThing, and the Toolbox. -
Page 24: Troubleshooting
Remove any discs that are left on the belt. 2. Lift the cover and check for any discs on the front deck of the MX Disc Publisher. Remove any discs found on the belts. Close the cover. -
Page 25: Gaps Or Overlap In Ink Coverage
The Microboards Printer Toolbox did not detect a connected printer when the PC was started. Verify that the MX Disc Publisher is connected and that the printer is powered on. After verifying the connection and the printer power, you should restart the Toolbox, as it monitors the printer’s ink levels and door... -
Page 26: Specifications
Maximum Print Width: 4.72” (120mm) Ink Cartridges: Microboards PFP-HC-CYAN, PFP-HC-MAGENTA, PFP-HC-YELLOW, and PFP-HC-BLACK Label Editing Software: SureThing™ First Edition Software for Windows included Technical Support For technical questions or support issues, contact Microboards Technology technical support: United States Europe Japan PH: 952-556-1639...