Table of Contents
Advertisement
Quick Links
Advertisement
Table of Contents

Related Manuals for MicroBoards Technology QD-DVD


Summary of Contents for MicroBoards Technology QD-DVD
- Page 1 QD-DVD User’s Manual www.microboards.com Version 4.2...
-
Page 3: Table Of Contents
Table of Contents Introduction... 5 Unpacking your system ... 5 Installation... 5 Basic Instructions ... 5 Buttons and LCD ... 5 Hardware Description... 6 Main Menu ... 7 Functions... 8 Copy ... 8 Test... 8 Test & Copy... 9 Verify ... 9 Compare... -
Page 5: Introduction
Introduction The QD-DVD is a high speed, low cost one to one DVD Recordable duplication system from Microboards Technology, LLC. The QD-DVD is perfect for any user requiring easy copying of audio, video, or Data discs. Superior technology allows the QD-DVD to ship without a hard drive. LED indicators provide the user with status of the duplication process, minimizing the number of faulty discs. -
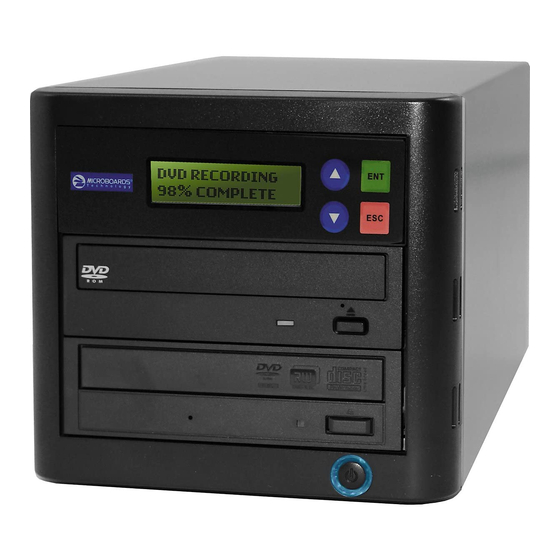
Page 6: Hardware Description
The master discs always go into the TOP DVD Reader drive. The blank media will always go into the BOTTOM DVD Recorder drive. The power switch and power LED are also located on the front of the QD-DVD duplicator. The USB Connection is located on the back of the QD-DVD. -
Page 7: Main Menu
Playing Track – 1 00:15 / 02:45 Closing Session Close Complete Please wait… ... OK: 1 Fail : 0 Reboots QD-DVD Track 01 CDXA 37.1 MB Continue edit Insert Next Master Next Disc ? NO Close all disc’s Session ? YES Closing Sesion Please wait…... -
Page 8: Functions
Compare, Prescan, Disc Info, Edit Track, Setup, and USB Mode. For the Setup options, please refer to pages 13-15. Copy The Copy function is used to copy your master disc to the blank media. The QD-DVD duplicator will be in Copy mode when it is turned on. The display will read: 1. Copy Place your master disc into the TOP DVD reader drive. -
Page 9: Test & Copy
To run the Verify function, press the ▼▲ buttons until the display reads: 4. Verify Place the copied disc into the BOTTOM DVD recorder drive. Press the ENT button on the controller interface. The copied disc will now be read. Once completed, the display will show: 4. -
Page 10: Compare
Compare The Compare function is used to compare the master disc with the copied disc. The Compare function will only work with Data masters. If your master disc has audio or video (VCD) on it, the Compare function will not work. To use the Compare function, press the ▼▲... -
Page 11: Disc Info
Disc Info The Disc Info function displays information on the type of master disc placed in the TOP reader drive. To use the Disc Info function, press the ▼▲ buttons until the display reads: 7. Disc Info Place the master disc into the TOP reader drive. Press the ENT button. The source is analyzed. The following screen appears: Source Disc (Analyzing) -
Page 12: Play Audio Track
11. Press the ENT button. The following screen appears: Once the disc is closed, the following screen appears: Play Audio Track The QD-DVD cannot use this function, as the reader drive does not include a headphone jack. Continue Edit Next disc? NO Close all disc’s... -
Page 13: Close Session
The USB Mode function is used to enter and exit USB mode, using the recorder drive as an external burner for a PC. The other functions of the QD-DVD will not be available until you return the unit to Stand-Alone mode. Connect the QD-DVD to a PC with a USB 2.0 connection for optimal performance. -
Page 14: Setup
48x, 40x, 16x, 8x ▲ Options are Off, Note: Option 2 is not used 1 and 2 ▼ in the QD-DVD duplicator. ▲ Options are Copy, Test, Test & Copy, Verify, Compare, Prescan , Disc Info, 1 . Copy ▼... -
Page 15: Language
The Setup menu includes many setting the user can select to customize the use of the QD-DVD duplicator. Please refer to the chart above for the location and options of these settings. A description of the options in the setup menu follows. -
Page 16: Burn Mode
Burn Mode There are 3 options for the Burn Mode setting: 1. DAO (Disc At Once) 2. TAO – Not Close (Track At Once, not closed) 3. TAO (Track At Once, closed) The default setting is DAO. It is recommended that this setting be used. Display Time The display time function is used to display the total record time, after the recording is completed. -
Page 17: Advanced Setup Menu
The Advanced Setup menu includes options for the more advanced user. Normally these functions are not used in the daily operation of the QD-DVD duplicator. If you have any questions about using these functions, please contact the Microboards technical support department. -
Page 18: Overburn
Overburn The default setting for this feature is OFF. Overburn can be used with certain CD recorders, to allow more data to be writing to the disc. This feature is not supported by the QD-DVD duplicator. Read Error Skip The Read Error Skip feature is used if you wish to ignore read errors during duplication. The default setting is OFF and it is highly recommended that this setting is not changed. -
Page 19: Specifications
FAX: 952-556-1628 support@microboards.com www.microboards.com Please have the Model and Serial Number of your QD-DVD available when contacting Technical Support. Any unauthorized modification to this equipment may result in the revocation by the FCC of the user’s authority to operate this equipment. -
Page 20: Appendix 1 List Of Functions
Appendix 1 List of Functions 1 Copy 2 Test 3 Test & Copy 4 Verify 5 Compare 6 Prescan 7 Disc Info 8 Edit Track (for CD only) 8-1 CD to CD Edit 8-3 Play Audio Track 8-4 Close Session 9 Setup 9-1 Language (Default is English) 9-2 CD Burn Speed (Default is Maximum) -
Page 21: Appendix 2 Lcd Messages
Appendix 2 LCD Messages Normal Conditions: Initialize SDRAM...Initialize the memory of the system. Detect Drives...Detect what drives are connected with the system. User Abort!...Cancel the job during operation. Analyzing...Analyze the source disc. Source Drive Not Ready...Source drive is not ready to read. Target Drive Not Ready...Target drive is not ready to write.