Stihl FSE 60 Instruction Manual
Hide thumbs
Also See for FSE 60:
- Instruction manual (372 pages) ,
- Instruction manual (44 pages) ,
- Instruction manual (20 pages)
Table of Contents
Advertisement
Quick Links
Advertisement
Table of Contents

Related Manuals for Stihl FSE 60


Summary of Contents for Stihl FSE 60
- Page 1 FSE 60, 71, 81 2 - 19 Instruction Manual...
-
Page 2: Table Of Contents
Engineering improvements responsible person. STIHL's philosophy is to continually improve all The use of noise-emitting power tools may be of its products. For this reason we may modify restricted to certain times by national or local the design, engineering and appearance of our regulations. - Page 3 Wear "personal" sound protection, e.g. ear that are explicitly approved for this power tool by defenders. STIHL or are technically identical. If you have Wear sturdy protective gloves made any questions about this, consult your dealer. of a resistant material (e.g. leather).
- Page 4 English 2 Safety Precautions and Working Techniques – The starting lockout lever and trigger switch – Any extension cords used must comply with must move freely – the switch must return to the specifications for the particular application the idle position when it is released. Position the connection cable and extension cord –...
- Page 5 2 Safety Precautions and Working Techniques English Avoid damage to the power supply cord. Do not Keep the connecting cord behind the power tool drive over it, pinch or tug it. at all times – do not walk backwards – risk of stumbling.
- Page 6 To reduce the risk of injury, always switch off the STIHL recommends that you have servicing and tool and unplug it from the power supply before repair work carried out exclusively by an author‐...
-
Page 7: Using The Unit
3 Using the Unit English Using the Unit A depth wheel can be quickly fitted to the trim‐ mer (see "Mounting Depth Wheel"). Mowing – It limits the cutting range of the mowing line – reduces the risk of the rotating mowing line causing damage (e.g. -
Page 8: Approved Combinations Of Cutting Attach- Ment, Deflector, Handle And Harness
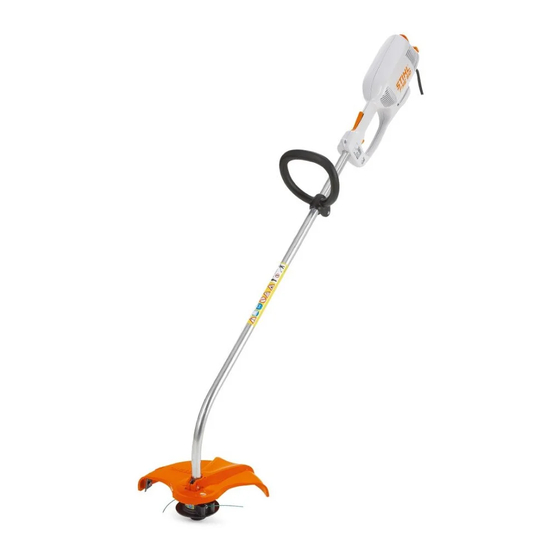
Only mowing heads (1) may be used on trim‐ mers with a curved drive tube and loop handle. Cutting Attachments 4.2.1 Mowing heads 1 STIHL AutoCut C 6‑2 Deflector 2 Deflector with blade, for mowing heads Handle 3 Loop handle Harness ►... -
Page 9: Mounting The Loop Handle
6 Mounting the Loop Handle English Mounting the Loop Handle Mounting the Loop Handle ► Fit the locknut (3) in the hex recess on the deflector. ► Make sure the holes line up. ► Insert the M6x30 screw (4) and tighten it down firmly. -
Page 10: Mounting Depth Wheel
English 9 Mounting Depth Wheel Removing the Mowing Head 8.2.1 STIHL AutoCut C 5-2 ► Hold the spool housing steady ► Unscrew the cap counterclockwise. Mounting Depth Wheel The depth wheel is included in the scope of sup‐ ply or is available as a special accessory. -
Page 11: Converting Unit To Power Edger
10 Converting Unit to Power Edger English Squeeze the locking hooks (3) together to release the depth wheel (1) from the support (2). Fitting Depth Wheel on Deflec‐ The trimmer can now be turned through 180° and used as a power edger (see "Applications"). 11 Connecting to Power Sup‐... -
Page 12: Fitting The Harness
Secure it against unauthorized use. led outlet 15 Overload Cutout 12 Fitting the Harness STIHL FSE 71 and FSE 81 electric trimmers are A shoulder strap is available as a special acces‐ equipped with an overload cutout. sory. The overload cut out cuts off the power supply in Wear the shoulder strap over your left shoulder case of mechanical or thermal overload. -
Page 13: Storing The Machine
16 Storing the Machine English 17.2 Re-Adjusting the Mowing Line Do not switch on the unit during this period because you will otherwise prolong the required cooling time. Once the motor starts: ► Run the unit for about 15 seconds off load. This helps cool the motor windings and con‐... -
Page 14: Maintenance And Care
The power tool must be operated, maintained STIHL recommends that you have servicing and and stored with the due care and attention repair work carried out exclusively by an author‐ described in this instruction manual. -
Page 15: Main Parts
Among other parts, this 21 Specifications includes: 21.1 Engine – Cutting attachment – Deflector 21.1.1 FSE 60 – Carbon brushes Rated voltage: 230 V 20 Main Parts Frequency: 50 Hz Rated current: 2.3 A... -
Page 16: Maintenance And Repairs
For further details on compliance with Vibration STIHL recommends the use of original STIHL Directive 2002/44/EC see replacement parts. www.stihl.com/vib Original STIHL parts can be identified by the 21.4.1 Sound pressure level L STIHL part number, the { logo and the EN 62841-4-4 STIHL parts symbol K (the symbol may appear alone on small parts). -
Page 17: General Power Tool Safety Warnings
The safety precautions and warnings on avoiding EN 62841-4-4, EN 61000‑3‑2, EN 61000‑3‑3 an electric shock given under “Electrical Safety” do not apply to STIHL cordless products. The measured and guaranteed sound power level was determined according to Directive WARNING 2000/14/EC, Annex VIII, using the ISO 11094 ■... - Page 18 English 25 General Power Tool Safety Warnings If operating a power tool in a damp location power tool will do the job better and safer at is unavoidable, use a residual current device the rate for which it was designed. (RCD) protected supply.
- Page 19 25 General Power Tool Safety Warnings English b) Thoroughly check the work area for wild ani‐ control, slipping or falling, which may result mals. Wild animals may be injured by the in injury. machine when it is running. o) When working on slopes, always make sure c) Thoroughly search the work area and you have a firm footing;...
- Page 20 *04582820121C* 0458-282-0121-C...