Table of Contents
Advertisement
Advertisement
Table of Contents

Related Manuals for Trane ComfortLink II XL 1040


Summary of Contents for Trane ComfortLink II XL 1040
- Page 1 ComfortLink™ II XL 1040 TZON1040 Zone Sensor Installation & User Guide This guide will help you install and configure your TZON1040 zone sensor quickly and easily. The 1040 is an easy to use communicating zone sensor with a color touch screen. 18-HD88D1-1D-EN...
-
Page 2: Table Of Contents
ComfortLink™ II TZON1040 Communicating Zone Sensor with touch screen interface CONTENTS Welcome! Welcome ....1 User Guide ... . . 2 This guide will introduce you to the 1040’s many features and get you Touch Screen . -
Page 3: User Guide
User Guide Touch Screen The 1040 utilizes a resistive touch screen, which allows you to apply light pressure with your finger or any non-sharp object in order to interact with the device. CAUTION: Do not use hard or sharp objects to touch the screen. -
Page 4: Home Screen
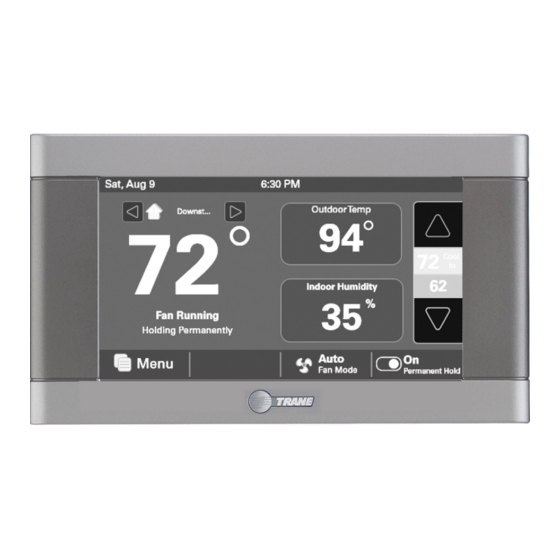
User Guide Notification and System Alerts Home Screen Day/Date* Time* Current Outdoor Temperature View and adjust Increase other zone temperature settings Heating or Cooling temperature Current adjustment temperature Decrease and status temperature Current Indoor Humidity Menu Screen Fan Mode (Auto/On) Permanent hold temperature setting * Day/Date/Time set on 1050 control... - Page 5 6:30 PM User Guide The 1040 System Mode is Indoor Humidity Home Screen bound to the 1050 System Mode and cannot be modified from the 1040 zone sensor. Cool F a n M o d e Heating & Cooling Outdoor Temp Setpoints: - Select a setpoint A u t o...
-
Page 6: Menu Screen
User Guide Menu Screen Calibration offsets (Indoor Display features (Brightness/ Temperature/ Indoor Backlight/Screen Saver/ Humidity) Clean screen function Color Themes) M e n u Rename Reboot the sensor zone sensor R e n a m e D i s Q l a y C a l i b r a t i o n C l e a n S c r e e n R e b o o t... -
Page 7: Name Sensor Screen
User Guide Name Sensor Screen Navigate to Name Sensor Screen by selecting: Home Screen > Menu > Rename Sensor This screen allows you to assign a unique name to the 1040 zone sensor. On first boot-up this screen will appear to allow you to set a name for the 1040 zone sensor. -
Page 8: Brightness
User Guide Brightness Navigate to Screen Settings by selecting: Home Screen > Menu > Screen Settings > Brightness S c r e e n S e t t i n g s S c r e e n S e t t i n g s Select a tab to Adjust the view different... -
Page 9: Backlight
User Guide Backlight Navigate to Screen Settings by selecting: Home Screen > Menu > Screen Settings > Backlight S c r e e n S e t t i n g s Adjust how long the screen will remain active after the last screen touch A p p l y... -
Page 10: Screen Saver
User Guide Navigate to Screen Settings by selecting: Home Screen Screen Saver > Menu > Screen Settings > Screen Saver Adjust how long the zone sensor will wait to display screen saver S c r e e n S e t t i n g s Select the screen saver you would... -
Page 11: Color Themes
User Guide Color Themes Navigate to Screen Settings by selecting: Home Screen > Menu > Screen Settings > Color Themes S c r e e n S e t t i n g s Select a custom color theme for the zone sensor A p p l y C a n c e l... -
Page 12: Calibration
User Guide Navigate to the Calibration screen by selecting: Calibration Home Screen > Menu > Calibration Adjust the Indoor Temp and Humidity values Return to the Menu page 11 TZON1040 Installation and User Guide... -
Page 13: Clean Screen
User Guide Clean Screen Reboot Navigate to Clean Screen by selecting: Home Screen Navigate to the Reboot screen by selecting: Home > Menu > Clean Screen Screen > Menu > Reboot The Clean Screen feature temporarily locks the screen From the Reboot screen, you can reboot the zone for 30 seconds to allow the display to be cleaned. -
Page 14: Installation
Installation Safety NOTE: Use 18-gauge color-coded ⚠ WARNING ⚠ ⚠ WARNING ⚠ thermostat cable for proper wiring. Shielded cable is not typically required. Keep this wiring at least This information is intended for LIVE ELECTRICAL COMPONENTS! one foot away from large inductive use by individuals possessing During installation, testing, loads such as electronic air cleaners,... -
Page 15: General Information
Installation General Information Box Contents The 1040 Connected Zone Sensor has a 4.3” color — 1 Control touch screen and offers a full-featured and easy-to- — 1 Sub-base use interface. — 2 #6 18x1 Phillips slotted head mounting screws — 2 #6x1 Nylon Drywall Anchors —... -
Page 16: Location
Installation Location The 1040 is designed for installation in climate Correct controlled living spaces when applied with Trane’s Celing Placement Natural heat dissipation ComfortLink™ II zone control system. Place the zone from the Touch Screen 2 FEET sensor in a central location with good circulation. - Page 17 Installation Location Mount the zone sensor on a section of interior wall that does not contain hot or cold water pipes or duct work. Incorrect Problematic Air Patterns Placement IMPORTANT: The 1040 zone sensor utilizes a 4.3” color touch screen. This screen generates heat which is vented out the top of the zone sensor utilizing natural convection.
-
Page 18: Mounting
Installation Mounting NOTE: RS1 and ODT terminals are disabled. They are not compatible with the 1040 zone sensor. 1. Turn OFF all power to heating and cooling NOTE: RJ-45 plug is disabled. It is not compatible equipment. with the 1040 zone sensor. 2. -
Page 19: Wiring
Installation Mounting Wiring 1. Adjust the length and position of each wire to 5. Drill the holes in the wall where marked. reach the proper terminal on the connector block 6. Mount the sub-base to the wall using included of the sub-base. Strip 1/4” of insulation from mounting screws and drywall anchors. - Page 20 Installation Navigate to Indoor Sensor Setup on the 1050 control Zone Assignment from the Service Menu. This is the Indoor Sensor Setup screen on the 1050 Z o n e a n d A s s i g n e d S e n s o r s A v a i l a b l e S e n s o r s U p s t a i r s G r e a t R o o m - 0 1 control.
-
Page 21: Zone Assignment
Installation Zone Assignment To unassign the 1040, select the desired sensor and then select Unassign. The sensor will move back to the list of Available Sensors. 18-HD88D1-1D-EN page 20 page 20... -
Page 22: Power-Up Sequence
Installation Power-Up Sequence When the 1040 zone sensor is installed to the sub-base, the zone sensor initiates a 90-120 second power-up sequence. During the power-up sequence, the Screen Calibration option is available for five seconds. NOTE: Screen Calibration is available for five minutes if the screen has never been calibrated. - Page 23 This page left intentionally blank 18-HD88D1-1D-EN page 22...
- Page 24 For more information, please visit trane.com or tranetechnologies.com. Trane has a policy of continuous data improvement and it reserves the right to change design and specifications without notice. We are committed to using environmentally conscious print practices.