Advertisement
Quick Links
Installation Instructions for part 99-7804
Honda Accord 2013-up
KIT FEATURES
• ISO DIN radio provision with pocket
• ISO DDIN radio provision
• Painted two-tone to match the factory dash
99-7804B - Black with silver accent
99-7804HG - High gloss black with silver accent
• Retains factory color screen
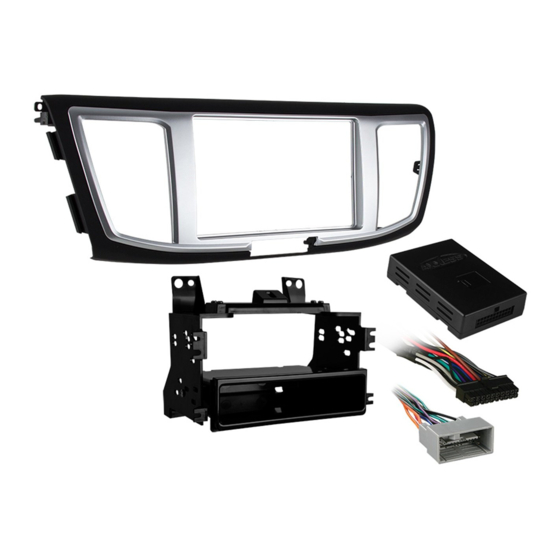
KIT COMPONENTS
• A) Radio housing trim panel • B) Brackets • C) Top bracket • D) Pocket • E) (6) White panel clips
• F) (8) #6 x 3/8" Phillips screws • G) (8) #8 x 3/8" Phillips screws • H) Display retention interface and harness (not shown)
A
B
WIRING & ANTENNA CONNECTIONS (sold separately)
Wiring Harness: Included
Antenna Adapter: 40-HD11
Steering wheel control interface: ASWC-1 (sold separately)
METRA - The World's best kits
99-7804
C
D
F
®
Dash Disassembly ................................................2-3
Kit Preparation ........................................................ 4
- ISO DIN radio provision with pocket ...................... 5
- ISO DDIN radio provision ...................................... 6
Wiring Instructions ............................................. 7-8
Touch Screen Instructions................................ 9-10
TOOLS REQUIRED
E
• Panel removal tool • Phillips screwdriver
G
CAUTION!
especially air bag indicator lights must be connected before cycling
the ignition. Also, do not remove the factory radio with the key in the
on position, or while the vehicle is running.
Table of Contents
All accessories, switches, climate controls panels, and
Advertisement

Related Manuals for Metra Electronics 99-7804


Summary of Contents for Metra Electronics 99-7804
-
Page 1: Table Of Contents
Installation Instructions for part 99-7804 Honda Accord 2013-up Table of Contents 99-7804 Dash Disassembly ..........2-3 Kit Preparation ............4 KIT FEATURES Kit Assembly • ISO DIN radio provision with pocket • ISO DDIN radio provision – ISO DIN radio provision with pocket ...... 5 •... -
Page 2: Dash Disassembly
99-7804 Dash Disassembly 1. Unclip and remove the side trim 3. Remove (2) 8 mm screws facing panels from each side of the up on bottom of radio chassis console. (Figure A) inside pocket cavity. (Figure C) 2. Remove (2) Phillips screws 4. - Page 3 99-7804 Dash Disassembly (cont) 5. Remove (2) Phillips screws on top 7. Remove (1) Phillips screw from of radio. (Figure E) each A/C vent then unclip and remove the vents. (Figure G) 6. Unclip and remove the radio 8. Remove (2) Phillips screws assembly.
-
Page 4: Kit Preparation
99-7804 Kit Preparation 1. Attach the hazard light switch to the radio trim panel using (2) of the supplied #8 x 3/8” Phillips screws. (Figure A) 2. Attach the (6) white panel clips to the radio housing trim panel. (Figure A) -
Page 5: Kit Assembly
99-7804 Kit Assembly ISO DIN radio provision with pocket 6. Locate the factory wiring harness in the dash. Follow the Wiring and 1. Attach the radio brackets to the Initialization section of this manual radio housing trim panel using (4) before completing the installation. -
Page 6: Iso Ddin Radio Provision
99-7804 Kit Assembly ISO DDIN radio provision 5. Locate the factory wiring harness in the dash. Follow the Wiring and 1. Attach the radio brackets to the Initialization section of this manual radio housing trim panel using before completing the installation. -
Page 7: Wiring Instructions
99-7804 Wiring Instructions Harnesses Included: Connections to be made: • 24-pin gray Honda connector to 14-pin black interface connector, with From the 24-pin gray Honda connector to the aftermarket radio: pre-wired 12-pin black ASWC-1 harness. • Connect the Red wire to the accessory wire. - Page 8 99-7804 Wiring Instruction Connections to be made: If Equipped with Factory Subwoofer: From the 14-pin black connector to the aftermarket radio: From the 8-pin gray Honda connector to the aftermarket radio: • Connect the Orange wire to the illumination wire. (If the aftermarket radio has •...
-
Page 9: Touch Screen Instructions
99-7804 Touch Screen Instructions Initialization Personalization Menu Procedure The controls are as follows: When the interface first boots up, the then continue through the menus. The steering wheel controls for the OEM screen will show an Android (System Settings>Others>Select personalization menu will override the... - Page 10 99-7804 Touch Screen Instructions System Settings Camera Settings LaneWatch Calibration This menu option allows for a background change This menu allows you to turn the on the clock, the ability to adjust the clock, and LaneWatch camera on and off, change Note: The LaneWatch button is located on the left select the year range for interface.