Table of Contents
Advertisement
Available languages
Available languages
Installation instructions for part 99-7803G
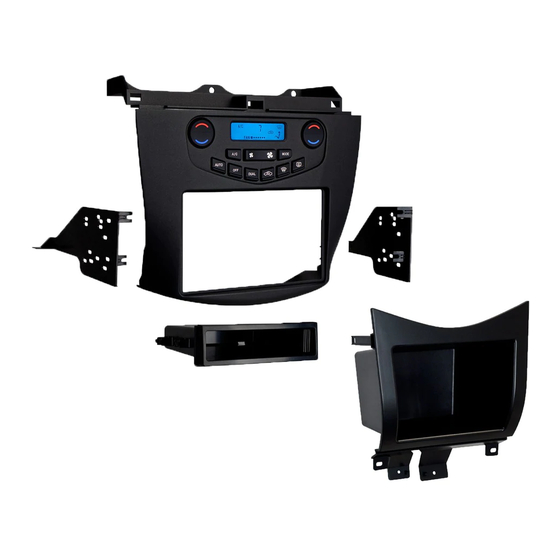
Honda Accord 2003-2007
KIT FEATURES
• ISO DIN radio provision with pocket
• ISO DDIN radio provision
• Retains all climate control systems including dual-zone
• Painted gray to match the factory finish
KIT COMPONENTS
• A) Radio housing trim panel • B) Radio brackets • C) Pocket • D) Panel clip legs • E) (2) Panel clips
• F) (2) Speed clips • G) (2) #10 x ¾" Phillips screws • H) (4) #4 x 3/8" Phillips pan-head screws
• I) (8) #8 x 3/8" Phillips truss-head screws • Wiring harness (not shown)
A
B
F
WIRING & ANTENNA CONNECTIONS (sold separately)
Wiring Harness: • Included with kit
Antenna Adapter: • Not Required
TOOLS REQUIRED
• Panel removal tool • Phillips screwdriver
METRA - The World's best kits
®
99-7803G
C
D
G
H
I
®
metraonline.com
Dash Disassembly ................................................. 2
Kit Preparation ....................................................... 3
Kit Assembly
– ISO DIN radio provision with pocket ...................... 4
– ISO DDIN radio provision ...................................... 5
Axxess Interface Installation ................................ 6
E
U.S. PATENT # D756,348
Table of Contents
Note: The door on the factory pocket below the
radio will not function properly with the 99-7803G
installed. As an alternate solution, Metra offers the
88-00-7803 replacement pocket (sold separately).
CAUTION!
All accessories, switches, climate controls panels, and
especially air bag indicator lights must be connected before cycling
the ignition. Also, do not remove the factory radio with the key in the
on position, or while the vehicle is running.
© COPYRIGHT 2017 METRA ELECTRONICS CORPORATION
Advertisement
Table of Contents

Related Manuals for Metra Electronics 99-7803G


Summary of Contents for Metra Electronics 99-7803G
- Page 1 • F) (2) Speed clips • G) (2) #10 x ¾” Phillips screws • H) (4) #4 x 3/8” Phillips pan-head screws radio will not function properly with the 99-7803G • I) (8) #8 x 3/8” Phillips truss-head screws • Wiring harness (not shown) installed.
-
Page 2: Dash Disassembly
® 99-7803G Dash Disassembly Attention! For auto-climate control models only. Turn the fan speed all the way up, and then turn the recirculation button off, prior to turning the vehicle off and removing the radio/climate control assembly. 1. Unclip and remove the shift lever trim ring. (Figure A) 2. -
Page 3: Kit Preparation
® 99-7803G Kit Preparation 1. Secure the (2) panel clip legs to the radio housing trim panel with the (4) #4 x 3/8” Phillips pan-head screws supplied, and then attach the panel clips. (Figure A) 2. Attach the (2) speed clips provided to the bottom mounting legs of the radio brackets. -
Page 4: Kit Assembly
® 99-7803G Kit Assembly ISO DIN radio provision with pocket 1. Secure the pocket to the radio brackets with the (4) #8 x 3/8” Phillips truss-head screws Step 2 provided. (Figure A, Step 1) Step 1 2. Secure the bracket/pocket assembly to the radio trim panel with the (4) #8 x 3/8”... -
Page 5: Iso Ddin Radio Provision
® 99-7803G Kit Assembly ISO DDIN radio provision 1. Secure the radio brackets to the Step 1 radio trim panel with the (4) #8 x 3/8” Phillips truss-head screws provided. (Figure A, Step 1) Step 2 2. Slide the radio into the assembly and then secure with the screws supplied with the radio. -
Page 6: Axxess Interface Installation
® 99-7803G Axxess interface Installation Table of Contents Connections to be made ........7 Installing the interface .......... 7 INTERFACE FEATURES • Pre-wired ASWC-1 harness (ASWC-1 sold separately) Changing the back-light color on the display ..8 • Retains balance and fade •... -
Page 7: Connections To Be Made
From the 7803 harness to the aftermarket radio: With the key in the off position: 1. Connect the 7803 harness into the 99-7803G, and then to the wiring harness in the vehicle. • Connect the Black wire to the ground wire. - Page 8 ® Installation instructions for part 99-7803G Changing the back-light color IMPORTANT on the display If you are having difficulties with the installation of this product, please call our 1. Press and hold the mode button for 5-10 seconds. The display will start flashing slowly.
- Page 9 ® Instrucciones de instalación para la pieza 99-7803G U.S. PATENT # D756,348 Honda Accord 2003-2007 Indice 99-7803G Desmontaje del tablero ......... 2 CARACTERÍSTICAS DEL KIT Preparación del kit ..........3 • Provisión de radio ISO DIN con cavidad Ensamble del kit •...
-
Page 10: Desmontaje Del Tablero
® 99-7803G Desmontaje del tablero ¡Atención! Para los modelos de control automático de clima solamente. Girar la velocidad del ventilador hasta el final, y luego gire el botón de recirculación fuera, antes de apagar el vehículo y retirar el conjunto de radio/climatizador. -
Page 11: Preparación Del Kit
® 99-7803G Preparación del kit 1. Asegurar los (2) patas del clip panel para el panel de ajuste carcasa de la radio con el (4) #4 x 3/8” tornillos de cabeza Phillips suministrados, y luego coloque los ganchos del panel. (Figura A) 2. -
Page 12: Ensamble Del Kit
® 99-7803G Ensamble del kit Provisión de radio ISO DIN con cavidad 1. Monte la cavidad en los soportes del radio con los (4) tornillos Phillips #8 de 3/8” suministrados. Paso 2 (Figura A, Paso 1) Paso 1 2. Monte los soportes del radio al panel de la moldura del radio con (4) los tornillos #8 de 3/8”... - Page 13 ® 99-7803G Ensamble del kit Provisión de radio ISO DDIN 1. Monte los soportes del radio al Paso 1 panel de la moldura del radio con (4) los tornillos #8 de 3/8” suministrados. (Figura A, Paso 1) Paso 2 2. Deslice el radio en el ensamble y luego sujételo con los tornillos...
- Page 14 ® 99-7803G Instalación de la interfase Axxess Indice Conexiones que se deben hacer ......7 Instalación de la interfase ........7 CARACTERÍSTICAS DE LA INTERFACE • Arnés ASWC-1 precableado (el ASWC-1 se vende por separado) Cambiar el color de retroiluminación •...
-
Page 15: Conexiones Que Se Deben Hacer
Desde el arnés 7803 al radio de mercado secundario: Con la llave en la posición de apagado: 1. Conecte el cable de 7803 en el 99-7803G, y luego al mazo de cables en el vehículo. • Conecte el cable negro al cable de tierra. - Page 16 ® Instrucciones de instalación para la pieza 99-7803G Cambiar el color de retroiluminación IMPORTANTE de la pantalla Si tiene dificultades con la instalación de este producto, llame a nuestra línea 1. Presione y mantenga presionado el botón de modo de 5 a 10 segundos. La pantalla empezará a de soporte técnico al 1-800-253-TECH.