Table of Contents
Advertisement
/
Technical Reference Guide
Product Overview
Describes features of the product.
Setup
Describes setup and installation of the product and
peripherals.
Advanced Usage
Describes advanced usage methods for the product.
Application Development Information
Describes how to control the printer and necessary
information when you develop applications.
Handling
Describes how to handle the product.
Appendix
Describes general specifications and character code
tables.
M00108101
Rev.B
Advertisement
Table of Contents

Related Manuals for Epson TM-J7200


Summary of Contents for Epson TM-J7200
- Page 1 Technical Reference Guide Product Overview Describes features of the product. Setup Describes setup and installation of the product and peripherals. Advanced Usage Describes advanced usage methods for the product. Application Development Information Describes how to control the printer and necessary information when you develop applications.
- Page 2 Neither is any liability assumed for damages resulting from the use of the information contained herein. Neither Seiko Epson Corporation nor its affiliates shall be liable to the purchaser of this product or third parties for damages, losses, costs, or expenses incurred by the purchaser or third parties as a result of: accident, misuse, or abuse of this product or unauthorized modifications, repairs, or alterations to this product, or (excluding the U.S.) failure to strictly comply with Seiko Epson Corporation’s operating and...
-
Page 3: For Safety
For Safety Key to Symbols The symbols shown below are used in this manual in order to ensure safety and proper use of this product and to prevent danger to customers and other persons, and property damage. The symbols indicate the precaution levels as described below. -
Page 4: Cautions On Power Supply
Cautions on Power Supply Be sure to use the specified AC adapter. Connection to an improper power source may cause fire. (See "Product Specifications" on page 95.) Do not allow dust or foreign materials to adhere to the power plug. Accumulated dust or WARNING foreign material may cause electric shock or fire. -
Page 5: Cautions On Handling
Cautions on Handling Do not use this product in a location with volatile substances such as alcohol or paint thin- ner, or near fire. Doing so may cause electric shock or fire. Shut down the product immediately if it produces smoke, a strange odor, or unusual noise. WARNING Continued use may cause electric shock or fire. -
Page 6: Cautions On The Ink Cartridge
Cautions on the Ink Cartridge The usable ink cartridges vary depending on the product. Use an ink cartridge that matches your printer. (See "Product Specifications" on page "Ink cartridge" on page 111.) CAUTION Do not touch the IC chip on the cartridge. Doing so may cause operating/printing malfunc- tion. -
Page 7: Restriction Of Use
Restriction of Use When this product is used for applications requiring high reliability/safety, such as transportation devices related to aviation, rail, marine, automotive, etc.; disaster prevention devices; various safety devices, etc.; or functional/precision devices, etc., you should use this product only after giving consideration to including fail- safes and redundancies into your design to maintain safety and total system reliability. -
Page 8: About This Manual
About this Manual Aim of the Manual This manual was created to provide information on development, design, and installation of POS systems and development and design of printer applications for developers. Manual Content The manual is made up of the following sections: Chapter 1 Product Overview Chapter 2... -
Page 9: Table Of Contents
Contents ■ For Safety..........................3 Key to Symbols..................................3 Cautions on Installation..............................3 Cautions on Power Supply.............................. 4 Cautions on Handling............................... 5 Cautions on the Ink Cartridge ............................6 ■ Restriction of Use ........................7 ■ About this Manual ........................8 Aim of the Manual ................................8 Manual Content .................................. - Page 10 Setup....................... 23 ■ Installing the Printer......................23 Notes for when installing the device........................23 ■ Removing the Protective Materials and Tape ..............24 ■ Changing the Roll Paper Width ..................26 ■ Adjusting the Roll Paper Near-End Sensor..............28 ■ Connecting the AC Adapter ....................30 ■...
- Page 11 Application Development Information............63 ■ Controlling the Printer ......................63 ESC/POS....................................63 ■ Software..........................64 Development Kit ................................64 Drivers ....................................64 Utilities ....................................65 Download ...................................65 ■ Turning off the Printer without Using the Power Switch..........66 ■ Printing Barcodes/2-dimensional Symbols..............67 Notes on printing barcodes............................67 Notes on printing 2-dimensional symbols ......................68 Handling ......................69 ■...
- Page 12 ■ Print Quality Problem......................88 Misaligned print position ............................. 88 Print result on slip paper is skewed........................... 88 Missing print data................................88 Paper gets dirty/stained with ink..........................88 ■ When slip paper is set, paper is discharged resulting an error ........89 ■...
-
Page 13: Product Overview
Various language support. (Code Page) Windows utility for printer setup (TM-J7200 TM-J7700 Utility, TM-J7200 TM-J7700 Printer Model Setting Utility) is provided. Printer driver is provided. (EPSON Advanced Printer Driver, EPSON OPOS ADK, EPSON OPOS for .NET, EPSON JavaPOS) - Page 14 Low noise printing, ideal for use in quiet environments. Ink jet printer that can print on normal paper at a low running cost. Others Can be equipped with an Epson customer display. (DM-D110 and DM-D210 only) Can be equipped with the cash drawer.
-
Page 15: Product Configurations
Chapter 1 Product Overview Product Configurations Models TM-J7200 TM-J7700 Accessories Included Roll paper (Paper width 76mm {2.99"}) Dedicated ink cartridge SJIC33P(K) Setup Guide and sheets Manual CD Power switch cover AC adapter PS-180 ... -
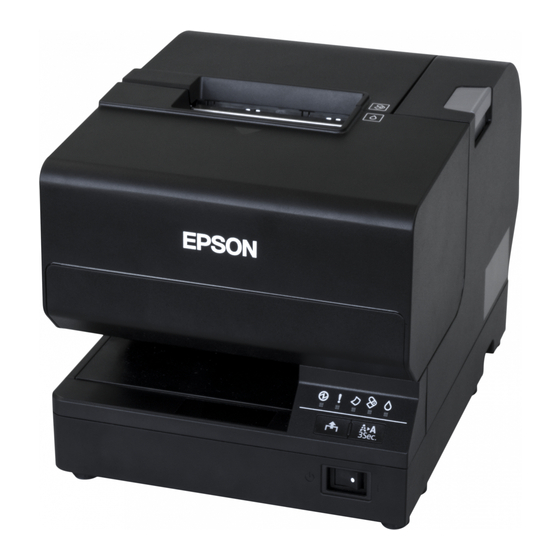
Page 16: Part Names And Functions
Part Names and Functions Front Side TM-J7200 TM-J7700 Roll paper cover Open this cover to install/replace the roll paper. Front cover Open this cover to install/replace the ink cartridge. Control panel For details on LED, see "Control panel" on page Power Switch Turns the printer on/ off. -
Page 17: Control Panel
Chapter 1 Product Overview Control panel Power LED Lights up when the printer is turned on. Flashes during head cleaning and other operations such as when turning the printer on/off. Error LED Lights up when the printer is offline due to the following conditions. ... -
Page 18: Rear Side Connectors
Rear Side Connectors DM-D connector For connecting the customer display. Be careful not to insert a telephone jack (RJ11) or the modular cable of the cash drawer into the DM-D connector. Doing so could damage the printer or the drawer. Drawer kick connector For connecting a modular cable for the cash drawer. -
Page 19: Online And Offline
Chapter 1 Product Overview Online and Offline Online When the product is ready for normal printing, it is "online". Offline The printer automatically goes offline under the following conditions: While the printer power is turning on/off When any of the following covers are opened: ... -
Page 20: Status And Errors
Status and Errors The status of the printer is indicated by lit and flashing LEDs. You cannot print when an error has occurred. You cannot identify the error by the flashing patterns of the LEDs. Develop the application so that users can identify the error description and check the solutions. - Page 21 Chapter 1 Product Overview Power Error Paper sheet Printer Status Roll paper cover open error. Auto Recoverable errors Autocutter error Carriage detection error Cut sheet error Roll paper cover open error Error Unrecoverable Errors CAUTION: Turn off the power immediately when an unrecover- able error occurs.
-
Page 22: Nv Memory (Non-Volatile Memory)
Graphics, such as shop logos to be printed on receipts, can be registered. To register graphics, use the TM-J7200 TM-J7700 Utility. To check the registered graphics, use the TM-J7200 TM-J7700 Utility or the NV graphics information print function for printing. -
Page 23: Setup
Chapter 2 Setup Setup This chapter describes setup and installation of the product and peripherals. Installing the Printer Notes for when installing the device On an area larger than the bottom surface of the product. In a location free of vibration and impacts. ... -
Page 24: Removing The Protective Materials And Tape
Removing the Protective Materials and Tape Protective materials and tape are applied for protection against impacts during transportation. Remove them before installation. The Protective materials and packaging box will be required for future transportation. Keep them in a safe place. TM-J7200... - Page 25 Chapter 2 Setup TM-J7700...
-
Page 26: Changing The Roll Paper Width
Follow the procedure below to change the paper width. When changing the paper width, be sure to change the setting for the paper width by using the TM-J7200 TM-J7700 Utility or customize value. (See "Customize Value Setting Mode" on page ... - Page 27 Chapter 2 Setup Change the location of the roll paper guide to match the paper width to select the required paper width. Align the upper and lower grooves, and confirm that the pro- trusion is inserted in the hole on the bottom. Use the removed screw to affix the guide.
-
Page 28: Adjusting The Roll Paper Near-End Sensor
Adjusting the Roll Paper Near-End Sensor Adjust the roll paper near-end sensor in the following situations: To adjust the detection position according to the thickness of the roll paper core that is used To adjust the detection position for remaining roll paper amount ... - Page 29 Chapter 2 Setup Tighten the adjustment screw. After completing the adjustments, check that the detection lever operates smoothly.
-
Page 30: Connecting The Ac Adapter
Connecting the AC Adapter Be sure to use the specified AC adapter [PS-180 (model: M159E)]. Connection to an improper power source may lead to equipment damage, fire, or electric shock. Should a fault ever occur, immediately turn off the power to the printer and unplug the AC WARNING cable from the socket. -
Page 31: To Install The Ac Adapter (Only For The Tm-J7700)
Chapter 2 Setup To install the AC Adapter (only for the TM-J7700) Follow the procedure below to install the AC Adapter. Perform the following when installing the AC adapter. Be sure to use a dedicated AC adapter [PS-180 (model: M159E)]. ... - Page 32 Place the AC adapter into the printer with the label side facing up. Align the depressions on the power source fixing plate with the hook protrusions on the main unit and gently push the plate to install. Use the included screws (× 2) to attach the fixing plate.
- Page 33 Chapter 2 Setup Connect the DC cable of the AC adapter to the power supply connector ("24V") and connect the AC cable to the AC adapter. ➀ ➁ Turn the printer right side up and connect the AC cable plug to a power outlet.
-
Page 34: Connecting The Printer To The Host Devices
18.) Connect the cable to be used to either the USB type-B connector or Ethernet connector. When using a USB cable, pass the cable through the wire saddle to prevent accidental disconnec- tion. CAUTION TM-J7200 Wire saddle TM-J7700 Wire saddle... -
Page 35: Connecting The Cash Drawer
Chapter 2 Setup Connecting the Cash Drawer Two driver transistors cannot be energized simultaneously. Leave intervals longer than 4 times the drawer driving pulse when sending it continuously. Required specifications of cash drawers Specifications of drawers differ depending on manufacturer and/or model. When you use a drawer other than specified, make sure its specification meets the following conditions. -
Page 36: Connecting The Drawer Kick Cable
Connecting the drawer kick cable Use a shielded cable for the drawer kick cable. When using cash drawer, make sure to use the correct connector pin (pin 4) for powering the cash drawer. Please see the "Drawer Connection Diagram" on page WARNING ... -
Page 37: Installing The Customer Display
Chapter 2 Setup Installing the Customer Display A customer display and DP-502 (customer display fixing plate) can be installed. For details, refer to DM-D110/DM-D210 Technical Reference Guide. -
Page 38: Attaching The Power Switch Cover
Attaching the Power Switch Cover Attach the Power switch cover to prevent accidental operation of the power switch. Insert a sharp-pointed object into one of the holes on the Power switch cover to turn the power on or off accordingly. Use a sharp- pointed object to detach the cover. -
Page 39: Advanced Usage
Timeout Config ✔ IP/Port Filter Config ✔ Administrator Name and Location 1: This appears only for TM-J7700. 2: This appears only for TM-J7200. For information about how to use the software setting mode, see "Customize Value Setting Mode" on page... -
Page 40: Software Setting Mode Functions
Software Setting Mode Functions Auto line feed Always disabled (Default setting) Always enabled Paper width 58 mm 70 mm 76 mm (Default setting) 82.5 mm Command execution during offline Enabled Disabled (Default setting) LED indicator when I/F starting ... -
Page 41: Network Settings
Chapter 3 Advanced Usage Network Settings The following explains the procedure for network settings in order to connect the product to your network. Status TM-J7200 TM-J7700 Web Browser Utility Sheet Articles Parameters Default Reference Setting Reference Setting Reference IP Address (192.168.192.168) *... - Page 42 Status TM-J7200 TM-J7700 Web Browser Utility Sheet Articles Parameters Default Reference Setting Reference Setting Reference Community (Up to 31 " " (no value) Name characters) (IP Trap #1) Community (Up to 31 " " (no value) Name characters) (IP Trap #2) IP Trap 0.0.0.0...
-
Page 43: Setup Methods
There are three methods for set up. Method 1: Setup using TM-J7200 TM-J7700 Utility This method involves installation of the TM-J7200 TM-J7700 Utility to the computer for setup. Setup is easiest when performed using a USB connection. Setup from an existing computer connected to the network is also available. -
Page 44: Setup Using Epsonnet Config (Web Version)
Input your user name and password on the authentication window. Input "epson" for both the user name and password. You can change the password in the [Optional] setting menu, under [Password]. Change the settings based on the network setting information you received from the network administrator. -
Page 45: Setup Using Arp/Ping Commands
When a message like "Reply From 192.168.0.10: Bytes=32 Time < 10ms TTL=255" is displayed, the IP address setting is complete. Use TM-J7200 TM-J7700 Utility or EpsonNet Config (Web version) for settings other than the IP address. MAC Address Confirmation You can check the printer's MAC address using the following procedures. -
Page 46: Ethernet Setting Mode
Ethernet setting mode This function initializes Ethernet interface settings. Follow the procedure below for initialization. With the Front cover/ Roll paper cover closed, turn the printer power on while press- ing the Feed button until printing of the printer status starts. After the printer status is printed, press the Feed button until printing of the instruc- tions for operation method starts. -
Page 47: Setting/Check Modes
Chapter 3 Advanced Usage Setting/Check Modes As well as print mode, the following modes are also provided for making various printer settings and checking items. Self-test mode NV graphics information print mode Customize Value settings mode Ethernet setup mode ... - Page 48 In 1 and 2, the following guidances are printed, the Paper LED flashes, and instructs the user's operations. 1. Continuing self-test guidance Select Modes by pressing Feed Button. Continue SELF-TEST: Less than 1 second Mode selection : 1 second or more 2.
-
Page 49: Self-Test Mode
Chapter 3 Advanced Usage Self-test Mode You can check the following items using the self-test. Product name Firmware version Product serial number Interface information Buffer Capacity Handshaking Operation (busy condition) Customer Display Resident fonts ... - Page 50 Self-test print result...
- Page 51 Chapter 3 Advanced Usage Slip paper Follow the steps below. The self-test on the slip paper will print in all columns, regardless of the slip paper width. Using a slip paper narrower than the print width of all columns will result in printing running over and making the platen dirty.
- Page 52 Self-test print result...
-
Page 53: Nv Graphics Information Print Mode
Chapter 3 Advanced Usage NV Graphics Information Print Mode Prints the following NV graphic information registered to the printers. Capacity of the NV graphics Used capacity of the NV graphics Unused capacity of the NV graphics Number of NV graphics that are registered ... -
Page 54: Customize Value Setting Mode
Printer Model Setting Information For details on the memory switches and customized values, see "Software Settings" on page Settings for Printer Model Setting Information are specified by using the "TM-J7200/TM-J7700 Printer Model Setting Utility". See "Utilities" on page Follow the steps below. - Page 55 Chapter 3 Advanced Usage After briefly pressing the Feed button (less than one second) for the number of times shown in the print result, hold down the button for more than one second to select the setting items. The setting selected as the setting item, the current settings and default settings are printed. Depending on the setting item, you may need to continue selecting the setting item before the set- tings are printed.
-
Page 56: Ethernet Setup Mode
Ethernet Setup Mode This mode restores the Ethernet interface settings to the factory-default settings. Follow the steps below. After running a self-test, hold down the Feed button for at least one second to enter the Mode selection. The Mode selection guidance is printed, and the Paper LED flashes. Briefly press the Feed button three times (less than one second), hold it down for at least one second to enter the Interface Setup mode. -
Page 57: Hexadecimal Dumping Mode
Chapter 3 Advanced Usage Hexadecimal Dumping Mode In hexadecimal dumping mode, data from the host device is printed in hexadecimal numbers and characters. By comparing the print outs and the program, you can check whether or not data is being sent to the printer correctly. -
Page 58: Printing A Status Sheet
Printing a Status Sheet By printing a status sheet, you can check the following network-related information: MAC address Physical Layer settings Connection status Network firmware version IP address setting method IP address, subnet mask, default gateway ... -
Page 59: Epsonnet Config (Web Version)
EpsonNet Config (Web Version) This section explains items that can be displayed in the Web application EpsonNet Config (Web version) built- into the TM-J7200/TM-J7700, as well as items that can be set. Information Menu On the Information menu, you can check the following settings. For the details of each protocol or the settings other than the Information menu, check the Configuration menu. -
Page 60: Configuration Menu
* If you import and select an invalid certificate, you will no longer be able to start up EpsonNet Config (Web version). In that case, use TM-J7200 TM-J7700 Utility to select a certificate other than the invalid one (for example, a Selfsigned Certificate), and import the correct certificate with EpsonNet Config (Web version) again. - Page 61 Chapter 3 Advanced Usage TCP/IP IP v4 Address This sets the IP address when setting the manual. Setting for IP address acquisition method (Manual / Auto) IP address setting Subnet mask address setting Default gateway address setting ...
- Page 62 Bonjour This sets Bonjour. Bonjour setting (Disable / Enable) Name input for when using Bonjour * Printer name setting for when using Bonjour * Installation location input * You can use upper and lower case alphabet characters, numerals and hyphens, however, only use upper and lower case alphabet characters for the initial character.
-
Page 63: Application Development Information
EPSON TM Virtual Port Driver ESC/POS ESC/POS is the Epson original printer command system for POS printers and customer display. With ESC/POS commands, you can directly control all the TM-J7200/TM-J7700 printer functions, but detailed knowledge of printer specifications or combination of commands is required, compared to using drivers and applications. -
Page 64: Software
In addition to ordinary Windows printer driver functions, this driver has controls Windows Printer Driver specific to POS. The Status API (Epson original DLL) that monitors printer status and sends ESC/POS commands is also attached to this driver. EPSON TM Virtual... -
Page 65: Utilities
TM printers for the first time, or when configuring multiple TM printers at the same time. Monitoring Tool Use to check a list of status for the Epson printers connected to the network. Windows You can also update certificates for multiple printers used for WPA-Enterprise in a batch. -
Page 66: Turning Off The Printer Without Using The Power Switch
Turning off the Printer without Using the Power Switch If turning off the printer without using the power switch, send the command to execute the power-off sequence. If the power-off sequence is not executed, cleaning will be performed the next time the printer is turned on, thus consuming ink, and if the printer is not used for over two weeks, the nozzles may become clogged and will not recover. -
Page 67: Printing Barcodes/2-Dimensional Symbols
Chapter 4 Application Development Information Printing Barcodes/2-dimensional Symbols To print barcodes/2-dimensional symbols with this product, the following methods are available: Printing after preparing graphic data of the barcode/2-dimensional symbol using the application. Printing by using the barcode fonts installed on the printer. For details about how to use the fonts, refer to the printer driver manual. -
Page 68: Notes On Printing 2-Dimensional Symbols
Notes on printing 2-dimensional symbols When printing 2-dimensional symbols with this product, note the following points: We recommend using the 2-dimensional symbols with the height of 33 mm {1.30"} or less. If the height of symbols is more than 33 mm {1.30"}, quality for scanning symbols may decline. After printing 2-dimensional symbols, make sure they can be scanned correctly using a barcode scanner. -
Page 69: Handling
Chapter 5 Handling Handling This chapter describes basic handling of the printer. Installing/Replacing the Roll Paper Be sure to use roll paper that meets the specifications. Do not use thermal paper. Be careful not to insert your fingers into the paper exit. The cutter blade is installed inside the paper exit and you might be injured. - Page 70 Make sure the printer is turned on. Open the Roll paper cover by pressing the cover open button. Remove the used roll paper core if there is one. Put the roll paper inside the printer in the correct direction as shown in the illustra- tion below.
- Page 71 Chapter 5 Handling Before closing the cover, pull out the leading edge of the roll paper and align the mark as shown in the illustration below. ➀ ➁ Close the Roll paper cover. The printer will automatically feed the roll paper to remove any slack in the paper.
-
Page 72: Notes On Use
Notes on Use The emergency cutter on the roll paper exit section is only for cutting paper. Be careful, as touching the blade may result in injury. When the Roll paper cover is open, it is possible to touch the fixed blade and revolving blade of the autocut- ter. -
Page 73: Inserting Slip Paper
Refer to the label affixed to the printer. ➀ ➀ ➁ ➁ TM-J7200 TM-J7700 The Cut sheet LED turns on when slip paper is being printed. After printing has been completed and the slip paper has been discharged, the Cut sheet LED repeats a dou- ble-flashing pattern. -
Page 74: Notes On Use
Remove the slip paper. After approximately one second, the status of the Cut sheet LED changes as follows. Next print data LED status If there is no next data If there is next data Flashing Confirm that the Cut sheet LED is not repeating a double-flashing pattern when inserting the next slip paper. -
Page 75: Installing/Replacing The Ink Cartridge
Chapter 5 Handling Installing/Replacing the Ink Cartridge Install/Replace the ink cartridge by following the procedure below. Make sure the printer is turned on. Make sure the Ink LED is on or flashing. Pull the handle to open the Front cover Handle During replacement, remove the used ink cartridge. - Page 76 Shake the ink cartridge package three or four times before opening it. Insert a new ink cartridge from the top and push it firmly but gently until it clicks into place. Push down the tab in the direction of the arrow before closing the Front cover.
-
Page 77: Notes On Use
Chapter 5 Handling Close the Front cover. The Ink LED will now turn off. When the ink cartridge is installed for the first time, the Power LED flashes and initial ink charging starts. Never open any cover on the printer or turn off the printer during ink charging (while the Power LED is flashing). - Page 78 Ink life varies based on the printer usage and the printed contents. We recommend using genuine Epson ink cartridges. Using ink cartridges not manufactured by Epson may cause the product to not function properly, such as causing unrecoverable damage to the printer or print quality.
-
Page 79: Removing Jammed Paper
Chapter 5 Handling Removing Jammed Paper When a paper jam occurs, never pull out the paper forcibly. For roll paper Follow the steps below if the roll paper is jammed. Turn off the printer. Open the Roll paper cover. Remove the paper causing the paper jam. Set the roll paper again and close the cover. -
Page 80: For Slip Papers
For slip papers Follow the steps below if the slip paper is jammed. Turn off the printer. Open the Front cover. Remove the paper causing the paper jam. Close the Front cover. -
Page 81: Test Printing
Chapter 5 Handling Test Printing You can perform printer status printing using the self-test to check if any print errors, such as dot drop-outs, are occurring. You can use the nozzle check pattern which is printed to check whether the nozzle is clogged. Follow the procedure below to perform the self-test. -
Page 82: Cleaning The Printer
Cleaning the Printer Cleaning the Printer Case Be sure to turn off the printer, and wipe the dirt off the printer case with a dry cloth or a damp cloth. Be sure to unplug the AC cable while cleaning. Never clean the product with alcohol, benzine, thinner, or other such solvents. Doing so may damage or break the parts made of plastic and rubber. -
Page 83: Preparing For Transport
Turn off the printer. Check that the Power LED is off. Disconnect the power cable and all other cables. Attach the protective materials and affix tape as shown in the figure below. TM-J7200... - Page 84 TM-J7700 Wrap the printer with protective cushioning material to prevent any impacts during transport. Keep the printer upright and horizontal while packing and transporting it. Reshipping it can result in dot dropout. Perform head cleaning if dot dropout occurs. (See "Cleaning the Print Head"...
-
Page 85: Troubleshooting
Chapter 6 Troubleshooting Troubleshooting This chapter describes the actions to take when a trouble occurs. Trouble Reference Error LED is on/flashing page 86. Ink LED is on/flashing page 87. Print quality problem page 88. When slip paper is set, paper is discharged, resulting in an error page 89. -
Page 86: Error Led Is On/Flashing
Error LED is On/Flashing Automatically Recoverable Errors Error Error description Error LED flash code Recovery measure Roll paper cover open The Roll paper cover is Automatically recovers LED ON error open during roll paper when the Roll paper cover LED OFF print operation. -
Page 87: Ink Led Is On/Flashing
Chapter 6 Troubleshooting Ink LED is On/Flashing Check the Ink LED. Ink LED is flashing Cause Solution and reference Ink is low. Prepare an ink cartridge for when replacement is required. Ink LED is on Cause Solution and reference An ink cartridge is not installed. Install an ink cartridge. -
Page 88: Print Quality Problem
Print Quality Problem Identify the cause from the print examples below and solve the problem. Print example Solution and reference Missing dots are occurring. Perform head cleaning. (See "Cleaning the Print Head" on page 82.) If the problem is not solved, ask for repair. Misaligned print position Cause Solution and reference... -
Page 89: When Slip Paper Is Set, Paper Is Discharged Resulting An Error
Chapter 6 Troubleshooting When slip paper is set, paper is discharged resulting an error Cause Solution and reference The paper being used does not match Check the printer driver settings. the printer driver settings. -
Page 90: Setting Slip Paper Does Not Start Printing
Setting slip paper does not start printing Check the Cut sheet LED. Cut sheet LED is flashing continuously Waiting for insertion of slip paper. Cause Solution and reference The slip paper is set in a incorrect posi- Check whether the slip paper is inserted straight along the paper guide. tion. -
Page 91: Printing From The Computer Is Disabled/Printing Was Suddenly Disabled
Chapter 6 Troubleshooting Printing from the computer is disabled/Printing was suddenly disabled Printer is offline Remove the cause of going offline. "Online and Offline" on page 19. Reconnect the printer and the computer Check the cable connection. Check whether the power/USB/wired LAN cables are properly connected. Reconnect all devices. -
Page 92: Power Does Not Turn On
Power does not turn on Check whether the power cable and AC adapter are properly connected to the printer and outlet. "A maintenance part must be replaced. " is printed Cause Solution and reference The message shown below is printed A maintenance part (pump unit, ink supply unit, or waste liquid absorber) is each time the printer is turned on. -
Page 93: Appendix
USB bulk IN (TM) 64 bytes USB device class USB vendor-defined class. USB descriptor USB vendor-defined class Vendor ID 04b8h Product ID 0202h String Descriptor Manufacturer Epson Product TM-J7200 / TM-J7700 Serial number Character string based on the product serial number... -
Page 94: Ethernet Interface
Ethernet Interface Communication specifications 10BASE-T/100BASE-TX Support protocols Protocols Usage IP, ARP, ICMP, UDP, TCP Basic communication protocols LPR, TCP Socket Port Printing protocols HTTP/HTTPS Used in EpsonNet Config (Web version) SNMP, ENPC Used in setting and monitoring DHCP, APIPA Used in automatic setting for the IP address and so on... -
Page 95: Product Specifications
Appendix Product Specifications Item Specification Model number TM-J7200 TM-J7700 Printing method Serial inkjet Dot Matrix Method Single color printing (Black) Paper feed Unidirectional friction feed Paper feed speed 282 mm/s {11.1"/s} (continuous paper feeding with the Feed button) Cutting method... - Page 96 251 × 260 × 188 mm {7.68 × 10.24 × 7.40”} {9.88 × 10.24 × 7.40”} Weight Approximately 5.1 kg {11.24 lb} Approximately 5.8 kg {12.79 lb} (including the ink cartridge) (including the ink cartridge) *: According to Epson's operating conditions.
-
Page 97: Printing Specifications
Special Font A 12 cpi *: With 600 dpi. Parentheses indicate value for 180 dpi. [cpi: characters per inch (25.4 mm)] Characters per Line and Printable Area for Slips (TM-J7200) Print dot count (dots) * 1920 (576) Right margin (mm) * Print width (mm) 81.3... - Page 98 12 cpi 12 cpi *: With 600 dpi. Parentheses indicate value for 180 dpi. [cpi: characters per inch (25.4 mm)] General Print Speed Roll paper width Slip paper TM-J7200/ TM-J7700 (mm) Print control mode Font 57.5 69.5 82.5 TM-J7200 TM-J7700...
- Page 99 Appendix Print control mode Number of carriage Vertical resolution Horizontal resolution Print control mode passes * [dpi] [dpi] Normal High-speed Economy [dpi: dots per inch (25.4 mm)] * Pass: Refers to when the carriage moves from the right side to the left side, or from the left side to the right side.
-
Page 100: Character Specifications
Character Specifications Number of characters Alphanumeric characters: 95 Extended graphics: 128 × 31 pages (including user-defined page) International characters: 37 Character structure Font A * 40 × 80 dot (12 × 24 dot) Font B * 30 × 56 dot (9 × 17 dot) Special Font A * 50 ×... - Page 101 Appendix Character size Standard/Double-height/Double-width/Quadruple W × H Font A 1.69 × 3.38 mm {0.067 × 0.133”}/1.69 × 6.77 mm {0.067 × 0.267”}/3.38 × 3.38 mm {0.133 × 0.133”} (40 × 80) /3.38 × 6.77 mm {0.133 × 0.267”} Font B 1.27 x 2.40 mm {0.05 ×...
-
Page 102: Paper Specifications
Paper Specifications Roll paper Paper width Paper width Paper width Paper width 57.5 mm 69.5 mm 76 mm 82.5 mm {2.26"} {2.74"} {2.99"} {3.25"} Paper types Normal quality paper (only single-ply rolls can be used) Paper thickness 0.06–0.09 mm {0.0023–0.0035"} Form Roll paper Size... - Page 103 Appendix Slip paper Paper types Normal paper Paper size 68–230 mm {2.68–9.06"} (width) × 68–297 mm {2.68–11.7"} (length) The minimum size is 68 × 152 mm {2.68 × 5.98"}. Paper thickness 0.09–0.2 mm {0.0035–0.0079"} (only single-ply can be used) Notes on slip paper ...
-
Page 104: Printable Area
Printable Area Roll paper Roll paper width Print width Left margin Right margin Roll paper width Print width Left margin Right margin 57.5 {2.26“} 50.8 {2.00"} (1200 dots) 3.4 {0.134"} 3.3 {0.130"} 69.5 {2.74“} 61.0 {2.40"} (1440 dots) 4.2 {0.165"} 4.3 {0.169"} 76 {2.99“} 67.7 {2.67"} (1600 dots) - Page 105 Appendix Slip paper for TM-J7200 81.3 mm {3.20“} 2 mm {0.079“} 4 mm {0.157“} Print area 28 mm {1.10“} B.O.F. sensor position 2 mm {0.079“} T.O.F sensor position 55.7 mm {2.19"} All the numeric values are typical.
- Page 106 Slip paper for TM-J7700 135.6 mm {5.34“} 4.3 mm {0.169“} 4 mm {0.157“} Print area 18.4 mm {0.72“} B.O.F. sensor position 2 mm {0.079“} T.O.F sensor position 55.7 mm {2.19"} All the numeric values are typical.
-
Page 107: Printing And Cutting Positions
Appendix Printing and Cutting Positions Autocutting operation is enabled with roll paper only. One point left uncut on the right side Autocutting position 22 mm {0.87“} Printing area Paper feed direction The values above may vary slightly as a result of paper slack or variations in the paper. Take this into account when setting the cutting position of the autocutter. -
Page 108: Environmental Conditions
Acoustic noise (operating) Approximately 55 dB (bystander position) Note: The values above are measured in the Epson evaluation condition. Acoustic noise differs depending on the paper used, printing contents, and the setting values, such as print speed or print density. -
Page 109: External Dimensions
Appendix External Dimensions TM-J7200 237 {9.33“} 195 {7.68“} 260 {10.24“} 260 {10.24“} 86 {3.39“} 291 {11.46“} [Units: mm]... - Page 110 TM-J7700 237 {9.33“} 251 {9.88“} 260 {10.24“} 260 {10.24“} 86 {3.39“} 291 {11.46“} [Units: mm]...
-
Page 111: Ink Cartridge
Appendix Ink cartridge Model number SJIC33P(K) Ink colors Black Ink type Pigmented ink Expiration date Expiration date 6 months after installation in the printer, 2 years after manufacture including the period of use Storage temperature Transportation -20 to 60°C {-4 to 140°F} (within 5 days when 60°C {140°F}) Storage in individual -20 to 40°C {-4 to 104°F} (within 1 month when 40°C {104°F}) packaging... -
Page 112: Character Code Tables
Character Code Tables Refer to the following URL regarding the character code table. http://www.epson-biz.com/pos/reference/charcode/...