Table of Contents
Advertisement
Advertisement
Table of Contents

Related Manuals for Zeiss Axio Observer Series


Summary of Contents for Zeiss Axio Observer Series
- Page 2 References to products of other manufacturers are for information purposes only and not intended as an approval or a recommendation of these products. Carl Zeiss Microscopy GmbH accept no liability for the performance or the use of these products. Published by:...
-
Page 3: Table Of Contents
Axio Observer Contents ZEISS CONTENTS Page INTRODUCTION ........................ 6 SAFETY INSTRUCTIONS ....................8 General Information ......................8 Warranty information ....................... 12 Warning and information labels on the device ..............13 DESCRIPTION OF THE DEVICE ..................14 Designation and intended use ................... 14 Instrument description and main features ................ - Page 4 ZEISS Contents Axio Observer 4.11.2 Loading the reflector turret ....................55 4.11.3 Changing the filter set in the reflector module FL P&C ............56 4.11.4 Changing the beam splitter in reflector module FL P&C ............57 4.12 Fitting the TFT display to the 7, 7 materials stand ............... 59 4.13...
- Page 5 Axio Observer Contents ZEISS 5.9.4 Selecting the Light Manager mode on 5, 5 materials stand ..........112 5.9.5 Selecting and configuring Light Manager mode on the 7, 7 materials stand ..... 113 5.10 Contrast Manager on the Axio Observer 7, 7 materials ............ 113 5.11...
-
Page 6: Introduction
INTRODUCTION ZEISS General Information Axio Observer INTRODUCTION Axio Observer microscopes have been designed, manufactured and tested in accordance with DIN EN 61010-1 (IEC 61010-1) “Safety requirements for electrical equipment for measurement, control and laboratory use”. They comply with RoHS directive 2011/65/EU. - Page 7 INTRODUCTION Axio Observer General Information ZEISS The CE mark of conformity confirms that the product conforms with all valid European directives applicable to it. ATTENTION This symbol indicates a potential hazard to the instrument or system. ATTENTION Read the Operating Manual ATTENTION Stand-by: The device is not disconnected from the power supply.
-
Page 8: Safety Instructions
SAFETY INSTRUCTIONS ZEISS General Information Axio Observer SAFETY INSTRUCTIONS General Information Regulations for occupational health and safety must be observed when operating the HXP 120 V source of UV radiation. The national legal requirements must also be observed. Follow the operating manual for the HXP 120 V illuminator as supplied by the manufacturer. - Page 9 (452358-7044-001) must be strictly observed. If it is determined that protective measures are no longer effective, the instrument must be taken out of service and secured against inadvertent operation. Please contact ZEISS Service or the ZEISS Microscopy Service to repair the instrument.
- Page 10 SAFETY INSTRUCTIONS ZEISS General Information Axio Observer Switching the Axio Observer 5, 5 materials, 7, 7 materials off using the standby button only turns off the internal computer. The mains supply is not switched off. The Axio Observer 7, 7 materials can only be disconnected from the mains supply using the on/off switch on the external VP232-2 power unit.
- Page 11 To ensure proper function of the device, the Axio Observer should be subjected to an annual safety inspection. The safety inspection must be carried out by an authorized ZEISS service technician. All national safety checks should be carried out.
-
Page 12: Warranty Information
With the exception of the work described in these safety instructions, no maintenance or repair work is to be carried out on these microscopes. Repairs may only be performed by ZEISS Service or individuals specially authorized by ZEISS Service. In the event of a problem with the instrument, please contact the ZEISS microscopy service team in Germany or your local ZEISS overseas representative. -
Page 13: Warning And Information Labels On The Device
SAFETY INSTRUCTIONS Axio Observer Warning and information labels on the device ZEISS Warning and information labels on the device Fig. 1 Warning labels on the microLED attachment lamp Fig. 2 Labels on the Axio Observer 12/2016 431004-7244-001... -
Page 14: Description Of The Device
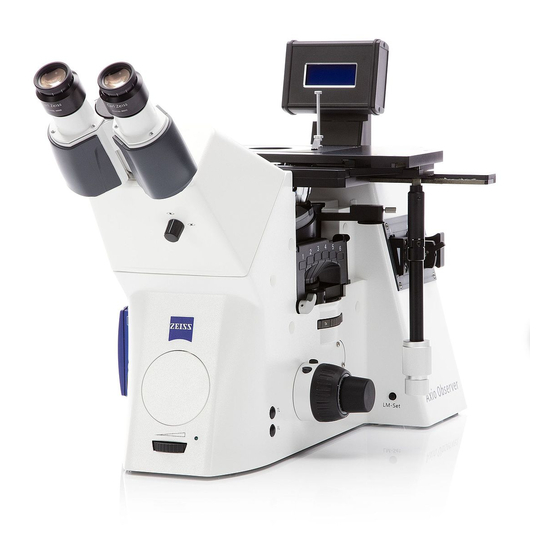
DESCRIPTION OF THE DEVICE ZEISS Designation and intended use Axio Observer DESCRIPTION OF THE DEVICE Designation and intended use Manufacturer's designation: Inverted microscope for transmitted light and reflected light fluorescence (Axio Observer 3, Axio Observer 5 and Axio Observer 7) - Page 15 DESCRIPTION OF THE DEVICE Axio Observer Designation and intended use ZEISS Fig. 3 Bio / Med microscopes Axio Observer 3, 5 and 7 Axio Observer materials microscopes 3 materials, 5 materials, 7 materials (Fig. 4) are inverted light microscopes for universal use. They are used in all areas of research-based and industrial microscopy.
- Page 16 DESCRIPTION OF THE DEVICE ZEISS Designation and intended use Axio Observer Identification of microstructure types, study of the heat-affected zone around welded joints − Assessment of the composition and structure of materials, finding the causes of component failures, − in-process inspection of cast, worked or machined components and semi-finished products.
-
Page 17: Instrument Description And Main Features
DESCRIPTION OF THE DEVICE Axio Observer Instrument description and main features ZEISS Instrument description and main features The Axio Observer microscopes can be supplied with three stand fittings: manual / coded (Axio Observer 3, 3 materials), − coded / semi-motorized (Axio Observer 5, 5 materials), −... - Page 18 DESCRIPTION OF THE DEVICE ZEISS Instrument description and main features Axio Observer 3-position Optovar turret − Removable aperture diaphragm and luminous-field diaphragm sliders for reflected light − Fluorescence shutter (internal standard shutter or external high-speed shutter) − HAL 100, HBO 100, HBO 50, VIS-LED and microLED illuminators −...
-
Page 19: Equipment And Compatibility Table
DESCRIPTION OF THE DEVICE Axio Observer Equipment and compatibility table ZEISS Equipment and compatibility table 3.3.1 Axio Observer 3, 5 and 7 Axio Observer Equipment Option manual Stand motorized Coding PC readable LCD display Display TFT display Docking station RS 232... - Page 20 DESCRIPTION OF THE DEVICE ZEISS Equipment and compatibility table Axio Observer Axio Observer Equipment Option PlasDIC Transmitted light contrast method PlasDIC with contrast slider 1-position tube lens mount, fixed Tube lens mount, fixed / Optovar Optovar turret 3-position, coded turret Optovar turret 3-position, mot.
- Page 21 DESCRIPTION OF THE DEVICE Axio Observer Equipment and compatibility table ZEISS Axio Observer Equipment Option manual Reflected light illuminator motorized manual Slider for reflected light illuminator motorized Shutter FL, internal Shutter for reflected light High-speed, external (with internal control) Illumination system...
-
Page 22: Axio Observer 3 Materials, 5 Materials And 7 Materials
DESCRIPTION OF THE DEVICE ZEISS Equipment and compatibility table Axio Observer 3.3.2 Axio Observer 3 materials, 5 materials and 7 materials Axio Observer Equipment Option manual Stand motorized Coding PC readable LCD display Display TFT display Docking station RS 232... - Page 23 DESCRIPTION OF THE DEVICE Axio Observer Equipment and compatibility table ZEISS Axio Observer Equipment Option 2 or 3-position, manual (port only on left) Sideport (type) 2 or 3-position, man. L/R 3-position, mot. L/R 60N L, 2 switching positions (100% vis : 0% L / 20% vis : 80% L)
- Page 24 DESCRIPTION OF THE DEVICE ZEISS Equipment and compatibility table Axio Observer Axio Observer Equipment Option Shutter FL, internal Shutter for reflected light High-speed, external (with internal control) 6-position, manual 6-position, coded Reflector turret 6-position, motorized 6-position, motorized ACR Filter wheel excitation 8-pos. mot.
-
Page 25: System Overview Axio Observer Bio / Med
DESCRIPTION OF THE DEVICE Axio Observer System overview Axio Observer Bio / Med ZEISS System overview Axio Observer Bio / Med Fig. 5 System overview Axio Observer Bio / Med (Sheet 1) 12/2016 431004-7244-001... - Page 26 DESCRIPTION OF THE DEVICE ZEISS System overview Axio Observer Bio / Med Axio Observer Fig. 6 System overview Axio Observer Bio / Med (Sheet 2) 431004-7244-001 12/2016...
- Page 27 DESCRIPTION OF THE DEVICE Axio Observer System overview Axio Observer Bio / Med ZEISS Fig. 7 System overview Axio Observer Bio / Med (Sheet 3) 12/2016 431004-7244-001...
- Page 28 DESCRIPTION OF THE DEVICE ZEISS System overview Axio Observer Bio / Med Axio Observer Fig. 8 System overview Axio Observer Bio / Med (Sheet 4) 431004-7244-001 12/2016...
-
Page 29: System Overview Axio Observer Materials (Mat)
DESCRIPTION OF THE DEVICE Axio Observer System overview Axio Observer materials (Mat) ZEISS System overview Axio Observer materials (Mat) Fig. 9 System overview Axio Observer materials (Sheet 1) 12/2016 431004-7244-001... - Page 30 DESCRIPTION OF THE DEVICE ZEISS System overview Axio Observer materials (Mat) Axio Observer Fig. 10 System overview Axio Observer materials (Sheet 2) 431004-7244-001 12/2016...
- Page 31 DESCRIPTION OF THE DEVICE Axio Observer System overview Axio Observer materials (Mat) ZEISS Fig. 11 System overview Axio Observer materials (Sheet 3) 12/2016 431004-7244-001...
- Page 32 DESCRIPTION OF THE DEVICE ZEISS System overview Axio Observer materials (Mat) Axio Observer Fig. 12 System overview Axio Observer materials (Sheet 4) 431004-7244-001 12/2016...
-
Page 33: Ambient Conditions
DESCRIPTION OF THE DEVICE Axio Observer Ambient conditions ZEISS Ambient conditions Storage (in packaging) Permissible ambient temperature .................. +10 °C to +40 °C Permissible air humidity (without condensation) ............max. 75 % at +40 °C Transport (in packaging): Permissible ambient temperature ................... -40 °C to +70 °C Permissible air humidity (without condensation) ............ -
Page 34: Technical Data
DESCRIPTION OF THE DEVICE ZEISS Technical data Axio Observer Technical data Dimensions (width x depth x height) Stand Axio Observer 3, 3 materials; ......................Stand Axio Observer 5, 5 materials and ....................Stand Axio Observer 7, 7 materials ........approx. 295 mm x 805 mm x max. 707 mm Weight Axio Observer 3, 3 materials .................... - Page 35 DESCRIPTION OF THE DEVICE Axio Observer Technical data ZEISS Light sources HBO 50W/AC mercury vapor short-arc lamp Output ............................50 W Average service life ........................100 h HBO 103 W/2 mercury vapor short-arc lamp .................. 100 W Desktop power supply unit for external filter wheel Protection class ............................I...
-
Page 36: Installation Instructions And First-Time Set-Up
First-time set-up Because of the complexity of the equipment and to ensure correct function, the Axio Observer microscopes will be installed and set up for use on site by your ZEISS representative. This includes the following services: Installation of the microscope, assembly and adjustment of all components (where these are not −... -
Page 37: Unpacking And Installing The Microscope
INSTALLATION INSTRUCTIONS AND FIRST-TIME SET-UP Axio Observer Unpacking and installing the microscope ZEISS Unpacking and installing the microscope The basic instrument is delivered packed to commercial standards in a polyethylene case with cardboard packaging. The package includes the stand, binocular tube, objectives, eyepieces, condenser, microLED or halogen illuminator, fluorescence illuminator and a number of small components such as filter sliders and diaphragm sliders, DIC slider, dust cover and tools. -
Page 38: Attaching The Binocular (Photo) Tube
INSTALLATION INSTRUCTIONS AND FIRST-TIME SET-UP ZEISS Attaching the binocular (photo) tube Axio Observer Attaching the binocular (photo) tube All binocular tubes listed in the system overview can be fitted to the Axio Observer, Axio Observer materials stands as described below. -
Page 39: Inserting The Eyepiece Reticle
INSTALLATION INSTRUCTIONS AND FIRST-TIME SET-UP Axio Observer Attaching the binocular (photo) tube ZEISS 4.4.2 Inserting the eyepiece reticle Eyepiece reticles can be set into focusable eyepieces. The slight image shift caused by the additional path through glass is taken into account on the... -
Page 40: Fitting The Carrier For Transmitted-Light Illumination
INSTALLATION INSTRUCTIONS AND FIRST-TIME SET-UP ZEISS Fitting the carrier for transmitted-light illumination Axio Observer Fitting the carrier for transmitted- light illumination • Remove cover if necessary. • Place the mount (Fig. 17/1) in position against the rear of the stand and screw into place using the four Allen screws provided (Fig. -
Page 41: Fitting The Holder With Lcd Display On 5, 5 Materials Stand
INSTALLATION INSTRUCTIONS AND FIRST-TIME SET-UP Axio Observer Fitting the holder with LCD display on 5, 5 materials stand ZEISS Fitting the holder with LCD display on 5, 5 materials stand The holder with LCD display (Fig. 18/1) has a magnetic base. It can be placed on a microscope if this is not equipped with a transmitted light illuminator or beside it. -
Page 42: Fitting The Aqua Stop Ii
INSTALLATION INSTRUCTIONS AND FIRST-TIME SET-UP ZEISS Fitting the Aqua Stop II Axio Observer Fitting the Aqua Stop II The Aqua Stop II should be used to protect the objective and nosepiece when working with liquid specimens. • Detach the microscope stage and screw out the objectives. -
Page 43: Fitting The Microscope Stages
INSTALLATION INSTRUCTIONS AND FIRST-TIME SET-UP Axio Observer Fitting the microscope stages ZEISS Fitting the microscope stages If you work on microscope stages with a recessed mounting frame or insert frame the microscope stages should be mounted on the stand using spacer disks (see table). -
Page 44: Mounting The Mechanical Stage 130X85 And Mounting Frame K For Mechanical Stage
INSTALLATION INSTRUCTIONS AND FIRST-TIME SET-UP ZEISS Fitting the microscope stages Axio Observer 4.9.1 Mounting the mechanical stage 130x85 and mounting frame K for mechanical stage The mechanical stage is fitted directly to the stand via three contact points with drilled screw holes. -
Page 45: Fitting Scanning Stages
INSTALLATION INSTRUCTIONS AND FIRST-TIME SET-UP Axio Observer Fitting the microscope stages ZEISS 4.9.2 Fitting scanning stages • Scanning stages are fitted in the same way as the mechanical stage. All stands and stages are supplied with appropriate spacer disks for use of recessed mounting frames. - Page 46 INSTALLATION INSTRUCTIONS AND FIRST-TIME SET-UP ZEISS Fitting the microscope stages Axio Observer Y direction: • To adjust the front or rear mechanical stops in Y direction, first loosen the screws (Fig. 24/1) at the covers on the top side of the stage and remove the covers (Fig.
-
Page 47: Fitting The Scanning Stage 130X100 Step
INSTALLATION INSTRUCTIONS AND FIRST-TIME SET-UP Axio Observer Fitting the microscope stages ZEISS 4.9.3 Fitting the scanning stage 130x100 STEP Scanning stage 130x100 STEP rests directly on three contact points which have drilled screw holes for fastening. To improve access during stage assembly, the •... -
Page 48: Fitting The Scanning Stage 130X85 Mat; Can
INSTALLATION INSTRUCTIONS AND FIRST-TIME SET-UP ZEISS Fitting the microscope stages Axio Observer 4.9.4 Fitting the scanning stage 130x85 MAT; CAN Scanning stage 130x100 MAT; CAN rests directly on three contact points which have drilled screw holes for fastening. To improve access during stage assembly, the •... -
Page 49: Fitting The Specimen Stage 250X230, Object Guide And Mounting Frame M For The Object Guide
INSTALLATION INSTRUCTIONS AND FIRST-TIME SET-UP Axio Observer Fitting the microscope stages ZEISS 4.9.5 Fitting the specimen stage 250x230, object guide and mounting frame M for the object guide The specimen stage is fitted to the stand using a spacer bar and a spacer disk. -
Page 50: Fitting The Heatable Microscope Stage S1
INSTALLATION INSTRUCTIONS AND FIRST-TIME SET-UP ZEISS Fitting the microscope stages Axio Observer 4.9.6 Fitting the heatable microscope stage S1 The heating stage is fitted to the contact points of the stand using three spacer disks. • If required, remove the microscope stage and additional mounting components. -
Page 51: Condensers
INSTALLATION INSTRUCTIONS AND FIRST-TIME SET-UP Axio Observer Condensers ZEISS 4.10 Condensers 4.10.1 Attaching condensers for the Axio Observer • Insert the condenser (Fig. 31/1) into the condenser carrier on the carrier for transmitted- light illumination, with the dovetail ring facing upwards. -
Page 52: Fitting Condensers From The Axio Imager Range
INSTALLATION INSTRUCTIONS AND FIRST-TIME SET-UP ZEISS Condensers Axio Observer 4.10.2 Fitting condensers from the Axio Imager range The following condensers from the Axio Imager range can be used: Condenser, LD achromatic 0.8 H DIC (424206- − 9901-000) Achromatic aplanatic condenser 1.4 H D Ph DIC −... -
Page 53: Changing The Dic Prism In The Condenser Turret
INSTALLATION INSTRUCTIONS AND FIRST-TIME SET-UP Axio Observer Condensers ZEISS 4.10.3 Changing the DIC prism in the condenser turret If a motorized condenser is being used, first switch the instrument off and disconnect the connection plug. You may only move the condenser turret manually after this has been done, otherwise the condenser will be damaged. -
Page 54: Reflector Turret
INSTALLATION INSTRUCTIONS AND FIRST-TIME SET-UP ZEISS Reflector turret Axio Observer 4.11 Reflector turret 4.11.1 Fitting the reflector turret The reflector turret (manual or motorized) is inserted into the stand from the right. Switch the instrument off before inserting the motorized reflector turret. -
Page 55: Loading The Reflector Turret
INSTALLATION INSTRUCTIONS AND FIRST-TIME SET-UP Axio Observer Reflector turret ZEISS 4.11.2 Loading the reflector turret To load the reflector turret with reflector modules, it can be retracted from the stand either half-way or completely. • Rotate the locking lever (Fig. 34/2) downwards and raise the cover (Fig. -
Page 56: Changing The Filter Set In The Reflector Module Fl P&C
(Fig. 36/4). This will ensure that the wedge angles of the barrier filters used in all reflector modules in the turret have identical, defined positions. Although image offset between modules is intrinsically very small with ZEISS filter sets, it can be further minimized or even fully compensated by the above measure. 431004-7244-001... -
Page 57: Changing The Beam Splitter In Reflector Module Fl P&C
INSTALLATION INSTRUCTIONS AND FIRST-TIME SET-UP Axio Observer Reflector turret ZEISS If you need to insert filters which have no direction indicator (arrow), we recommend proceeding as follows: Insert the filters with reflective dielectric coatings so that the reflective coating (Fig. 37/6) of the excitation filter (Fig. - Page 58 INSTALLATION INSTRUCTIONS AND FIRST-TIME SET-UP ZEISS Reflector turret Axio Observer • Tilt up the excitation half (Fig. 38/1), which now is on top, and remove it from the retaining elements (Fig. 38/5b) lower half (emission) (Fig. 38/4). Remove beam splitter (Fig. 38/2) and spring- •...
-
Page 59: Fitting The Tft Display To The 7, 7 Materials Stand
To connect the docking station to the 7, 7 materials stand, the appropriate plug-in module must be installed at the rear of the stand. The plug-in module should only be installed by ZEISS Service or sales personnel. • Insert the docking station cable (Fig. 42/5) into the connector on the rear of the stand. -
Page 60: Connectors On The Rear Of The Axio Observer 3, 3 Materials
INSTALLATION INSTRUCTIONS AND FIRST-TIME SET-UP ZEISS Connectors on the rear of the Axio Observer 3, 3 materials Axio Observer 4.14 Connectors on the rear of the Axio Observer 3, 3 materials Switch microscope before connecting any components. Key to Fig. 43:... -
Page 61: Connectors On The Rear Of The Axio Observer 7, 7 Materials
INSTALLATION INSTRUCTIONS AND FIRST-TIME SET-UP Axio Observer Connectors on the rear of the Axio Observer 7, 7 materials ZEISS 4.16 Connectors on the rear of the Axio Observer 7, 7 materials Key to Fig. 45: Connector for closed-loop sensor Z drive... -
Page 62: Connectors On The Can Distributor Box And Axio Observer 7
INSTALLATION INSTRUCTIONS AND FIRST-TIME SET-UP ZEISS Connectors on the CAN distributor box and Axio Observer 7 Axio Observer 4.17 Connectors on the CAN distributor box and Axio Observer 7 Fig. 46 Connectors on the CAN distributor box and Axio Observer 7 (rear) Key to Fig. -
Page 63: Connecting The Microscope To The Mains
INSTALLATION INSTRUCTIONS AND FIRST-TIME SET-UP Axio Observer Connecting the microscope to the mains ZEISS 4.18 Connecting the microscope to the mains • Plug the power supply cable into the power socket of the Axio Observer 3, 3 materials or Axio Observer 5, 5 materials. -
Page 64: Disconnect The Microscope From Mains Supply
INSTALLATION INSTRUCTIONS AND FIRST-TIME SET-UP ZEISS Disconnect the microscope from mains supply Axio Observer 4.20 Disconnect the microscope from mains supply Axio Observer 3, 3 materials: • Disconnect the microscope from mains supply using the power switch on the microscope. -
Page 65: Hal 100 Illuminator
INSTALLATION INSTRUCTIONS AND FIRST-TIME SET-UP Axio Observer HAL 100 illuminator ZEISS 4.22 HAL 100 illuminator The HAL 100 illuminator is used as a light source for transmitted light and reflected light techniques (excluding fluorescence) on the Axio Observer. The procedure is essentially the same for fitting the halogen illuminator to the reflected light and transmitted light sockets. -
Page 66: Adjusting The Hal 100 Illuminator
INSTALLATION INSTRUCTIONS AND FIRST-TIME SET-UP ZEISS HAL 100 illuminator Axio Observer 4.22.2 Adjusting the HAL 100 illuminator Coarse adjustment • After loosening the clamping screw (Fig. 50/1 or Fig. 50/8), remove the halogen illuminator (Fig. 51/3) which is ready for use from the microscope stand. -
Page 67: Replacing The Halogen Bulb 12 V 100 W
INSTALLATION INSTRUCTIONS AND FIRST-TIME SET-UP Axio Observer HAL 100 illuminator ZEISS 4.22.3 Replacing the halogen bulb 12 V 100 W Hot surface! The lamp housing does not need to be removed from the stand in order to replace the halogen bulb. The bulb replacement tool (Fig. -
Page 68: Hbo 100 Illuminator
INSTALLATION INSTRUCTIONS AND FIRST-TIME SET-UP ZEISS HBO 100 illuminator Axio Observer 4.23 HBO 100 illuminator 4.23.1 Inserting the HBO 103 W/2 mercury vapor short-arc bulb For safety reasons, the HBO 100 illuminator and the HBO 103 W/2 mercury vapor short-arc bulb are packed separately. -
Page 69: Adjusting The Hbo 100 Illuminator
INSTALLATION INSTRUCTIONS AND FIRST-TIME SET-UP Axio Observer HXP 120 V illuminator ZEISS 4.23.3 Adjusting the HBO 100 illuminator Two versions (manual and automatic adjustment) HBO 100 illuminator (Fig. 55/1) available. The self-adjusting HBO 100 (423011-9901-000) adjusts the illumination automatically after the power supply unit is switched on. -
Page 70: Mounting Adapter For Third Party Components On The Stand
INSTALLATION INSTRUCTIONS AND FIRST-TIME SET-UP ZEISS Mounting adapter for third party components on the stand Axio Observer 4.26 Mounting adapter for third party components on the stand • Loosen the four screws (Fig. 56/3) from the plastic cover (Fig. 56/4) and remove the cover from the stand by pulling to the right. -
Page 71: Operation
OPERATION Axio Observer ZEISS OPERATION The Axio Observer microscopes is available with six different stand versions. Axio Observer 3, 3 materials (manual / coded version) − Axio Observer 5, 5 materials (coded / semi-motorized version) − Axio Observer 7, 7 materials (fully motorized version, including motorized Z-drive) −... -
Page 72: Operating And Function Controls - Overview
OPERATION ZEISS Operating and function controls - overview Axio Observer Operating and function controls - overview 5.1.1 Axio Observer 3 (manual with coded nosepiece) Fig. 57 Axio Observer 3 (manual with coded nosepiece) 431004-7244-001 12/2016... - Page 73 OPERATION Axio Observer Operating and function controls - overview ZEISS Key to Fig. 57: On / Off switch (see page 84) Left sideport (see page 84) Coarse / fine focus drive (left side) with finger wheel for fine focus, flat (see page 84)
-
Page 74: Axio Observer 5 (Coded, Semi-Motorized)
OPERATION ZEISS Operating and function controls - overview Axio Observer 5.1.2 Axio Observer 5 (coded, semi-motorized) Fig. 58 Axio Observer 5 (coded, semi-motorized) 431004-7244-001 12/2016... - Page 75 OPERATION Axio Observer Operating and function controls - overview ZEISS Key to Fig. 58: Standby button (see page 84) Left sideport (see page 84) Coarse / fine focus drive (left side) with finger wheel for fine focus, flat (see page 84)
-
Page 76: Axio Observer 7 (Motorized)
OPERATION ZEISS Operating and function controls - overview Axio Observer 5.1.3 Axio Observer 7 (motorized) Fig. 59 Axio Observer 7 (motorized) 431004-7244-001 12/2016... - Page 77 OPERATION Axio Observer Operating and function controls - overview ZEISS Key to Fig. 59: Standby button (see page 84) Left sideport (see page 84) Coarse / fine focus drive (left side) (see page 84) Control ring, left (see page 95)
-
Page 78: Axio Observer 3 Materials (Manual With Coded Nosepiece)
OPERATION ZEISS Operating and function controls - overview Axio Observer 5.1.4 Axio Observer 3 materials (manual with coded nosepiece) Fig. 60 Axio Observer 3 materials (manual with coded nosepiece) 431004-7244-001 12/2016... - Page 79 OPERATION Axio Observer Operating and function controls - overview ZEISS Key to Fig. 60: On / Off switch (see page 84) Left sideport (see page 84) Coarse / fine focus drive (left side) with finger wheel for fine focus, flat (see page 84)
-
Page 80: Axio Observer 5 Materials (Coded, Semi-Motorized)
OPERATION ZEISS Operating and function controls - overview Axio Observer 5.1.5 Axio Observer 5 materials (coded, semi-motorized) Fig. 61 Axio Observer 5 materials (coded, semi-motorized) 431004-7244-001 12/2016... - Page 81 OPERATION Axio Observer Operating and function controls - overview ZEISS Key to Fig. 61: Standby button (see page 84) Left sideport (see page 84) Coarse / fine focus drive (left side) with finger wheel for fine focus, flat (see page 84)
-
Page 82: Axio Observer 7 Materials (Motorized)
OPERATION ZEISS Operating and function controls - overview Axio Observer 5.1.6 Axio Observer 7 materials (motorized) Fig. 62 Axio Observer 7 materials (motorized) 431004-7244-001 12/2016... - Page 83 OPERATION Axio Observer Operating and function controls - overview ZEISS Key to Fig. 62: Standby button (see page 84) Left sideport (see page 84) Coarse / fine focus drive (left side) (see page 84) Control ring, left (see page 95)
-
Page 84: Operating And Function Controls - Description
OPERATION ZEISS Operating and function controls - description Axio Observer Operating and function controls - description On / off switch (Fig. 57/1) or standby button (Fig. 58/1) When the microscope is on, the power LED on the front of the stand lights up (see also section 4.19) −... - Page 85 OPERATION Axio Observer Operating and function controls - description ZEISS Instrument configuration with sideport 60N right (R 100) and left (L 100); 3 switch positions (425155- − 0000-000): 100 % vis: 0 % left/right 0 % vis : 100 % doc left 0 % vis : 100 % doc right Instrument configuration with sideport 60N right (R 100) and left (L 80);...
- Page 86 OPERATION ZEISS Operating and function controls - description Axio Observer Vertical adjustment knob condenser (Fig. 64/1) Adjustment knob on the carrier for transmitted- − light illumination for raising and lowering the condenser to set KÖHLER illumination Centering screws (Fig. 64/2 or 5) for the condenser (Fig.
- Page 87 OPERATION Axio Observer Operating and function controls - description ZEISS Manual condensers (Fig. 64/3), (Fig. 65 and (Fig. 66) Depending on the version, condensers (Fig. 65/1) are equipped with the following: 6-position turret disk for: − bright field: H ...
- Page 88 OPERATION ZEISS Operating and function controls - description Axio Observer Motorized condensers (Fig. 67) The turret is moved by pressing the Rev − (forwards and backwards, Fig. 67/1) keys on the right side of the condenser Motorized aperture diaphragm operation using −...
- Page 89 OPERATION Axio Observer Operating and function controls - description ZEISS Slot A for aperture diaphragm slider MAT or slot F for iris diaphragm slider as luminous-field diaphragm (Fig. 60/8 or 6) For Axio Observer 3 materials, 5 materials and 7 materials stands −...
- Page 90 OPERATION ZEISS Operating and function controls - description Axio Observer Manual, coded or motorized reflector turret 6- position (Fig. 57/22) Can be loaded with a maximum of six reflector − modules for reflected light fluorescence Manual, coded reflector turret: Rapid reflector −...
- Page 91 OPERATION Axio Observer Operating and function controls - description ZEISS Binocular tubes (Fig. 57/27) The binocular tubes provided allow the interpupillary distance to be individually adjusted and the − viewing height to be adjusted within defined limits Binocular tube 45°/23 with manual shutter vis (Fig.
- Page 92 OPERATION ZEISS Operating and function controls - description Axio Observer Binocular section of tubes (Fig. 57/28) The eyepieces are adjusted for the interpupillary − distance by swiveling the two eyepiece sockets towards or away from each other (Fig. 73/A and B) Two different height settings are available by −...
- Page 93 OPERATION Axio Observer Operating and function controls - description ZEISS Vertical stop for focus drive (Fig. 58/4) On 5, 5 materials stand only − For limiting the upper position of the focus drive − (to protect the specimen) The operating principle of the stop is explained −...
- Page 94 OPERATION ZEISS Operating and function controls - description Axio Observer Holder with LCD display (Fig. 61/8) Use on 5, 5 materials stand only − LCD display with four-line display, each line − with 16 characters Main information displayed: Line 1 (Fig. 76/1): −...
- Page 95 OPERATION Axio Observer Operating and function controls - description ZEISS Control ring, left (Fig. 59/4) On 7, 7 materials stand only − Two pairs of buttons (Fig. 78/2 and 3) and one − single button (Fig. 78/4) operating motorized components or illumination settings The factory set default button configuration is −...
- Page 96 OPERATION ZEISS Operating and function controls - description Axio Observer Automatic component recognition (ACR) on the 5, 5 materials and 7, 7 materials stands Automatic component recognition (ACR) means automatic recognition of objectives and reflector modules on the Axio Observer.
-
Page 97: Using Objectives
N-ACHROPLAN 20x/0,45 ∞/0,17 Fig. 80 Objective labeling Key: 20× Objective magnification, with a color ring on the microscope objective allocated to each magnification step (ZEISS color code) 0.45 Numerical aperture ∞ Infinite tube length 0.17 can only be used with cover slip thickness D = 0.17 mm. - Page 98 OPERATION ZEISS Using objectives Axio Observer Using LD objectives When working with inverted microscopes, vessels are common whose bottom thickness deviates significantly from the usual cover slip thickness of 0.17 mm. Normally, working distances (a) of objectives with low magnification can bridge these distances without any problem: A-Plan 5x / 0.12 a= 10.9 mm (in air)
- Page 99 OPERATION Axio Observer Using objectives ZEISS Using immersion objectives With immersion objectives, the air between the cover slip and the objective is replaced with a liquid, the so called immersion oil. ® ® Place a small, bubble-free drop of Immersol 518 N...
-
Page 100: Brightfield Transmitted Light Microscopy - Quick Guide
OPERATION ZEISS Brightfield transmitted light microscopy - quick guide Axio Observer Brightfield transmitted light microscopy - quick guide Before starting to work with the microscope, first read the sections 2, 3 and 4. • Prepare the microscope and switch it on in accordance with section 4 (Fig. 83/1). - Page 101 OPERATION Axio Observer Brightfield transmitted light microscopy - quick guide ZEISS • Reinsert the eyepiece and where necessary refocus on the specimen using the fine focusing drive. • Adjust the light intensity using the rocker switch. The field size and objective aperture change each time the objective is changed, so that for optimal results the luminous-field diaphragm and aperture diaphragm should be readjusted whenever the objective is changed.
- Page 102 OPERATION ZEISS Brightfield transmitted light microscopy - quick guide Axio Observer Key to Fig. 83: On / off switch (3, 3 materials stand), standby button (5, 5 materials stand and 7, 7 materials stand) Sideport selector wheel Condenser turret disk...
-
Page 103: Brightfield Reflected Light Microscopy - Quick Guide
OPERATION Axio Observer Brightfield reflected light microscopy... ZEISS Brightfield reflected light microscopy - quick guide Before starting to work with the microscope, first read the sections 2, 3 and 4. • Prepare the microscope and switch it on in accordance with section 4 (Fig. 85/17). - Page 104 OPERATION ZEISS Brightfield reflected light microscopy... Axio Observer Fig. 85 Axio Observer 5 materials (example) 431004-7244-001 12/2016...
- Page 105 OPERATION Axio Observer Brightfield reflected light microscopy... ZEISS Key to Fig. 85: Microscope stage Aperture diaphragm slider MAT in slot A Iris diaphragm slider (luminous-field diaphragm) in slot F LM-Set button Nosepiece Compensator mount 6x20 Reflector turret Optovar turret selector wheel...
-
Page 106: Basic Settings On Axio Observer 3, 3 Materials Stand
After switching on, the instrument is initialized. The instrument status is shown on the LCD display. LCD display during booting of the Axio Observer 5, 5 materials stand: "Axio Observer 5 or 5 materials", the ZEISS logo and the status "Loading" are displayed while the instrument is booting. -
Page 107: Configuring Of 5, 5 Materials Stand
OPERATION Axio Observer Basic settings on Axio Observer 5, 5 materials stand ZEISS 5.7.1 Configuring of 5, 5 materials stand Set Objective List of objectives Set ReflModule FL filter sets List of FL filter sets Fluorochromes List of fluorocromes Contrast... -
Page 108: Options During Operation (When The Status Display Is Active)
OPERATION ZEISS Basic settings on Axio Observer 5, 5 materials stand Axio Observer Two beeps indicates that the system has switched to configuration mode. The first line of the LCD display shows the selected menu. If a component (e.g. the reflector turret) is not available (cannot be configured), the relevant menu (e.g. -
Page 109: Light Manager On The Axio Observer 3, 3 Materials
OPERATION Axio Observer Light Manager on the Axio Observer 5, 5 materials and … ZEISS Light Manager on the Axio Observer 3, 3 materials The Light Manager function can be used both in reflected and transmitted light. The Light Manager performs the following functions: Pressing the LM-Set button permanently saves the current brightness value of the objective in use, i.e. -
Page 110: Light Manager On Axio Observer 5, 5 Materials, And 7, 7 Materials Stands
OPERATION ZEISS Light Manager on the Axio Observer 5, 5 materials and ... Axio Observer Light Manager on Axio Observer 5, 5 materials, and 7, 7 materials stands The purpose of Light Manager is to generate specimen-dependent optimum illumination settings for the various contrast techniques and magnifications used, and to save these temporarily or permanently so that the user is able to reproduce these settings. -
Page 111: Light Manager Mode: Off
OPERATION Axio Observer Light Manager on the Axio Observer 5, 5 materials and … ZEISS 5.9.1 Light Manager mode: OFF Fig. 87 Illumination intensity when looking into the eyepieces, if only the objective is to be changed (assuming 20x). If the Light Manager is switched off, the microscope operates like a conventional light microscope. -
Page 112: Light Manager Mode: Smart
OPERATION ZEISS Light Manager on the Axio Observer 5, 5 materials and ... Axio Observer 5.9.3 Light Manager mode: SMART Fig. 89 Illumination intensity when looking into the eyepieces, if only the objective is to be changed (assuming 20x). Settings for one objective have been saved previously. -
Page 113: Selecting And Configuring Light Manager Mode On The 7, 7 Materials Stand
OPERATION Axio Observer Contrast Manager on the Axio Observer 7, 7 materials ZEISS 5.9.5 Selecting and configuring Light Manager mode on the 7, 7 materials stand • The Light Manager can be deactivated or activated in the selected mode by pressing either Off, Classic or Smart. -
Page 114: Tft Display Touchscreen On The Axio Observer 7, 7 Materials
OPERATION ZEISS TFT display touchscreen on the Axio Observer 7, 7 materials Axio Observer 5.11 TFT display touchscreen on the Axio Observer 7, 7 materials 5.11.1 Screen layout On the motorized Axio Observer, the user can operate and configure the microscope and utilize optional functions using the TFT display. - Page 115 OPERATION Axio Observer TFT display touchscreen on the Axio Observer 7, 7 materials ZEISS Tabs Tabs are used to select subsidiary functions. These are displayed in the controls area. A maximum of six tabs are available per page. Illumination/shutter The RL shutter button for reflected light and TL shutter button for transmitted light are displayed on the right side of the controls area.
-
Page 116: Menu Overview
OPERATION ZEISS TFT display touchscreen on the Axio Observer 7, 7 materials Axio Observer 5.11.2 Menu overview The menu overview shown below may differ from the available menus for your microscope configuration. It represents all possible menu options including optional components and menu items which are accessible only if the user has administrator privileges. - Page 117 OPERATION Axio Observer TFT display touchscreen on the Axio Observer 7, 7 materials ZEISS Navigation bar Tabs in the control area 1st level 2nd level 3rd level Home Home Magnifi- Virtual Colibri-LEDs Contrast Light path reflector (materials) see page 118...
-
Page 118: Home Page
OPERATION ZEISS TFT display touchscreen on the Axio Observer 7, 7 materials Axio Observer 5.11.3 Home page After switching on, the microscope is initialized. This process takes a few seconds. Under normal circumstances, the Home page (Fig. 95 or Fig. 96) will then be displayed. - Page 119 OPERATION Axio Observer TFT display touchscreen on the Axio Observer 7, 7 materials ZEISS The following controls are displayed on the right side: Load position button When the Load position button is pressed, the nosepiece moves to the load position. Nosepiece movement can be interrupted by pressing Stop (Fig.
- Page 120 OPERATION ZEISS TFT display touchscreen on the Axio Observer 7, 7 materials Axio Observer TL / RL illumination switch The Off and On switches open or close the shutter for reflected light (RL) and transmitted light (TL) or switch the illuminators on and off.
-
Page 121: Microscope
OPERATION Axio Observer TFT display touchscreen on the Axio Observer 7, 7 materials ZEISS 5.11.4 Microscope Pressing Microscope on the navigation bar of the Home page brings up the Microscope page. The Control, Automatic, XYZ and Incubation pages are available from the Microscope page. - Page 122 OPERATION ZEISS TFT display touchscreen on the Axio Observer 7, 7 materials Axio Observer If an Auto immersion module is installed on the microscope and a water objective is swiveled in, the Immersion bar will be displayed on the TFT display showing the four buttons Create, Renew, Setup and Prime for auto immersion.
- Page 123 OPERATION Axio Observer TFT display touchscreen on the Axio Observer 7, 7 materials ZEISS 5.11.5.4 Virt. Reflector Instructions for the virtual reflector wheel can be found in the separate Quick Reference Guide for the filter wheel excitation 8-pos. mot. and dual filter wheel mot.
- Page 124 OPERATION ZEISS TFT display touchscreen on the Axio Observer 7, 7 materials Axio Observer 5.11.5.6 Light path Below the Light Path tab, the light path of the microscope is displayed schematically. The following controls are available: Active beam splitter: pressing this button switches through the available splitting ratios.
- Page 125 OPERATION Axio Observer TFT display touchscreen on the Axio Observer 7, 7 materials ZEISS 5.11.5.7 F/A (luminous-field diaphragm/aperture diaphragm) The F/A tab is used to configure the motorized iris diaphragm slider for luminous-field diaphragm (field stop) and the aperture stop.
-
Page 126: Microscope -> Automatic
OPERATION ZEISS TFT display touchscreen on the Axio Observer 7, 7 materials Axio Observer 5.11.5.9 Contrast This tab will not be displayed if there is no motorized reflector turret installed. The active reflector module will only be displayed on the status page (Fig. 96). -
Page 127: Microscope -> Xyz
OPERATION Axio Observer TFT display touchscreen on the Axio Observer 7, 7 materials ZEISS 5.11.7 Microscope -> XYZ The display of the XYZ page depends on the microscope stage used. Motorized stages (only CAN bus stages directly connected to 7, 7 materials stands): −... - Page 128 OPERATION ZEISS TFT display touchscreen on the Axio Observer 7, 7 materials Axio Observer Save position The Save position button is used to define coordinate positions for the five position buttons. To define a position proceed as follows: • Move to the desired XYZ position.
- Page 129 OPERATION Axio Observer TFT display touchscreen on the Axio Observer 7, 7 materials ZEISS 5.11.7.2 Measure This tab is only accessible if a motorized (CAN bus) stage is used. Otherwise, the Start button and a display for the Z-distance ∆Z are displayed on the Position tab.
-
Page 130: Microscope -> Incubation
OPERATION ZEISS TFT display touchscreen on the Axio Observer 7, 7 materials Axio Observer 5.11.8 Microscope -> Incubation The Microscope -> Incubation page is only available for Bio / Med stand types. It contains the two tabs Incubation and Y module. -
Page 131: Settings
OPERATION Axio Observer TFT display touchscreen on the Axio Observer 7, 7 materials ZEISS 5.11.9 Settings The Settings page can be accessed from the Home page by pressing the Settings button on the navigation button bar. The Settings page provides access to the following pages: Components, User, Extras and Info. - Page 132 Objective list. via catalog no. button − Fig. 120 Settings -> Components -> The user must enter the ZEISS catalog number Objectives -> Configure Objective # (XXXXXX-XXXX-XXX) to select an objective. page Press Empty pos. to clear the current objective selection.
- Page 133 OPERATION Axio Observer TFT display touchscreen on the Axio Observer 7, 7 materials ZEISS Reflector This tab is used to configure the reflector turret. Up to six buttons are displayed, depending on the actual number of turret positions. The system...
- Page 134 OPERATION ZEISS TFT display touchscreen on the Axio Observer 7, 7 materials Axio Observer Focus On this tab, you can enter the firmware settings for the focus drive. The speed of the focus drive can be set individually for each objective.
- Page 135 OPERATION Axio Observer TFT display touchscreen on the Axio Observer 7, 7 materials ZEISS Setting the parfocality/parcentricity The parfocality function is activated or deactivated by using the On and Off buttons. To configure the parfocality function press the Adjustment button. This will activate a wizard which will guide you through the configuration procedure.
- Page 136 OPERATION ZEISS TFT display touchscreen on the Axio Observer 7, 7 materials Axio Observer Camera-ports Use this tab to configure the adapter for the camera ports (frontport / baseport / sideport / photo tube). Adapters Up to five buttons are displayed depending on the camera mirroring on the left and the tube used.
- Page 137 OPERATION Axio Observer TFT display touchscreen on the Axio Observer 7, 7 materials ZEISS Misc The Misc tab is used to configure additional, optional microscope components. The number of buttons displayed depends on the components detected during initialization when Settings -> Components page is opened.
- Page 138 OPERATION ZEISS TFT display touchscreen on the Axio Observer 7, 7 materials Axio Observer 5.11.9.2 Settings -> User Press the User button in the navigation bar to access the User page with its five Mode, Buttons left, Buttons right, Stand type, Language and Docking Station tabs (7, 7 materials stand only).
- Page 139 OPERATION Axio Observer TFT display touchscreen on the Axio Observer 7, 7 materials ZEISS Buttons left An administrator password must be entered before button configuration can be changed. Users have administrator privileges will be able to view the button configuration, but will not be able to edit it.
- Page 140 OPERATION ZEISS TFT display touchscreen on the Axio Observer 7, 7 materials Axio Observer Stand type This used select whether Axio Observer should be configured as a Bio / Med microscope materials microscope (MAT/materials). Changes to the basic settings will take effect after the microscope has restarted automatically.
- Page 141 OPERATION Axio Observer TFT display touchscreen on the Axio Observer 7, 7 materials ZEISS 5.11.9.3 Settings -> Extras The Settings -> Extras page includes the Light manager, Oil stop, Dazzle protect, Ethernet and Misc tabs. Light Manager This tab is used to activate or deactivate Light Manager or to change the Light Manager mode.
- Page 142 OPERATION ZEISS TFT display touchscreen on the Axio Observer 7, 7 materials Axio Observer Ethernet This tab is used to configure the Axio Observer's Ethernet connection. Fig. 144 Settings -> Extras -> Ethernet page Misc The Misc tab is used to calibrate the TFT display.
-
Page 143: Display
OPERATION Axio Observer TFT display touchscreen on the Axio Observer 7, 7 materials ZEISS 5.11.9.4 Settings -> Info The Settings -> Info page only contains the Firmware tab. The Firmware tab shows the firmware version. Fig. 146 Settings -> Info -> Firmware page 5.11.10... -
Page 144: Illumination And Contrast Techniques
OPERATION ZEISS Illumination and contrast techniques Axio Observer 5.12 Illumination and contrast techniques 5.12.1 Setting up transmitted light bright field according to KÖHLER Fig. 148 Setting transmitted light brightfield (Axio Observer 5) 431004-7244-001 12/2016... - Page 145 OPERATION Axio Observer Illumination and contrast techniques ZEISS Key to Fig. 148: Standby button Left sideport Coarse / fine focus drive (left side) with finger wheel for fine focus, flat Vertical stop for focus drive Light path selector wheel (left / right sideport / vis)
- Page 146 OPERATION ZEISS Illumination and contrast techniques Axio Observer 5.12.1.2 Transmitted light brightfield instrument equipment Every Axio Observer microscope is equipped with the components required to carry out transmitted light bright field microscopy. 5.12.1.3 Setting transmitted light brightfield according to KÖHLER (example: stand 5) The microscope has been started properly as described in section 4 INSTALLATION INSTRUCTIONS −...
- Page 147 OPERATION Axio Observer Illumination and contrast techniques ZEISS • Set the light intensity to a comfortable level by using the illumination control wheel (Fig. 148/32). • Close luminous-field diaphragm (Fig. 148/10) until it is visible in the field of view (not necessarily in focus) (Fig.
-
Page 148: Setting Up Transmitted Light Phase Contrast
OPERATION ZEISS Illumination and contrast techniques Axio Observer 5.12.2 Setting up transmitted light phase contrast 5.12.2.1 General operating principle The phase contrast technique is ideal for examining thin, unstained specimens such as cultured cells. The human eye is generally unable to perceive phase differences (differences in refractive index and thickness) between the various components of the cell. - Page 149 OPERATION Axio Observer Illumination and contrast techniques ZEISS 5.12.2.3 Setting up transmitted light phase contrast • Swivel the phase contrast objective, e.g. Ph 1, into the optical path. • On the condenser turret select the phase stop with the same designation as the phase contrast objective (e.g.
-
Page 150: Setting Up Differential Interference Contrast (Dic) For Transmitted Light
OPERATION ZEISS Illumination and contrast techniques Axio Observer 5.12.3 Setting up differential interference contrast (DIC) for transmitted light 5.12.3.1 General operating principle The transmitted light DIC technique is used to produce high-contrast, 3D images of transparent specimen details. Light which has been linearly polarized by a polarizer is split into two beams in a birefringent prism. These two beams pass through adjoining regions of the specimen a small distance apart and experience different path differences as a result of different refractive indices and specimen thicknesses. - Page 151 OPERATION Axio Observer Illumination and contrast techniques ZEISS Polarizer D (fixed, optional: rotatable) Condenser DIC slider Analyzer slider, fixed ±30° analyzer slider Fig. 152 Components required for transmitted-light DIC (Axio Observer 5) 12/2016 431004-7244-001...
- Page 152 OPERATION ZEISS Illumination and contrast techniques Axio Observer (2) Transmitted light DIC with ±30° analyzer slider (de SÉNARMONT) This technique can only be applied using the 0.35 H/DIC condenser. If the ±30° analyzer slider is used, the DIC slider must first be centered.
-
Page 153: Setting Up Transmitted Light Plasdic Contrast
OPERATION Axio Observer Illumination and contrast techniques ZEISS 5.12.4 Setting up transmitted light PlasDIC contrast 5.12.4.1 General operating principle PlasDIC is an innovative transmitted light interference contrast technique that provides a relief-like image and is particularly useful for thicker specimens. The contrast can be varied. - Page 154 OPERATION ZEISS Illumination and contrast techniques Axio Observer PlasDIC components: Contrast slider 3-position 10x29 mm for PlasDIC module and analyzer − (426980-9100-000, only for BioMed stands Axio Observer 3 and Axio Observer 5) with PlasDIC module LD A-Plan 10x-63x −...
- Page 155 OPERATION Axio Observer Illumination and contrast techniques ZEISS 5.12.4.3 Setting up PlasDIC The microscope has been started properly as described in section 4. • Place a specimen. • Set the specimen for transmitted light brightfield. Select a PlasDIC objective. •...
-
Page 156: Setting Up Reflected Light Bright Field
OPERATION ZEISS Illumination and contrast techniques Axio Observer 5.12.5 Setting up reflected light bright field Fig. 154 Setting reflected light brightfield (Axio Observer 5 materials) 431004-7244-001 12/2016... - Page 157 OPERATION Axio Observer Illumination and contrast techniques ZEISS Key to Fig. 154: Microscope stage Aperture diaphragm slider MAT in slot A Iris diaphragm slider for reflected light (as luminous-field diaphragm) in slot F LM-Set button Nosepiece Compensator mount 6x20 Reflector turret...
- Page 158 OPERATION ZEISS Illumination and contrast techniques Axio Observer Setting reflected light brightfield according to KÖHLER The microscope has been started properly as described in section 4 INSTALLATION INSTRUCTIONS − AND FIRST-TIME SET-UP. The microscope has been switched on. − •...
-
Page 159: Setting Up Reflected Light Fluorescence Contrast
OPERATION Axio Observer Illumination and contrast techniques ZEISS 5.12.6 Setting up reflected light fluorescence contrast 5.12.6.1 General operating principle The reflected light fluorescence technique enables high-contrast images of fluorescent substances to be displayed in typical fluorescence colors. In the reflected light fluorescence microscope, light generated by a high-performance illuminator reaches the excitation filter through a heat-absorbing filter. - Page 160 OPERATION ZEISS Illumination and contrast techniques Axio Observer • Switch on the HXP 120 V or HBO 100 fluorescence illuminator and leave to warm up to operating temperature for approx. 15 minutes. • On the reflector turret (Fig. 154/7) or the virtual reflector turret (if dual filter wheel mot. is available), select the desired fluorescence filter combination (depending on the desired kind of excitation) and switch on.
-
Page 161: Setting Up Reflected Light Polarization
OPERATION Axio Observer Illumination and contrast techniques ZEISS 5.12.7 Setting up reflected light polarization Application Reflected light polarization presents a further contrasting option for polished sections of ore minerals, coals, ceramic products, certain metals and metal alloys, as these specimens often exhibit varied reflection behavior in linearly polarized light depending on the orientation of the crystals and specimen features. - Page 162 OPERATION ZEISS Illumination and contrast techniques Axio Observer Setting reflected light polarization on 3 materials, 5 materials or 7 materials stands Additional equipment: Polarizer slider RL 6x30 mm, 90° rotatable, − 427710-9060-000 (Fig. 157/1) (section 3.3) Analyzer slider, fixed, and reflector module −...
-
Page 163: Setting Up Reflected Light Darkfield
OPERATION Axio Observer Illumination and contrast techniques ZEISS 5.12.8 Setting up reflected light darkfield Application The reflected light darkfield technique is used to examine specimens that do not only have reflective surfaces of different reflectivity (ideal brightfield objects), but also exhibit scratches, cracks, pores, or in a nutshell, flat surface deviations. -
Page 164: Setting Up Reflected Light Dic And Reflected Light C-Dic
OPERATION ZEISS Illumination and contrast techniques Axio Observer 5.12.9 Setting up reflected light DIC and reflected light C-DIC Application The reflected light DIC and reflected light C-DIC technique (DIC = Differential Interference Contrast, C-DIC = Differential Interference Contrast in Circularly polarized light) produces high-contrast images of phase specimens, i.e. - Page 165 OPERATION Axio Observer Illumination and contrast techniques ZEISS Reflected light C-DIC • Prepare the microscope for reflected light brightfield. • Rotate reflector turret to swivel C-DIC/TIC P&C reflector module (Fig. 154/7) into the beam path. • Insert the C-DIC slider 6x20 (Fig. 158/1) into the slot for C-DIC slider.
-
Page 166: Setting Up Reflected Light Tic
OPERATION ZEISS Illumination and contrast techniques Axio Observer 5.12.10 Setting up reflected light TIC Application The reflected-light TIC technique (microinterferometry; TIC = Total Interference Contrast in circularly polarized light) can be used to image and measure object structures available in different azimuths. - Page 167 OPERATION Axio Observer Illumination and contrast techniques ZEISS The values for a and b (see Fig. 160) are determined using the eyepiece reticle or the micrometer eyepiece. If you are working with white light (without interference filter), λ = 550 nm must be used.
- Page 168 OPERATION ZEISS Illumination and contrast techniques Axio Observer Attention: • If the step and the environment are of different materials, the phase jumps inherent to the material must be taken into account. The phase jump for all non-conductors is 180° and for semiconductors it only deviates slightly from 180°, i.e.
-
Page 169: Image Orientation Of Camera Outputs For Documentation
Image orientation of camera outputs for documentation Depending on the configuration, Axio Observer microscopes are fitted with up to five documentation ports: Frontport for connecting an SLR, video or digital camera (e.g. ZEISS Axiocam) via a special video or − camera adapter. - Page 170 OPERATION ZEISS Image orientation for camera outputs for the… Axio Observer Catalog number/ Viewed with / Intermediate image / Direction of Viewing direction Description switch position monitor object motion schematic 425537-0000-000 Eyepieces (100% vis) Binocular tube 425536-0000-000 (100% vis): 0% doc...
- Page 171 OPERATION Axio Observer Image orientation for camera outputs for the… ZEISS Catalog number/ Viewed with / Intermediate image / Direction of Viewing direction Description switch position monitor object motion schematic 425165-0000-000 Sideport 60N 0% doc left/right L80 /R100, 3 switch positions...
-
Page 172: Interface 60N (External Thread M52 X 1)
(30 mm internal diameter) can still be used. Microscope cameras (e.g. Axiocam from ZEISS), standard SLR (Single Lens Reflex; 35 mm film or digital) cameras or compact digital cameras can be coupled to the camera port of the Axio Observer stand. -
Page 173: Photomicrography With Slr Camera
OPERATION Axio Observer Photomicrography with SLR camera ZEISS 5.15 Photomicrography with SLR camera The Axio Observer microscopes 5, 5 materials and 7, 7 materials permit the beam path to be switched to 100% vis (visual observation through eyepieces and an open position for activation of the right or left sideport), 100% frontport (port pointing to the front for photomicrography) or 100% baseport (port pointing downwards). -
Page 174: Photomicrography Using A Digital Camera And Videomicroscopy
The Axio Observer microscopes 5, 5 materials and 7, 7 materials permit the connection of one video camera or one digital camera (e.g. Axiocam digital camera from ZEISS), (Fig. 163/1) to the frontport via the V200 C 2/3” 0.63x video adapter (Fig. 163/2). -
Page 175: Care, Maintenance, Troubleshooting And Service
CARE, MAINTENANCE, TROUBLESHOOTING AND SERVICE Axio Observer Care ZEISS CARE, MAINTENANCE, TROUBLESHOOTING AND SERVICE Care Care of the microscope is limited to the following procedures: • Cover the instrument with the dust cover after each use. • Do not install the instrument in damp areas. -
Page 176: Maintenance
• If any damage is visible, switch off the instrument and prevent its use. Any damage should be repaired by the ZEISS service team. • Check that the maximum operating times of the halogen and HBO illuminators have not been exceeded (weekly). -
Page 177: Changing The Fuses In The Axio Observer 3, 3 Materials, And 5, 5 Materials Stands
CARE, MAINTENANCE, TROUBLESHOOTING AND SERVICE Axio Observer Maintenance ZEISS 6.2.2 Changing the fuses in the Axio Observer 3, 3 materials, and 5, 5 materials stands Pull out the power plug before changing fuses. The power fuses for the input voltage are located in the back of the stand of the Axio Observer 3 materials and 5 materials. -
Page 178: Changing Fuses On The External Power Supply Unit Of Axio Observer 7, 7 Materials
CARE, MAINTENANCE, TROUBLESHOOTING AND SERVICE ZEISS Maintenance Axio Observer 6.2.3 Changing fuses on the external power supply unit of Axio Observer 7, 7 materials Pull out the power plug before changing fuses. The Axio Observer 7, 7 materials is supplied with voltage from the external power supply unit VP232-2. -
Page 179: Changing The Fuses In The Ballast Unit For The Hbo 100
CARE, MAINTENANCE, TROUBLESHOOTING AND SERVICE Axio Observer Maintenance ZEISS 6.2.4 Changing the fuses in the ballast unit for the HBO 100 Pull out the power plug before changing fuses. The fuse holder for the F1 and F2 fuses is located on the rear of the ballast unit. -
Page 180: Service
Any repairs to optical components or moving parts inside the instrument or any work on the power supply may only be carried out by service technicians or specially authorized personnel. If servicing is required, please contact your local representative or Carl Zeiss Microscopy GmbH Carl-Zeiss-Promenade 10 07745 Jena, Germany microscopy@zeiss.com... -
Page 181: Appendix
APPENDIX Axio Observer List of abbreviations ZEISS APPENDIX List of abbreviations Free working distance Alternating current Automatic component recognition A-Plan Achromatic objectives featuring improved image flatness (ICS line) Bright field Suitable for spectacle wearers C-DIC Differential Interference Contrast in circularly polarized light... - Page 182 APPENDIX ZEISS List of abbreviations Axio Observer M, mot. motorized manual N. A. Numerical aperture Ph, PH Phase contrast Plan PlasDIC Plastic differential interference contrast Reflected light Single lens reflex Wrench size across flats Slow-blow (fuse type) Total Interference Contrast in circularly polarized light...
-
Page 183: List Of Illustrations
APPENDIX Axio Observer List of illustrations ZEISS List of illustrations Fig. 1 Warning labels on the microLED attachment lamp ............. 13 Fig. 2 Labels on the Axio Observer ....................13 Fig. 3 Bio / Med microscopes Axio Observer 3, 5 and 7 ............... 15 Fig. - Page 184 APPENDIX ZEISS List of illustrations Axio Observer Fig. 52 Fitting/removing the diffusion disk ..................66 Fig. 53 Replacing the halogen bulb ....................67 Fig. 54 Power supply unit (ballast unit) for HBO 100 ..............68 Fig. 55 Adjusting the HBO 100 ..................... 69 Fig.
- Page 185 APPENDIX Axio Observer List of illustrations ZEISS Fig. 101 Microscope -> Control -> Colibri LEDs page ..............122 Fig. 102 Microscope -> Control -> Reflector page ................. 122 Fig. 103 Microscope -> Control -> Virt. Reflector page..............123 Fig. 104 Microscope ->...
- Page 186 APPENDIX ZEISS List of illustrations Axio Observer Fig. 152 Components required for transmitted-light DIC (Axio Observer 5) ........151 Fig. 153 Setting the PlasDIC contrast ..................... 155 Fig. 154 Setting reflected light brightfield (Axio Observer 5 materials) ..........156 Fig. 155 Diaphragm settings in reflected light brightfield acc.
-
Page 187: Index
APPENDIX Axio Observer Index ZEISS Index Page 3200 K ............................... 90 ACR ..............................96 Ambient conditions ..........................33 Ambient temperature ......................... 33 Ametropia ............................39 Analyzer ............................. 85 Aperture diaphragm ......................... 160 Aperture diaphragm slider MAT ......................89 Aqua Stop II ............................42 Auto immersion .......................... - Page 188 APPENDIX ZEISS Index Axio Observer Differential interference contrast ......................150 Docking station ..........................59, 95 Documentation ..........................169 Dual filter wheel mot...........................90 Equipment ............................19 Eyepiece reticle............................39 Eyepieces ............................38, 92 Filter set ..............................56 Filter slider ............................88 First-time set-up ..........................36 FL attenuator ............................89...
- Page 189 APPENDIX Axio Observer Index ZEISS Main features ............................. 17 Maintenance ............................ 176 Menu overview ..........................116 Microinterferometry .......................... 166 microLED illuminator ........................... 64 Microscope stage .......................... 43, 88 Mounting frame ..........................49 Nosepiece..........................41, 85, 158 Object guide ............................49 Objectives.............................
- Page 190 APPENDIX ZEISS Index Axio Observer Unpacking ............................37 Vertical adjustment for condenser ......................86 Vertical stop for focus drive .........................93 Videomicroscopy ..........................174 Virt. Reflector ............................ 123 Warranty information ..........................12 XY positioning ............................89 431004-7244-001 12/2016...
-
Page 191: Patent Rights
APPENDIX Axio Observer Patent rights ZEISS Patent rights Instruments, instrument components or methods described in this manual are protected by patents. DE29821694 JP3032901 US6392796 US5015082 US5235459 US6818882 US6123459 12/2016 431004-7244-001...