Table of Contents
Advertisement
Advertisement
Table of Contents

Related Manuals for Fortinet FortiFone FON-C71


Summary of Contents for Fortinet FortiFone FON-C71
- Page 1 FortiFone™ User Guide for FON-C71...
- Page 2 Fortinet. For absolute clarity, any such warranty will be limited to performance in the same ideal conditions as in Fortinet's internal lab tests. In no event does Fortinet make any commitment related to future deliverables, features or development, and circumstances may change such that any forward-looking statements herein are not accurate.
-
Page 3: Table Of Contents
Contents Introduction....................... 1 Phone features......................1 FON-C71 base unit ....................1 Display layout......................3 LED Indication......................4 Installation......................5 Connecting the network and power ................ 5 Power over Ethernet ..................5 To connect the PoE..................5 Power adapter (optional)..................6 To connect the power adapter.............. - Page 4 Using the FON-C71 as a Bluetooth speaker........15 Making the FON-C71 discoverable via Bluetooth........ 16 Editing device information..............16 Disconnecting a Bluetooth device ............16 Wi-Fi ......................16 Activating the Wi-Fi mode..............16 Connecting to the wireless network............. 17 Viewing the wireless network information..........18 Managing the saved wireless networks ..........
- Page 5 Using your Phone ................... 30 Receiving a call ...................... 30 Placing a call......................30 Ending a call ......................31 Hold ........................31 Mute........................31 Attendant transfer ....................31 Blind transfer......................31 Conference calls ....................31 Call waiting ......................32 DND ........................32 Voicemail........................
-
Page 7: Introduction
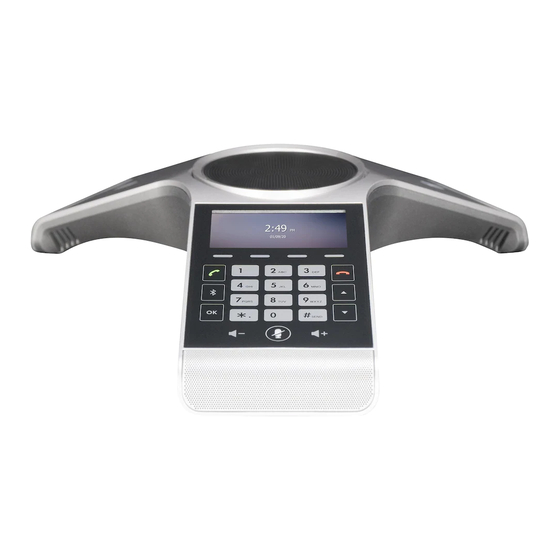
Introduction This user guide includes information about configuring and using your FON-C71 IP conference phone. Phone features • 3.1" pixel graphic display • Full duplex speakerphone • Three microphone array • PoE support eliminates the need for a power adapter •... - Page 8 Item Description Three Internal Microphones Provides 20-foot (6-meter) pickup range. Toggles mute feature. Mute Key Speaker Provides ringer and hands-free (speakerphone) audio output. Shows information about calls, messages, softkeys, time, date and LCD Screen other relevant data. Softkeys For various context-sensitive features. See table below. On-hook Key Ends a call or returns to the idle screen.
-
Page 9: Display Layout
Softkey Function History Displays a list of previous calls. Directory Displays a list of saved contacts. Toggles Do Not Disturb on and off. Menu Brings up the Settings menu. Display layout The FON-C71 top line of the screen will display the extension name and number. The following status icons will also appear on the display: Icon Description... -
Page 10: Led Indication
Icon Description Placed calls Call and Conference recording Idle recordings USB flash drive is detected USB flash drive is detecting Bluetooth enabled Bluetooth enabled mobile device paired and connected WiFi enabled High Definition Voice LED indication The Mute keys can indicate various call states via LED. LED Status Description Solid red... -
Page 11: Installation
Installation Connecting the network and power There are two options for powering the phone: 1. Power over Ethernet (PoE) 2. Power adapter (Optional) Power over Ethernet The FON-C71 can obtain network access as well as be powered through a Power over Ethernet (PoE) switch/hub. -
Page 12: Power Adapter (Optional)
Power adapter (optional) To connect the power adapter 1. Connect the the power adapter to the DC12V/1A port on the phone and the other end of the power adapter into an electrical power outlet. 2. Connect an Ethernet cable between the Internet port on the phone and the one on the wall or switch/hub device port. -
Page 13: Setting Up The Phone
Setting up the Phone For use as an internal extension The phone supports plug and play installation and will automatically download its configuration from the FortiVoice system. The phone will display the extension number and name when it has registered. Once configured within the FortiVoice system, reboot the phone to download its configuration and register to the system. -
Page 14: Personalizing Your Phone
Personalizing your Phone How to navigate through menus To access the configuration menu: • Tap the Menu softkey. To select an item: • Use the arrow keys to select an item, then tap the OK button. The bottom line of the display shows up to 4 softkey functions at a time. To return to a previous menu, tap the Back softkey. -
Page 15: Configuration Overview
Configuration Overview The phone supports the access and configuration of many parameters directly from the Telephone User Interface. To access the Configuration menu, tap the Menu softkey while the phone is not in use. The Configuration menu consists of several sub-menus as listed below: •... -
Page 16: History Setting
History setting You can enable/disable the FON-C71 ability to keep a record of Missed Calls and Placed Calls through this setting. By default this setting is enabled. To change the option for History Record: 1. Tap Menu > Features > History Setting. 2. - Page 17 To configure the SNTP settings via phone user interface: 1. Tap Menu > Settings > Basic Settings > Time & Date > SNTP Settings. 2. Tap the softkey to select the time zone that applies to your area from the Time Zone field.
-
Page 18: Display
Display You can configure the backlight to adjust the brightness of the LCD screen. Backlight status on the LCD screen can be configured from the following options: • Always On: Backlight is on permanently. • Always Off: Backlight is off permanently. •... -
Page 19: Change Pin
Key Tone You can enable or disable a tone being heard when dialing on the FON-C71. To change the Key Tone setting via phone user interface: 1. Tap Menu > Settings > Basic Settings > Sound > Key Tone. 2. Tap the softkey to select Enable or Disable. - Page 20 To activate the phone lock via phone user interface: 1. Tap Menu > Settings > Advanced Settings (Default password: 23646) > Phone Lock. 2. Tap the softkey to select Enabled from the Lock Enable field. 3. Tap the softkey to select the desired type from the Lock Type field. 4.
-
Page 21: Bluetooth
Bluetooth Activating/deactivating Bluetooth on the FON-C71 The FON-C71 features Bluetooth connectivity between itself and mobile phones. To activate Bluetooth on the FON-C71: 1. Tap 2. Tap the Switch softkey to change the Bluetooth setting between On/Off. 3. Tap the Save softkey. Paring a mobile phone with the FON-C71 You can pair many mobile phones with your IP phone;... -
Page 22: Making The Fon-C71 Discoverable Via Bluetooth
2. Tap 3. Select Paired Bluetooth Device. 4. Select the connected mobile phone, then tap the Option softkey. 5. Tap the softkey to select Enabled from the Media audio field. 6. Tap the Save softkey. Making the FON-C71 discoverable via Bluetooth If you make the FON-C71 discoverable, other Bluetooth devices can scan and find the FON-C71. -
Page 23: Connecting To The Wireless Network
Connecting to the wireless network There are three ways to connect the FON-C71 to your wireless network: • Manually connect to an available wireless network • Wi-Fi Protected Setup (WPS) • Manually add a wireless network Manually connect to a wireless network To manually connect to a wireless network: 1. -
Page 24: Viewing The Wireless Network Information
Manually add a wireless network If your gateway/router has SSID broadcast disabled, it might not appear in the scanning results. In that case, you must manually add the wireless network. To manually add the wireless network: 1. Tap Menu > Settings > Basic Settings > Wi-Fi. 2. -
Page 25: Disconnecting From The Wireless Network
• To delete the desired wireless network profile: i. Select Delete or Delete All from the prompts list. If you delete your wireless network profile, you will need to manually connect the next time Wi-Fi is enabled. Disconnecting from the wireless network To disconnect from the wireless network: 1. -
Page 26: Vlan
You can configure a static IPv4 address for the IP phone. Before configuring it, make sure that the IP mode is configured as IPv4 IP or IPv4 & IPv6. To configure a static IPv4 address via phone user interface: 1. Tap Menu > Settings > Advanced Settings (Default password: 23646) > Network > WAN Port. 2. -
Page 27: 802.1X
802.1X IEEE 802.1X authentication is an IEEE standard for Port-based Network Access Control (PNAC), part of the IEEE 802.1 group of networking protocols. It offers an authentication mechanism for devices to connect/link to a LAN or WLAN. The 802.1X authentication involves three parties: a supplicant, an authenticator and an authentication server. -
Page 28: Lldp
FON-C71s use OpenVPN to achieve VPN feature. To prevent disclosure of private information, tunnel endpoints must authenticate each other before secure VPN tunnel is established. After VPN feature is configured properly on the FON-C71, the FON-C71 acts as a VPN client and uses the certificates to authenticate the VPN server. -
Page 29: Cdp
CDP (Cisco Discovery Protocol) allows the FON-C71 to receive and/or transmit device-related information from/to directly connected devices on the network that are also using the protocol, and store the information about other devices. When CDP feature is enabled on the FON-C71, the FON-C71 periodically advertises their information to the directly connected CDP-enabled switch. -
Page 30: Auto Provision
Auto provision The FON-C71 can be set to obtain configuration files through auto provisioning via FTP/TFTP/HTTP/HTTPS. To configure auto provisioning via the phone user interface: 1. Tap Menu > Settings > Advanced Settings (Default password: 23646) > Auto Provision. 2. Enter the URL of the auto provisioning server. 3. -
Page 31: Messages
Messages The Messages section is where you can check Voicemail. Voicemail When receiving a new voicemail, the LCD screen will prompt n New Voicemail(s) (n indicates the number of unread voice messages, e.g., 89 New Voicemail(s)) and display To listen to voicemail: 1. -
Page 32: Directory
Directory The phone supports up to 1000 contacts. Each contact can have up to 3 phone numbers and a ring tone assigned. When a call is received from the contact, the specified ring tone overrides the default one. Adding a contact To add a contact: 1. -
Page 33: Usb Recording
USB Recording If you insert a USB flash drive into the USB port on your phone, you can record active calls and conferences on your phone. Recordings are stored as *.wav files on the USB flash drive. When your phone is idle, and you insert a USB flash drive into the USB port on your phone, the phone will detect the USB flash drive and display the prompt message USB Inserted and If the phone detects the USB flash drive, will display on the idle screen. -
Page 34: Conference Recording
• To stop the recording, tap the StopREC softkey. The StartREC softkey appears on the LCD screen. Recording stops and the LCD screen prompts Record file saved. If there is insufficient free space (30 or 10 minutes left) on the USB flash drive during recording, recording will not be stopped. -
Page 35: Recorded Files Playback
During the recording, you can do the following: • To pause the recording, tap the PauseREC softkey. The Re REC softkey appears on the LCD screen. The LCD screen displays the icon and the duration stops counting. • To continue the recording, tap the Re REC softkey. •... -
Page 36: Using Your Phone
Using your Phone Receiving a call When you receive a call, the phone will display the call details and the ring indicator will flash. The phone will also ring unless the ringer is off. To answer a call: • Tap or the Answer softkey. -
Page 37: Ending A Call
Ending a call To end a call: • Tap the EndCall softkey or Hold To place calls on hold, tap the Hold softkey. While a call is on hold, you can answer or place other calls. The held party will hear music, if configured to do so. To toggle between two calls, tap the SWAP softkey or select a call using and tap the Resume softkey. -
Page 38: Call Waiting
To end a conference call: 1. Tap the Split softkey to separate the parties from the conference. All parties will be placed on hold. 2. Tap the EndCall softkey to end the conference call. All parties will be disconnected. Call waiting When call waiting is enabled, the phone will present new calls to you while you’re on a call. -
Page 39: Troubleshooting
Tapping the OK button on the phone provides the means to quickly view the network parameters (IP address, default gateway address, and subnet-mask), registration status of phone, MAC address and firmware version. This information may be useful if calling Fortinet Support. -
Page 40: Warranty
Warranty This phone is covered by a one-year hardware warranty against manufacturing defects as set forth in the EULA. www.fortivoice.com/support For warranty service: • In North America, please call 1-866-648-4638 for further information. • Outside North America, contact your sales representative for return instructions. You will be responsible for shipping charges, if any.