Fortinet FortiFone FON-350i Quick Start Manual
Hide thumbs
Also See for FortiFone FON-350i:
- User manual (86 pages) ,
- Start manual (33 pages) ,
- User manual (86 pages)
Table of Contents
Advertisement
Quick Links
Advertisement
Table of Contents

Related Manuals for Fortinet FortiFone FON-350i


Summary of Contents for Fortinet FortiFone FON-350i
- Page 1 FortiFone QuickStart Guide ™ for FON-350i/360i...
- Page 2 FortiGuard , and certain other marks are registered trademarks of Fortinet, Inc., in the U.S. and other jurisdictions, and other Fortinet names herein may also be registered and/or common law trademarks of Fortinet. All other product or company names may be trademarks of their respective owners.
-
Page 3: Table Of Contents
Contents Introduction................1 Phone Features................. 1 Requirements................1 About this Guide ............... 2 Flexible Key States ..............3 Display Layout ................4 Installation................5 Connecting the Phone .............. 5 Attaching the Stand ..............6 Wall Mounting ................7 Provisioning the Phone............. 8 For internal use .............. -
Page 4: Introduction
Introduction Phone Features • A 3.0” x 1.5” LCD display • 6 flexible keys with LEDs • Up to 6 line appearance options with LEDs • Message waiting with indicator lamp and tone • Full duplex speakerphone • Intercom paging •... -
Page 5: About This Guide
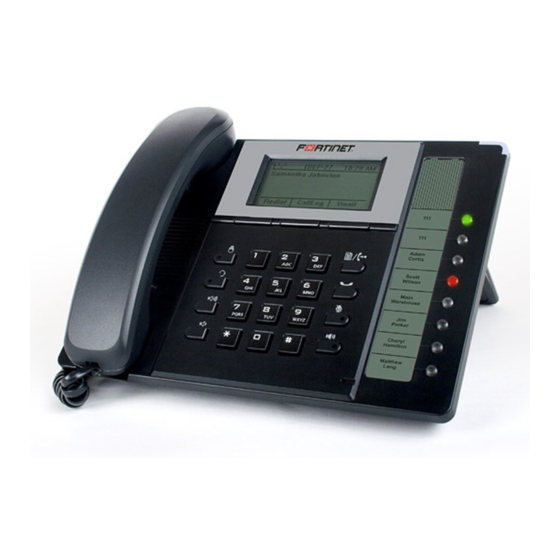
About this Guide This guide describes how to set up your phone with a brief overview of features. For detailed instructions on using the phone, download the user guide from http://docs.fortinet.com. Figure 1: FON-350i/360i front Item Function Softkeys — softkeys change function based on the state of the phone. -
Page 6: Flexible Key States
Item Function Configuration/transfer — transfer a call. When the phone is not in use, this button accesses the Configuration menu. Hold/retrieve — place or retrieve a call on hold. Mute — mute and unmute the microphone during calls. Speakerphone — engage the speakerphone and hang up after the call. -
Page 7: Display Layout
Display Layout The top-bar status line of the display shows icons, date and time. The bottom line shows choices associated with the three context-sensitive softkeys located just below the display. Network connection. Indicates the status of the LAN connection to the IP phone. -
Page 8: Installation
Installation Connecting the Phone The figure below shows the cable connections for your phone. The LAN and desktop PC connections employ standard Ethernet cables terminated with RJ-45 connectors. The phone supports Power over Ethernet (PoE) in accordance with the IEEE-802.1af Class 2 standard. When connected to a PoE-compliant LAN port, the phone derives power from the port. -
Page 9: Attaching The Stand
Wiring Chart Power If the LAN port supports PoE, the power adapter is not required. If PoE is not supported on the LAN, connect the power adapter to the power jack on phone. Headset Optionally connect a headset to the RJ22 headset jack on the phone. -
Page 10: Wall Mounting
Wall Mounting Wall mount the phone using the instructions below. • Mark and drill two 7 mm (5/16”) holes for plastic wall anchors (not included) with a vertical separation of 10 cm (4”). • Insert two anchors into the holes, then insert and tighten two screws (not included) leaving about 2.5 mm (1/8”) exposed. -
Page 11: Provisioning The Phone
Provisioning the Phone For instructions on programming your FortiVoice phone system for the phone, refer to “Adding IP Phones” in Chapter 2 of the FortiVoice User Guide. For internal use The phone supports ‘plug and play’ installation employing the automated provisioning process for discovering FortiVoice phone systems. -
Page 12: Advanced Configuration
If the top 2 flexible keys continue to flash red/yellow after 30 seconds, the phone is not registered with the phone system. See “Troubleshooting” on page If you encounter problems, ensure the appropriate ports are forwarded from the firewall to the FortiVoice system. For more information, see the FortiVoice User Guide. -
Page 13: Using Your Phone With Fortivoice
Using your Phone with FortiVoice Accessing an Outside Line Dial hunt group – (Americas, UK), dial – (other countries). No hunt group is required if direct line access is enabled. You can select a line directly if it has a programmed key. Accessing Features If direct line access is enabled, dial to access features indicated... - Page 14 Screened transfer Press the button + <extension> (or outside number) + . To complete the transfer, press the Transfer softkey or hang up. To cancel transfer, press the EndCall softkey and then the Resume softkey to connect to the caller on hold. Blind transfer Press the button + <extension>...
-
Page 15: Voicemail
Voicemail Access Mailbox — Locally Press the Vmail softkey. Access Mailbox — Remotely + <mailbox number> Change greeting options Change personal options (password, date stamp, remote notification options) MESSAGE PLAYBACK CONTROLS Rewind 10 seconds Go to beginning Skip ahead 10 seconds Skip to end of message Check time and date stamp Forward message... -
Page 16: Troubleshooting
Troubleshooting Symptom Corrective Action Nothing showing 1. Ensure the power adapter is plugged in. on the LCD 2. Check/replace AC/DC adapter. 3. Check/correct input power from the LAN if using PoE. Phone displays The DHCP server is not responding. “Obtaining IP 1. -
Page 17: Regulatory And Safety Notices
Regulatory and Safety Notices Radio Frequency Emissions FCC Compliance Statement This device complies with Part 15 rules. Operation is subject to the following two conditions: 1. This device may not cause harmful interference, and 2. This device must accept any interference received, including interference that may cause undesired operation. -
Page 18: European Union Declarations Of Conformity
European Union Declarations of Conformity Fortinet declares that the equipment specified in this document, which bears the “CE” mark, conforms to the European Union Radio and Telecommunications Terminal Equipment Directive (R&TTE 1999/5/EC) including, • Electromagnetic Compatibility Directive (89/336/EEC) and • Low Voltage Directive (73/23/EEC) The product fulfills the essential requirements of the harmonized standards shown above. -
Page 19: Warranty
Warranty This phone is covered by a one-year hardware warranty against manufacturing defects as set forth in the EULA. www.fortivoice.com/support For warranty service: • In North America, please call 1-866-648-4638 for further information. • Outside North America, contact your sales representative for return instructions.