Table of Contents
Advertisement
Quick Links
Advertisement
Table of Contents

Related Manuals for Hitron HCB-J5FD


Summary of Contents for Hitron HCB-J5FD
-
Page 3: Important Safety Instructions
IMPORTANT SAFETY INSTRUCTIONS 1. Read these instructions. 2. Keep these instructions. 3. Heed all warnings. 4. Follow all instructions. 5. Do not use this apparatus near water. 6. Clean only with dry cloth. 7. Do not block any ventilation openings. Install in accordance with the m anufacturer’s instructions. - Page 4 CONTENTS OF PACKAGE Installation of the camera must be performed by qualified service personnel in accordance with all local and national electrical and mechanical codes. Carefully remove the colour camera and its accessories from the carton and verify that they were not damaged in shipment. The content of the package includes: Color CCD camera Mini-DIN connector (for video-or dc-type auto-iris lens)
-
Page 5: Introduction
INTRODUCTION The camera provided high-quality image using SONY Wide Dynamic 1/3” Super-HADII PS 960H CCD and digital signal processing LSIs. Features: 1/3" Super-HADII PS 960H CCD Super high-resolution of 650TV lines Wide Dynamic Range (~x512) Excessive High-Light Compensation ... -
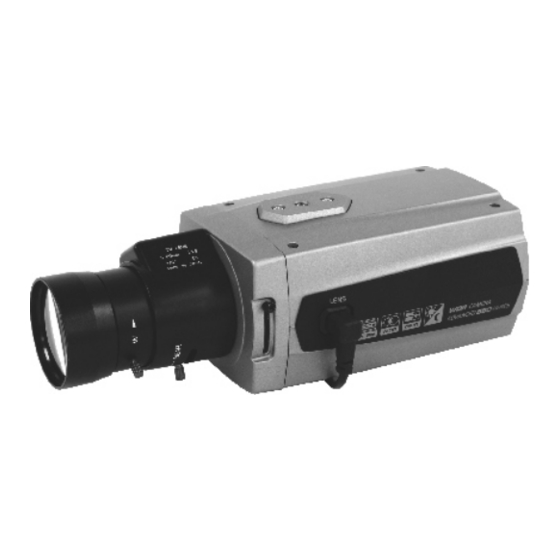
Page 6: Camera Overview
CAMERA OVERVIEW SIDE VIEW TOP VIEW FRONT VIEW Left Button Up Button Enter Button REAR VIEW Right Button Down Button Day/Night External I/O Motion ALARM OUT RS - 485... -
Page 7: Camera Adjustment
CAMERA ADJUSTMENT <White Balance> 1) Auto(Auto White Balance) : AWB mode (1800ºK ~10500ºK) 2) Push/Hold : Push&Hold Mode. To find the Optimal setting for the current luminance environment in this mode, set the direction towards a sheet of white paper and select Hold and press enter button. - Page 8 Both : Privacy function and BLM function on. Off : Function off. 3) Edit : Mask area edit. Edit mode take effect during Func not Off. Size : adjust the size of the Privacy and BLM mask area. ...
- Page 9 In low luminance environment, the accuracy is down of the result. Because object color is effect to auto exposure, the accuracy is down of the result If the object is too big, the accuracy is down of the result. 7) Cross : Cross counting mode. ...
- Page 10 Camera Installed at the ceiling Several Object Crossing object is none The distance is too long Crossing Object One object is passing. <Picture/DNR> 1) Sharpness : Adjust sharpness of outlines (0~15) 2) Resolution : Select high resolution mode (Low/Mid/High) 3) 2D-NR : Select 2D noise reduction level (0~6) ...
-
Page 11: System Setup
6) ScnChg/Unfoc : Select scene change/unfocus detection On/Off . Inform that whether scene have been changed or not. Detect breaking or changing in the watching scene (Spray, Screen Camera, Changing Scene…) This function is linked with alarm out In low luminance environment, the accuracy is down of the result. - Page 12 Alarm . Period : Alarm out period (5sec/10sec/20sec/30sec/1min/5min/Cont.) Snooze : Alarm out snooze(Off/5sec/10sec/20sec/30sec/1min/5min) Active pol : Alarm output active state configuration. (Low, High) System Init Cancel : Back to General Setup Menu. Confirm : Initialize all data. (Factory Default) 3) Lens ...
- Page 13 <Bottom Line Menus> When user entered in main menu and sub-menus, following menus will be appeared. Main Manu (menu in bottom lines) Exit : Save & Exit. Load : Load Default Value. Sub Menu (menu in bottom lines) Return : Return to previous menu. Exit : Save &...
- Page 14 CONTROL AND CONNECTIONS/DAY&NIGHT I/O / ALARM OUT TERMINALS UTP- UTP+ D&N I/O ALARM RS-485 (optional) (optional) RS-485+(RX) RS-485-(TX) UTP Connections/Video output (optional) ● 1 PIN: UTP- ● 2 PIN: UTP+ DAY&NIGHT I/O Terminals To select Day/Night mode using external equipment, by connecting control lines to the appropriate terminals.
-
Page 15: Lens
LENS The lens is not supplied with this camera. Purchase a lens suitable for your requirements. These cameras accept both C-and CS-mount type lens. <Notes > ● For using main functions it is recommended to use Auto Iris Lens with DC type. -
Page 16: Specifications
SPECIFICATIONS MODEL NTSC PAL(Free Voltage) Image sensor 1/3" Super-HADII PS 960H CCD Effective pixels 976x494 976x582 Scanning system 2:1 interlace Scanning frequency 15.734KHz(H), 59.94Hz(V) 15.625KHz(H), 50Hz(V) Sync. system Internal / Line lock Resolution 650 TVL Min. illumination 0.4 Lux (COLOUR), 0.04 Lux (B/W), 0.001 Lux (Low-shutter) Video output 1.0 Vp-p (75 ohm, composite) S/N Ratio... - Page 17 50302575B...