Siemens SINAMICS S120 Manual
Sinamics family modular motion control drives
Hide thumbs
Also See for SINAMICS S120:
- Function manual (1094 pages) ,
- Diagnostic manual (947 pages) ,
- Manual (848 pages)

Related Manuals for Siemens SINAMICS S120


Summary of Contents for Siemens SINAMICS S120
- Page 1 SINAMICS S120 AC Drive Equipment Manual 07/2007 Edition SINAMICS S120 AC Drive sinamics...
- Page 3 Foreword System overview Line-side power components SINAMICS Power Modules S120 SINAMICS S120 AC Drive DC link components Motor-side power components Manual Control Units Supplementary system components and encoder system integration Accessories Cabinet design and EMC for components, Blocksize format Service and maintenance...
- Page 4 Trademarks All names identified by ® are registered trademarks of the Siemens AG. The remaining trademarks in this publication may be trademarks whose use by third parties for their own purposes could violate the rights of the owner.
-
Page 5: Foreword
SINAMICS S120 Equipment Manual for Control Units and Installation / assembly • Supplementary System Components SINAMICS S120 Equipment Manual Power Modules Booksize • SINAMICS S120 Equipment Manual Power Modules in chassis format • SINAMICS S150 Operating Instructions • STARTER parameterization and commissioning tool Commissioning •... - Page 6 Foreword Usage phase Tools/documents SINAMICS S120 Commissioning Manual Usage / operation • SINAMICS S List Manual • SINAMICS S150 Operating Instructions • SINAMICS S120 Commissioning Manual Maintenance/servicing • SINAMICS S List Manual • SINAMICS S150 Operating Instructions • Target group This documentation is aimed at machine manufacturers, commissioning engineers, and service personnel who use SINAMICS.
- Page 7 Foreword Technical Support If you have any questions, please contact our hotline: Europe/Africa Telephone +49 180 5050 - 222 +49 180 5050 - 223 Internet http://www.siemens.de/automation/support-request America Telephone +1 423 262 2522 +1 423 262 2200 E-mail mailto:techsupport.sea@siemens.com Asia/Pacific Telephone...
- Page 8 ● in the Internet: http://support.automation.siemens.com under the Product/Order No. 15257461 ● with the responsible branch office of the A&D MC Business Division of Siemens AG. The EC Declaration of Conformity for the Low-Voltage Directive can be found/obtained ● in the Internet: http://support.automation.siemens.com...
-
Page 9: Format
Foreword ESD information CAUTION Electrostatic sensitive devices (ESDs) are individual components, integrated circuits, or boards that may be damaged by either electrostatic fields or electrostatic discharge. Regulations for handling ESD components: When handling components, make sure that personnel, workplaces, and packaging are well earthed. - Page 10 Foreword DANGER Correct and safe operation of SINAMICS S drive units assumes correct transportation in the transportation packaging, correct long-term storage in the transport packaging, setup and installation, as well as careful operation and maintenance. The details in the Catalogs and proposals also apply to the design of special equipment versions.
- Page 11 Foreword Explanation of symbols The symbols are in accordance with IEC 617-2. Table 2 Symbols Symbol Meaning Protective earth (PE) Ground (e.g. M 24 V) Functional ground (e.g. shield) Equipotential bonding AC Drive Manual, (GH6), 07/2007 Edition, 6SL3097-2AL00-0BP2...
- Page 12 Foreword Residual risks of power drive systems When carrying out a risk assessment of the machine in accordance with the EU Machinery Directive, the machine manufacturer must consider the following residual risks associated with the control and drive components of a power drive system (PDS). 1.
-
Page 13: Table Of Contents
System Overview............................. 21 Field of application ........................21 Versions ............................22 Platform concept and Totally Integrated Automation..............23 Overview, SINAMICS S120 AC Drive..................24 Components, SINAMICS S120 AC Drive ..................26 System data ..........................28 Standards.............................30 Line-Side Power Components ......................... 33 Introduction ..........................33 Line connection variants ......................35 2.2.1... - Page 14 Table of Contents 3.1.3 Interface description........................66 3.1.3.1 Overview ............................. 66 3.1.3.2 Line supply connection........................ 75 3.1.3.3 Motor connection......................... 76 3.1.3.4 Connection to the option module, brake control ................. 76 3.1.3.5 Braking resistor R1/R2 ........................ 77 3.1.4 Dimension drawings........................78 3.1.5 Mounting............................
- Page 15 Table of Contents Motor-Side Power Components......................143 Motor reactors ..........................143 5.1.1 Blocksize ............................143 5.1.1.1 Description ..........................143 5.1.1.2 Safety information ........................143 5.1.1.3 Dimension drawings........................144 5.1.1.4 Mounting ............................149 5.1.1.5 Electrical connection ........................154 5.1.1.6 Technical data..........................154 5.1.2 Chassis ............................157 5.1.2.1 Description ..........................157 5.1.2.2 Safety information ........................157 5.1.2.3 Dimension drawing ........................158...
- Page 16 Table of Contents Control Unit CU310 PN (PROFINET) ..................196 6.3.1 Description ..........................196 6.3.2 Safety information ........................196 6.3.3 Interface description........................197 6.3.3.1 Overview ........................... 197 6.3.3.2 Sample connection........................198 6.3.3.3 X100 DRIVE-CLiQ interface...................... 199 6.3.3.4 X120 EP terminals / temperature sensor connection ............... 199 6.3.3.5 X121 digital inputs/outputs ......................
- Page 17 Table of Contents 7.3.2 Safety information ........................237 7.3.3 Interface description........................238 7.3.3.1 Overview ............................238 7.3.3.2 DRIVE-CLiQ interface X500 ......................239 7.3.3.3 X520 sensor system ........................240 7.3.3.4 Electronics power supply X524....................241 7.3.3.5 Meaning of LEDs on the Sensor Module Cabinet 10 / 20 (SMC10 / SMC20)......242 7.3.4 Dimension drawing ........................243 7.3.5...
- Page 18 Table of Contents Screening kit ..........................276 8.3.1 Dimension drawings........................277 8.3.2 Mounting............................ 283 Cabinet Design and EMC for Components, Blocksize Format............... 289 Information ..........................289 9.1.1 General............................289 9.1.2 Safety information ........................290 Selection of devices required for operating SINAMICS ............291 9.2.1 General............................
- Page 19 Table of Contents Appendix A ............................333 List of abbreviations ........................333 Index..............................345 AC Drive Manual, (GH6), 07/2007 Edition, 6SL3097-2AL00-0BP2...
- Page 20 Table of Contents AC Drive Manual, (GH6), 07/2007 Edition, 6SL3097-2AL00-0BP2...
-
Page 21: System Overview
System Overview Field of application SINAMICS is the new family of drives from Siemens for industrial machines and plant construction. SINAMICS offers solutions for all drive tasks: ● Simple pump and fan applications in the process industry. ● Complex individual drives in centrifuges, presses, extruders, elevators, as well as conveyor and transport systems. -
Page 22: Versions
System Overview 1.2 Versions Versions SINAMICS offers different versions designed to meet a range of requirements: ● SINAMICS G is designed for standard applications with induction motors. These applications have less stringent requirements regarding the dynamics and accuracy of the motor speed. ●... -
Page 23: Platform Concept And Totally Integrated Automation
The different SINAMICS versions can be easily combined with each other. SINAMICS is part of Siemens "Totally Integrated Automation". Integrated SINAMICS systems covering configuration, data storage, and communication at automation level ensure low-maintenance solutions with SIMATIC, SIMOTION, and SINUMERIK. -
Page 24: Overview, Sinamics S120 Ac Drive
System Overview 1.4 Overview, SINAMICS S120 AC Drive Overview, SINAMICS S120 AC Drive SINAMICS S120 AC Drive is a modular drive system for individual axes and addresses sophisticated drive tasks for an extremely wide range of industrial applications. Applications include: ●... - Page 25 System Overview 1.4 Overview, SINAMICS S120 AC Drive Configuration example Figure 1-3 Configuration with multi-axis and single-axis drives AC Drive Manual, (GH6), 07/2007 Edition, 6SL3097-2AL00-0BP2...
-
Page 26: Components, Sinamics S120 Ac Drive
System Overview 1.5 Components, SINAMICS S120 AC Drive Components, SINAMICS S120 AC Drive This overview includes components from SINAMICS S120 AC Drive. Figure 1-4 Component overview, SINAMICS S120 AC Drive AC Drive Manual, (GH6), 07/2007 Edition, 6SL3097-2AL00-0BP2... - Page 27 ● Power Modules, either with or without integrated line filter as well as integrated braking chopper to provide power to the connected motor To address the required functions, SINAMICS S120 AC Drive is equipped with: ● Control Units that provide the drive and technological functions.
-
Page 28: System Data
System Overview 1.6 System data System data Table 1-1 General technical data Electrical data Line supply voltage Blocksize format units 1-ph. 200 V to 240 V AC ±10 % 3-ph. 380 V to 480 V AC ±10 % Chassis format units 3-ph. - Page 29 System Overview 1.6 System data Permissible cooling medium temperature (air) 0 °C to +40 °C and up to 1000 m installation altitude without derating, and installation altitude in operation >40 °C up to +55 °C, refer to the characteristic for current derating. Installation altitude >1000 m up to 4000 m, refer to the characteristic for current derating or reduce the ambient temperature by 3.5 K per 500 m.
-
Page 30: Standards
System Overview 1.7 Standards Standards Table 1-2 Essentially the application-relevant standards Standards Title EN ISO 12100-1 Safety of Machinery; General Design Guidelines; Part 1: Basic terminology, methodology EN ISO 12100-2 Safety of Machinery; General Design Guidelines; Part 2: Technical Principles and Specifications EN 563 Safety of machinery;... - Page 31 System Overview 1.7 Standards Standards Title EN 61800-2 Adjustable-speed electrical power drive systems; Part 2: General requirements - Rating specifications for low-voltage adjustable frequency a.c. power drive systems EN 61800-3 Adjustable-speed electrical power drive systems; Part 3: EMC - Requirements and specific test methods EN 61800-5-X Adjustable-speed electrical power drive systems;...
- Page 32 System Overview 1.7 Standards AC Drive Manual, (GH6), 07/2007 Edition, 6SL3097-2AL00-0BP2...
-
Page 33: Line-Side Power Components
Line-Side Power Components Introduction The line connection for a SINAMICS blocksize drive line-up comprises an optional line reactor and an optional line filter: ● Line supply voltages: – 1-ph. 200 V to 1-ph. 240 V AC +/- 10%. – 3-ph. 380 V to 3-ph. 480 V AC +/- 10%. ●... - Page 34 CAUTION The following can occur if line reactors/line filters are used, which have not been approved for SINAMICS by SIEMENS: - the Power Modules could be damaged/destroyed. - Line reactions can occur that can damage or interfere with other loads powered from the same network.
-
Page 35: Line Connection Variants
Line-Side Power Components 2.2 Line connection variants Line connection variants 2.2.1 Methods of line connection A distinction is made between: ● Direct operation of the line connection components on the supply ● Operation of the Line Connection Components via an Autotransformer ●... -
Page 36: Operation Of The Line Connection Components On The Supply Network
Line-Side Power Components 2.2 Line connection variants 2.2.2 Operation of the line connection components on the supply network The SINAMICS S Blocksize drive system is designed to be directly connected to TN, TT line supply systems with grounded neutral conductor or grounded phase conductor as well as to IT line systems with rated voltages from 3-ph. -
Page 37: Operation Of The Line Connection Components Via An Autotransformer
Line-Side Power Components 2.2 Line connection variants 2.2.3 Operation of the line connection components via an autotransformer An autotransformer can be used to adapt the voltage in the range up to 3-ph. 480 V AC +10 % or 1-ph. 240 V AC +10 %. CAUTION To ensure protective separation, an isolating transformer must be used for voltages greater than 3-ph. -
Page 38: Operation Of The Line Connection Components Via An Isolating Transformer
Line-Side Power Components 2.2 Line connection variants 2.2.4 Operation of the line connection components via an isolating transformer The isolating transformer converts the type of the line supply type in the plant (e.g. IT/TT line supply) to a TN line supply. Additional voltage adaptation to the permissible voltage tolerance range is possible. -
Page 39: Line Connection Via A Residual-Current Circuit-Breaker
Line-Side Power Components 2.2 Line connection variants Figure 2-6 Isolating transformer 2.2.5 Line connection via a residual-current circuit-breaker In preparation AC Drive Manual, (GH6), 07/2007 Edition, 6SL3097-2AL00-0BP2... -
Page 40: Line Filter
• Outgoing cable to the line reactor to LOAD/LAST L1', L2', L3' Non-observance may damage the line filter CAUTION Using line filters not released by Siemens AG for SINAMICS can lead to line reactions that can damage or destroy other loads powered from the network. AC Drive... -
Page 41: Dimension Drawing, Blocksize
Line-Side Power Components 2.3 Line filter 2.3.3 Dimension drawing, Blocksize Figure 2-7 Dimension drawing: Line filter, frame size FSA AC Drive Manual, (GH6), 07/2007 Edition, 6SL3097-2AL00-0BP2... -
Page 42: Dimension Drawing, Chassis
Line-Side Power Components 2.3 Line filter 2.3.4 Dimension drawing, Chassis Figure 2-8 Dimension drawing, line filter Table 2-1 Dimensions of the line filter, all data in mm and (inches) 6SL3000- 0BE32-5AA0 0BE34-4AA0 0BE36-0AA0 330 (12.99) 360 (14.17) 400 (15.74) 240 (9.44) 240 (9.44) 265 (10.43) 116 (4.56) - Page 43 Line-Side Power Components 2.3 Line filter 6SL3000- 0BE32-5AA0 0BE34-4AA0 0BE36-0AA0 2 (0.07) 2 (0.07) 2.5 (0.09) 78.2 (3.07) 78.2 (3.07) 90 (3.54) 220 (8.66) 220 (8.66) 240 (9.44) 210 (8.26) 210 (8.26) 250 (9.84) 330 (12.99) 330 (12.99) 370 (14.56) 9 (0.35) 9 (0.35) 12 (0.47)
-
Page 44: Installation
Line-Side Power Components 2.3 Line filter 2.3.5 Installation Figure 2-9 Mounting: Power Module PM340 frame size FSA with Screening Kit and line filter AC Drive Manual, (GH6), 07/2007 Edition, 6SL3097-2AL00-0BP2... -
Page 45: Technical Data, Blocksize Line Filter
Line-Side Power Components 2.3 Line filter 2.3.6 Technical data, Blocksize line filter Table 2-2 Technical data, Blocksize line filter Line supply voltage 3-ph. 380...480 V AC Line filter 6SE6400-2FA00-6AD0 Suitable for Power Module 6SL3210-1SE11-3UA0, 6SL3210-1SE11-7UA0 6SL3210-1SE12-2UA0, 6SL3210-1SE13-1UA0 6SL3210-1SE14-1UA0 Rated current Power loss <... -
Page 46: Line Reactors
- Incoming line cable to 1U1, 1V1, 1W1, and - Outgoing cable to the load 1U2, 1V2, 1W2. CAUTION When using line reactors that have not been approved by SIEMENS for SINAMICS, the following can occur: - the Power Modules could be damaged/destroyed. -
Page 47: Dimension Drawings, Blocksize Line Reactors
Line-Side Power Components 2.4 Line reactors 2.4.3 Dimension drawings, Blocksize line reactors Figure 2-10 Dimension drawing: Line reactor, frame sizes FSA, FSB and FSC Table 2-4 Total and retaining dimensions, line reactors, Part 1 Line reactor 6SE6400- 3CC00-4AB3 3CC01-0AB3 3CC00-2AD3 3CC00-2AD3 3CC00-4AD3 Suitable for Power Module... - Page 48 Line-Side Power Components 2.4 Line reactors Table 2-5 Total and retaining dimensions, line reactors, Part 2 Line reactor 6SE6400-3CC00- 6SE6400-3CC00- 6SL3203-0CD21- 6SL3203-0CD21- 6SL3203-0CD21- 4AD3 6AD3 0AA0 0AA0 4AA0 Suitable for Power Module 6SL3210- 1SE13-1UA0 1SE14-1UA0 1SE16-0UA0 1SE17-7UA0 1SE21-0UA0 Frame size Dimension A in mm and (inches) 200 (7.87) 270 (10.
- Page 49 Line-Side Power Components 2.4 Line reactors Figure 2-11 Dimension drawing: Line reactor, frame sizes FSD and FSE Table 2-7 Total and retaining dimensions, line reactor Line reactor 6SL3203- 0CJ24-5AA0 0CJ24-5AA0 0CD25-3AA0 0CJ28-6AA0 0CJ28-6AA0 Suitable for Power Module 6SL3210- 1SE23-8UA0 1SE24-5UA0 1SE26-0UA0 1SE27-5UA0 1SE31-0UA0...
- Page 50 Line-Side Power Components 2.4 Line reactors Figure 2-12 Dimension drawing: Line reactor, frame size FSF Table 2-8 Total and retaining dimensions, line reactor Line reactor 6SE6400- 3CC11-2FD0 3CC11-2FD0 3CC11-7FD0 Suitable for Power Module 1SE31-1UA0 1SE31-5UA0 1SE31-8UA0 6SL3210- Frame size Dimension A in mm and (inches) 240 (9.44) Dimension B in mm and (inches) 141 (5.55)
-
Page 51: Dimension Drawing, Chassis Line Reactor
Line-Side Power Components 2.4 Line reactors 2.4.4 Dimension drawing, Chassis line reactor Dimension drawing of the line reactors Figure 2-13 Dimension drawing, line reactors AC Drive Manual, (GH6), 07/2007 Edition, 6SL3097-2AL00-0BP2... - Page 52 Line-Side Power Components 2.4 Line reactors Table 2-9 Dimensions of the line reactors, all data in mm and (inches) 6SL3000- 0CE32-3AA0 0CE32-8AA0 0CE33-3AA0 0CE35-1AA0 25 (0.98) 25 (0.98) 25 (0.98) 30 (1.18) 5 (0.19) 5 (0.19) 5 (0.19) 6 (0.23) 12.5 (0.49) 12.5 (0.49) 12.5 (0.49)
-
Page 53: Installation
Line-Side Power Components 2.4 Line reactors 2.4.5 Installation Figure 2-14 Mounting: Line reactor, frame size FSA Table 2-10 Overall and retaining dimensions, line reactor, Part 1, all data in mm and (inches) Line reactors 3CC00-4AB3 3CC01-0AB3 3CC00-2AD3 6SE6400- 3CC00-4AD3 3CC00-6AD3 Suitable for 1SB11-0UA0 1SB14-0UA0... - Page 54 Line-Side Power Components 2.4 Line reactors Figure 2-15 Mounting: Line reactor, frame sizes FSB and FSC Table 2-11 Total and retaining dimensions, line reactor, Part 2, all data in mm and (inches) Line reactors 0CD21-0AA0 0CD21-4AA0 0CD22-2AA0 0CD22-2AA0 0CD23-5AA0 6SL3203- Suitable for Power Module 1SE16-0UA0 1SE21-0UA0...
- Page 55 Line-Side Power Components 2.4 Line reactors Figure 2-16 Mounting: PM340 and line reactor, frame size FSB AC Drive Manual, (GH6), 07/2007 Edition, 6SL3097-2AL00-0BP2...
- Page 56 Line-Side Power Components 2.4 Line reactors Figure 2-17 Side mounting: Line reactors, frame sizes FSB and FSC The line reactors for Power Modules, frame sizes FSA - FSE, are designed as sub-chassis components. The line reactor is retained on the mounting surface and the Power Module is mounted on the line reactor in a space-saving fashion.
-
Page 57: Electrical Connection
Line-Side Power Components 2.4 Line reactors 2.4.6 Electrical connection Line supply/load connection Figure 2-18 Power Module with line filter Figure 2-19 Power Module Blocksize with line reactor and line filter AC Drive Manual, (GH6), 07/2007 Edition, 6SL3097-2AL00-0BP2... -
Page 58: Technical Data, Blocksize
Line-Side Power Components 2.4 Line reactors 2.4.7 Technical data, Blocksize Table 2-12 Technical data, Blocksize line reactors, Part 1 Line supply voltage 1-ph 200 V AC -10 % to 240 V AC+10% Order No. 6SE6400- 3CC00-4AB3 3CC01-0AB3 Suitable for Power 1SB11-0UA0 1SB14-0UA0 Module 6SL3210-... - Page 59 Line-Side Power Components 2.4 Line reactors Table 2-14 Technical data, Blocksize line reactors, Part 3 Line supply voltage 3-ph 380 V AC -10 % to 480 V AC +10% Order No. 6SL3203- 0CD21-4AA0 0CD22-2AA0 0CD23-5AA0 0CJ24-5AA0 Suitable for 1SE17-7UA0 1SE21-8UA0 1SE23-2UA0 1SE23-8UA0 Power Module...
-
Page 60: Technical Data, Chassis
Line-Side Power Components 2.4 Line reactors 2.4.8 Technical data, Chassis Table 2-16 Technical data, Chassis line reactors Order No. 6SL3000- 0CE32-3AA0 0CE32-8AA0 0CE33-3AA0 0CE35-1AA0 0CE35-1AA0 Suitable for 6SL3310- 1TE32-1AA0 1TE32-6AA0 1TE33-1AA0 1TE33-8AA0 1TE35-0AA0 Power Module Rated current of the Power Module Rated voltage 3-ph. -
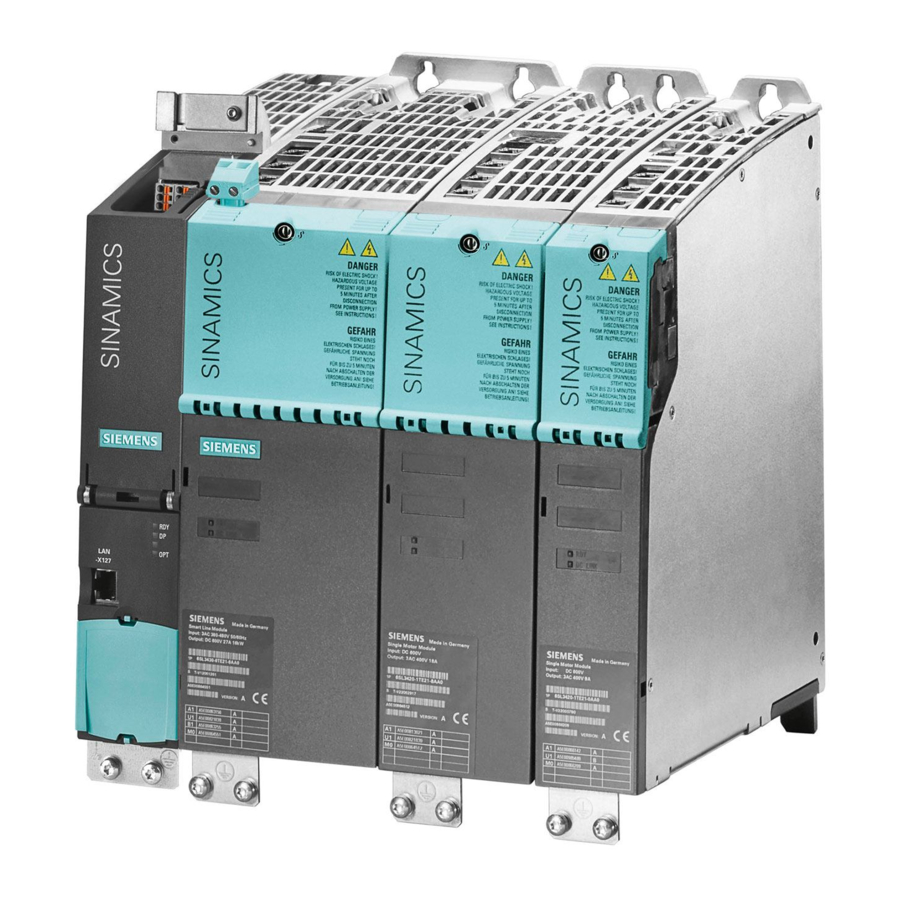
Page 61: Power Modules
Power Modules Power Modules Blocksize (PM340) 3.1.1 Description The Power Modules in blocksize format are designed as follows: ● Line side diode rectifier ● DC link electrolytic capacitors with pre-charging circuit ● Output inverter ● Braking chopper for (external) braking resistor ●... - Page 62 Power Modules 3.1 Power Modules Blocksize (PM340) Table 3-1 Overview, Power Modules PM340 (selection) Power Module (230 V) frame size FSA, with and without Power Module frame size FSB, with and without integrated line integrated line filter filter Power Module (400 V) frame size FSA, without integrated line filter Power Module frame size FSC, with and without Power Module frame size FSD, without line filter...
-
Page 63: Safety Information
Power Modules 3.1 Power Modules Blocksize (PM340) Power Module frame size FSE, without line filter Power Module frame size FSF, without line filter 3.1.2 Safety information CAUTION During transport and during storage, Power Modules must be protected against mechanical shock and vibration. It is also important to protect the unit against water (rain) and against excessively high/excessively low temperatures. - Page 64 Power Modules 3.1 Power Modules Blocksize (PM340) DANGER It must be checked as to whether the Power Module is designed for the correct power supply - higher supply voltages may not be connected to the Power Module. DANGER After connecting the line and motor feeder cables to the appropriate terminals, it must be checked that the front covers (only frame sizes FSD and FSF) are closed and latched.
- Page 65 Power Modules 3.1 Power Modules Blocksize (PM340) WARNING Power Modules must be mounted in the vertical position. For the Power Modules, the following cooling clearances must be maintained above and below the component: - frame sizes FSA and FSB: 100 mm (3.93 inches), - frame size FSC: 125 mm (4.92 inches), - frame sizes FSD and FSE: 300 mm (11.81 inches) and - frame size FSF: 350 mm (13.77 inches).
-
Page 66: Interface Description
Power Modules 3.1 Power Modules Blocksize (PM340) 3.1.3 Interface description 3.1.3.1 Overview Figure 3-1 PM340, frame size FSA AC Drive Manual, (GH6), 07/2007 Edition, 6SL3097-2AL00-0BP2... - Page 67 Power Modules 3.1 Power Modules Blocksize (PM340) Figure 3-2 PM340, frame size FSB AC Drive Manual, (GH6), 07/2007 Edition, 6SL3097-2AL00-0BP2...
- Page 68 Power Modules 3.1 Power Modules Blocksize (PM340) Figure 3-3 PM340, frame size FSC AC Drive Manual, (GH6), 07/2007 Edition, 6SL3097-2AL00-0BP2...
- Page 69 Power Modules 3.1 Power Modules Blocksize (PM340) Figure 3-4 PM340, frame size FSD AC Drive Manual, (GH6), 07/2007 Edition, 6SL3097-2AL00-0BP2...
- Page 70 Power Modules 3.1 Power Modules Blocksize (PM340) Figure 3-5 PM340, frame size FSE AC Drive Manual, (GH6), 07/2007 Edition, 6SL3097-2AL00-0BP2...
- Page 71 Power Modules 3.1 Power Modules Blocksize (PM340) Figure 3-6 PM340, frame size FSF AC Drive Manual, (GH6), 07/2007 Edition, 6SL3097-2AL00-0BP2...
- Page 72 Power Modules 3.1 Power Modules Blocksize (PM340) Figure 3-7 Connection example PM340, 1-ph. 200 V - 240 V AC AC Drive Manual, (GH6), 07/2007 Edition, 6SL3097-2AL00-0BP2...
- Page 73 Power Modules 3.1 Power Modules Blocksize (PM340) Figure 3-8 Connection example PM340, 3-ph. 380 V - 480 V AC AC Drive Manual, (GH6), 07/2007 Edition, 6SL3097-2AL00-0BP2...
- Page 74 Power Modules 3.1 Power Modules Blocksize (PM340) Arrangement of the line supply and motor terminals. The following diagram shows the arrangement of the line and motor terminals for frame sizes FSA to FSF of the PM340 Power Module. The diagram also includes the terminal tightening torques.
-
Page 75: Line Supply Connection
Power Modules 3.1 Power Modules Blocksize (PM340) 3.1.3.2 Line supply connection Table 3-2 Terminal strip, line supply connection 1-ph. 200 V - 240 V AC Terminal Signal name Technical specifications Line phase L Line phase N Max. conductor cross-section: 2.5 mm² Table 3-3 Terminal strip, line supply connection 3-ph. -
Page 76: Motor Connection
Power Modules 3.1 Power Modules Blocksize (PM340) 3.1.3.3 Motor connection Table 3-4 Terminal strip, motor connection 1-ph. 200 V - 240 V AC and 3-ph. 380 V - 480 V AC Terminal Designation Technical specifications DC link negative DCP/R1 DC link positive and position connection of the braking resistor Negative connection for the braking resistor PE connection Motor phase U... -
Page 77: Braking Resistor R1/R2
Power Modules 3.1 Power Modules Blocksize (PM340) 3.1.3.5 Braking resistor R1/R2 Table 3-6 Terminal strip R1/R2 Terminal Technical specifications Braking resistor connection Braking resistor connection AC Drive Manual, (GH6), 07/2007 Edition, 6SL3097-2AL00-0BP2... -
Page 78: Dimension Drawings
Power Modules 3.1 Power Modules Blocksize (PM340) 3.1.4 Dimension drawings Figure 3-10 Dimension drawings, Power Module PM340 Frame size FSC Frame size FSB Frame size FSA AC Drive Manual, (GH6), 07/2007 Edition, 6SL3097-2AL00-0BP2... - Page 79 Power Modules 3.1 Power Modules Blocksize (PM340) Figure 3-11 Dimension drawing: Power Module PM340, frame size FSD AC Drive Manual, (GH6), 07/2007 Edition, 6SL3097-2AL00-0BP2...
- Page 80 Power Modules 3.1 Power Modules Blocksize (PM340) Figure 3-12 Dimension drawing: Power Module PM340 with integrated line filter, frame size FSD AC Drive Manual, (GH6), 07/2007 Edition, 6SL3097-2AL00-0BP2...
- Page 81 Power Modules 3.1 Power Modules Blocksize (PM340) Figure 3-13 Dimension drawing: Power Module PM340, frame size FSE AC Drive Manual, (GH6), 07/2007 Edition, 6SL3097-2AL00-0BP2...
- Page 82 Power Modules 3.1 Power Modules Blocksize (PM340) Figure 3-14 Dimension drawing: Power Module PM340 with integrated line filter, frame size FSE AC Drive Manual, (GH6), 07/2007 Edition, 6SL3097-2AL00-0BP2...
- Page 83 Power Modules 3.1 Power Modules Blocksize (PM340) Figure 3-15 Dimension drawing: Power Module PM340, frame size FSF AC Drive Manual, (GH6), 07/2007 Edition, 6SL3097-2AL00-0BP2...
- Page 84 Power Modules 3.1 Power Modules Blocksize (PM340) Figure 3-16 Dimension drawing: Power Module PM340 with integrated line filter, frame size FSF AC Drive Manual, (GH6), 07/2007 Edition, 6SL3097-2AL00-0BP2...
-
Page 85: Mounting
Power Modules 3.1 Power Modules Blocksize (PM340) 3.1.5 Mounting Drilling templates for frame sizes FSA and FSC Figure 3-17 Drilling templates for frame sizes FSA and FSC AC Drive Manual, (GH6), 07/2007 Edition, 6SL3097-2AL00-0BP2... - Page 86 Power Modules 3.1 Power Modules Blocksize (PM340) Drilling templates for frame sizes FSD to FSF Figure 3-18 Drilling templates for frame sizes FSD to FSF - with and without line filter AC Drive Manual, (GH6), 07/2007 Edition, 6SL3097-2AL00-0BP2...
- Page 87 Power Modules 3.1 Power Modules Blocksize (PM340) The dimensions and the tightening torques when retaining the Power Modules are specified in the following table. Table 3-7 PM340, dimensions and tightening torques when mounting Frame size Height, width, depth Dimensions Retaining type Tightening torques (with Control Unit) HxWxD...
- Page 88 Power Modules 3.1 Power Modules Blocksize (PM340) For frame sizes FSD to FSF, the terminals are accessed by releasing the tongue at the side of the terminal covers using a suitable flat screwdriver. The cover can then be pushed upwards and engaged in this position as shown in the following diagram. Figure 3-19 Access to the line and motor terminals for frame sizes FSD to FSF AC Drive...
-
Page 89: Electrical Installation
Power Modules 3.1 Power Modules Blocksize (PM340) 3.1.6 Electrical installation Operation on non-grounded line supply systems (IT) It is not permissible to use Power Modules with series line filter in IT line supply systems. In order that the Power Modules remain functional when ground faults occur, a line reactor must be connected in series. -
Page 90: Technical Data
Power Modules 3.1 Power Modules Blocksize (PM340) 3.1.7 Technical data Table 3-9 Technical data PM340, Part 1 Line supply voltage 1-ph. 230 V AC ± 10 % PM340 6SL3210– 1SB11-0UA0 1SB12-3UA0 1SB14-0UA0 PM340 with integrated line filter 6SL3210– 1SB11-0AA0 1SB12-3AA0 1SB14-0AA0 Rated output current I Base load current I... - Page 91 Power Modules 3.1 Power Modules Blocksize (PM340) Table 3-10 Technical data PM340, Part 2 Line voltage 3-ph. 380 V to 480 V AC PM340 6SL3210- 1SE11-3UA0 1SE11-7UA0 1SE12-2UA0 1SE13-1UA0 1SE14-1UA0 PM340 with integrated line filter Rated output current I Base load current I Output current for S6 duty (40%) l Max.
- Page 92 Power Modules 3.1 Power Modules Blocksize (PM340) Line voltage 3-ph. 380 V to 480 V AC PM340 6SL3210- 1SE11-3UA0 1SE11-7UA0 1SE12-2UA0 1SE13-1UA0 1SE14-1UA0 PM340 with integrated line filter Depth - PM340 with Control 234.6 (9.23) 234.6 (9.23) 234.6 (9.23) 234.6 (9.23) 234.6 (9.23) Unit CU310 - PM340 with CUA31...
- Page 93 Power Modules 3.1 Power Modules Blocksize (PM340) Line voltage 3-ph. 380 V to 480 V AC PM340 6SL3210- 1SE16-0UA0 1SE17-7UA0 1SE21-0UA0 1SE21-8AA0 1SE22-5UA0 PM340 with integrated 6SL3210- 1SE16-0AA0 1SE17-7AA0 1SE21-0AA0 1SE21-8UA0 1SE22-5AA0 line filter Line supply connection Screw terminals Screw terminals Screw terminals Screw terminals L, N...
- Page 94 Power Modules 3.1 Power Modules Blocksize (PM340) Line voltage 3-ph. 380 V to 480 V AC PM340 6SL3210- 1SE23-2UA0 1SE23-8UA0 1SE24-5UA0 1SE26-0UA0 1SE27-5UA0 PM340 with integrated 6SL3210- 1SE23-2AA0 1SE23-8AA0 1SE24-5AA0 1SE26-0AA0 1SE27-5AA0 line filter Rated pulse frequency Power loss 0.40 0.38 0.51 0.69...
- Page 95 Power Modules 3.1 Power Modules Blocksize (PM340) Table 3-13 Technical data PM340, Part 5 Line voltage 3-ph. 380 V to 480 V AC PM340 6SL3210- 1SE31-0UA0 1SE31-1UA0 1SE31-5UA0 1SE31-8UA0 PM340 with integrated line 6SL3210- 1SE31-0AA0 1SE31-1AA0 1SE31-5AA0 1SE31-8AA0 filter Rated output current I Base load current I Output current for S6 duty (40%) l...
- Page 96 Power Modules 3.1 Power Modules Blocksize (PM340) Line voltage 3-ph. 380 V to 480 V AC PM340 6SL3210- 1SE31-0UA0 1SE31-1UA0 1SE31-5UA0 1SE31-8UA0 PM340 with integrated line 6SL3210- 1SE31-0AA0 1SE31-1AA0 1SE31-5AA0 1SE31-8AA0 filter Weight, approx. without line 19.8 50.7 50.7 50.7 filter/ with integrated line filter 27.1...
- Page 97 Power Modules 3.1 Power Modules Blocksize (PM340) Interrelationship between the pulse frequency and current de-rating Table 3-15 Current de-rating depending on the pulse frequency Order Line Rated Power Output current in A at a switching frequency of: voltage output (high current overload) 6SL3210...
- Page 98 Power Modules 3.1 Power Modules Blocksize (PM340) Order Line Rated Power Output current in A at a switching frequency of: voltage output (high current overload) 6SL3210 [kW] 4 kHz 6 kHz 8 kHz 10 kHz 12 kHz 14 kHz 16 kHz 1SE31- 55.0 110.0...
- Page 99 Power Modules 3.1 Power Modules Blocksize (PM340) Figure 3-22 S6 load cycle with pre-load condition Figure 3-23 S6 load cycle with pre-load condition Figure 3-24 Load cycle with 60 s overload with a load cycle period of 300 s AC Drive Manual, (GH6), 07/2007 Edition, 6SL3097-2AL00-0BP2...
- Page 100 Power Modules 3.1 Power Modules Blocksize (PM340) 30 s 300 s Figure 3-25 Load cycle with 30 s overload with a load cycle period of 300 s Derating characteristic for Power Modules in blocksize format Frame size FSA - FSC: Figure 3-26 Output current as a function of pulse frequency Figure 3-27...
- Page 101 Power Modules 3.1 Power Modules Blocksize (PM340) Figure 3-28 Output power as a function of installation altitude Figure 3-29 Voltage correction factor as a function of installation altitude AC Drive Manual, (GH6), 07/2007 Edition, 6SL3097-2AL00-0BP2...
-
Page 102: Power Modules Chassis
Power Modules 3.2 Power Modules Chassis Power Modules Chassis 3.2.1 Description A Power Module is a power unit (frequency inverter) that provides the power supply for the connected motor. A Power Module must be connected to a Control Unit via DRIVE-CLiQ. The open-loop and closed-loop control functions are stored in the Control Unit. -
Page 103: Interface Description
Power Modules 3.2 Power Modules Chassis 3.2.3 Interface description 3.2.3.1 Overview Figure 3-30 Power Module, frame size FX AC Drive Manual, (GH6), 07/2007 Edition, 6SL3097-2AL00-0BP2... - Page 104 Power Modules 3.2 Power Modules Chassis Figure 3-31 Power Module, frame size GX AC Drive Manual, (GH6), 07/2007 Edition, 6SL3097-2AL00-0BP2...
-
Page 105: Sample Connection
Power Modules 3.2 Power Modules Chassis 3.2.3.2 Sample connection Figure 3-32 Connection example: Power Module Chassis AC Drive Manual, (GH6), 07/2007 Edition, 6SL3097-2AL00-0BP2... -
Page 106: Terminal Block X9
Power Modules 3.2 Power Modules Chassis 3.2.3.3 Terminal Block X9 Table 3-16 Terminal strip X9 Terminal Signal name Technical specifications P24V Voltage: 24 V DC (20.4 V - 28.8 V) Current consumption: max 1.4 A Reserved, do not use Reserved, do not use Main contactor 240 V AC / max. -
Page 107: X41 Ep Terminal / Temperature Sensor Connection
Power Modules 3.2 Power Modules Chassis 3.2.3.5 X41 EP terminal / temperature sensor connection Table 3-18 Terminal strip X41 Terminal Function Technical specifications +Temp Temperature sensor connection KTY84-1C130 -Temp are assigned are assigned Max. cross-section that can be connected: 1.5 mm² (AWG 14) NOTICE The KTY temperature sensor must be connected with the correct polarity. -
Page 108: Meaning Of The Leds On The Power Module
Power Modules 3.2 Power Modules Chassis 3.2.3.7 Meaning of the LEDs on the Power Module Table 3-20 Single Motor Module / Double Motor Module / Power Module - description of the LEDs Status Description, cause Remedy Ready (H200) DC link (H201) Electronics power supply is missing or outside –... -
Page 109: Dimension Drawings
Power Modules 3.2 Power Modules Chassis 3.2.4 Dimension drawings Dimension drawing frame size FX The cooling clearances to be maintained are indicated by the dotted line. Figure 3-33 Dimension drawing Power Module, frame size FX AC Drive Manual, (GH6), 07/2007 Edition, 6SL3097-2AL00-0BP2... - Page 110 Power Modules 3.2 Power Modules Chassis Dimension drawing frame size GX The cooling clearances to be maintained are indicated by the dotted line. Figure 3-34 Dimension drawing Power Module, frame size GX AC Drive Manual, (GH6), 07/2007 Edition, 6SL3097-2AL00-0BP2...
-
Page 111: Mounting The Cu310 In The Power Module Chassis
Power Modules 3.2 Power Modules Chassis 3.2.5 Mounting the CU310 in the Power Module Chassis Figure 3-35 Mounting the CU310 in the Power Module chassis format, frame size FX The DRIVE-CLiQ cable and the cable for the 24 V supply must be correctly routed so that the front flap can close. -
Page 112: Electrical Connection
Power Modules 3.2 Power Modules Chassis 3.2.6 Electrical connection Adjusting the fan voltage (-T10) The power supply for the device fans (1-ph. 230 V AC) in the Power Module (-T10) is taken from the line supply using transformers. The locations of the transformers are indicated in the interface descriptions. -
Page 113: Technical Data
Power Modules 3.2 Power Modules Chassis 3.2.7 Technical data Table 3-22 Technical data, Power Modules in chassis format Line supply voltage 3-ph. 380 V to 480 V AC ± 10 % (-15 % < 1 min) Order No.: 6SL3310– 1TE32-1AA0 1TE32-6AA0 1TE33–1AA0 1TE33-8AA0 1TE35-0AA0... - Page 114 Power Modules 3.2 Power Modules Chassis Line supply voltage 3-ph. 380 V to 480 V AC ± 10 % (-15 % < 1 min) Order No.: 6SL3310– 1TE32-1AA0 1TE32-6AA0 1TE33–1AA0 1TE33-8AA0 1TE35-0AA0 PE connection Flat connector for M10 cable lug, max. connection cross section 2 x 185 mm Max.
-
Page 115: Characteristics
Power Modules 3.2 Power Modules Chassis 3.2.7.1 Characteristics Overload capability The Power Modules are equipped with an overload reserve e.g. to handle breakaway torques. In drives with overload requirements, the appropriate base load current must, therefore, be used as a basis for the required load. The criterion for overload is that the drive is operated with its base load current before and after the overload occurs (a load duration of 300 s is used as a basis here). -
Page 116: Current De-Rating As A Function Of The Pulse Frequency
Power Modules 3.2 Power Modules Chassis High overload The base load current for high overload IH is based on a load duty cycle of 150% for 60 s or 160% for 10 s with a load duty duration of 300 s. Figure 3-38 High overload 3.2.7.2... - Page 117 Power Modules 3.2 Power Modules Chassis Maximum output frequencies achieved by increasing the pulse frequency By multiplying the rated pulse frequency with a multiple integer, the following output frequencies can be achieved taking into account the derating factors: Table 3-24 Maximum output frequencies achieved by increasing the pulse frequency Pulse frequency [kHz] Maximum output frequency [Hz]...
- Page 118 Power Modules 3.2 Power Modules Chassis Figure 3-41 Voltage correction factor as a function of installation altitude AC Drive Manual, (GH6), 07/2007 Edition, 6SL3097-2AL00-0BP2...
-
Page 119: Dc Link Components
DC Link Components Blocksize 4.1.1 Braking resistors 4.1.1.1 Description The PM340 Power Modules cannot regenerate into the line supply. For the regenerative operation, e.g. the braking of a rotating mass, a braking resistor must be connected to convert the resulting energy into heat. The braking resistor is connected at terminals DCP/R1 and R2. - Page 120 DC Link Components 4.1 Blocksize Protecting the resistance The power supply to the Power Modules must be established through a contactor which can then shut down the power supply when the resistor overheats. A temperature protection switch handles the protective function (this is supplied with each break resistor).
-
Page 121: Dimension Drawings
DC Link Components 4.1 Blocksize 4.1.1.3 Dimension drawings Figure 4-2 Dimension drawing: Braking resistor, frame sizes FSA and FSB AC Drive Manual, (GH6), 07/2007 Edition, 6SL3097-2AL00-0BP2... - Page 122 DC Link Components 4.1 Blocksize Figure 4-3 Dimension drawing: Braking resistor, frame sizes FSC, FSD, FSE, FSF AC Drive Manual, (GH6), 07/2007 Edition, 6SL3097-2AL00-0BP2...
-
Page 123: Mounting
DC Link Components 4.1 Blocksize Table 4-1 Dimension data: Braking resistor, all data in mm and (inches), Part 1 Order No. 4BC05-0AA0 4BD11-0AA0 4BD12-0BA0 4BD16-5CA0 6SE6400- Frame size 230 (9.05) 230 (9.05) 239 (9.40) 285 (11.22) 217 (8.54) 217 (8.54) 226 (8.89) 200 (7.87) 145 (5.70) -
Page 124: Technical Data
DC Link Components 4.1 Blocksize 4.1.1.5 Technical data Table 4-3 Technical data, braking resistors, Part 1 Order No. 6SE6400- 6SE6400- 6SL3201- 6SE6400- 4BC05-0AA0 4BD11-0AA0 0BE12-0AA0 4BD16-5CA0 Resistance Rated power P 0.05 0.65 Peak power P Load duration for peak power T 27.6 13.8 12.6... - Page 125 DC Link Components 4.1 Blocksize Figure 4-4 Load diagram for the braking resistor, Blocksize format T [s] period duration of braking duty cycle [s] load duration for peak power [W] rated power of the braking resistor [W] peak braking power of the braking resistor AC Drive Manual, (GH6), 07/2007 Edition, 6SL3097-2AL00-0BP2...
-
Page 126: Chassis
DC Link Components 4.2 Chassis Chassis 4.2.1 Braking Modules 4.2.1.1 Description A Braking Module (and an external braking resistor) is required in certain cases when the drive is to be braked or brought to a standstill (e.g. EMERGENCY SWITCHING-OFF Category 1). The Braking Module contains the power electronics and the associated control. The supply voltage for the electronics is taken from the DC link. -
Page 127: Braking Module For Frame Size Fx
DANGER The connection to the braking resistors must be short-circuit/ground-fault proof. WARNING If braking resistors are used that have not been released by SIEMENS for SINAMICS, then the braking resistors could be destroyed. 4.2.1.3 Braking Module for frame size FX... -
Page 128: Braking Module For Type Gx
DC Link Components 4.2 Chassis 4.2.1.4 Braking Module for type GX Figure 4-6 Braking Module for Power Module, frame size GX AC Drive Manual, (GH6), 07/2007 Edition, 6SL3097-2AL00-0BP2... -
Page 129: Sample Connection
DC Link Components 4.2 Chassis 4.2.1.5 Sample connection Figure 4-7 Example connection of Braking Module 4.2.1.6 Braking resistor connection X1 Table 4-5 Braking resistor connection Terminal Designation Braking resistor connection R+ Break resistor connection R- Max. cross-section that can be connected: 50 mm AC Drive Manual, (GH6), 07/2007 Edition, 6SL3097-2AL00-0BP2... -
Page 130: X21 Digital Inputs/Outputs
DC Link Components 4.2 Chassis 4.2.1.7 X21 digital inputs/outputs Table 4-6 Terminal block X21 Terminal Designation Technical specifications Shield Shield connection for terminal 2 ... 6 Low signal level: -3 V to 5 V High signal level: +15 V to 30 V DI inhibit input Current drain: 2 mA to 15 mA Voltage: 24 V DC... -
Page 131: Installing A Braking Module In A Power Module, Frame Size Fx
DC Link Components 4.2 Chassis 4.2.1.9 Installing a Braking Module in a Power Module, frame size FX Figure 4-8 Installing a Braking Module in a Power Module, frame size FX – steps 1 - 3 AC Drive Manual, (GH6), 07/2007 Edition, 6SL3097-2AL00-0BP2... - Page 132 DC Link Components 4.2 Chassis Figure 4-9 Installing a Braking Module in a Power Module, frame size FX – steps 4 - 6 AC Drive Manual, (GH6), 07/2007 Edition, 6SL3097-2AL00-0BP2...
- Page 133 DC Link Components 4.2 Chassis Installing the Braking Module The steps for the installation procedure are numbered in accordance with the diagrams in front of them. 1. Unscrew the 2 M6 screws from the front cover and lift off the cover. 2.
-
Page 134: Installing A Braking Module In A Power Module, Frame Size Gx
DC Link Components 4.2 Chassis 4.2.1.10 Installing a Braking Module in a Power Module, frame size GX Figure 4-10 Installing a Braking Module in a Power Module, frame size GX – steps 1 - 3 AC Drive Manual, (GH6), 07/2007 Edition, 6SL3097-2AL00-0BP2... - Page 135 DC Link Components 4.2 Chassis Figure 4-11 Installing a Braking Module in a Power Module, frame size GX – steps 4 - 6 AC Drive Manual, (GH6), 07/2007 Edition, 6SL3097-2AL00-0BP2...
- Page 136 DC Link Components 4.2 Chassis Installing the Braking Module The steps for the installation procedure are numbered in accordance with the diagrams in front of them. 1. Unscrew the 2 M6 screws from the front cover and lift off the cover. 2.
-
Page 137: Technical Data
DC Link Components 4.2 Chassis 4.2.1.11 Technical data Table 4-8 Technical data, Braking Modules Order No. 6SL3300–1AE31-3AA0 6SL3300–1AE32-5AA0 Suitable for installation in Power Modules, frame size power (rated power) 25 kW 50 kW power (peak power) 125 kW 250 kW power 100 kW 200 kW... -
Page 138: Braking Resistors
DC Link Components 4.2 Chassis 4.2.2 Braking resistors 4.2.2.1 Description The braking resistor is used to reduce the excess DC link energy in regenerative operation. The braking resistor is connected to the Braking Module. The braking resistor is mounted outside the cabinet or switchgear room. This means that the resulting heat loss around the Power Module can be dissipated - and cooling costs/equipment reduced. -
Page 139: Dimension Drawing
DC Link Components 4.2 Chassis DANGER The braking resistors are only suitable for base mounting. Sufficient space must be available for dissipating the energy converted by the braking resistor. A sufficient distance from flammable objects must be maintained. The braking resistor must be vertically installed as a free-standing unit. Objects must not be placed on or anywhere above the braking resistor. -
Page 140: Technical Data
DC Link Components 4.2 Chassis Figure 4-13 Dimension drawing, 50 kW/250 kW resistor 4.2.2.4 Technical data Table 4-9 What are the technical data of the braking resistors Order No.: Units 6SL3000–1BE31-3AA0 6SL3000–1BE32-5AA0 power (rated power) power (peak power) Max. current Cable entry Via cable gland M50 Via cable gland M50... - Page 141 DC Link Components 4.2 Chassis Duty cycle Figure 4-14 Duty cycle for braking resistors AC Drive Manual, (GH6), 07/2007 Edition, 6SL3097-2AL00-0BP2...
- Page 142 DC Link Components 4.2 Chassis AC Drive Manual, (GH6), 07/2007 Edition, 6SL3097-2AL00-0BP2...
-
Page 143: Motor-Side Power Components
Note The connecting cables to the Power Module must be kept as short as possible (max. 5 m). CAUTION When using motor reactors that SIEMENS has not approved for SINAMICS, then these can thermally damage the reactor. CAUTION The surface temperature of the motor reactors can exceed 80 °C. -
Page 144: Dimension Drawings
Motor-Side Power Components 5.1 Motor reactors 5.1.1.3 Dimension drawings Figure 5-1 Dimension drawing: Motor reactor, frame size FSA Table 5-1 Total dimensions: Motor reactor, frame size FSA, all data in mm and (inches) Motor reactor 3TC00-4AD3 3TC00-4AD2 6SE6400- Frame size Dimension A in mm and (inches) 200 (7.87) 200 (7.87) - Page 145 Motor-Side Power Components 5.1 Motor reactors Figure 5-2 Dimension drawing: Motor reactor, frame sizes FSB and FSC Table 5-2 Total dimensions: Motor reactor, frame sizes FSB and FSC Motor reactor 0AE21-0CA0 0AJ23-2CA0 6SL3202- Frame size Dimension A in mm and (inches) 270 (10.62) 334 (13.14) Dimension B in mm and (inches)
- Page 146 Motor-Side Power Components 5.1 Motor reactors Figure 5-3 Dimension drawing: Motor reactor, frame size FSD Figure 5-4 Dimension drawing: Motor reactor, frame size FSE AC Drive Manual, (GH6), 07/2007 Edition, 6SL3097-2AL00-0BP2...
- Page 147 Motor-Side Power Components 5.1 Motor reactors Figure 5-5 Dimension drawing: Motor reactor, frame size FSF Table 5-3 Total dimensions: Motor reactor, frame sizes FSD, FSE, all data in mm and (inches) Motor reactor 3TC05-4DD0 3TC03-8DD0 3TC07-5ED0 3TC08-0ED0 6SE6400- Frame size 70 (2.75) 94 (3.70) 101 (3.97)
- Page 148 Motor-Side Power Components 5.1 Motor reactors Table 5-4 Total dimensions: Motor reactor, frame size FSF, all data in mm and (inches) Motor reactor 3TC06-2FE0 3TC08-8FE0 3TC14-5FD0 3TC15-4FD0 6SE6400- Frame size 118 (4.64) 138 (5.43) 138 (5.43) 101 (3.97) 138 (5.43) 158 (6.22) 169 (6.65) 121 (4.76)
-
Page 149: Mounting
Motor-Side Power Components 5.1 Motor reactors 5.1.1.4 Mounting The motor reactor must be installed as close as possible to the Power Module. Figure 5-6 Mounting: Motor reactor, frame size FSA Table 5-5 Mounting: Motor reactor, frame size FSA, all data in mm and (inches) Motor reactor 3TC00-4AD3 3TC00-4AD2... - Page 150 Motor-Side Power Components 5.1 Motor reactors Figure 5-7 Mounting: Motor reactor, frame sizes FSB and FSC Table 5-6 Mounting: Motor reactor, frame sizes FSB and FSC, all data in mm and (inches) Motor reactor 6SL3202- 0AE21-0CA0 0AJ23-2CA0 Suitable for Power 6SL3210- 1SE16-0UA0 1SE21-8UA0...
- Page 151 Motor-Side Power Components 5.1 Motor reactors Cable cross-section and terminal tightening torques Terminals for wiring on site Frame size Tightening torque [Nm] 2.25 Recommended minimum conductor cross-section [mm Highest conductor cross-section [mm Figure 5-8 Mounting: Motor reactor, frame sizes FSD, FSE, FSF Table 5-7 Mounting: Motor reactor, frame sizes FSD, FSE, all data in mm and (inches) Motor reactor...
- Page 152 Motor-Side Power Components 5.1 Motor reactors Table 5-8 Mounting: Motor reactor, frame size FSF, all data in mm and (inches) Motor reactor 6SE6400- 3TC06-2FE0 3TC08-8FE0 3TC14-5FD0 3TC15-4FD0 Suitable for Power 6SL3210- 1SE31-1UA0 1SE31-5UA0 Module Frame size Motor reactor 248 (9.76) 321 (12.63) 269 (10.59) 321 (12.63)
- Page 153 Motor-Side Power Components 5.1 Motor reactors Mounting Power Modules and motor reactors Figure 5-9 Mounting Power Modules and motor reactors, frame sizes FSB and FSC Table 5-9 Total dimensions, Power Module 340 and motor reactor, frame sizes FSA, FSB and FSC, all data in mm and (inches) Motor reactor 6SE6400-3TC00-4AD3...
-
Page 154: Electrical Connection
Motor-Side Power Components 5.1 Motor reactors 5.1.1.5 Electrical connection Figure 5-10 Electrical connection 5.1.1.6 Technical data Table 5-10 Motor reactors for Power Modules 3-ph. 380 V to 480 V AC, Part 1 Motor reactor (for a 4 kHz pulse frequency) 6SE6400-3TC00-4AD2 6SL3202- 0AE21-0CA0... - Page 155 Motor-Side Power Components 5.1 Motor reactors Motor reactor (for a 4 kHz pulse frequency) 6SE6400-3TC00-4AD2 6SL3202- 0AE21-0CA0 Rated current In (power) of the Power Module Frame size Table 5-11 Motor reactors for Power Modules 3-ph. 380 V to 480 V AC, Part 2 Motor reactor (for a 4 kHz pulse frequency) 6SL3202-0AE21-0CA0 6SL3202-0AJ23-2CA0...
- Page 156 Motor-Side Power Components 5.1 Motor reactors Table 5-12 Motor reactors for Power Modules 3-ph. 380 V to 480 V AC, Part 3 Motor reactor (for a 4 kHz pulse frequency) 6SE6400- 6SE6400- 6SE6400- 6SE6400- 6SE6400- 6SE6400- 3TC03-8DD0 3TC05-4DD0 3TC08-0ED0 3TC07-5ED0 3TC14-5FD0 3TC15-4FD0 Rated current...
-
Page 157: Chassis
Note The connecting cables to the Power Module must be kept as short as possible (max. 5 m). CAUTION When using motor reactors that SIEMENS has not approved for SINAMICS, then these can thermally damage the reactor. CAUTION The surface temperature of the motor reactors can exceed 80 °C. -
Page 158: Dimension Drawing
Motor-Side Power Components 5.1 Motor reactors 5.1.2.3 Dimension drawing Mounting hole Type 2 Type 1 Figure 5-11 Dimension drawing, motor reactor AC Drive Manual, (GH6), 07/2007 Edition, 6SL3097-2AL00-0BP2... -
Page 159: Technical Data
Motor-Side Power Components 5.1 Motor reactors Table 5-14 Dimensions of motor reactors, all data in mm and (inches) 6SL3000- 2BE32-1AA0 2BE32-6AA0 2BE33-2AA0 2BE33-8AA0 2BE35-0AA0 Connection type 25 (0.98) 25 (0.98) 25 (0.98) 25 (0.98) 30 (1.18) 5 (0.19) 5 (0.19) 5 (0.19) 5 (0.19) 6 (0.23) -
Page 160: Sinusoidal Filter
The connecting cables to the Power Module must be kept as short as possible (max. 5 m). CAUTION Using sinusoidal filters that have not been approved by SIEMENS for SINAMICS can: • damage/destroy the Power Modules • cause line harmonics that may interfere with or damage other loads connected to the same line supply. -
Page 161: Dimension Drawing
Motor-Side Power Components 5.2 Sinusoidal filter 5.2.1.3 Dimension drawing Figure 5-12 Dimension drawing, sinusoidal filter AC Drive Manual, (GH6), 07/2007 Edition, 6SL3097-2AL00-0BP2... -
Page 162: Technical Data
Motor-Side Power Components 5.2 Sinusoidal filter Table 5-16 Dimensions of the sinusoidal filters, all data in mm and (inches) 6SL3000- 2CE32-3AA0 2CE32-8AA0 2CE33-3AA0 2CE34-1AA0 620 (24.40) 620 (24.40) 620 (24.40) 620 (24.40) 320 (12.59) 320 (12.59) 360 (14.17) 360 (14.17) 300 (11.81) 300 (11.81) 370 (14.56) -
Page 163: Dv/Dt Filter
Motor-Side Power Components 5.3 dv/dt filter dv/dt filter 5.3.1 Chassis 5.3.1.1 Description The dv/dt filter with Voltage Peak Limiter consists of two components: the dv/dt reactor and the voltage limiting network (Voltage Peak Limiter), which limits voltage peaks and returns the energy to the DC link. -
Page 164: Safety Information
If this is not observed, then there is a danger of damage to the dv/dt reactor and the voltage limiting network. CAUTION When using dv/dt filters that SIEMENS has not approved for SINAMICS, then these dv/dt filters can be thermally damaged. CAUTION The surface temperature of the dv/dt reactors may exceed 80 °C. -
Page 165: Interface Description
Motor-Side Power Components 5.3 dv/dt filter 5.3.1.3 Interface description Figure 5-13 Interface overview, voltage limiting network, type 1 Figure 5-14 Interface overview, voltage limiting network, type 2 AC Drive Manual, (GH6), 07/2007 Edition, 6SL3097-2AL00-0BP2... -
Page 166: Connecting The Dv/Dt Filter With Voltage Peak Limiter
Motor-Side Power Components 5.3 dv/dt filter 5.3.1.4 Connecting the dv/dt filter with Voltage Peak Limiter Figure 5-15 Connecting the dv/dt filter with Voltage Peak Limiter Cable cross-sections Table 5-19 Cable cross-sections for connected between a dv/dt filter and Power Module dv/dt filter plus Voltage Peak Limiter Connection to the DC link Connection between a dv/dt reactor... -
Page 167: Dimension Drawing, Dv/Dt Reactor
Motor-Side Power Components 5.3 dv/dt filter 5.3.1.5 Dimension drawing, dv/dt reactor Figure 5-16 Dimension drawing, dv/dt reactor AC Drive Manual, (GH6), 07/2007 Edition, 6SL3097-2AL00-0BP2... -
Page 168: Dimension Drawing Of Voltage Peak Limiter
Motor-Side Power Components 5.3 dv/dt filter Table 5-20 Dimensions dv/dt reactor, 3-ph. 380 V – 480 V AC, all data in mm and (inches) 6SL3000- 2DE32-6CA0 2DE35-0CA0 25 (0.98) 30 (1.18) 5 (0.19) 6 (0.23) 14 (0.55) 17 (0.66) 10.5 x 14 (0.41 x 0.55) 14 x 18 (0.55 x 0.70) 7 (0.27) 9 (0.35) - Page 169 Motor-Side Power Components 5.3 dv/dt filter Figure 5-18 Dimension drawing of Voltage Peak Limiter, type 2 Table 5-21 Assigning voltage limiting networks to dimension drawings Voltage limiting network Dimension drawing, type 6SL3000-2DE32-6BA0 Type 1 6SL3000-2DE35-0BA0 Type 2 AC Drive Manual, (GH6), 07/2007 Edition, 6SL3097-2AL00-0BP2...
-
Page 170: Technical Data
Motor-Side Power Components 5.3 dv/dt filter 5.3.1.7 Technical data Table 5-22 Technical data for the dv/dt filter with Voltage Peak Limiter, 3-ph. 380 V – 480 V AC, Part 1 Order No.: 6SL3000- 2DE32-6AA0 2DE32-6AA0 2DE35-0AA0 Suitable for Motor Module 6SL3310- 1TE32-1AA0 1TE32-6AA0... - Page 171 Motor-Side Power Components 5.3 dv/dt filter Table 5-23 Technical data for the dv/dt filter with Voltage Peak Limiter, 3-ph. 380 V – 480 V AC, Part 2 Order No.: 6SL3000- 2DE35-0AA0 2DE35-0AA0 2DE35-0AA0 Suitable for Motor Module 6SL3310- 1TE33-8AA0 1TE35-0AA0 1TE35-0AA0 Rated power of the Motor Module...
- Page 172 Motor-Side Power Components 5.3 dv/dt filter AC Drive Manual, (GH6), 07/2007 Edition, 6SL3097-2AL00-0BP2...
-
Page 173: Control Units
Control Units Introduction Description The Control Units of SINAMICS S120 AC Drive are designed for use with blocksize format or chassis format Power Modules. Advantages 1. The CU310 DP Control Unit provides the PROFIBUS external communications interface and a TTL/HTL/SSI encoder evaluation circuit. - Page 174 Control Units 6.1 Introduction Control Unit CU310 DP Control Unit CU310 PN Photo (in preparation) CUA31 Control Unit adapter CUA32 Control Unit Adapter AC Drive Manual, (GH6), 07/2007 Edition, 6SL3097-2AL00-0BP2...
- Page 175 Control Units 6.1 Introduction Figure 6-1 Slot for the CompactFlash card on a CU310 Control Unit Note The Control Unit and the CompactFlash card must be ordered separately. AC Drive Manual, (GH6), 07/2007 Edition, 6SL3097-2AL00-0BP2...
-
Page 176: Control Unit Cu310 Dp (Profibus)
Control Units 6.2 Control Unit CU310 DP (PROFIBUS) Control Unit CU310 DP (PROFIBUS) 6.2.1 Description The Control Unit 310 DP (PROFIBUS) is the component in which the open-loop and closed- loop control functions of a drive are implemented. The CU310 DP has the following interfaces (ports): Table 6-1 Overview of the CU310 interfaces Type... -
Page 177: Interface Description
Control Units 6.2 Control Unit CU310 DP (PROFIBUS) 6.2.3 Interface description 6.2.3.1 Overview Figure 6-2 Description of the CU310 DP interfaces (ports) AC Drive Manual, (GH6), 07/2007 Edition, 6SL3097-2AL00-0BP2... -
Page 178: Sample Connection
Control Units 6.2 Control Unit CU310 DP (PROFIBUS) 6.2.3.2 Sample connection Figure 6-3 Connection example CU310 DP AC Drive Manual, (GH6), 07/2007 Edition, 6SL3097-2AL00-0BP2... -
Page 179: X100 Drive-Cliq Interface
Control Units 6.2 Control Unit CU310 DP (PROFIBUS) 6.2.3.3 X100 DRIVE-CLiQ interface Table 6-2 DRIVE-CLiQ interface Signal name Technical data Transmit data + Transmit data - Receive data + Reserved, do not use Reserved, do not use Receive data - Reserved, do not use Reserved, do not use + (24 V) -
Page 180: X121 Digital Inputs/Outputs
Control Units 6.2 Control Unit CU310 DP (PROFIBUS) 6.2.3.5 X121 digital inputs/outputs Table 6-4 Terminal strip X121 Terminal Designation Technical specifications DI 0 Voltage: -3 V to 30 V Typical current consumption: 10 mA at 24 V DC DI 1 Isolation: The reference potential is terminal M1 DI 2 Level (incl. -
Page 181: Electronics Power Supply X124
Control Units 6.2 Control Unit CU310 DP (PROFIBUS) Note A 24 V voltage supply must be connected to terminal X124 so that the digital outputs can be used. If a the 24 V supply is briefly interrupted, then the digital outputs are de-activated during this time. -
Page 182: X21 Profibus
Control Units 6.2 Control Unit CU310 DP (PROFIBUS) 6.2.3.7 X21 PROFIBUS Table 6-6 PROFIBUS interface X21 Signal name Meaning Range Not assigned M24_SERV Supply for teleservice, ground RxD/TxD–P Receive/transmit data P (B) RS485 CNTR–P Control signal DGND PROFIBUS data reference potential Power supply plus 5 V + -10 % P24_SERV... -
Page 183: X23 Htl/Ttl/Ssi Encoder Interface
Control Units 6.2 Control Unit CU310 DP (PROFIBUS) 6.2.3.8 X23 HTL/TTL/SSI encoder interface Table 6-7 Encoder connection X23 Signal name Technical specifications +Temp* KTY or PTC input SSI_CLK* SSI clock, positive SSI_XCLK* SSI clock, negative P_Encoder 5 V / 24 V Encoder power supply P_Encoder 5 V / 24 V Encoder power supply... - Page 184 Control Units 6.2 Control Unit CU310 DP (PROFIBUS) Table 6-8 Specification, measuring systems that can be connected Parameters Designation Threshold Min. Type Max. Unit High signal level Hdiff (TTL bipolar at X23) Low signal level Ldiff (TTL bipolar at X23) High signal level High (HTL unipolar)
-
Page 185: Profibus Address Switches
The address switch is behind the blanking plate. The blanking plate is part of the scope of supply. Setting the PROFIBUS address The following reference contains further information about setting the PROFIBUS address: Reference: /IH1/ SINAMICS S120 Commissioning Manual. AC Drive Manual, (GH6), 07/2007 Edition, 6SL3097-2AL00-0BP2... -
Page 186: X22 Serial Interface (Rs232)
Control Units 6.2 Control Unit CU310 DP (PROFIBUS) 6.2.3.10 X22 serial interface (RS232) Table 6-10 Serial interface (RS-232-C) X140 Designation Technical data Receive data Transmit data Ground Ground reference Type: 9-pin SUB D connector 6.2.3.11 Measurement sockets T0, T1, and T2 Table 6-11 Measurement sockets T0, T1, and T2 Socket... -
Page 187: Slot For The Compactflash Card
Control Units 6.2 Control Unit CU310 DP (PROFIBUS) 6.2.3.12 Slot for the CompactFlash card Figure 6-4 Slot for CompactFlash card CAUTION The CompactFlash card may only be inserted as shown in the figure (arrow top right). The CompactFlash card may only be inserted or removed when the Control Unit is in a no- voltage condition. -
Page 188: Description Of The Leds On The Control Unit
Control Units 6.2 Control Unit CU310 DP (PROFIBUS) 6.2.3.13 Description of the LEDs on the Control Unit The individual statuses during booting are indicated via the LEDs on the Control Unit (CU320, CU310). ● The duration of the individual statuses varies. ●... - Page 189 Control Units 6.2 Control Unit CU310 DP (PROFIBUS) Table 6-15 Control Unit 310 – description of the LEDs after booting Color Status Description, cause Remedy Electronics power supply is missing or outside (READY) permissible tolerance range. Green Continuous The component is ready and cyclic DRIVE-CLiQ communication takes place or the control unit waits for initial commissioning.
- Page 190 Control Units 6.2 Control Unit CU310 DP (PROFIBUS) Color Status Description, cause Remedy Orange Flashing Firmware CRC error. Make sure that the 2 Hz CompactFlash card has been inserted properly. Replace the CompactFlash Card. Replace Control Unit. Carry-out a POWER OUT>5 V Electronics power supply is missing or outside permissible tolerance range.
-
Page 191: Dimension Drawing
Control Units 6.2 Control Unit CU310 DP (PROFIBUS) 6.2.4 Dimension drawing Figure 6-5 Dimension drawing CU310 DP AC Drive Manual, (GH6), 07/2007 Edition, 6SL3097-2AL00-0BP2... -
Page 192: Mounting The Cu310 On The Power Module Blocksize
Control Units 6.2 Control Unit CU310 DP (PROFIBUS) 6.2.5 Mounting the CU310 on the Power Module Blocksize As soon as the Power Module has been been correctly installed, the Control Unit can be attached to the Power Module. Snap the CU310 onto the Power Module PM340 Power Module PM340 (frame size FSD) with CU310 (Frame size FSD) The procedure when mounting the Control Unit on the Power Module is independent of the... - Page 193 Control Units 6.2 Control Unit CU310 DP (PROFIBUS) Removing the Control Unit Removing the CU310 from the Power Module PM340 (frame size FSD) In order to remove the Control Unit from the Power Module, the blue release lever, as shown in the diagram, must be pressed downwards and the Control Unit swung-out to the front.
-
Page 194: Mounting The Cu310 In The Power Module Chassis
Control Units 6.2 Control Unit CU310 DP (PROFIBUS) 6.2.6 Mounting the CU310 in the Power Module Chassis Figure 6-6 Mounting the CU310 in the Power Module chassis format, frame size FX The DRIVE-CLiQ cable and the cable for the 24 V supply must be correctly routed so that the front flap can close. -
Page 195: Technical Data
Control Units 6.2 Control Unit CU310 DP (PROFIBUS) 6.2.7 Technical data Table 6-16 Technical data CU310 DP Unit Value Electronics power supply Voltage 24 DC (20.4 – 28.8) Current (without DRIVE-CLiQ and digital outputs) Power loss <20 PE/ground connection On housing with M4/3 Nm screw Response time The response time of digital inputs/outputs depends on the evaluation (refer to the function diagram). -
Page 196: Control Unit Cu310 Pn (Profinet)
Control Units 6.3 Control Unit CU310 PN (PROFINET) Control Unit CU310 PN (PROFINET) 6.3.1 Description The Control Unit 310 PN (PROFINET) is the control module in which the open-loop and closed-loop control functions of a drive are implemented. The CU310 PN has the following interfaces (ports): Table 6-17 Overview of the CU310 PN interfaces (ports) Type... -
Page 197: Interface Description
Control Units 6.3 Control Unit CU310 PN (PROFINET) 6.3.3 Interface description 6.3.3.1 Overview Figure 6-7 Description of the CU310 PN interfaces Note The PROFIBUS address switch is present for the CU310 PN, however it has not function. AC Drive Manual, (GH6), 07/2007 Edition, 6SL3097-2AL00-0BP2... -
Page 198: Sample Connection
Control Units 6.3 Control Unit CU310 PN (PROFINET) 6.3.3.2 Sample connection Figure 6-8 Connection example CU310 PN AC Drive Manual, (GH6), 07/2007 Edition, 6SL3097-2AL00-0BP2... -
Page 199: X100 Drive-Cliq Interface
Control Units 6.3 Control Unit CU310 PN (PROFINET) 6.3.3.3 X100 DRIVE-CLiQ interface Table 6-18 DRIVE-CLiQ interface Signal name Technical specifications Transmit data + Transmit data - Receive data + Reserved, do not use Reserved, do not use Receive data - Reserved, do not use Reserved, do not use + (24 V) -
Page 200: X121 Digital Inputs/Outputs
Control Units 6.3 Control Unit CU310 PN (PROFINET) 6.3.3.5 X121 digital inputs/outputs Table 6-20 Terminal strip X121 Terminal Designation Technical specifications DI 0 Voltage: -3 V to 30 V Typical current consumption: 10 mA at 24 V DC DI 1 Isolation: The reference potential is terminal M1 DI 2 Level (incl. -
Page 201: Electronics Power Supply X124
Control Units 6.3 Control Unit CU310 PN (PROFINET) Note A 24 V voltage supply must be connected to terminal X124 so that the digital outputs can be used. If a the 24 V supply is briefly interrupted, then the digital outputs are de-activated during this time. -
Page 202: X23 Htl/Ttl/Ssi Encoder Interface
Control Units 6.3 Control Unit CU310 PN (PROFINET) 6.3.3.8 X23 HTL/TTL/SSI encoder interface Table 6-23 Encoder connection X23 Signal name Technical specifications +Temp* KTY or PTC input SSI_CLK* SSI clock, positive SSI_XCLK* SSI clock, negative PENC Encoder power supply PENC Encoder power supply PSENSE Remote sense encoder power supply... - Page 203 Control Units 6.3 Control Unit CU310 PN (PROFINET) Table 6-24 Specification of measuring systems that can be connected Parameter Designation Threshold Min. Type Max. Unit High signal level Hdiff (TTL bipolar at X23) Low signal level Ldiff (TTL bipolar at X23) High signal level High (HTL unipolar)
-
Page 204: X22 Serial Interface (Rs232)
Control Units 6.3 Control Unit CU310 PN (PROFINET) 6.3.3.9 X22 serial interface (RS232) Table 6-25 Serial interface (RS-232-C) X140 Designation Technical data Receive data Transmit data Ground Ground reference Type: 9-pin SUB D connector 6.3.3.10 Measurement sockets T0, T1, and T2 Table 6-26 Measurement sockets T0, T1, and T2 Socket... -
Page 205: Description Of The Leds On The Control Unit
Control Units 6.3 Control Unit CU310 PN (PROFINET) 6.3.3.11 Description of the LEDs on the Control Unit The individual statuses during booting are indicated via the LEDs on the Control Unit (CU320, CU310). ● The duration of the individual statuses varies. ●... - Page 206 Control Units 6.3 Control Unit CU310 PN (PROFINET) Table 6-30 Control Unit 310 – description of the LEDs after booting Color Status Description, cause Remedy Electronics power supply is missing or outside (READY) permissible tolerance range. Green Continuous The component is ready and cyclic DRIVE-CLiQ communication takes place or the control unit waits for initial commissioning.
- Page 207 Control Units 6.3 Control Unit CU310 PN (PROFINET) Color Status Description, cause Remedy Orange Flashing Firmware CRC error. Make sure that the 2 Hz CompactFlash card has been inserted properly. Replace the CompactFlash Card. Replace Control Unit. Carry-out a POWER OUT>5 V Electronics power supply is missing or outside permissible tolerance range.
-
Page 208: Dimension Drawing
Control Units 6.3 Control Unit CU310 PN (PROFINET) 6.3.4 Dimension drawing Figure 6-9 Dimension drawing, CU310 PN AC Drive Manual, (GH6), 07/2007 Edition, 6SL3097-2AL00-0BP2... -
Page 209: Mounting The Cu310 On The Power Module Blocksize
Control Units 6.3 Control Unit CU310 PN (PROFINET) 6.3.5 Mounting the CU310 on the Power Module Blocksize As soon as the Power Module has been been correctly installed, the Control Unit can be attached to the Power Module. Snap the CU310 onto the Power Module PM340 Power Module PM340 (frame size FSD) with CU310 (Frame size FSD) The procedure when mounting the Control Unit on the Power Module is independent of the... -
Page 210: Technical Data
Control Units 6.3 Control Unit CU310 PN (PROFINET) Removing the Control Unit Removing the CU310 from the Power Module PM340 (frame size FSD) In order to remove the Control Unit from the Power Module, the blue release lever, as shown in the diagram, must be pressed downwards and the Control Unit swung-out to the front. -
Page 211: Control Unit Adapter Cua31
Control Units 6.4 Control Unit Adapter CUA31 Control Unit Adapter CUA31 6.4.1 Description The Control Unit Adapter CUA31 combined with a modular power unit is used to extend an existing DC/AC drive line-up e.g. with CU320 by one drive. The closed-loop control is externally implemented. This is the reason that a SINAMICS, SIMOTION or SINUMERIK closed-loop control is always required for operation. -
Page 212: Interface Description
Control Units 6.4 Control Unit Adapter CUA31 6.4.3 Interface description 6.4.3.1 Overview Figure 6-10 Interface description CUA31 AC Drive Manual, (GH6), 07/2007 Edition, 6SL3097-2AL00-0BP2... -
Page 213: X200 - X202 Drive-Cliq Interface
Control Units 6.4 Control Unit Adapter CUA31 Figure 6-11 Connection example, CUA31 6.4.3.2 X200 - X202 DRIVE-CLiQ interface Table 6-33 DRIVE-CLiQ interface Signal name Technical data Transmit data + Transmit data - Receive data + Reserved, do not use Reserved, do not use Receive data - Reserved, do not use Reserved, do not use... -
Page 214: X224 Electronics Power Supply
Control Units 6.4 Control Unit Adapter CUA31 6.4.3.3 X224 electronics power supply Table 6-34 Terminal strip X224 Terminal Function Technical specifications Electronics power supply Voltage: 24 V DC (20.4 V - 28.8 V) Current consumption: max. 0.8 A (without DRIVE-CLiQ) Electronics power supply Max. -
Page 215: X210 Ep Terminals / Temperature Sensor Connection
The component is ready for operation and cyclic DRIVE-CLiQ communication is taking place. Cause and rectification of faults The following reference contains information about the cause and rectification of faults: Reference: /IH1/ SINAMICS S120 Commissioning Manual. AC Drive Manual, (GH6), 07/2007 Edition, 6SL3097-2AL00-0BP2... -
Page 216: Dimension Drawing
Control Units 6.4 Control Unit Adapter CUA31 6.4.4 Dimension drawing Figure 6-12 Dimension drawing of the Control Unit Adapter CUA31 AC Drive Manual, (GH6), 07/2007 Edition, 6SL3097-2AL00-0BP2... -
Page 217: Mounting
Control Units 6.4 Control Unit Adapter CUA31 6.4.5 Mounting Snapping the CUA31 onto the Power Module 340 (frame Power Module 340 (frame size FSD) and CUA31 size FSD) AC Drive Manual, (GH6), 07/2007 Edition, 6SL3097-2AL00-0BP2... -
Page 218: Technical Data
Control Units 6.4 Control Unit Adapter CUA31 Removing the Control Unit Adapters CUA31 Removing the CUA31 from the Power Module 340 (frame size FSD) In order to remove the Control Unit Adapter CUA31 from the Power Module, the blue release lever, as shown in the diagram, must be pressed downwards and the Control Unit Adapter CUA31 is swung-out to the front. -
Page 219: Cua32 Control Unit Adapter
Control Units 6.5 CUA32 Control Unit Adapter CUA32 Control Unit Adapter 6.5.1 Description The CUA32 Control Unit Adapter combined with a modular power unit is used to extend an existing DC/AC drive line-up e.g. with CU320 by one drive. It also provides an encoder interface (HTL / TTL / SSI). -
Page 220: Interface Description
Control Units 6.5 CUA32 Control Unit Adapter 6.5.3 Interface description 6.5.3.1 Overview Figure 6-13 Interface description CUA32 AC Drive Manual, (GH6), 07/2007 Edition, 6SL3097-2AL00-0BP2... -
Page 221: X200 - X202 Drive-Cliq Interface
Control Units 6.5 CUA32 Control Unit Adapter Figure 6-14 Connection example for CUA32 6.5.3.2 X200 - X202 DRIVE-CLiQ interface Table 6-39 DRIVE-CLiQ interface Signal name Technical data Transmit data + Transmit data - Receive data + Reserved, do not use Reserved, do not use Receive data - Reserved, do not use... -
Page 222: X224 Electronics Power Supply
Control Units 6.5 CUA32 Control Unit Adapter 6.5.3.3 X224 electronics power supply Table 6-40 Terminal strip X224 Terminal Function Technical specifications Electronics power supply Voltage: 24 V DC (20.4 V - 28.8 V) Current consumption: max. 0.8 A (without DRIVE-CLiQ Electronics power supply and encoder) Electronics ground... -
Page 223: X220 Htl/Ttl/Ssi Encoder Interface
Control Units 6.5 CUA32 Control Unit Adapter 6.5.3.4 X220 HTL/TTL/SSI encoder interface Table 6-41 Encoder connection X220 Signal name Technical specifications +Temp KTY or PTC input SSI_CLK SSI clock, positive SSI_XCLK SSI clock, negative P_Encoder 5 V / 24 V Encoder power supply P_Encoder 5 V / 24 V Encoder power supply... - Page 224 Control Units 6.5 CUA32 Control Unit Adapter Table 6-42 Specification of measuring systems that can be connected Parameter Designation Threshold Min. Type Max. Unit High signal level Hdiff (TTL bipolar at X220) Low signal level Ldiff (TTL bipolar at X220) High signal level High (HTL unipolar)
-
Page 225: X210 Ep Terminals / Temperature Sensor Connection
Control Units 6.5 CUA32 Control Unit Adapter 6.5.3.5 X210 EP terminals / temperature sensor connection Table 6-43 Terminal strip X210 Terminal Function Technical specifications +Temp Temperature sensor connection KTY84–1C130/PTC -Temp EP +24 V (Enable Pulses) Supply voltage: 24 V DC (20.4 V - 28.8 V) Current consumption: 10 mA EP M1 (Enable Pulses) Isolated input... -
Page 226: Description Of The Leds On The Cua32 Control Unit Adapter
24 V power supply, this can destroy the encoder electronics. Cause and rectification of faults The following reference contains information about the cause and rectification of faults: Reference: /IH1/ SINAMICS S120 Commissioning Manual. AC Drive Manual, (GH6), 07/2007 Edition, 6SL3097-2AL00-0BP2... -
Page 227: Dimension Drawing
Control Units 6.5 CUA32 Control Unit Adapter 6.5.4 Dimension drawing Figure 6-15 Dimension drawing of the CUA32 Control Unit Adapter 6.5.5 Assembly See Section "CUA31 Assembly". AC Drive Manual, (GH6), 07/2007 Edition, 6SL3097-2AL00-0BP2... -
Page 228: Technical Data
Control Units 6.5 CUA32 Control Unit Adapter 6.5.6 Technical data Table 6-45 Technical data CUA32 Unit Value Electronics power supply Voltage 24 DC (20.4 – 28.8) Current (without DRIVE-CLiQ and encoder) 0.11 Max. current consumption of encoder Power loss Weight 0.32 AC Drive Manual, (GH6), 07/2007 Edition, 6SL3097-2AL00-0BP2... -
Page 229: Supplementary System Components And Encoder System Integration
SME125 CU310 DP CU310 PN via DRIVE-CLiQ Additional information on the additional system components is provided in the following reference: Reference: /GH1/ SINAMICS S120 Equipment Manual for Control Units and Additional System Components AC Drive Manual, (GH6), 07/2007 Edition, 6SL3097-2AL00-0BP2... -
Page 230: Basic Operator Panel Bop20
Supplementary System Components and Encoder System Integration 7.2 Basic Operator Panel BOP20 Basic Operator Panel BOP20 7.2.1 Description The Basic Operator Panel BOP20 is a basic operator panel with six keys and a backlit display unit. The BOP20 can be inserted on the SINAMICS Control Unit CU310 DP / PN and operated. - Page 231 Supplementary System Components and Encoder System Integration 7.2 Basic Operator Panel BOP20 Overview of displays and keys Figure 7-2 Overview of displays and keys Table 7-3 Displays Display Meaning top left The active drive object of the BOP is displayed here. 2 positions The displays and key operations always refer to this drive object.
- Page 232 The keys are dependent on the actual display and are used to raise or lower values. Lower Displays and operating the BOP20 Information about the displays and using the BOP20 is provided in the following reference: Reference: /IH1/ SINAMICS S120 Commissioning Manual. AC Drive Manual, (GH6), 07/2007 Edition, 6SL3097-2AL00-0BP2...
-
Page 233: Mounting
Supplementary System Components and Encoder System Integration 7.2 Basic Operator Panel BOP20 7.2.3 Mounting Table 7-5 Mounting 1. CU310 and BOP20 2. Press the bars of the dummy cover together 3. Remove the dummy cover 4. Locate the BOP20 Note The Basic Operator Panel BOP20 may be inserted and withdrawn while the Control Unit is operational. -
Page 234: Technical Data
Supplementary System Components and Encoder System Integration 7.2 Basic Operator Panel BOP20 7.2.4 Technical data Table 7-6 Technical specifications Basic Operator Panel BOP20 Weight, approx. 0.02 AC Drive Manual, (GH6), 07/2007 Edition, 6SL3097-2AL00-0BP2... -
Page 235: Sensor Module Cabinet-Mounted Smc10
Supplementary System Components and Encoder System Integration 7.3 Sensor Module Cabinet-Mounted SMC10 Sensor Module Cabinet-Mounted SMC10 7.3.1 Description The Sensor Module Cabinet-Mounted SMC10 evaluates encoder signals and transmits the speed, actual position value, rotor position and, if necessary, the motor temperature via DRIVE-CLiQ to the Control Unit. - Page 236 Supplementary System Components and Encoder System Integration 7.3 Sensor Module Cabinet-Mounted SMC10 Figure 7-3 Connectable impedances with an exciting frequency f = 5000 Hz The maximum sensor cable length is 130 m. The component is snapped on to a mounting rail according to DIN EN 60715. AC Drive Manual, (GH6), 07/2007 Edition, 6SL3097-2AL00-0BP2...
-
Page 237: Safety Information
Supplementary System Components and Encoder System Integration 7.3 Sensor Module Cabinet-Mounted SMC10 7.3.2 Safety information WARNING The 50 mm clearances above and below the components must be observed. NOTICE Only one measuring system can be connected to each Sensor Module. Note There may be no electrical connection between the measuring system housing and the measuring system electronics (this requirement is fulfilled for most encoder systems). -
Page 238: Interface Description
Supplementary System Components and Encoder System Integration 7.3 Sensor Module Cabinet-Mounted SMC10 7.3.3 Interface description 7.3.3.1 Overview Figure 7-4 Interface description of the SMC10 AC Drive Manual, (GH6), 07/2007 Edition, 6SL3097-2AL00-0BP2... -
Page 239: Drive-Cliq Interface X500
Supplementary System Components and Encoder System Integration 7.3 Sensor Module Cabinet-Mounted SMC10 7.3.3.2 DRIVE-CLiQ interface X500 Table 7-8 DRIVE-CLiQ interface X500 Signal name Technical specifications Transmit data + Transmit data - Receive data + Reserved, do not use Reserved, do not use Receive data - Reserved, do not use Reserved, do not use... -
Page 240: X520 Sensor System
Supplementary System Components and Encoder System Integration 7.3 Sensor Module Cabinet-Mounted SMC10 7.3.3.3 X520 sensor system Table 7-9 Sensor interface X520 Signal name Technical data Reserved, do not use Reserved, do not use Resolver signal A (sin+) Inverse resolver signal A (sin-) Ground Ground (for internal shield) Resolver signal B (cos+) -
Page 241: Electronics Power Supply X524
Supplementary System Components and Encoder System Integration 7.3 Sensor Module Cabinet-Mounted SMC10 7.3.3.4 Electronics power supply X524 Table 7-10 Terminal block X524 Terminal Function Technical specifications Electronics power supply Voltage: 24 V (20.4 V – 28.8 V) Current consumption: max. 0.35 A Electronics power supply Maximum current via jumper in connector: 20 A at 55 °C Electronic ground... -
Page 242: Meaning Of Leds On The Sensor Module Cabinet 10 / 20 (Smc10 / Smc20)
Supplementary System Components and Encoder System Integration 7.3 Sensor Module Cabinet-Mounted SMC10 7.3.3.5 Meaning of LEDs on the Sensor Module Cabinet 10 / 20 (SMC10 / SMC20) Table 7-11 Sensor Module Cabinet 10 / 20 (SMC10 / SMC20) – description of the LEDs Color Status Description, cause... -
Page 243: Dimension Drawing
Supplementary System Components and Encoder System Integration 7.3 Sensor Module Cabinet-Mounted SMC10 7.3.4 Dimension drawing Figure 7-5 Dimension drawing of the SMC10 AC Drive Manual, (GH6), 07/2007 Edition, 6SL3097-2AL00-0BP2... -
Page 244: Installation
Supplementary System Components and Encoder System Integration 7.3 Sensor Module Cabinet-Mounted SMC10 7.3.5 Installation Installation 1. Place the component on the DIN rail. 2. Snap the component on to the DIN rail. Make sure that the mounting slides at the rear latch into place. -
Page 245: Technical Data
Supplementary System Components and Encoder System Integration 7.3 Sensor Module Cabinet-Mounted SMC10 7.3.6 Technical data Table 7-12 Technical specifications Sensor Module Cabinet-Mounted SMC10 Designation Unit Value 6SL3055-0AA00-5AAx Electronics power supply Voltage 24 DC (20.4 – 28.8) Current (without measuring system) ≤... -
Page 246: Sensor Module Cabinet-Mounted Smc20
Supplementary System Components and Encoder System Integration 7.4 Sensor Module Cabinet-Mounted SMC20 Sensor Module Cabinet-Mounted SMC20 7.4.1 Description The Sensor Module Cabinet-Mounted SMC20 evaluates encoder signals and transmits the speed, actual position value, rotor position and, if necessary, the motor temperature and reference point via DRIVE-CLiQ to the Control Unit. -
Page 247: Interface Description
Supplementary System Components and Encoder System Integration 7.4 Sensor Module Cabinet-Mounted SMC20 7.4.3 Interface description 7.4.3.1 Overview Figure 7-7 Interface description of the SMC20 AC Drive Manual, (GH6), 07/2007 Edition, 6SL3097-2AL00-0BP2... -
Page 248: Drive-Cliq Interface X500
Supplementary System Components and Encoder System Integration 7.4 Sensor Module Cabinet-Mounted SMC20 7.4.3.2 DRIVE-CLiQ interface X500 Table 7-14 DRIVE-CLiQ interface X500 Signal name Technical specifications Transmit data + Transmit data - Receive data + Reserved, do not use Reserved, do not use Receive data - Reserved, do not use Reserved, do not use... -
Page 249: X520 Sensor System
Supplementary System Components and Encoder System Integration 7.4 Sensor Module Cabinet-Mounted SMC20 7.4.3.3 X520 sensor system Table 7-15 Sensor interface X520 Signal name Technical data P encoder Encoder power supply M encoder Ground for encoder power supply Incremental signal A Inverse incremental signal A Ground Ground (for internal shield) -
Page 250: Electronics Power Supply X524
Supplementary System Components and Encoder System Integration 7.4 Sensor Module Cabinet-Mounted SMC20 7.4.3.4 Electronics power supply X524 Table 7-16 Terminal block X524 Terminal Function Technical specifications Electronics power supply Voltage: 24 V (20.4 V – 28.8 V) Current consumption: max. 0.35 A Electronics power supply Maximum current via jumper in Electronics ground... -
Page 251: Meaning Of Leds On The Sensor Module Cabinet 10 / 20 (Smc10 / Smc20)
Supplementary System Components and Encoder System Integration 7.4 Sensor Module Cabinet-Mounted SMC20 7.4.3.5 Meaning of LEDs on the Sensor Module Cabinet 10 / 20 (SMC10 / SMC20) Table 7-17 Sensor Module Cabinet 10 / 20 (SMC10 / SMC20) – description of the LEDs Color Status Description, cause... -
Page 252: Dimension Drawing
Supplementary System Components and Encoder System Integration 7.4 Sensor Module Cabinet-Mounted SMC20 7.4.4 Dimension drawing Figure 7-8 Dimension drawing of the SMC20 AC Drive Manual, (GH6), 07/2007 Edition, 6SL3097-2AL00-0BP2... -
Page 253: Installation
Supplementary System Components and Encoder System Integration 7.4 Sensor Module Cabinet-Mounted SMC20 7.4.5 Installation Installation 1. Place the component on the DIN rail. 2. Snap the component on to the DIN rail. Make sure that the mounting slides at the rear latch into place. -
Page 254: Technical Specifications
Supplementary System Components and Encoder System Integration 7.4 Sensor Module Cabinet-Mounted SMC20 7.4.6 Technical specifications Table 7-18 Technical specifications Sensor Module Cabinet-Mounted SMC20 Designation Unit Value 6SL3055-0AA00-5BAx Electronics power supply Voltage 24 DC (20.4 – 28.8) Current (without measuring system) ≤... -
Page 255: Option Modules, Brake Control
Supplementary System Components and Encoder System Integration 7.5 Option modules, brake control Option modules, brake control 7.5.1 Introduction An option module brake control is required for operating motors with holding brakes. The option module brake control provides the electrical interface between the CU/PM340 and the brake of a motor. -
Page 256: Interface Description
Supplementary System Components and Encoder System Integration 7.5 Option modules, brake control 7.5.2.2 Interface description Figure 7-10 Interface description: Brake Relay AC Drive Manual, (GH6), 07/2007 Edition, 6SL3097-2AL00-0BP2... - Page 257 Supplementary System Components and Encoder System Integration 7.5 Option modules, brake control Figure 7-11 Connection example: Brake Relay Brake connection Table 7-20 Terminal block Terminal Technical specifications + (BR+) Brake connection - (BR-) AC Drive Manual, (GH6), 07/2007 Edition, 6SL3097-2AL00-0BP2...
-
Page 258: Dimension Drawing
Supplementary System Components and Encoder System Integration 7.5 Option modules, brake control 7.5.2.3 Dimension drawing Figure 7-12 Dimension drawing: Brake Relay 7.5.2.4 Technical data Table 7-21 Technical data Brake Relay Switching capability of the NO contact Max. 440 V AC / 3.5 A 30 V DC/12 A Max. -
Page 259: Safe Brake Relay
The DC power supply should be set to 26 V. This ensures that the power supply for the brake remains within the permissible range when the following conditions are fulfilled: • Using Siemens three-phase motors • Using Siemens MOTION-CONNECT power cables • Motor cable lengths: max. 100 m AC Drive... -
Page 260: Interface Description
Supplementary System Components and Encoder System Integration 7.5 Option modules, brake control 7.5.3.2 Interface description Figure 7-13 Interface description: Safe Brake Relay AC Drive Manual, (GH6), 07/2007 Edition, 6SL3097-2AL00-0BP2... - Page 261 Supplementary System Components and Encoder System Integration 7.5 Option modules, brake control Figure 7-14 Connection example: Safe Brake Relay AC Drive Manual, (GH6), 07/2007 Edition, 6SL3097-2AL00-0BP2...
- Page 262 Supplementary System Components and Encoder System Integration 7.5 Option modules, brake control Electronics power supply X524 Table 7-23 Terminal block X524 Terminal Function Technical specifications Electronics power supply Voltage: 24 V (20.4 V – 28.8 V) Current consumption: max. 0.3 A (without Electronics power supply motor holding brake) Electronics ground...
-
Page 263: Dimension Drawing
Supplementary System Components and Encoder System Integration 7.5 Option modules, brake control 7.5.3.3 Dimension drawing Figure 7-15 Dimension drawing: Safe Brake Relay AC Drive Manual, (GH6), 07/2007 Edition, 6SL3097-2AL00-0BP2... -
Page 264: Mounting
Supplementary System Components and Encoder System Integration 7.5 Option modules, brake control 7.5.3.4 Mounting The Safe Brake Relay can be mounted below the Power Module on the Screening Kit. Figure 7-16 Mounting the Safe Brake Relay on the Screening Kit (frame size FSA) AC Drive Manual, (GH6), 07/2007 Edition, 6SL3097-2AL00-0BP2... - Page 265 Supplementary System Components and Encoder System Integration 7.5 Option modules, brake control Figure 7-17 Mounting the Safe Brake Relay on the Screening Kit (frame sizes FSB and FSC) AC Drive Manual, (GH6), 07/2007 Edition, 6SL3097-2AL00-0BP2...
-
Page 266: Technical Data
Supplementary System Components and Encoder System Integration 7.5 Option modules, brake control 7.5.3.5 Technical data Safe Brake Relay Power supply 20.4 to 28.8 V DC Recommended nominal value of the power supply 26 V DC (to equalize and compensate for the voltage drop along the feeder cable to the 24 V DC solenoid of the motor brake) Max. -
Page 267: Accessories
IP54 acc. to EN 60529. In addition to the data lines, the power supply contacts of DRIVE-CLiQ are also routed via the coupling. 8.1.2 Safety information Note Only Siemens cables should be used for DRIVE-CLiQ connections. AC Drive Manual, (GH6), 07/2007 Edition, 6SL3097-2AL00-0BP2... -
Page 268: Interface Description
Accessories 8.1 DRIVE-CLiQ cabinet gland 8.1.3 Interface description 8.1.3.1 Overview Figure 8-1 DRIVE-CLiQ cabinet gland DRIVE-CLiQ cabinet gland Covering cap, Yamaichi, order no.: Y-ConAS-24-S IP67 acc. to EN 60529 interface Mounting holes Rating plate IP20 or IPXXB acc. to EN 60529 interface AC Drive Manual, (GH6), 07/2007 Edition, 6SL3097-2AL00-0BP2... -
Page 269: Dimension Drawing
Accessories 8.1 DRIVE-CLiQ cabinet gland 8.1.4 Dimension drawing Figure 8-2 Dimension drawing, DRIVE-CLiQ cabinet gland Accessories W [mm] D [mm] H [mm] DRIVE-CLiQ cabinet gland (with 69.3 (2.72) 62.2 (2.44) 48 (1.88) seal) AC Drive Manual, (GH6), 07/2007 Edition, 6SL3097-2AL00-0BP2... - Page 270 Accessories 8.1 DRIVE-CLiQ cabinet gland Figure 8-3 Cut-out for the cabinet AC Drive Manual, (GH6), 07/2007 Edition, 6SL3097-2AL00-0BP2...
-
Page 271: Mounting
Accessories 8.1 DRIVE-CLiQ cabinet gland 8.1.5 Mounting Figure 8-4 DRIVE-CLiQ cabinet gland Installation 1. Make an opening in the cabinet panel according to the Chapter "Dimension drawing" for the DRIVE-CLiQ cabinet gland. 2. Insert the components from the outer side of the cabinet through the opening in the cabinet. -
Page 272: Technical Data
Accessories 8.1 DRIVE-CLiQ cabinet gland 8.1.6 Technical data Table 8-1 Technical data DRIVE-CLiQ cabinet gland Unit 6SL3066-2DA00-0AAx Weight 0.135 Degree of protection IP20 or IPXXB acc. to EN 60529 in the electrical cabinet IP54 to EN 60529 outside the electrical cabinet AC Drive Manual, (GH6), 07/2007 Edition, 6SL3097-2AL00-0BP2... -
Page 273: Drive-Cliq Coupling
IP67 acc. to EN 60529. In addition to the data lines, the power supply contacts of DRIVE-CLiQ are also routed via the coupling. 8.2.2 Safety information Note Only Siemens cables should be used for DRIVE-CLiQ connections. 8.2.3 Interface description 8.2.3.1 Overview Figure 8-5... -
Page 274: Dimension Drawing
Accessories 8.2 DRIVE-CLiQ coupling 8.2.4 Dimension drawing Figure 8-6 Dimension drawing, DRIVE-CLiQ coupling Table 8-2 Dimensions of the DRIVE-CLiQ coupling, all data in mm and (inches) Accessories W [mm] b [mm] H [mm] D [mm] DRIVE-CLiQ 111.5 (4.38) 57.1 (2.24) 61 (2.40) 38 (1.49) coupling... -
Page 275: Installation
Accessories 8.2 DRIVE-CLiQ coupling 8.2.5 Installation Figure 8-7 Hole drilling template for installation 1. Fit the DRIVE-CLiQ coupling to the mounting surface in accordance with the drilling template. 2. Remove the protective caps on the DRIVE-CLiQ coupling. 3. Insert the DRIVE-CLiQ connector at both ends of the DRIVE-CLiQ coupling. 8.2.6 Technical data Table 8-3... -
Page 276: Screening Kit
Accessories 8.3 Screening kit Screening kit Shielding methods A Screening Kit is available as option for all frame sizes to connect the shield. This Screening Kit is used to connect the shield of power cables. For frame sizes FSA to FSC, the Screening Kit is directly mounted on the electrical cabinet panel and for frame sizes FSD to FSF, it is screwed to the Power Module. -
Page 277: Dimension Drawings
Accessories 8.3 Screening kit 8.3.1 Dimension drawings Figure 8-9 Dimension drawing: Power Module PM340 with Screening Kit and Brake Relay, frame size FSA AC Drive Manual, (GH6), 07/2007 Edition, 6SL3097-2AL00-0BP2... - Page 278 Accessories 8.3 Screening kit Figure 8-10 Dimension drawing: Screening Kit, frame size FSB AC Drive Manual, (GH6), 07/2007 Edition, 6SL3097-2AL00-0BP2...
- Page 279 Accessories 8.3 Screening kit Figure 8-11 Dimension drawing: Screening Kit, frame size FSC AC Drive Manual, (GH6), 07/2007 Edition, 6SL3097-2AL00-0BP2...
- Page 280 Accessories 8.3 Screening kit Figure 8-12 Dimension drawing: Power Module PM340 with Screening Kit, frame size FSD AC Drive Manual, (GH6), 07/2007 Edition, 6SL3097-2AL00-0BP2...
- Page 281 Accessories 8.3 Screening kit Figure 8-13 Dimension drawing: Power Module PM340 with Screening Kit, frame size FSE AC Drive Manual, (GH6), 07/2007 Edition, 6SL3097-2AL00-0BP2...
- Page 282 Accessories 8.3 Screening kit Figure 8-14 Dimension drawing: Power Module PM340 with Screening Kit, frame size FSF AC Drive Manual, (GH6), 07/2007 Edition, 6SL3097-2AL00-0BP2...
-
Page 283: Mounting
Accessories 8.3 Screening kit 8.3.2 Mounting Figure 8-15 Mounting: Power Module PM340, frame size FSA, with Screening Kit AC Drive Manual, (GH6), 07/2007 Edition, 6SL3097-2AL00-0BP2... - Page 284 Accessories 8.3 Screening kit Figure 8-16 Power Module PM340, frame size FSA, with line filter and Screening Kit 1. Power Module PM340 frame size FSA 2. Line filters 3. Screening Kit AC Drive Manual, (GH6), 07/2007 Edition, 6SL3097-2AL00-0BP2...
- Page 285 Accessories 8.3 Screening kit Figure 8-17 Mounting: Power Module PM340, frame sizes FSB and FSC, with Screening Kit AC Drive Manual, (GH6), 07/2007 Edition, 6SL3097-2AL00-0BP2...
- Page 286 Accessories 8.3 Screening kit Figure 8-18 Mounting: Power Module PM340, frame sizes FSD and FSE, with Screening Kit AC Drive Manual, (GH6), 07/2007 Edition, 6SL3097-2AL00-0BP2...
- Page 287 Accessories 8.3 Screening kit Figure 8-19 Mounting: Power Module PM340, frame size FSF, with Screening Kit AC Drive Manual, (GH6), 07/2007 Edition, 6SL3097-2AL00-0BP2...
- Page 288 Accessories 8.3 Screening kit AC Drive Manual, (GH6), 07/2007 Edition, 6SL3097-2AL00-0BP2...
-
Page 289: Cabinet Design And Emc For Components, Blocksize Format
Cabinet Design and EMC for Components, Blocksize Format Information 9.1.1 General The SINAMICS S components are designed in accordance with degree of protection IP20 or IPXXB acc. to EN 60529 and as open-type devices to UL 50. This ensures protection against electric shocks. -
Page 290: Safety Information
CAUTION To ensure that the encoder system works properly, you are advised to use the original Siemens accessories from catalogs D21.1 and D21.2. Only motors with a safe electrically isolated holding brake may be connected. The brake conductors must also be safely electrically isolated. -
Page 291: Selection Of Devices Required For Operating Sinamics
Cabinet Design and EMC for Components, Blocksize Format 9.2 Selection of devices required for operating SINAMICS Selection of devices required for operating SINAMICS 9.2.1 General The following components are required to connected to the line supply: ● Line disconnecting device ●... -
Page 292: Line Filter
9.2.4 Line filter A separate line filter (see catalog) must be used for the SINAMICS S120 drive line-up. An additional line filter must be used to suppress interference in other loads. To prevent mutual interference, this line filter must not be equipped with line-side capacitors with respect to ground. -
Page 293: Line Contactors
Cabinet Design and EMC for Components, Blocksize Format 9.2 Selection of devices required for operating SINAMICS 9.2.5 Line contactors Line contactors are required to provide electrical isolation between the drive line-up and the line supply. When selecting a line contactor, the characteristic values in the technical data apply. The cable routing, the bundling factor and the factor for the ambient temperature according to EN 60204-1 must be taken into account when dimensioning the various cables. -
Page 294: Dc Supply Voltage
The DC power supply should be set to 26 V. This ensures that the power supply for the brake remains within the permissible range when the following conditions are fulfilled: • Using Siemens three-phase motors • Using Siemens MOTION-CONNECT power cables • Motor cable lengths: max. 100 m AC Drive... -
Page 295: Selecting Power Supply Units
Cabinet Design and EMC for Components, Blocksize Format 9.3 24 V DC supply voltage 9.3.2 Selecting power supply units You are advised to use the devices in the following table. These devices meet the applicable requirements of EN 60204-1. Table 9-1 Recommendation for SITOP Power modular Rated output current [A] Input voltage range [V]... -
Page 296: Component Current Consumption
9.3.3 24 V component current consumption A separate 24 V power supply must be used for the SINAMICS S120 drive line-up. The following table can be used to calculate the 24 V DC power supply. The values for typical current consumption are used as a basis for configuration. -
Page 297: Overcurrent Protection
● Cable laying method to EN 60204-1 EN 60204-1, Section 14, can be used to determine the overcurrent protection devices. Circuit-breakers from the Siemens NSK catalog are recommended as overcurrent protection devices on the primary side, and miniature circuit-breakers or SITOP select 6EP1961-2BA00 as overcurrent protection devices on the secondary side. - Page 298 Cabinet Design and EMC for Components, Blocksize Format 9.3 24 V DC supply voltage Table 9-4 MCBs by conductor cross-section and temperature Conductor cross-section Max. value up to 40 °C Max. value up to 55 °C 1.5 mm 10 A 2.5 mm 16 A 10 A...
-
Page 299: Arrangement Of Components And Equipment
Cabinet Design and EMC for Components, Blocksize Format 9.4 Arrangement of components and equipment Arrangement of components and equipment 9.4.1 General The arrangement of the components and equipment takes account of ● Space requirements ● Cable routing ● Bending radius of connection cables For MOTION-CONNECT cables, see catalog D21.1 or D21.2. -
Page 300: Mounting
Cabinet Design and EMC for Components, Blocksize Format 9.4 Arrangement of components and equipment 9.4.2 Mounting The components should be mounted on a conductive mounting surface to ensure low impedance between the component and the mounting surface. Mounting plates with a galvanized surface are suitable. -
Page 301: Information About Electromagnetic Compatibility (Emc) And Cable Routing
● SINAMICS line filter (optional for frame size FSA) ● Observance of information about cable shielding and equipotential bonding ● Only the recommended Siemens power and signal cables are used ● Only cables from Siemens must be used for DRIVE-CLiQ connections. -
Page 302: Cable Shielding And Routing
Cabinet Design and EMC for Components, Blocksize Format 9.5 Information about electromagnetic compatibility (EMC) and cable routing 9.5.2 Cable shielding and routing In order to comply with the EMC requirements, certain cables must be routed apart from other cables and from certain components. To full EMC requirements, the following cables must be used with shields: ●... - Page 303 Cabinet Design and EMC for Components, Blocksize Format 9.5 Information about electromagnetic compatibility (EMC) and cable routing Figure 9-2 Shielding of a Power Module PM340 1. Line supply input 2. Motor cable 3. Rear metal panel 4. Use suitable clamps/clips to reliably connect the shield of the motor and field cable to the rear metal panel.
- Page 304 Cabinet Design and EMC for Components, Blocksize Format 9.5 Information about electromagnetic compatibility (EMC) and cable routing external magnetic fields (e.g. transformers, line reactors). In both cases, a distance of ≥ 300 mm is usually sufficient. Signal and DC power supply cables Operating non-shielded signal and DC power supply cables (e.g.
-
Page 305: Equipotential Bonding
Cabinet Design and EMC for Components, Blocksize Format 9.5 Information about electromagnetic compatibility (EMC) and cable routing 9.5.3 Equipotential bonding The SINAMICS S drive system is designed for use in cabinets with a PE conductor connection. The machinery construction OEM must carefully ensure that all of the conditions regarding the assignment of the ground cable, ground connecting cables, protective conductor and potential bonding cable connections and terminals are clearly specified in his Technical User/Manufacturer Documentation, are clearly specified (this is especially important if there... -
Page 306: Connection Methods
Cabinet Design and EMC for Components, Blocksize Format 9.6 Connection methods Connection methods 9.6.1 Screw terminals Connectable conductor cross-sections of screw terminals Table 9-6 Screw terminals Screw terminal type Connectable conductor cross- Flexible 0.14 mm to 1.5 mm sections With wire end ferrule, without plastic sleeve 0.25 mm to 1.5 mm With wire end ferrule, with plastic sleeve... -
Page 307: Connectable Cable Cross-Sections
Cabinet Design and EMC for Components, Blocksize Format 9.6 Connection methods 9.6.2 Connectable cable cross-sections Table 9-7 Connectable cable cross-sections: Power supply cable / motor cable, part 1 Connection cross-section [mm Component Terminal type Motor Module Motor connector 30 A 3+2 pin 3 A to 30 A 2 x 3 A to 2 x 18 A Motor Module... - Page 308 Cabinet Design and EMC for Components, Blocksize Format 9.6 Connection methods Table 9-8 Connectable cable cross-sections: Power supply cable / motor cable, part 2 Connection cross-section [mm Component Terminal type Motor Module Motor connector 30 A 3+2 pin 3 A to 30 A 2 x 3 A to 2 x 18 A Motor Module Threaded bolt M6/6 Nm...
- Page 309 Cabinet Design and EMC for Components, Blocksize Format 9.6 Connection methods Table 9-10 Connectable cable cross-sections: Power supply cable / connection for braking resistor, part 4 Connection cross-section [mm Component Terminal type Basic Line Module 20 kW Screw-type line connection terminal Basic Line Module 20 kW Screw-type...
-
Page 310: Information On Cabinet Cooling
Cabinet Design and EMC for Components, Blocksize Format 9.7 Information on cabinet cooling Information on cabinet cooling 9.7.1 General Electrical cabinets can be cooled, using among other things the following: ● filtered fans ● heat exchangers or ● cooling units. The decision in favor of one of these methods will depend on the prevailing ambient conditions and the cooling power required. - Page 311 Cabinet Design and EMC for Components, Blocksize Format 9.7 Information on cabinet cooling Table 9-11 Cooling clearances around the components Component Clearance above and below Lateral clearance in mm and (inches) in mm and (inches) CU310 DP 50 (1.97) CU310 PN 50 (1.97) CUA31 50 (1.97)
-
Page 312: Ventilation
Cabinet Design and EMC for Components, Blocksize Format 9.7 Information on cabinet cooling 9.7.2 Ventilation The SINAMICS equipment is ventilated separately by means of integrated fans and is in some cases cooled by means of natural convection. The cooling air must flow through the components vertically from bottom (cooler region) to top (region heated by operation). - Page 313 Cabinet Design and EMC for Components, Blocksize Format 9.7 Information on cabinet cooling Figure 9-4 Examples of cabinet ventilation CAUTION The air guidance and arrangement of the cooling equipment must be chosen in such a way as to prevent condensation from forming. If necessary, cabinet enclosure heating may have to be installed.
-
Page 314: Power Loss Of Components In Rated Operation
Cabinet Design and EMC for Components, Blocksize Format 9.7 Information on cabinet cooling 9.7.3 Power loss of components in rated operation The following table shows the power loss for components. The characteristic values apply for the following conditions: ● Line supply voltage for Power Modules 1-ph. 200 V AC to 3-ph. 380 V to 480 V AC ±10%. ●... -
Page 315: Service And Maintenance
Safety information DANGER Only Siemens customer service, repair centers that have been authorized by Siemens or authorized personnel may repair drive equipment. Al of the persons involved must have in- depth knowledge of all of the warnings and operating instructions as listed in this Manual. -
Page 316: Service And Maintenance For Components, Blocksize Format
Service and Maintenance 10.2 Service and maintenance for components, Blocksize format 10.2 Service and maintenance for components, Blocksize format 10.2.1 Replacing hardware components NOTICE Hardware components may only be replaced when in the no-voltage state! The following components can be replaced with replacement/exchange components with the same Order No.: ●... - Page 317 Service and Maintenance 10.2 Service and maintenance for components, Blocksize format Figure 10-1 Replacing the fan for a Power Module PM340, frame size FSA (tightening torque 0.4 Nm) AC Drive Manual, (GH6), 07/2007 Edition, 6SL3097-2AL00-0BP2...
- Page 318 Service and Maintenance 10.2 Service and maintenance for components, Blocksize format Figure 10-2 Replacing a fan for a Power Module PM340, frame sizes FSB and FSC (tightening torque 0.4 Nm) AC Drive Manual, (GH6), 07/2007 Edition, 6SL3097-2AL00-0BP2...
- Page 319 Service and Maintenance 10.2 Service and maintenance for components, Blocksize format Figure 10-3 Replacing a fan for a Power Module PM340, frame sizes FSD and FSE 1. Removing the cover using a suitable tool. 2. Withdraw the two connectors shown and lift-out the fan. 3.
- Page 320 Service and Maintenance 10.2 Service and maintenance for components, Blocksize format Figure 10-4 Replacing the fan for a Power Module PM340, frame size FSF 5. Release the screws and remove the cover. 6. Withdraw the two connectors shown and lift-out the fan. 7.
-
Page 321: Service And Maintenance For Chassis Format Components
The actual intervals at which maintenance procedures are to be performed depend on the installation conditions (cabinet environment) and the operating conditions. Siemens offers its customers support in the form of a service contract. For further details, contact your regional office or sales office. -
Page 322: Maintenance
Service and Maintenance 10.3 Service and maintenance for Chassis format components 10.3.1 Maintenance Servicing involves activities and procedures for maintaining and restoring the operating condition of the devices. Required tools The following tools are required for replacing components: ● Spanner or socket spanner (w/f 10) ●... -
Page 323: Installation Equipment
Service and Maintenance 10.3 Service and maintenance for Chassis format components 10.3.2 Installation equipment Description The installation equipment is used to install and remove the power blocks for Power Modules in the Chassis format. It is used as an installation aid, which is placed in front of and secured to the module. The telescopic guide support allows the withdrawable device to be adjusted according to the height at which the power blocks are installed. -
Page 324: Replacing Components
Service and Maintenance 10.3 Service and maintenance for Chassis format components 10.3.3 Replacing components 10.3.3.1 Safety information DANGER When transporting the devices and replacing components, note the following: • Some of the devices and components are heavy or top heavy. •... -
Page 325: Replacing The Powerblock, Power Module, Frame Size Fx
Service and Maintenance 10.3 Service and maintenance for Chassis format components 10.3.3.2 Replacing the Powerblock, Power Module, frame size FX Replacing the Powerblock Figure 10-6 Replacing the Powerblock, Power Module, frame size FX AC Drive Manual, (GH6), 07/2007 Edition, 6SL3097-2AL00-0BP2... - Page 326 Service and Maintenance 10.3 Service and maintenance for Chassis format components Preparatory steps ● Disconnect the drive line-up from the power supply. ● Allow unimpeded access to the power block. ● Remove the front cover. Removal The steps for the removal procedure are numbered in accordance with the previous diagram. 1.
-
Page 327: Replacing The Powerblock, Power Module, Frame Size Gx
Service and Maintenance 10.3 Service and maintenance for Chassis format components 10.3.3.3 Replacing the Powerblock, Power Module, frame size GX Replacing the Powerblock Figure 10-7 Replacing the Powerblock, Power Module, frame size GX AC Drive Manual, (GH6), 07/2007 Edition, 6SL3097-2AL00-0BP2... - Page 328 Service and Maintenance 10.3 Service and maintenance for Chassis format components Preparatory steps ● Disconnect the drive line-up from the power supply. ● Allow unimpeded access to the power block. ● Remove the front cover. Removal The steps for the removal procedure are numbered in accordance with Fig. 8.3. 1.
-
Page 329: Replacing The Fan, Power Module, Frame Size Fx
Service and Maintenance 10.3 Service and maintenance for Chassis format components 10.3.3.4 Replacing the fan, Power Module, frame size FX Replacing the fan Figure 10-8 Replacing the fan, Power Module, frame size FX AC Drive Manual, (GH6), 07/2007 Edition, 6SL3097-2AL00-0BP2... - Page 330 Service and Maintenance 10.3 Service and maintenance for Chassis format components Description The average service life of the device fans is 50,000 hours. In practice, however, the service life depends on other variables, including ambient temperature and the degree of cabinet protection and, therefore, may deviate from this value.
-
Page 331: Replacing The Fan, Power Module, Frame Size Gx
Service and Maintenance 10.3 Service and maintenance for Chassis format components 10.3.3.5 Replacing the fan, Power Module, frame size GX Replacing the fan Figure 10-9 Replacing the fan, Power Module, frame size GX AC Drive Manual, (GH6), 07/2007 Edition, 6SL3097-2AL00-0BP2... - Page 332 Service and Maintenance 10.3 Service and maintenance for Chassis format components Description The average service life of the device fans is 50,000 hours. In practice, however, the service life depends on other variables, including ambient temperature and the degree of cabinet protection and, therefore, may deviate from this value.
-
Page 333: A.1 List Of Abbreviations
Appendix A List of abbreviations Note The following list of abbreviations includes all abbreviations and their meanings used in the entire SINAMICS user documentation. Abbreviation Meaning, German Meaning, English A... Warnung Alarm Wechselstrom Alternating Current Analog-Digital-Konverter Analog Digital Converter Analogeingang Analog Input Active Interface Module Active Interface Module... - Page 334 Appendix A A.1 List of abbreviations Abbreviation Meaning, German Meaning, English Serielles Bussystem Controller Area Network Kommunikationsbaugruppe CAN Communication Board CAN Compact Disc Compact Disc Befehlsdatensatz Command Data Set CompactFlash CompactFlash Konnektoreingang Connector Input Computerunterstützte numerische Steuerung Computer Numerical Control Konnektorausgang Connector Output CO/BO...
- Page 335 Appendix A A.1 List of abbreviations Abbreviation Meaning, German Meaning, English Europäische Norm European Standard EnDat Geber-Schnittstelle Encoder-Data-Interface Impulsfreigabe Enable Pulses EPOS Einfachpositionierer Basic positioner Engineering System Engineering System Ersatzschaltbild Equivalent circuit diagram Erweitertes Stillsetzen und Rückziehen Extended Stop and Retract F...
- Page 336 Appendix A A.1 List of abbreviations Abbreviation Meaning, German Meaning, English Identifizierung Identifier Internationale Norm in der Elektrotechnik International Electrotechnical Commission Interface Interface IGBT Bipolartransistor mit isolierter Steuerelektrode Insulated Gate Bipolar Transistor Impulslöschung Pulse suppression Interpolatortakt Interpolator clock Drehstromversorgungsnetz ungeerdet Insulated three-phase supply network Interner Spannungsschutz Internal Voltage Protection...
- Page 337 Appendix A A.1 List of abbreviations Abbreviation Meaning, German Meaning, English NEMA Normengremium in USA (United States of America) National Electrical Manufacturers Association Nullmarke Zero Mark Schließer Normally Open (contact) Netzstromrichter Line power converter Open Architecture Open Architecture Original Equipment Manufacturer Original Equipment Manufacturer Busstecker für Lichtleiter Optical Link Plug...
- Page 338 Appendix A A.1 List of abbreviations Abbreviation Meaning, German Meaning, English RPDO Receive Process Data Object Receive Process Data Object RS232 Serielle Schnittstelle Serial Interface RS485 Norm. Beschreibt die Physik einer digitalen seriellen Standard. Describes the physical characteristics of a Schnittstelle.
- Page 339 Appendix A A.1 List of abbreviations Abbreviation Meaning, German Meaning, English Terminal Board Terminal Board Totally Integrated Automation Totally Integrated Automation Terminal Module Terminal Module Drehstromversorgungsnetz geerdet Grounded three-phase supply network Nachstellzeit Integral time TPDO Transmit Process Data Object Transmit Process Data Object Drehstromversorgungsnetz geerdet Grounded three-phase supply network Transistor-Transistor-Logik...
- Page 340 Appendix A A.1 List of abbreviations AC Drive Manual, (GH6), 07/2007 Edition, 6SL3097-2AL00-0BP2...
- Page 341 AC Drive Manual, (GH6), 07/2007 Edition, 6SL3097-2AL00-0BP2...
- Page 342 Service and Maintenance AC Drive Manual, (GH6), 07/2007 Edition, 6SL3097-2AL00-0BP2...
- Page 343 If you come across any misprints in this document, please let us know using this form. We would also be grateful for any suggestions and recommendations for improvement. AC Drive Manual, (GH6), 07/2007 Edition, 6SL3097-2AL00-0BP2...
- Page 344 Service and Maintenance AC Drive Manual, (GH6), 07/2007 Edition, 6SL3097-2AL00-0BP2...
-
Page 345: Index
Index Control Unit 310 DP (CU310 DP), 1 76 3 2 7 H Control Unit 310 PN (CU310 PN), 1 96 3 2 8 H Control Unit Adapter CUA31, 2 11 3 2 9 H Cooling clearances, 6 5, 3 11 Autotransformer, 3 3 0 H 3 3 1 H... - Page 346 Index EMC Directive, 3 01 Power loss, 3 14 3 6 5 H 3 9 5 H Equipotential Bonding, 3 05 Power Modules Chassis, 1 02 3 6 6 H 3 9 6 H ESD information, Power Modules PM340 blocksize, 3 6 7 H 3 9 7 H Power supply,...
- Page 347 Index Line reactors, 4 3 4 H Motor reactors, 1 59 4 3 5 H Motor reactors Chassis, 1 59 4 3 6 H Motor reactors, blocksize, 1 54 4 3 7 H Power Modules blocksize, 4 3 8 H Power Modules in chassis format, 1 13 4 3 9 H...
- Page 348 Siemens AG 6SL3097-2AL00-0BP2 Automation and Drives Motion Control Systems P.O. Box 3180 91050 ERLANGEN GERMANY www.siemens.com/motioncontrol...