Table of Contents
Advertisement
Quick Links
Advertisement
Table of Contents

Related Manuals for Olivetti d-COLOR MF654


Summary of Contents for Olivetti d-COLOR MF654
- Page 1 QUICK GUIDE d-COLOR MF654 / MF554 / MF454 MF364 / MF304 / MF254...
-
Page 3: Table Of Contents
Telephone cable (for users in countries subject to class B regulations).......... 1-14 USB Host ............................1-14 Graphic symbols used on this machine................... 1-14 Caution notations and labels ....................... 1-15 d-COLOR MF654/MF554/MF454 ....................1-15 d-COLOR MF364/MF304/MF254 ....................1-16 Special notice to user ........................1-17 For Europe ............................1-17 Space requirements........................ - Page 4 Finisher FS-533, Punch Kit PK-519 (d-COLOR MF554/MF454/MF364/MF304/MF254) ....2-24 Job Separator JS-506 (d-COLOR MF554/MF454/MF364/MF304/MF254) ........2-25 Finisher FS-536, Finisher FS-534, Saddle Stitcher SD-511, Punch Kit PK-520......2-26 Large Capacity Unit LU-302/LU-207 (d-COLOR MF654/MF554/MF454) ........2-28 Power supply ..........................2-29 2.4.1 Turning the power on and off......................2-29...
- Page 5 Checking network settings of this machine ..................3-15 Checklist ............................3-16 Checking computer information ...................... 3-16 Configuring your computer ......................3-17 Registering destinations ........................3-17 Sending the original ......................... 3-20 3.2.3 Sending data to your Mac computer (SMB Send) ................3-22 d-COLOR MF654/MF554/MF454/MF364/MF304/MF254 Contents-3...
- Page 6 Getting help on the currently displayed screen: ................3-73 Getting help on the desired function or procedure:................. 3-75 Help Menu list ..........................3-77 Using the [Quick Security] function .................... 3-78 3.8.1 [Quick Security]..........................3-78 Required settings ..........................3-78 Contents-4 d-COLOR MF654/MF554/MF454/MF364/MF304/MF254...
- Page 7 When it is time to replace a Developing Unit................... 5-12 When a Waste Toner Box is full ....................... 5-13 5.5.1 Replacing a Toner Cartridge ......................5-13 d-COLOR MF654/MF554/MF454 ....................5-13 d-COLOR MF364/MF304/MF254 ....................5-14 5.5.2 Replacing a Waste Toner Box ......................5-16 d-COLOR MF654/MF554/MF454 ....................
- Page 8 Contents-6 d-COLOR MF654/MF554/MF454/MF364/MF304/MF254...
-
Page 9: Introduction
Introduction... - Page 11 The illustrations and screens used in this manual may appear slightly different from views of the actual equip- ment and screens. Tips Please keep this manual as well as the attached CD/DVD in a safe place where you can access them easily. d-COLOR MF654/MF554/MF454/MF364/MF304/MF254...
-
Page 12: Environmental Information
With a product which has a duplex unit, you can print on both sides of paper automatically. Using this function leads to reducing consumption of natural resources and your cost. Attached printer driver provides this duplex printing function as initial setting in your computer (The setting can be changed after installation manually). d-COLOR MF654/MF554/MF454/MF364/MF304/MF254... -
Page 13: Safety Information
The power cord meets regulatory requirements for the area. The power cord is provided with grounding pin/terminal. Do not use the power cord to other products. Failure to do that could re- sult in a fire or electrical shock. d-COLOR MF654/MF554/MF454/MF364/MF304/MF254... - Page 14 Remove the power plug from the outlet more than one time a year and clean the area between the plug terminals. Dust that accumulates be- tween the plug terminals may cause a fire. d-COLOR MF654/MF554/MF454/MF364/MF304/MF254...
-
Page 15: Installation
When moving this product, always hold it at the locations specified in the User’s Guide or other documents. If the unit is moved while held at loca- tions other than those specified, it may fall, causing severe personal in- jury. d-COLOR MF654/MF554/MF454/MF364/MF304/MF254... -
Page 16: Using The Product
"Caution HOT" caution label. A burn could result. Unplug the product when you will not use the product for long periods of time. When using the machine, do not look at the light of the lamp for a pro- longed time. Eyestrain could result. d-COLOR MF654/MF554/MF454/MF364/MF304/MF254... -
Page 17: Consumables
Then, leave the machine to stand idle for a specified period of time and make sure that the fusing section has cooled down to room temperature. Failure to follow these in- structions could result in a burn. d-COLOR MF654/MF554/MF454/MF364/MF304/MF254... -
Page 18: Regulation Notices
CE Marking (Declaration of Conformity) for users of the European Union (EU) This product is in compliance with the essential requirements and other relevant provisions of Directive 1999/5/EC. Declaration of Conformity is available at "http://www.olivetti.com/Tool/Download/Certificati/view_html". USER INSTRUCTIONS FCC PART 15 - RADIO FREQUENCY DEVICES (for U.S.A. users) NOTE: This equipment has been tested and found to comply with the limits for a Class A digital device, pur- suant to Part 15 of the FCC Rules. -
Page 19: Internal Laser Radiation
Regulation notices Internal laser radiation Maximum Average Radiation Power: 15.1 μW (d-COLOR MF654) / 13.1 μW (d-COLOR MF554) / 10.1 μW (d- COLOR MF454) / 8.1 μW (d-COLOR 364) / 7.1 μW (d-COLOR MF304/MF254) at the laser aperture of the print head unit. -
Page 20: Cdrh Regulations
775-800 nm (d-COLOR MF 654/MF554) or 770-800 nm (d-COLOR MF454/MF364/MF304/MF254). Laser safety label A laser safety label is attached to the outside of the machine, as shown below. d-COLOR MF654/MF554/MF454 or/and complies with 21 CFR 1040.10 and 1040.11 except for deviations pursuant to laser notice no.50,... -
Page 21: Ozone Release
Re- cycling of this product will help to conserve natural resources and prevent potential negative consequences for the environment and human health caused by inappropriate waste handling. This product complies with RoHS (2011/65/EU) Directive. d-COLOR MF654/MF554/MF454/MF364/MF304/MF254 1-13... -
Page 22: Telephone Cable (For Users In Countries Subject To Class B Regulations)
Ground/Earth (Pro- switches tective bonding ter- tective earthing) minal) CLASS II EQUIP- Class II equipment Functional earthing MENT with functional earthing General precaution High temperature Electrical shock hazard CAUTION CAUTION moving fan blade DOUBLE POLE / NEUTRAL FUSING 1-14 d-COLOR MF654/MF554/MF454/MF364/MF304/MF254... -
Page 23: Caution Notations And Labels
Safety precaution notations and labels appear on this machine at the following positions.Be very careful that an accident does not occur when operations such as removing paper jams and staple jams are performed. d-COLOR MF654/MF554/MF454 NOTICE Do not remove caution labels or notations. If any caution label or caution notation is soiled, please clean to make legible. -
Page 24: D-Color Mf364/Mf304/Mf254
Do not remove caution labels or notations. If any caution label or caution notation is soiled, please clean to make legible. If you cannot make them legible, or if the caution label or notation is damaged, please contact your service representative. 1-16 d-COLOR MF654/MF554/MF454/MF364/MF304/MF254... -
Page 25: Special Notice To User
PSTNs provided in different countries, the approval does not, of itself, give an unconditional assurance of successful operation on every PSTN network terminal point. In the event of problems, you should contact your equipment supplier in the first instance. d-COLOR MF654/MF554/MF454/MF364/MF304/MF254 1-17... -
Page 26: Space Requirements
38-11/16 17-13/16 16-9/16 33-3/8 (420) (847) (528) (982) (452) 4-1/2 (115) 9/16 (15) d-COLOR MF654/MF554/MF454 + PC-215 + FS-536 + SD-511 + RU-513 + PI-507 + Unit: inch (mm) LU-302 52-1/16 (1322) 49-7/8 (1267) 6-11/16 9-15/16 16-9/16 33-3/8 (170) (252) -
Page 27: D-Color Mf364/Mf304/Mf254
MF364/MF304/MF254 + DF-629 + PC-210 + JS-506 + MK-730 + CU-101 + Unit: inch (mm) MK-745 NOTICE Be sure to allow a clearance of 8 inches (200 mm) or more at the back of this machine for the ventilation duct. d-COLOR MF654/MF554/MF454/MF364/MF304/MF254 1-19... -
Page 28: Operation Precautions
For details of the overwrite all data function, refer to the User's Guide. Contact your service representative before deleting data. It is recommended to backup HDD periodically as the measures for HDD defect. For the detail information of HDD backup, contact your service representative. 1-20 d-COLOR MF654/MF554/MF454/MF364/MF304/MF254... -
Page 29: Legal Restrictions On Reproduction
This machine provides the forgery prevention function in order to prevent financial instruments from being re- produced illegally. We appreciate your understanding that printed images may infrequently have some noise or image data may not be stored under certain circumstances due to this forgery prevention function. d-COLOR MF654/MF554/MF454/MF364/MF304/MF254 1-21... -
Page 30: Trademark Acknowledgements
FeliCa is a registered trademark of Sony Corporation. MIFARE is a registered trademark of NXP Semiconductors. Bluetooth is a registered trademark of Bluetooth SIG, Inc. All other product and brand names are trademarks or registered trademarks of their respective companies or organizations. 1-22 d-COLOR MF654/MF554/MF454/MF364/MF304/MF254... -
Page 31: Note
Trademark acknowledgements Note User's Guide may not be reproduced in part or in full without permission. Information included in User's Guide is subject to change without notice. d-COLOR MF654/MF554/MF454/MF364/MF304/MF254 1-23... -
Page 32: Software License Agreement
Software, even if Konica Minolta, its affiliate companies, its authorized remarketers or Konica Minolta Licensor have been advised of the possibility of such damages or for any claim by you based on a third party claim. 1-24 d-COLOR MF654/MF554/MF454/MF364/MF304/MF254... - Page 33 BOUND BY ITS TERMS AND CONDITIONS. NEITHER PARTY SHALL BE BOUND BY ANY OTHER STATE- MENTS OR REPRESENTATIONS THAT ARE INCONSISTENT WITH THE TERMS AND CONDITIONS OF THIS AGREEMENT. NO AMENDMENT TO THIS AGREEMENT IS EFFECTIVE UNLESS IN WRITING AND SIGNED BY DULY AUTHORIZED REPRESENTATIVES OF EACH PARTY. d-COLOR MF654/MF554/MF454/MF364/MF304/MF254 1-25...
-
Page 34: I-Option Lk-105 V4 (Searchable Pdfs) End User License Agreement
This license shall automatically terminate upon a failure on your part to comply with any term or condi- tion of this Agreement, in which case you agree to immediately stop use of the Program. This Agreement shall be governed by the laws of Japan. 1-26 d-COLOR MF654/MF554/MF454/MF364/MF304/MF254... - Page 35 About This Machine...
-
Page 37: About This Machine
Errors or damage have been discovered, Maintenance intervals have been exceeded, Mechanical or electrical functions do not work as they should. Exclusion of liability The manufacturer of the system assumes no liability for damages if the system was operated under imper- missible conditions. d-COLOR MF654/MF554/MF454/MF364/MF304/MF254... -
Page 38: Introduction To User's Guide
Select a desired function on the top page (Home), and check the details of the function. Selecting [Introduction] on the top page (Home) allows you to view detailed methods for using the User's Guide. d-COLOR MF654/MF554/MF454/MF364/MF304/MF254... -
Page 39: Layout Of Top Page
• Check that JavaScript in your Web browser is enabled. The Us- er's Guide uses JavaScript for the page display and search func- tions. 1024 e 768 pixels or more Display resolution d-COLOR MF654/MF554/MF454/MF364/MF304/MF254... -
Page 40: Target Groups
This check mark symbol shows a precondition of a procedure. This format number "1" represents the first step. This format number represents the order of serial steps. % This symbol indicates a supplementary explanation of a procedural instruction. d-COLOR MF654/MF554/MF454/MF364/MF304/MF254... -
Page 41: Symbols And Notations
An item enclosed by brackets [ ] indicates a key name on the Touch Panel or computer screen, or the name of a user's guide. Bold text This presents a key name, part name, product name, or option name on the Control Panel. d-COLOR MF654/MF554/MF454/MF364/MF304/MF254... -
Page 42: About This Machine
About this machine About this machine 2.3.1 Optional components (d-COLOR MF654/MF554/MF454) Various optional components can be added to meet your office requirements. List of optional components Name Description Main Unit Scans the original in the scanner section, and prints a scanned im- age in the printer section. - Page 43 Punch Kit PK-520 Used to add the punch function to the Finisher FS-536. Relay Unit RU-513 Required to install the Finisher FS-536 or Finisher FS-537. Saddle Stitcher SD-512 Used to add the fold/center staple function to the Finisher FS-537. d-COLOR MF654/MF554/MF454/MF364/MF304/MF254...
- Page 44 Used to turn the Heater operations on or off. MK-734 The Power Supply BOX MK-734 can be mounted when you pur- chase the Paper Feed Cabinet PC-115, Paper Feed Cabinet PC-215, Paper Feed Cabinet PC-415, or Desk DK-510. 2-10 d-COLOR MF654/MF554/MF454/MF364/MF304/MF254...
- Page 45 ADF. Mount Kit MK-735 Required to use the machine unit that has Authentication Unit AU-201S built in to it. Hard Disk HD-524 Install this unit to perform mirroring of the hard disk contained in the main unit. d-COLOR MF654/MF554/MF454/MF364/MF304/MF254 2-11...
-
Page 46: List Of Optional Components
About this machine 2.3.2 Optional components (d-COLOR MF364/MF304/MF254) Various optional components can be added to meet your office requirements. List of optional components 2-12 d-COLOR MF654/MF554/MF454/MF364/MF304/MF254... - Page 47 110, or Paper Feed Cabinet PC-210 must be installed on this ma- chine. Saddle Stitcher SD-511 Used to add the fold/center staple function to the Finisher FS-534. Punch Kit PK-520 Used to add the punch function to the Finisher FS-534. d-COLOR MF654/MF554/MF454/MF364/MF304/MF254 2-13...
-
Page 48: List Of Other Optional Components
Heater HT-509 Prevents paper in a paper tray from being affected by humidity. The Heater HT-509 can be mounted when you purchase the Paper Feed Cabinet PC-110, Paper Feed Cabinet PC-210, Paper Feed Cabinet PC-410, or Desk DK-510. 2-14 d-COLOR MF654/MF554/MF454/MF364/MF304/MF254... - Page 49 Unit LU-302 to function. Mount Kit MK-735 Required to use the machine unit that has Authentication Unit AU-201S built in to it. Hard Disk HD-524 Install this unit to perform mirroring of the hard disk contained in the main unit. d-COLOR MF654/MF554/MF454/MF364/MF304/MF254 2-15...
-
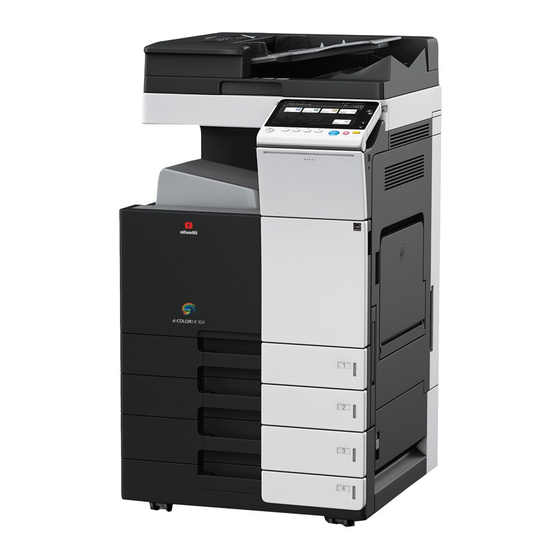
Page 50: Name Of Parts (Mfp) (D-Color Mf654/Mf554/Mf454)
About this machine 2.3.3 Name of parts (MFP) (d-COLOR MF654/MF554/MF454) Front The illustration shows the main unit that contains the optional Output Tray OT-508 and Paper Feed Cabinet PC-215. Name Description Control Panel Use the Touch Panel or buttons on this panel to operate this ma- chine. -
Page 51: Side/Rear
Jack for connecting a telephone (TEL PORT1) Telephone Jack 1 (LINE PORT1) Telephone Jack 2 (LINE PORT2) USB Port (Type A) USB2.0/1.1 Network Connector (10Base-T/100Base-TX/1000Base-T) USB Port (Type B) USB2.0/1.1 Reference For details, refer to the User's Guide CD/DVD. d-COLOR MF654/MF554/MF454/MF364/MF304/MF254 2-17... -
Page 52: Name Of Parts (Mfp) (D-Color Mf364/Mf304/Mf254)
Flashes blue while this machine is receiving a job. If a job is current- ly spooled, this indicator lamp lights up blue. Status Indicator Flashes white during printing. Warning Indicator Flashes orange if a warning occurs. Lights up orange if this machine has stopped due to an error. 2-18 d-COLOR MF654/MF554/MF454/MF364/MF304/MF254... -
Page 53: Side/Rear
Jack for connecting a telephone (TEL PORT1) Telephone Jack 1 (LINE PORT1) Telephone Jack 2 (LINE PORT2) USB Port (Type A) USB2.0/1.1 Network Connector (10Base-T/100Base-TX/1000Base-T) USB Port (Type B) USB2.0/1.1 Reference For details, refer to the User's Guide CD/DVD. d-COLOR MF654/MF554/MF454/MF364/MF304/MF254 2-19... -
Page 54: Name Of Parts (Optional Units)
Name of parts (Optional units) This section shows the names of distinctive parts for each optional unit that can be installed in this machine. Finisher FS-537, Saddle Stitcher SD-512, Punch Kit PK-523, Z Folding Unit ZU-609 (d-COLOR MF654/MF554/MF454) Name Output Tray... - Page 55 About this machine Name Z Folding Unit Staple Cartridge Folding Output Tray Stopper d-COLOR MF654/MF554/MF454/MF364/MF304/MF254 2-21...
-
Page 56: Job Separator Js-602 (D-Color Mf654/Mf554/Mf454)
About this machine Job Separator JS-602 (d-COLOR MF654/MF554/MF454) Name Output Tray 2-22 d-COLOR MF654/MF554/MF454/MF364/MF304/MF254... -
Page 57: Post Inserter Pi-507 (D-Color Mf654/Mf554/Mf454)
About this machine Post Inserter PI-507 (d-COLOR MF654/MF554/MF454) Name Lower Tray Upper Tray Post Inserter Control Panel Reference For details on how to use the Post Inserter Control Panel, refer to the User's Guide CD/DVD. d-COLOR MF654/MF554/MF454/MF364/MF304/MF254 2-23... -
Page 58: Finisher Fs-533, Punch Kit Pk-519 (D-Color Mf554/Mf454/Mf364/Mf304/Mf254)
About this machine Finisher FS-533, Punch Kit PK-519 (d-COLOR MF554/MF454/MF364/MF304/MF254) Name Punch Kit Staple Cartridge Output Tray Tray Extension 2-24 d-COLOR MF654/MF554/MF454/MF364/MF304/MF254... -
Page 59: Job Separator Js-506 (D-Color Mf554/Mf454/Mf364/Mf304/Mf254)
About this machine Job Separator JS-506 (d-COLOR MF554/MF454/MF364/MF304/MF254) Name Output Tray d-COLOR MF654/MF554/MF454/MF364/MF304/MF254 2-25... -
Page 60: Finisher Fs-536, Finisher Fs-534, Saddle Stitcher Sd-511, Punch Kit Pk-520
About this machine Finisher FS-536, Finisher FS-534, Saddle Stitcher SD-511, Punch Kit PK-520 Name Output Tray Staple Cartridge Punch Scrap Box Saddle Stitcher 2-26 d-COLOR MF654/MF554/MF454/MF364/MF304/MF254... - Page 61 About this machine Name Punch Kit Staple Cartridge Folding Output Tray d-COLOR MF654/MF554/MF454/MF364/MF304/MF254 2-27...
-
Page 62: Large Capacity Unit Lu-302/Lu-207 (D-Color Mf654/Mf554/Mf454)
About this machine Large Capacity Unit LU-302/LU-207 (d-COLOR MF654/MF554/MF454) 2-28 d-COLOR MF654/MF554/MF454/MF364/MF304/MF254... -
Page 63: Power Supply
Open the Lower Front Door or Front Door, and press n on the Main Power Switch. Press o on the Main Power Switch. NOTICE To restart this machine, turn the Main Power Switch off and on again after 10 or more seconds have passed. d-COLOR MF654/MF554/MF454/MF364/MF304/MF254 2-29... -
Page 64: Operating The Power Key
Power OFF mode, they are printed when the machine returns to the normal mode. Normal mode During opera- Lights up blue. tion Tips When the optional Image Controller is installed, the machine cannot shift to the Sub Power OFF mode. 2-30 d-COLOR MF654/MF554/MF454/MF364/MF304/MF254... -
Page 65: Power Save Function
To enable the machine to return to the normal mode from the Sub Power OFF or ErP Auto Power OFF mode, press the Power key again. Tips When the optional Image Controller is installed, [Power Key Setting] is not displayed. Reference For details, refer to the User's Guide CD/DVD. d-COLOR MF654/MF554/MF454/MF364/MF304/MF254 2-31... -
Page 66: Control Panel
Press this key to reset all settings, excluding the registered ones, that you entered using the Control Panel. Stop Press this key to temporarily stop an active copy, scan, or print job. Start Press to start the copy, scan or fax operation. 2-32 d-COLOR MF654/MF554/MF454/MF364/MF304/MF254... - Page 67 Use this Keypad to enter numeric values such as the number of copies, zoom ratio, and fax number. C (Clear) Press this key to cancel numeric values such as the number of cop- ies, zoom ratio, and size you entered using the Keypad. d-COLOR MF654/MF554/MF454/MF364/MF304/MF254 2-33...
-
Page 68: Touch Panel
[Sound Setting], [Address book], and [Utility]. • In some regions, [Quick Security] is displayed on the main menu by default (only in d-COLOR MF654/MF554/MF454). [Utility] Tap this button to configure settings of this machine or view the use status of this machine. -
Page 69: Customizing The Main Menu
Name Description Tab key Tap this key to open and close the slide menu. Slide menu key Display function keys assigned to any function. By default, the main menu shows [Copy], [Scan/Fax], [User Box], and [Interrupt]. d-COLOR MF654/MF554/MF454/MF364/MF304/MF254 2-35... -
Page 70: Customizing The Slide Menu
User Box. Flick Make a slight fillip while sliding your finger on the screen. Used to scroll the destination/job list or to feed a page in the Main menu screen/Preview screen. 2-36 d-COLOR MF654/MF554/MF454/MF364/MF304/MF254... -
Page 71: Drag
Hold down the document by the finger. Used to display the icon re- lated to the document. Drag & Drop Slide your finger to the intended place and release it while a doc- ument is selected. Used to move the document to the intended place. d-COLOR MF654/MF554/MF454/MF364/MF304/MF254 2-37... -
Page 72: Pinch In/Pinch Out
19-11/16 inches (500 mm) or less while you are operating the Touch Panel. Avoid using the Touch Panel at a site near a device that generates electric noise (such as a generator and an air conditioner). The electric noise may cause the Touch Panel to operate erratically. 2-38 d-COLOR MF654/MF554/MF454/MF364/MF304/MF254... -
Page 73: How To Display The Keypad
Move your finger while the upper side of Keypad is being pressed. How to close the Keypad After entering, tap [Close] to close the Keypad. It can also be closed by pressing the 10 Keypad key (default: Reg- ister key 3). d-COLOR MF654/MF554/MF454/MF364/MF304/MF254 2-39... -
Page 74: To Display The Keypad All The Time
] or [ ] to move the cursor to the character you want to clear, then tap the [Delete] key. % Tap the [Shift] key again to return to the original keyboard screen. After typing completes, tap [OK]. 2-40 d-COLOR MF654/MF554/MF454/MF364/MF304/MF254... -
Page 75: Jobs
The table below shows the maximum number of jobs that can be registered for each function. Function Minimum number of jobs Maximum number of jobs Copy Print Fax memory TX + Scan Fax RX Sharing These values may vary depending on conditions. d-COLOR MF654/MF554/MF454/MF364/MF304/MF254 2-41... -
Page 76: Loading Paper
Load paper into the tray. % Load paper into the tray with the print side facing up. When loading paper other than plain paper, specify the paper type. % For details, refer to the User's Guide CD/DVD. 2-42 d-COLOR MF654/MF554/MF454/MF364/MF304/MF254... -
Page 77: Lct (Built-In)
Load paper into the left tray. % Load paper into the tray with the print side facing up. When loading paper other than plain paper, specify the paper type. % For details, refer to the User's Guide CD/DVD. d-COLOR MF654/MF554/MF454/MF364/MF304/MF254 2-43... -
Page 78: Loading Paper Into The Large Capacity Unit
Do not load the Large Capacity Unit with paper of a size other than that previously specified. To change the paper size, con- tact your service representative. When loading paper other than plain paper, specify the paper type. % For details, refer to the User's Guide CD/DVD. 2-44 d-COLOR MF654/MF554/MF454/MF364/MF304/MF254... -
Page 79: Bypass Tray
Paper not available Do not load the following paper into the Bypass Tray. Doing so may cause a paper jam or damage to the machine. Folded, torn or creased paper, or bundles of sheets of different sizes d-COLOR MF654/MF554/MF454/MF364/MF304/MF254 2-45... -
Page 80: How To Load Paper
Select the paper type and paper size. % When loading paper other than plain paper, change the paper type setting. % When loading custom sized paper, change the paper type setting. % For details, refer to the User's Guide CD/DVD. 2-46 d-COLOR MF654/MF554/MF454/MF364/MF304/MF254... -
Page 81: Loading Postcards
When loading postcards into the Bypass Tray, note the following points. When loading curled postcards, uncurl the postcards as shown in the figure in advance. Do not put spare postcards in the Bypass Tray. Doing so causes a size detection error. d-COLOR MF654/MF554/MF454/MF364/MF304/MF254 2-47... -
Page 82: Loading Transparencies
Change the paper type setting. % Select [Transparency] from [Paper Type]. % Transparencies can only be printed in black. When the color function is other than black and [Trans- parency] is selected, check the displayed message, and tap [Yes]. 2-48 d-COLOR MF654/MF554/MF454/MF364/MF304/MF254... -
Page 83: Loading Envelopes
Do not use envelopes that have glue or release paper on the flaps or the part covered by the flap on the body. Otherwise, the machine may be damaged or a failure may occur. d-COLOR MF654/MF554/MF454/MF364/MF304/MF254 2-49... - Page 84 When loading envelopes with flaps opened, also select the standard size that matches them. You do not have to measure the size of the envelope with the flap opened to set the size as a custom-sized enve- lope. 2-50 d-COLOR MF654/MF554/MF454/MF364/MF304/MF254...
-
Page 85: Loading Label Sheets
% Insert label sheets into the tray until their edges are pressed against the back. The screen for selecting the paper type and paper size ap- pears. Change the paper type setting. % Select [Thick 1+] from [Paper Type]. d-COLOR MF654/MF554/MF454/MF364/MF304/MF254 2-51... -
Page 86: Loading Index Papers
% Insert index papers into the tray until their edges are pressed against the back. The screen for selecting the paper type and paper size ap- pears. Change the paper type setting. % Select [Index Paper] from [Paper Type]. 2-52 d-COLOR MF654/MF554/MF454/MF364/MF304/MF254... -
Page 87: Basic Settings And Operations
Basic Settings and Operations... -
Page 89: Print Function
The following describes a flow to print data from your computer. For details, refer to page 3-5. Opening original data % Open the data you want to print using the application software. Configuring the printer driver for printing % Select a printer driver, and change the setting if necessary before printing. d-COLOR MF654/MF554/MF454/MF364/MF304/MF254... -
Page 90: Checking The Cable Connection
If no IP address is displayed, you need to configure the network. Tap [Utility], and select [Administrator Settings] - [Network Settings] - [TCP/IP Settings]. Configure the required settings to suit your environ- ment. For details, refer to the User's Guide CD/DVD. For information on the default administrator password, refer to User’s Guide CD/DVD. d-COLOR MF654/MF554/MF454/MF364/MF304/MF254... -
Page 91: Installing The Printer Driver
Select the installed printer driver, and click [Print]. Tips Clicking [Preferences] can change the setting of the printer driver as required. If user authentication is enabled in this machine, specify the required data such as the user name and password. d-COLOR MF654/MF554/MF454/MF364/MF304/MF254... -
Page 92: Types Of Printer Drivers
% Install the printer driver on the computer. For details, refer to page 3-10. Adding and configuring a printer driver % Set up your computer so that data can be printed using the installed printer driver. For details, refer to page 3-10. d-COLOR MF654/MF554/MF454/MF364/MF304/MF254... -
Page 93: Operation Flow
% Select a printer driver, and change the setting if necessary before printing. Checking the cable connection Check that a LAN cable is connected to the LAN port of this ma- chine and the green LED is on. d-COLOR MF654/MF554/MF454/MF364/MF304/MF254... -
Page 94: Checking Network Settings Of This Machine
Specify the Bonjour name. Tap [Utility], and select [Administrator Settings] - [Network Settings] - [Bon- jour Setting] - [ON]. % For information on the default administrator password, refer to User’s Guide CD/DVD. % The Bonjour name is displayed on the printer driver as a connected device name. d-COLOR MF654/MF554/MF454/MF364/MF304/MF254... - Page 95 If no IP address is displayed in Step 1, you need to set up the network. Tap [Utility], and select [Admin- istrator Settings] - [Network Settings] - [TCP/IP Settings]. Configure the required settings to suit your environment. For details, refer to the User's Guide CD/DVD. For information on the default administrator password, refer to User’s Guide CD/DVD. d-COLOR MF654/MF554/MF454/MF364/MF304/MF254...
-
Page 96: Installing The Printer Driver
% If the target printer name is not displayed, select [Add Other Printer or Scanner] or [Add Printer or Scanner] to set up the printer. For details, refer to the User's Guide CD/DVD. Select the installed optional units. 3-10 d-COLOR MF654/MF554/MF454/MF364/MF304/MF254... -
Page 97: Printing Data
Open the data you want to print using the application software. From the [File] menu, select [Print]. Select the Bonjour name of this machine. Tips If necessary, you can change the settings of the printer driver to click [Show Details]. d-COLOR MF654/MF554/MF454/MF364/MF304/MF254 3-11... -
Page 98: Scan-To-Send Function
Send scanned data as an E-mail attachment. This function is useful when you want to forward data to an outside location. For details, refer to page 3-31. Saving data to the USB memory device (External memory) Directly save scanned data on the USB memory device connected to this machine. For details, refer to page 3-68. 3-12 d-COLOR MF654/MF554/MF454/MF364/MF304/MF254... -
Page 99: Various Methods For Transmitting And Saving Data
Issuing a scan instruction from a computer (Web service function) Saving data to a User Box on the HDD (Save in User Box) Sending to an FTP server (FTP TX) Sending to a WebDAV server (WebDAV Send) Reference For details, refer to the User's Guide CD/DVD. d-COLOR MF654/MF554/MF454/MF364/MF304/MF254 3-13... -
Page 100: Sending Data To Your Windows Computer (Smb Send)
% Configure settings to share a computer, or create a dedicated folder to receive files. For details, refer to page 3-17. Registering destinations % Register destinations to which files are sent while checking the checklist. For details, refer to page 3-17. 3-14 d-COLOR MF654/MF554/MF454/MF364/MF304/MF254... -
Page 101: Operation Flow
If no IP address is displayed, you need to configure the network. Tap [Utility], and select [Administrator Settings] - [Network Settings] - [TCP/IP Settings]. Configure the required settings to suit your environ- ment. For details, refer to the User's Guide CD/DVD. d-COLOR MF654/MF554/MF454/MF364/MF304/MF254 3-15... -
Page 102: Checklist
Prompt] in the displayed menu. % In Windows Vista/7, from the Start menu, select [All Programs] - [Accessories] - [Command Prompt]. Check the user name, and write it down in the User ID column of the checklist. 3-16 d-COLOR MF654/MF554/MF454/MF364/MF304/MF254... -
Page 103: Configuring Your Computer
While checking the created checklist, register the folder for receiving the scanned data as an address book of this machine. Tap [Utility], and select [One-Touch/ User Box Reg.] - [Create One-Touch Destination] - [Address Book (Public)] - [PC (SMB)]. d-COLOR MF654/MF554/MF454/MF364/MF304/MF254 3-17... - Page 104 % For [Sort Character], enter the same name as [Name]. % This sets the appropriate index for the name, which you entered into [Name], to [Index]. To change the setting, tap [Index]. While checking the checklist, enter the user ID and password you wrote down. 3-18 d-COLOR MF654/MF554/MF454/MF364/MF304/MF254...
- Page 105 Scan-to-Send function While checking the checklist, enter the host address and file path you wrote down. Tap [Close]. d-COLOR MF654/MF554/MF454/MF364/MF304/MF254 3-19...
-
Page 106: Sending The Original
Scan-to-Send function Sending the original Load the original. Tap [Scan/Fax]. Select a destination. 3-20 d-COLOR MF654/MF554/MF454/MF364/MF304/MF254... - Page 107 Select the type of the file to save scanned data. [Scan Size] Specify the size of the original to be scanned. [File Name/Subject Change the file name or the subject of an E-mail to be sent. Name/Other] Press the Start key. d-COLOR MF654/MF554/MF454/MF364/MF304/MF254 3-21...
-
Page 108: Sending Data To Your Mac Computer (Smb Send)
% Configure settings to share a computer, or create a dedicated folder to receive files. For details, refer to page 3-26. Registering destinations % Register destinations to which files are sent while checking the checklist. For details, refer to page 3-26. 3-22 d-COLOR MF654/MF554/MF454/MF364/MF304/MF254... -
Page 109: Operation Flow
If no IP address is displayed, you need to configure the network. Tap [Utility], and select [Administrator Settings] - [Network Settings] - [TCP/IP Settings]. Configure the required settings to suit your environ- ment. For details, refer to the User's Guide CD/DVD. d-COLOR MF654/MF554/MF454/MF364/MF304/MF254 3-23... -
Page 110: Configuring This Machine
Select [NTLM v1/v2] in [Utility] - [Administrator Settings] - [Network Settings] - [SMB Settings] - [Client Settings], then tap [OK]. Select [ON] in [Utility] - [Administrator Settings] - [Network Settings] - [SMB Settings] - [Direct Hosting Setting], then tap [OK]. 3-24 d-COLOR MF654/MF554/MF454/MF364/MF304/MF254... -
Page 111: Checklist
Check the host address and user ID. This operation requires administrator privileges for your computer. Check the IP address and user name, and write it down in the Host Address and User ID columns of the checklist. d-COLOR MF654/MF554/MF454/MF364/MF304/MF254 3-25... -
Page 112: Configuring Your Computer
While checking the created checklist, register the folder for receiving the scanned data as an address book of this machine. Tap [Utility], and select [One-Touch/ User Box Reg.] - [Create One-Touch Destination] - [Address Book (Public)] - [PC (SMB)]. Tap [New]. 3-26 d-COLOR MF654/MF554/MF454/MF364/MF304/MF254... - Page 113 % This sets the appropriate index for the name, which you entered into [Name], to [Index]. To change the setting, tap [Index]. While checking the checklist, enter the user ID and password you wrote down. While checking the checklist, enter the host address and file path you wrote down. d-COLOR MF654/MF554/MF454/MF364/MF304/MF254 3-27...
- Page 114 Scan-to-Send function Tap [Close]. 3-28 d-COLOR MF654/MF554/MF454/MF364/MF304/MF254...
-
Page 115: Sending The Original
Scan-to-Send function Sending the original Load the original. Tap [Scan/Fax]. Select a destination. d-COLOR MF654/MF554/MF454/MF364/MF304/MF254 3-29... - Page 116 Select the type of the file to save scanned data. [Scan Size] Specify the size of the original to be scanned. [File Name/Subject Change the file name or the subject of an E-mail to be sent. Name/Other] Press the Start key. 3-30 d-COLOR MF654/MF554/MF454/MF364/MF304/MF254...
-
Page 117: Transmit The Scanned Data Via E-Mail (E-Mail Tx)
Loading the original Entering a destination % Enter the destination E-mail address, and check the settings such as the file type and image quality. Press the Start key. % Press the Start key to scan the original. d-COLOR MF654/MF554/MF454/MF364/MF304/MF254 3-31... -
Page 118: Checking The Cable Connection
If no IP address is displayed, you need to configure the network. Tap [Utility], and select [Administrator Settings] - [Network Settings] - [TCP/IP Settings]. Configure the required settings to suit your environ- ment. For details, refer to the User's Guide CD/DVD. For information on the default administrator password, refer to User’s Guide CD/DVD. 3-32 d-COLOR MF654/MF554/MF454/MF364/MF304/MF254... -
Page 119: Configuring The E-Mail Transmission Environment
Tap [Utility], and select [Administrator Settings] - [Network Settings] - [E-Mail Settings]. % For information on the default administrator password, refer to User’s Guide CD/DVD. Tap [E-Mail TX (SMTP)]. Select [ON] to enable E-mail TX (SMTP) settings and E-mail TX function. d-COLOR MF654/MF554/MF454/MF364/MF304/MF254 3-33... -
Page 120: Configuring Administrator Information
Scan-to-Send function Enter the SMTP server address. Configuring administrator information Tap [Utility], and select [Administrator Settings] - [Administrator/Machine Settings] - [Administrator Reg- istration]. Enter the required information, then tap [OK]. 3-34 d-COLOR MF654/MF554/MF454/MF364/MF304/MF254... -
Page 121: Sending The Original
Scan-to-Send function Sending the original Load the original. Tap [Scan/Fax]. d-COLOR MF654/MF554/MF454/MF364/MF304/MF254 3-35... - Page 122 Scan-to-Send function Enter a destination. 3-36 d-COLOR MF654/MF554/MF454/MF364/MF304/MF254...
- Page 123 Select the type of the file to save scanned data. [Scan Size] Specify the size of the original to be scanned. [File Name/Subject Change the file name or the subject of an E-mail to be sent. Name/Other] Press the Start key. d-COLOR MF654/MF554/MF454/MF364/MF304/MF254 3-37...
-
Page 124: Fax Function
The following describes a flow to send a fax. For details, refer to page 3-42. Loading the original Entering a destination % Enter the destination fax number, and check the settings such as the image quality. Press the Start key. % Press the Start key to send the original. 3-38 d-COLOR MF654/MF554/MF454/MF364/MF304/MF254... -
Page 125: Checking The Cable Connection
Fax function Checking the cable connection Check that a modular cable is connected to the LINE port of this ma- chine. d-COLOR MF654/MF554/MF454/MF364/MF304/MF254 3-39... -
Page 126: Registering Transmission Information
% For information on the default administrator password, refer to User’s Guide CD/DVD. Enter the sender information, then tap [OK]. • Sender settings • Sender Fax No. Settings Enter the name to be displayed as a sender. Enter the fax number to be displayed as a sender. 3-40 d-COLOR MF654/MF554/MF454/MF364/MF304/MF254... -
Page 127: Selecting The Dialing Method
If you do not know the type of the dialing method, operate push buttons of your phone. When you hear "beep boop beep", set [Dialing Method] to [PB]. If you do not hear "beep boop beep" after operating push buttons, select [10pps]. d-COLOR MF654/MF554/MF454/MF364/MF304/MF254 3-41... -
Page 128: Sending The Original
Fax function Sending the original Load the original. Tap [Scan/Fax]. 3-42 d-COLOR MF654/MF554/MF454/MF364/MF304/MF254... - Page 129 Check the setting if necessary. % Tap [Check Setting] to check the setting. % You can also check the setting using the keys displayed on the Touch Panel. % To change the setting, tap the desired key on the Touch Panel. d-COLOR MF654/MF554/MF454/MF364/MF304/MF254 3-43...
-
Page 130: Sending A Fax Directly From A Pc (Pc-Fax Tx)
Completing fax operations without leaving your desk Offering clear images by sending data directly from a computer Tips To use this function, the optional Fax Kit must be installed in this machine. This function is not supported in the Mac operating system. 3-44 d-COLOR MF654/MF554/MF454/MF364/MF304/MF254... -
Page 131: Preparation Flow
Checking the cable connection Check that a modular cable is connected to the LINE port of this machine. Check that a LAN cable is connected to the LAN port of this machine and the green LED is on. d-COLOR MF654/MF554/MF454/MF364/MF304/MF254 3-45... -
Page 132: Checking Network Settings Of This Machine
If no IP address is displayed, you need to configure the network. Tap [Utility], and select [Administrator Settings] - [Network Settings] - [TCP/IP Settings]. Configure the required settings to suit your environ- ment. For details, refer to the User's Guide CD/DVD. For information on the default administrator password, refer to User’s Guide CD/DVD. 3-46 d-COLOR MF654/MF554/MF454/MF364/MF304/MF254... -
Page 133: Installing The Fax Driver
Click [Printer Install]. Proceed with the procedure according to the on-screen instructions. Printers and MFPs connected to the network are automatically searched for. Select this machine from the list. Select a fax driver. Click [Install]. Click [Finish]. d-COLOR MF654/MF554/MF454/MF364/MF304/MF254 3-47... -
Page 134: Sending Data
Enter the destination [Name] and [FAX Number]. % To send data to more than one destination, repeat this step. % Clicking [Add from Address Book] can retrieve the registered destinations of this machine. Click [OK]. 3-48 d-COLOR MF654/MF554/MF454/MF364/MF304/MF254... -
Page 135: Copy Function
If user authentication is enabled, the login screen appears. Tap the entry area or keyboard icon to enter the required information, then tap [Login] or press the Access key. % If IC card or biometric authentication is enabled, refer to page 3-51. Load the original. Tap [Copy]. d-COLOR MF654/MF554/MF454/MF364/MF304/MF254 3-49... - Page 136 Specify the zoom ratio. [Duplex/Combine] Specify double-sided copying or combine copying. [Finishing] Configure the offset, punch, or staple setting for output paper. [Density] Adjust the copy density. Tap the input area for entering the number of copies. 3-50 d-COLOR MF654/MF554/MF454/MF364/MF304/MF254...
-
Page 137: User Authentication
If IC card or NFC authentication is enabled, place the IC card or Android terminal on the card reader of the authenti- cation unit. If biometric authentication is enabled, put your finger on the finger vein reader of the authentication unit. d-COLOR MF654/MF554/MF454/MF364/MF304/MF254 3-51... -
Page 138: Registering A Destination
Using the Control Panel to register an address book - Registration from Util- Select a destination type, and register destination information. Tap [Utility], and select [One-Touch/ User Box Reg.] - [Create One-Touch Destination] - [Address Book (Public)]. Select the type of the destination you want to register. Tap [New]. 3-52 d-COLOR MF654/MF554/MF454/MF364/MF304/MF254... - Page 139 ] to switch setting screens while entering the required items. For information on entry items, refer to page 3-60. Enter the fax number. % Tap [Display Keypad] to display the Keypad, and enter the fax number. Tap [Close]. d-COLOR MF654/MF554/MF454/MF364/MF304/MF254 3-53...
-
Page 140: Using The Control Panel To Register An Address Book - Registration From Address Book
Using the Control Panel to register an address book - Registration from Ad- dress book Select a destination type, and register destination information. Tap [Address book]. Tap [New]. Select the type of the destination you want to register. 3-54 d-COLOR MF654/MF554/MF454/MF364/MF304/MF254... - Page 141 [Index] field. % Entry items and the number of setting screens vary depending on the destination type. For informa- tion on entry items, refer to page 3-60. Enter the fax number. Tap [Close]. d-COLOR MF654/MF554/MF454/MF364/MF304/MF254 3-55...
-
Page 142: Using The Control Panel To Register An Address Book - Registration In Scan/Fax Mode
Using the Control Panel to register an address book - Registration in scan/fax mode Select a destination type, and register destination information. Display the scan/fax screen. Tap [Address Reg.]. Tap [New]. Select the type of the destination you want to register. 3-56 d-COLOR MF654/MF554/MF454/MF364/MF304/MF254... - Page 143 [Index] field. % Entry items and the number of setting screens vary depending on the destination type. For informa- tion on entry items, refer to page 3-60. Enter the fax number. Tap [Close]. d-COLOR MF654/MF554/MF454/MF364/MF304/MF254 3-57...
- Page 144 This is used as an index of a registered destination. Tap the Index key to narrow down a target desti- nation. If [Favorite] is selected as an index, the destination appears in the basic screen of the transmission screen after it has been registered in the address book; enabling the user to easily select a destination. 3-58 d-COLOR MF654/MF554/MF454/MF364/MF304/MF254...
-
Page 145: Using A Computer To Register A One-Touch Destination
% If the login screen appears, enter the required items, then click [Login]. Select [Store Address] and click [New Registration]. Select the type of the destination you want to register. Enter the required information such as the name, fax number, and index. d-COLOR MF654/MF554/MF454/MF364/MF304/MF254 3-59... -
Page 146: Information Required To Register A Destination
Enter the user ID required to log in with WebDAV. [Password] Enter the password required to log in with Web- DAV. [Host Address] Enter the address of the WebDAV server. [File Path] Enter the directory to be used as the destination. 3-60 d-COLOR MF654/MF554/MF454/MF364/MF304/MF254... -
Page 147: Registering A Group
% Tap [Name], and enter the destination name using the displayed keyboard. % For [Sort Character], enter the same name as [Name]. % This sets the appropriate index for the name, which you entered into [Name], to [Index]. To change the setting, tap [Index]. d-COLOR MF654/MF554/MF454/MF364/MF304/MF254 3-61... - Page 148 % [Index]: Searches for the target destination name using an index. % [Registration Number]: Searches for the target destination using a registration number. Repeat Step 4 until you select all address books to be grouped. 3-62 d-COLOR MF654/MF554/MF454/MF364/MF304/MF254...
-
Page 149: Retrieving A Registered Destination
Retrieve an address book or group to specify it as a destination to which data is sent. Retrieving a destination Tap [Scan/Fax]. The destinations, which are categorized into [Favorite] when registering indexes, are displayed on the basic screen. d-COLOR MF654/MF554/MF454/MF364/MF304/MF254 3-63... - Page 150 Registering a destination Narrow down destinations using index and address type. 3-64 d-COLOR MF654/MF554/MF454/MF364/MF304/MF254...
-
Page 151: Specifying A Destination
Retrieves destination candidates by the prefix search function using the name (registered destination name) or address (fax number, E-mail ad- dress, or computer name). This function is convenient when there are too many registered destinations. Reference For details, refer to the User's Guide CD/DVD. d-COLOR MF654/MF554/MF454/MF364/MF304/MF254 3-65... -
Page 152: Using A Usb Memory Device
Connect a USB memory device to this machine. NOTICE Use the USB connector on the side that is near the Control Panel. Do not use a USB device other than a flash-memory device. Tap [Print a document from External Memory.]. 3-66 d-COLOR MF654/MF554/MF454/MF364/MF304/MF254... - Page 153 Using a USB memory device Select data to be printed, and tap [Print]. Check print settings. d-COLOR MF654/MF554/MF454/MF364/MF304/MF254 3-67...
-
Page 154: Saving The Scanned Data In The Usb Memory Device (External Memory)
Change the settings to save documents in the USB memory device. Tap [Utility], and select [Administrator Settings] - [System Settings] - [User Box Settings]. % For information on the default administrator password, refer to User’s Guide CD/DVD. 3-68 d-COLOR MF654/MF554/MF454/MF364/MF304/MF254... - Page 155 Using a USB memory device Tap [External Memory Functional Settings]. Select [Save Document] and [ON]. Tap [OK]. d-COLOR MF654/MF554/MF454/MF364/MF304/MF254 3-69...
-
Page 156: Saving Data In The Usb Memory Device
Connect a USB memory device to this machine. NOTICE Use the USB connector on the side that is near the Control Panel. Do not use a USB device other than a flash-memory device. Tap [Save a document to External Memory.]. 3-70 d-COLOR MF654/MF554/MF454/MF364/MF304/MF254... - Page 157 [Color] Select whether to scan the original in color or black and white mode. [File Type] Select the type of the file to save scanned data. [Scan Size] Specify the size of the original to be scanned. d-COLOR MF654/MF554/MF454/MF364/MF304/MF254 3-71...
- Page 158 Using a USB memory device Press the Start key. NOTICE Do not disconnect the USB memory device during data saving. 3-72 d-COLOR MF654/MF554/MF454/MF364/MF304/MF254...
-
Page 159: Using The Guidance Function
If you have any questions during operation, try to use this guidance function. Getting help on the currently displayed screen: Select [Function] on the Help Menu to display the guidance screen. Press the Guidance key (default: Register key 2). Select a menu. d-COLOR MF654/MF554/MF454/MF364/MF304/MF254 3-73... - Page 160 Using the guidance function Narrow down the information you want to know. 3-74 d-COLOR MF654/MF554/MF454/MF364/MF304/MF254...
-
Page 161: Getting Help On The Desired Function Or Procedure
Returns to the preceding screen. Getting help on the desired function or procedure: Open the Help Menu, and select a menu depending on an objective to display the guidance screen. Press the Guidance key (default: Register key 2). Select a menu. d-COLOR MF654/MF554/MF454/MF364/MF304/MF254 3-75... - Page 162 Using the guidance function Narrow down the information you want to know. 3-76 d-COLOR MF654/MF554/MF454/MF364/MF304/MF254...
-
Page 163: Help Menu List
[Service/Admin. Information] Tap this button to display the service or administrator information, ad- ministrator name, extension number, and E-mail address. [Consumables Replace/ Pro- Tap this button to check the consumables replacement or punch scrap- cessing Procedure] ping procedure. d-COLOR MF654/MF554/MF454/MF364/MF304/MF254 3-77... -
Page 164: Using The [Quick Security] Function
Allows you to restrict the devices that can access this machine using the IP address (IPv4/IPv6). The range of IP addresses for which ac- cess is to be restricted is specified automatically. [Web Setting] Select whether to use Web Connection. 3-78 d-COLOR MF654/MF554/MF454/MF364/MF304/MF254... - Page 165 To display the key again, tap [Utility], and select [Administrator Settings] - [System Settings] - [Custom Display Settings] - [Main Menu Default Settings] - [Main Menu Key]. For information on the default administrator password, refer to User’s Guide CD/DVD. Reference For details, refer to the User's Guide CD/DVD. d-COLOR MF654/MF554/MF454/MF364/MF304/MF254 3-79...
- Page 166 Using the [Quick Security] function 3-80 d-COLOR MF654/MF554/MF454/MF364/MF304/MF254...
-
Page 167: Advanced Functions
Advanced Functions... -
Page 169: Using Advanced Functions
You can use the address book for personal use (My Address Book). • This requires the association with My Panel Manager. In addition, this machine supports advanced functions such as the barcode font, unicode font, and OCR font. d-COLOR MF654/MF554/MF454/MF364/MF304/MF254... -
Page 170: Association With Application
% Enter the license code to enable the function. For details, refer to page 4-9. Configuring each function (Administrator) % Configure the required settings for each advanced function. For details, refer to page 4-10. Reference For details on the procedure, refer to the User's Guide CD/DVD. d-COLOR MF654/MF554/MF454/MF364/MF304/MF254... -
Page 171: Enabling The I-Option Function
% For information on the default administrator password, refer to User’s Guide CD/DVD. Enter the token number shown in the token certificate. Select [Yes], then tap [OK]. This machine is connected to the Internet to communicate with the License Management Server (LMS), and it restarts automatically. d-COLOR MF654/MF554/MF454/MF364/MF304/MF254... -
Page 172: Registering The I-Option License
% For information on the default administrator password, refer to User’s Guide CD/DVD. Tap [Yes] and [OK]. Tapping [Print] prints the serial number and request code. % Prepare at hand the printed serial number, request code, and token certificate supplied with i-Op- tion. d-COLOR MF654/MF554/MF454/MF364/MF304/MF254... - Page 173 Code], then click [Next]. % The URL is https://licensemanage.com/index.aspx. Enter the [Token Number], select the option you want to register from the [Product Description] list, then click [Next]. Confirm the registration contents, then click [Generate License Code]. d-COLOR MF654/MF554/MF454/MF364/MF304/MF254...
- Page 174 You could also store them in your USB memory device. The license code input could be omitted by using a USB memory device to achieve a convenient operation. When using a USB memory device, insert the USB memory device and click [Download] to store the license code. d-COLOR MF654/MF554/MF454/MF364/MF304/MF254...
-
Page 175: Enabling The I-Option Function Using The License
Tap [Utility], and select [Administrator Settings] - [Forward] - [License Settings] - [Install License] - [Function/Licence Code]. % For information on the default administrator password, refer to User’s Guide CD/DVD. Enter the license and function codes you wrote down. Select [Yes], then tap [OK]. This machine restarts automatically. d-COLOR MF654/MF554/MF454/MF364/MF304/MF254... -
Page 176: Configuring Each Function
Select [Yes], then tap [OK]. This machine restarts automatically. Configuring each function Configure the required settings for each advanced function. Reference For details on the required setting items for each advanced function, refer to the User's Guide CD/DVD. 4-10 d-COLOR MF654/MF554/MF454/MF364/MF304/MF254... -
Page 177: Using The Web Browser Function
% Register the license on a dedicated Web site. For details, refer to page 4-13. Enabling the Web browser using the license (Administrator) % Enter the license code to enable the function. For details, refer to page 4-15. d-COLOR MF654/MF554/MF454/MF364/MF304/MF254 4-11... -
Page 178: Operation Flow
% For information on the default administrator password, refer to User’s Guide CD/DVD. Select [ON], then tap [OK]. This machine is connected to the Internet to communicate with the License Management Server (LMS), and it restarts automatically. 4-12 d-COLOR MF654/MF554/MF454/MF364/MF304/MF254... -
Page 179: Registering The License
Display the serial number of this machine. Tap [Utility], and select [Device Information]. Write down the serial number of this machine. Access the Web site of the License Management Server (LMS). Enter the [MFP Serial Number], then click [Next]. % The URL is https://licensemanage.com/activate. d-COLOR MF654/MF554/MF454/MF364/MF304/MF254 4-13... - Page 180 You could also store them in your USB memory device. The license code input could be omitted by using a USB memory device to achieve a convenient operation. When using a USB memory device, insert the USB memory device and click [Download] to store the license code. 4-14 d-COLOR MF654/MF554/MF454/MF364/MF304/MF254...
-
Page 181: Enabling The Web Browser Using The License
Tap [Utility], and select [Administrator Settings] - [Network Settings] - [Forward] (twice) - [Web Browser Settings] - [Web Browser Usage Settings]. % For information on the default administrator password, refer to User’s Guide CD/DVD. Select [ON], then tap [OK]. When the screen shown below appears, tap [Function/License Code]. d-COLOR MF654/MF554/MF454/MF364/MF304/MF254 4-15... - Page 182 Using the Web browser function Enter the license code you wrote down. Select [Yes], then tap [OK]. This machine restarts automatically. 4-16 d-COLOR MF654/MF554/MF454/MF364/MF304/MF254...
- Page 183 By using a USB memory device Tap [Utility], and select [Administrator Settings] - [Network Settings] - [Forward] (twice) - [Web Browser Settings] - [Web Browser Usage Settings]. Select [ON], then tap [OK]. Wait a few moments until the screen shown below appears. d-COLOR MF654/MF554/MF454/MF364/MF304/MF254 4-17...
- Page 184 Using the Web browser function Connect the USB memory device stored with the license code. Select [Install License from Ext. Memory]. Select [Yes] , then tap [OK]. This machine restarts automatically. 4-18 d-COLOR MF654/MF554/MF454/MF364/MF304/MF254...
-
Page 185: Starting The Web Browser
The target page appears. Tips Selecting [Menu] - [Display] allows you to zoom in and out from a page or change the character code. Selecting [Menu] - [Tab] allows you to open a new tab and display a different page. d-COLOR MF654/MF554/MF454/MF364/MF304/MF254 4-19... -
Page 186: Printing The Currently Displayed Page Or The Linked File
[Simplex/Duplex] Select whether to print one side or both sides of sheets of paper. To specify 2-sided printing, select the binding position. [Finishing] Configure the offset, punch, or staple setting for output paper. Press the Start key. 4-20 d-COLOR MF654/MF554/MF454/MF364/MF304/MF254... -
Page 187: Troubleshooting
Troubleshooting... -
Page 189: Main Messages And Remedies
For Waste Toner Box: When the message [Waste Toner Box needs to be replaced.] appears, replace it based on the maintenance contract. Contact your service representative if the messages continue to appear even after replacement or cleaning has been carried out. d-COLOR MF654/MF554/MF454/MF364/MF304/MF254... -
Page 190: When A Paper Jam Message Persists
If a defective part can be separated in order to be able to continue operations after a problem has been de- tected, [Continue] or [Recover Data] is displayed. To continue operations, select any key. However, the prob- lem has not been resolved, so contact your service representative immediately. d-COLOR MF654/MF554/MF454/MF364/MF304/MF254... -
Page 191: When [Stabilizing Image.] Appears
In case image stabilization does not finish after a short while, contact your service representative. NOTICE You cannot interrupt or prohibit image stabilization. Reference To perform image stabilization on a voluntary basis, refer to the User’s Guide CD/DVD. d-COLOR MF654/MF554/MF454/MF364/MF304/MF254... -
Page 192: When Printing Quality Has Deteriorated
Open the Lower Front Door or Front Door of the machine. Release the Waste Toner Box Lock Lever, then remove the Waste Toner Box. Remove the Printhead Cleaner from the Lower Front Door or Front Door of this machine. d-COLOR MF654/MF554/MF454/MF364/MF304/MF254... - Page 193 % Repeat this operation approximately three times for all of the Print Head Glass sections. Mount the Printhead Cleaner onto the Lower Front Door or Front Door of this machine. Install the Waste Toner Box. Close the Lower Front Door or Front Door of the machine. d-COLOR MF654/MF554/MF454/MF364/MF304/MF254...
-
Page 194: When The Machine Cannot Be Powered On
Check whether the power plug of this machine is firmly plugged into the power outlet. Also check that the breaker has not tripped. Check to see that the Main Power Switch and the Power key are turned ON. In case the machine cannot be powered on even after checking, contact your service representative. d-COLOR MF654/MF554/MF454/MF364/MF304/MF254... -
Page 195: When The Touch Panel Is Not Visible
Auto Power OFF mode, press the Power key to display the Touch Panel. To use it outside the preset operating hours, follow the on-screen instructions. Check to see that the Main Power Switch and the Power key are turned ON. In case the Touch Panel does not appear even after checking it, contact your service representative. d-COLOR MF654/MF554/MF454/MF364/MF304/MF254... -
Page 196: When A Message Appears To Replace Consumables Or Carry Out Cleaning
When the punch scrap box is full When the punch scrap box is full, a message appears to prompt you to dispose of the punch scraps (at re- placement by user). Take action while referring to the label inside the machine. 5-10 d-COLOR MF654/MF554/MF454/MF364/MF304/MF254... -
Page 197: When Toner Is Running Out In The Toner Cartridge
Do not replace a Toner Cartridge of a color that is not displayed. When it is time to replace a Toner Cartridge of a color other than black, printing can be forcibly con- tinued using black. Tap [Continue], and then select a desired print job. d-COLOR MF654/MF554/MF454/MF364/MF304/MF254 5-11... -
Page 198: When It Is Time To Replace A Drum Unit
For details, contact your service representative. When it is time to replace a Developing Unit of a color other than black, printing can be forcibly con- tinued using black. Tap [Continue], and then select a desired print job. 5-12 d-COLOR MF654/MF554/MF454/MF364/MF304/MF254... -
Page 199: When A Waste Toner Box Is Full
Tap [Start Guidance], then follow the displayed guidance to take an action. 5.5.1 Replacing a Toner Cartridge d-COLOR MF654/MF554/MF454 The following example shows how to replace a Yellow Toner Cartridge. Tips Shake a new Toner Cartridge well, approximately 5 to 10 times, before installing it. -
Page 200: D-Color Mf364/Mf304/Mf254
If a Toner Cartridge other than for black is empty, printing can be continued forcibly using black. Tap [Continue], and then select a desired print job. Do not forcedly open or disassemble a Toner Cartridge (toner container). Do not forcedly remove or dispose of toner that remains in a Toner Cartridge (toner container). 5-14 d-COLOR MF654/MF554/MF454/MF364/MF304/MF254... - Page 201 If you get toner into your eyes, immediately rinse them with running water for over 15 minutes. Seek medical advice if irritation persists. If you swallow toner, rinse out your mouth and drink a few glasses of water. Seek medical advice if nec- essary. d-COLOR MF654/MF554/MF454/MF364/MF304/MF254 5-15...
-
Page 202: Replacing A Waste Toner Box
When a message appears to replace consumables or carry out cleaning 5.5.2 Replacing a Waste Toner Box d-COLOR MF654/MF554/MF454 New waste toner box Used waste toner box Tips After removing the Waste Toner Box, quickly install the cap. If the Waste Toner Box is tilted, waste toner may spill. -
Page 203: D-Color Mf364/Mf304/Mf254
If you get toner into your eyes, immediately rinse them with running water for over 15 minutes. Seek medical advice if irritation persists. If you swallow toner, rinse out your mouth and drink a few glasses of water. Seek medical advice if nec- essary. d-COLOR MF654/MF554/MF454/MF364/MF304/MF254 5-17... -
Page 204: Replacing A Drum Unit
When a message appears to replace consumables or carry out cleaning 5.5.3 Replacing a Drum Unit d-COLOR MF654/MF554/MF454 Unpacking the drum unit Tips Your service representative will collect your used Drum Unit. Put it in a black plastic bag and store it in a box by itself. -
Page 205: D-Color Mf364/Mf304/Mf254
Tap [Continue], and then select a desired print job. After replacing a Drum Unit, be sure to clean the Print Head Glass for each color. For details on how to clean the Print Head Glass, refer to page 5-6. d-COLOR MF654/MF554/MF454/MF364/MF304/MF254 5-19... - Page 206 When a message appears to replace consumables or carry out cleaning 5-20 d-COLOR MF654/MF554/MF454/MF364/MF304/MF254...
-
Page 207: Index
Index... - Page 209 2-45 Low Power mode 2-31 Main Menu 2-34 MFP 2-16 2-18 Multi-job 2-41 Options 2-8 2-12 2-20 PC-Fax TX 3-44 PCL 3-6 Power Save mode 2-31 Print Function 3-3 Printing from a USB memory device 3-66 PS 3-6 d-COLOR MF654/MF554/MF454/MF364/MF304/MF254...
- Page 210 MF654/MF554/MF454/MF364/MF304/MF254...