Sign In
Upload
Manuals
Brands
Kval Manuals
Industrial Equipment
990F-3
Kval 990F-3 Manuals
Manuals and User Guides for Kval 990F-3. We have
1
Kval 990F-3 manual available for free PDF download: Reference
Kval 990F-3 Reference (89 pages)
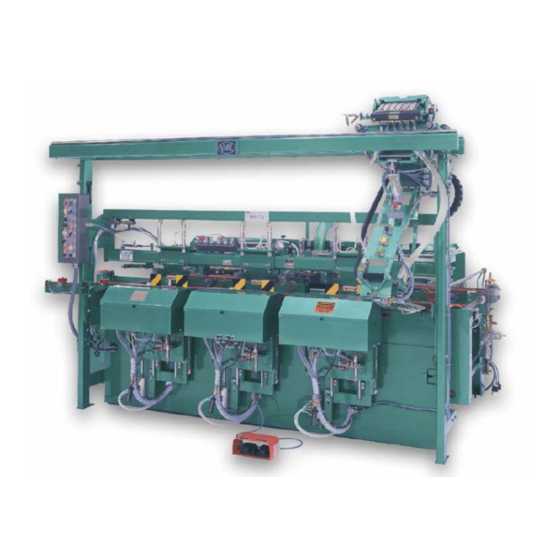
Pre-Hanging Door Machine
Brand:
Kval
| Category:
Industrial Equipment
| Size: 1 MB
Table of Contents
Contacting Kval
3
Proprietary Notice
3
Returning Parts or Equipment to Kval
4
Table of Contents
7
Chapter 1: Introduction
11
Customer Service Information
11
Returning Parts / Equipment to Kval
11
Note
11
When You Call
11
When Sending Merchandise Back
11
Getting Started
13
Chapter 2: Safety Information
15
Safety Procedures
15
Responsibility
15
Lock-Out/Tag-Out Procedure
15
Lock-Out and Tag-Out Procedure
16
Accident Situations
17
Lock Rules
17
P-R-O-P-E-R Electrical Lock-Out
18
P-R-O-P-E-R Hydraulic And/Or Pneumatic Lock-Out
18
P-R-O-P-E-R Fluids and Gases Lock-Out
19
P-R-O-P-E-R Mechanical Energy Lock-Out
19
Zero-Energy Start up
20
Safety Guidelines
21
Electrical
21
Compressed Air
21
Operating Safety
21
Compliance with Codes and Regulations
21
Operators Training
21
Other Hazard Control Action
21
Chapter 3: Specifications
23
Uncrating the 990F-3
23
Receiving the 990F-3
23
Uncrating Your Machine
23
Uncrating Procedure
24
Anchoring the Machine to the Floor
25
Chapter 4: Operation
27
Touch Screen Panel Operations
27
First Screen
27
Second Screen
28
Third Screen
28
Fourth Screen
29
Fifth Screen
29
Sixth Screen
30
Control Panel Operations
30
Control Transformer
30
Start Machine
30
R.H. Door L.H
30
Back Section / both / Front Selection
30
Off Lock Bore/ Reg. / Deep
31
Bolt Drill on
31
Face Plate Reg /Off / Extend Time
31
Feed Mode off / Auto / Feed through
31
Feed Jog for / Jog Rev
31
Slow Feed
31
Disable Auto Feed
31
1-Pass Front Routers 2 Pass
31
Width-Adjust Open / Close
31
Disable Auto-Adjust
31
Shift Routers out of Pocket
32
Center Hinge
32
Start Sequence
32
Emergency Stop
32
Optional Operating Controls
32
Pre-Drill Off/On
32
Pre-Drill Router Horizontal Pop-Up Stop Override
32
Pre-Drill Lock out
32
Deadbolt Shift
32
Deadbolt Bore
32
Face Plate Dead Bolt
33
Side Drill (Latch Hole)
33
Lock Bore Diameter
33
Router Operating Controls
33
Center Router
33
Router on / off
33
3- or 4-Pocket Configurations
33
Foot Pedal Operating Controls
33
Door Clamp
33
Jamb Clamp
33
Controls on the Electrical Box
34
Speed Control Front Section
34
Back Section Face Plate Control Time
34
700-C Reset
34
Six-Shooter
34
Six-Shooter Operating Controls
35
Insert Screw
35
Start Sequence
35
Reset
35
Unclamp
35
Emergency Stop
35
Hopper Slide Valve
35
Safety Insert Screw Slide Valve
35
Screw Driver in Close Trap
35
Optional Controls
36
Load / Unload
36
Six-Shooter Gear Installation and Maintenance
36
Removing the Gear Motor
36
Removing the Plunge Cylinder
37
Removing Gearbox
38
Gear Box Maintenance
39
Reinstalling the Gearbox
41
Re-Installing the Plunge Cylinder
41
Re-Installing the Gear Motor
41
Front Section
42
Preliminary Hinge Center Set-Up
42
Position "H" Blocks
42
Centering Routers Within the "H" Block
43
Setting up the Hinge Backset
43
Changing the Turret Settings
44
Plate Width: Plate Router Vertical Travel
45
Plate Router Depth
45
Switching the Bevel Plates
45
Setting the Doorstops
46
Change-Over between Hinge Sizes
46
Setting up Hinge Pocket Length
46
Door Width Minimum / Maximum Limits
47
Chipout Replacement / Break-In
47
Setting up the Back Section
48
Setting up Lock Height
50
Setting up Lock Bore Backset
51
Self - Centering Adjustments
52
Bolt Plate Width Adjustments
52
Side Drill (Latch Hole)
52
Lock Bore Diameter
53
40" Lock Location
53
Chapter 5: Maintenance
55
Maintenance Schedule
55
Daily
55
Weekly
55
May and December Check-Ups
55
Lubrication Requirements
56
Linear Bearings
56
Flange Bearing
56
Lubricate Special High-Speed Bearings
56
Perske High-Frequency Motors
56
Approved Lubrication Products
56
Lubricator Adjustments
56
Gear Motor Lubrication Requirements
56
Mist Oil Lubrication
56
Priming the Lubricator
56
Chapter 6: Troubleshooting
59
Limit Switches
59
Photo Eyes
59
General Air Circuitry Trouble Shooting
60
To Change Cylinder Retraction Speed
61
Basic Electrical Troubleshooting
62
If the Power Stops During Normal Operations: DE-ENERGIZED
62
Front Section Does Not Function Property
63
Front Section Is Not Turned on at the Control Panel
63
The Six-Shooter Is Not Moved Fully to the Right
63
The Through-Beam Lenses Are Dirty
63
Cylinders that Move the Front Section
64
Move Front Section to the "In Pocket Position", then Do the Following
64
One of the Cylinders Is Malfunctioning
64
The Alignment of the Cylinder Shafts Is off
64
There Is and Obstruction Blocking the through Beam
64
Guards Are Misaligned
64
Through-Beams Are Misaligned
64
Ferrous Proximity Eye that Controls the Router Carriages Movement down and to the Right Is out of Adjustment
64
One or more Through-Beams Are Malfunctioning
65
Environment too Cold
65
Width-Adjusts Doesn't Function Properly
65
Width-Adjust Photo Eyes on Back Section Arm on In-Feed Side Are Positioned too Close to the Edge of the Door
65
Unsatisfactory Hinge Pockets
65
Fuzzy Hinge Pockets
65
Ring Around the Pocket
65
Feed System Surging
65
Feed System Moving Doors too Fast
65
Setting up Bolt Plate Length
66
Lock Bore Two-Stage Face Drilling
66
990F-3 Six-Shooter
66
Six-Shooter Keeps Running after Cycle Is Completed
66
Hopper Alignment
67
Machine Hinge Pockets (Without Pre-Drill)
67
Hinge Laps Side of Pocket or Screws Pulled Sideways
68
Adjusting the Screw Receiver Block Horizontally
68
Bit Points Centered
68
Hinge Laps Top or Bottom of Pocket
68
Two Hinges- Bit Points too Height or too Low
68
All Four Hinges-Bit Marks too High or too Low
69
Hinge Laps Corners of the Pocket
69
Bit Points Cocked at an Angle
69
Crooked Screws
69
Split Shell Adjustments
69
Screw Driver Bits
69
Speed of Six-Shooter Going in
70
Loose Screws
70
All Screws Loose
70
Loose Screws at the Top or Bottom of the Hinge
70
Loose Screws on the Side of the Hinge
70
Stripped or Broken Screw Heads
70
Kick-Out
71
Six-Shooter Multi-Wood Density Screw Stop
71
Not Enough Power to Drive Screws
71
Hopper Troubleshooting
71
Missing Screws
71
Avoid Stacking Screws
71
Magnetized Screws
72
Not Feeding between the Hopper and Screw Feeder Slides
72
Jamming of the Slide Bar
72
Screws Ejecting from Hopper
72
Screws Ejecting from Pick off Bar
72
Hinge and Screw Quality
73
Warranty
75
Bills of Materials
77
Option R1 - Jamb Clamp Tube
77
Option R1 - Back Section
78
Frame Section
79
Head Section
81
Back Section
82
Screw Changing Hopper
84
Six Shooter
85
Eight Shooter
86
Notes
89
Advertisement
Advertisement
Related Products
Kval 994-X
Kval 990-HQ
Kval 990FX
Kval 990-HB
Kval 960-3
Kval 965X
Kval 995-H
Kval 990-F4
Kval 990-APEX
kval 990-H
Kval Categories
Industrial Equipment
Lifting Systems
Saw
Lathe
Accessories
More Kval Manuals
Login
Sign In
OR
Sign in with Facebook
Sign in with Google
Upload manual
Upload from disk
Upload from URL