Sign In
Upload
Manuals
Brands
Commodore Manuals
Desktop
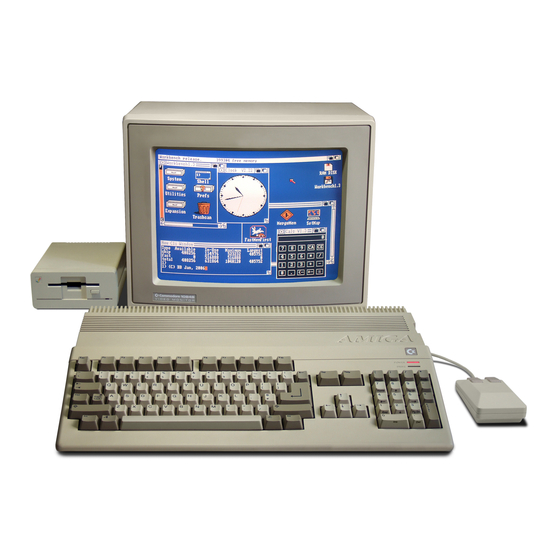
Amiga 500
Commodore Amiga 500 Manuals
Manuals and User Guides for Commodore Amiga 500. We have
2
Commodore Amiga 500 manuals available for free PDF download: User Manual, Technical Manual
Commodore Amiga 500 User Manual (301 pages)
Brand:
Commodore
| Category:
Desktop
| Size: 55 MB
Table of Contents
Copyright
5
About this Manual
7
For more Information
8
Table of Contents
9
Software
9
Product View
12
Chapter 1 Introducing the Amiga 500
13
RAM Disk
14
How the Amiga Works
16
Key Features of the Amiga 500
17
Digitized Stereo Audio
17
Multitasking-Running Several Programs at the same Time
17
Resolution, Screen
17
Direct Text-To-Speech Conversion
18
Standard File Format for Easy Interchange of Data Among Programs
18
Graphics, Windows, and Sound Support for Standard Languages
18
Multiple Disk Type Capability
19
Internal Memory Expansion
19
Addition of External
19
MIDI Interface
19
Amiga 500 Software
20
Productivity
20
Graphics and Art
21
Education
22
Amiga
23
Music and Sound
24
Telecommunications, Languages and more
24
Setting up the Amiga 500
27
Where to Find the Connectors
27
Introduction
13
Chapter 2 Setting up the Amiga
27
Whe Re to Find Th E Conn Ectors
27
RGB Connector
27
Before You Start
28
Attaching the Mouse
29
Attaching the Video Monitor
30
Attaching an RGB Monitor
31
Attaching a Monochrome Monitor
32
Attaching a Television
33
Connecting Audio Equipment
33
Connecting the Amiga to a Stereo System
34
Sound Connections for Monitors
34
Plugging It in
36
Chapter 3 Getting Started
39
A Note about the Mouse
39
Using Disks
40
A Word of Warning
42
Moving the Pointer
44
Selecting Icons
46
Dragging
48
Selection Button
48
Using Menus
48
Commands and Options
51
Duplicating Your Disks Using a Menu
52
Resetting the Amiga
54
What Is the Workbench?
57
Chapter 4 Using the Workbench
57
Icons
58
What's on the Workbench?
58
Windows
58
Creating a Project
59
Screens
59
Operations Involving Tools and Projects
63
Duplicating Tools and Projects
64
Renaming Tools and Projects
64
About String Gadgets
65
Getting Information about Tools and Projects
65
Discarding Tools and Projects
66
Opening Drawers
67
Operations Involving Drawers
67
Moving Tools, Projects, and Drawers
68
Discarding Drawers
69
Duplicating Drawers
69
Renaming Drawers
69
Operations Involving Windows
70
Special Drawers: Disks and the Trashcan
70
Using Gadgets
71
Dragging Windows
72
Sizing Windows
73
Moving Windows in Front of Other Windows
74
Pushing Windows Behind Other Windows
75
Scrolling the Contents of a Window
75
Closing Windows
79
Disk Gauges
79
Operations Involving Screens
80
Dragging Screens
81
Moving Screens in Front of Other Screens
82
Pushing Screens Behind Other Screens
83
Operati Ons Involving Requ Este Rs
84
The Memory Meter
84
String Gadgets
85
Copying Disks
86
Duplicating Disks
86
Initializing Disks
86
Operations Involving Disks
86
Expansion Drawer
87
Moving a Tool, Project, or Drawer to a New Disk
87
RAM Disk
87
Renaming Disks
87
Cleanup
88
Other Workbench Operations
88
Resetting the Workbench
88
Last Error
89
Redraw
89
Snapshot
89
Version
89
Mouse Tricks
90
The Clock
93
Chapter 5 Workbench Tools
93
Setting the Time
94
Opening the Clock
94
Changing the Clock from Analog to Digital
95
Changing the Size and Position of the Clock
96
Changing from a 12- to a 24-Hour Clock
96
Displaying the Seconds
97
Setting the Alarm
97
Menu
98
Closing the Clock
99
Opening the Notepad
99
Entering Text
100
Moving the Text Cursor
101
Tabbing
101
Changing the Size of the Notepad Window
102
Moving through the Text
102
Moving from Page to Page
103
New and Open
103
The Notepad Menus
103
The Project Menu
103
Save
104
Print
105
Save as
105
Print as
106
Cancel and Cut
107
Quit
107
Read Fonts
107
The Edit Menu
107
Copy
108
Paste
108
Find
109
Mark Place
109
Find Next
110
Find Prev
111
Replace
111
The Font Menu
112
Description of
114
Paper Color
114
The Format Menu
114
The Style Menu
114
Global Font
115
Pen Color
115
Word Wrap
115
Menu Shortcuts
116
Remove Font
116
Remove Styles
116
Changing the Notepad Default Values
117
Connecting the Notepad Window Default Position
117
Changing the Notepad Default Font
118
Changing the Default Font of a Note
119
Changing the Default Print Type
119
Changing the Default to Form-Feed
119
Specifying the Global Font Default
119
Opening the Calculator
120
Turning off the Word Wrap Default
120
The Calculator Keys
121
Closing the Calculator
122
Opening the Icon Editor
123
Loading an Icon
124
Icon Editor
125
Changing an Icon
126
Selecting Additional Icons
126
Changing an Icon's Colors
127
Filling Areas
127
Adding Text to an Icon
128
Using the Undo Feature
131
Working with Frames
131
Copying a Frame
132
Moving the Image Within a Frame
132
Exchanging Frames
133
Merging Frames
134
Highlighting an Icon
135
Specifying the Border Width
135
Saving an Icon
136
Stopping the Icon Editor
139
The Say Speech Synthesizer
139
Graphic Dump
140
Setmap
141
Setmap Code
142
Nofastmem
143
Using Preferences
145
Chapter 6 Using Preferences
145
Using the Preferences Tool
146
Date and Time
147
Key Repeat Speed
147
Key Repeat Delay
148
Mouse Speed
148
Double-Click Delay
148
Text Size
148
Cli
149
Display Centering
149
The Serial Settings Are
149
Workbench Colors
150
Interlace
151
The Pointer Editing Window
152
Changing the Colors
152
Changing the Pointer
153
Changing the Point
154
In this Screen, You Can Select
155
(Printer Setting)
155
Selecting this Gadget Opens the Printer Graphics
157
Getting Back Preferences
158
Using and Saving Preferences
158
Amigados and the CLI
161
Accessing CLI
161
Chapter 7 Amigados and the CLI
162
Amigados Command
163
Commonly Used CLI Commands
163
The Commands Summarized in this Chapter Can be Used to Perform the Following Tasks
164
Copying a Disk
165
Command
166
Formatting a Disk
166
Looking at a Directory
167
Relabeling a Disk
167
Using the List Command
169
Getting Information about the File System
170
Changing the Directory
171
Root Directory
171
Setting the Date and Time
172
Redirecting the Output of a Command
173
Typing a Textfile to the Screen
175
Changing the Name of a File
176
Copying Files
177
Deleting Files
177
Creating a New Directory
179
Is My File Somewhere on this Disk?
179
Using the RAM Disk
181
Changing the Startup-Sequence
182
Setting the A501 Real Time Clock
183
Creating a New CLI Window
184
Closing a CLI
186
Closing Comments
186
Precautions for Peripherals
189
Chapter 8 Adding to the Amiga
189
Adding Memory to the Amiga
190
Adding a Disk Drive to the Amiga
190
Printers for the Amiga
192
Adding a Modem
194
Other Peripherals
195
Amiga Precautions
197
Chapter 9 Caring for the Amiga
197
Taking Care of Disks
198
Cleaning the Mouse
199
Radio and Television Interference
201
Technical Reference
203
Specifications for the Amiga
203
Amiga Specifications
204
Input/Output Connectors
205
Serial Connector
206
ASOO Parallel Connector
207
RGB Monitor Connector
208
Mouse/Game Controller Connectors
209
Connectors 1 and 2: Mouse Connections
209
Connectors 1 and 2: Game Controller
210
Connector 2: Light Pen Connection
210
External Disk Connector
211
86-Pin Connector
212
A500 Block Diagram
213
Theory of Operation
214
68000 Microprocessor
214
Rom
215
Parallel I/O
215
Clocks Generator
215
The 3 Custom Chips
216
Bus Control, Address/Data MUX, Address Driver
216
Display RAM
217
Custom Control Chips
217
Custom Animation Chip
218
Fat Agnus
218
Features
218
Fat Agnus Block Diagram
219
Custom Graphics Chip
220
Denise
220
RGB Monitor
220
Denise Block Diagram
221
Custom Sound/Peripherals Chip
222
Paula
222
Paula Block Diagram
224
Custom Control Chip
225
Gary
225
Gary Block Diagram
226
Amiga 500 Memory Map
227
Real Time Clock
227
Amigados Information
229
Amigados User's Commands
229
ED Screen Editor Commands
231
Special Key Mappings
231
Immediate Commands
231
Extended Commands
232
Amigados Error Messages
233
Using the Amiga Keyboard
237
Layout of the Keyboard
237
The Typewriter Area
239
Return
239
Backspace
239
Del
239
Caps Lock
240
Shift Keys
240
ALT Keys
240
The Commodore Key
241
The Cursor Keypad
241
The Numeric Keypad
241
The Function Keys
241
Using the Amiga Without a Mouse
242
Moving the Pointer Without a Mouse
242
Selecting Without a Mouse
242
Using Menus Without a Mouse
243
International Key Maps
243
Standard U.S. Keyboard (USA)
244
Danish Keyboard (Dk)
245
German Keyboard (D)
246
Characters on the Front Side of Keytops
247
Spanish Keyboard (E)
248
French Keyboard (F)
250
British Keyboard (Gb)
252
Icelandic Keyboard (Is)
253
Italian Keyboard (I)
254
Swiss Keyboard (Ch)
256
Swedish/Finnish Keyboard (S)
257
Norwegian Keyboard (N)
258
Printer Escape Codes
259
Printer Escape Sequences
259
ANSI X3.64 Style Commands
260
Amiga Bibliography
263
Introductory Level
264
Advanced Books
264
Amiga 500 Schematics
265
Paula Power
269
Audio Power
269
External Floppy
272
Internal Floppy
272
Master Clock
273
Expansion
273
Power Input
274
Floppy Power
274
Spares
274
Glossary
277
Extended Selection
280
RGB Monitors
285
Scroll Arrow
286
Scroll Bar
286
Scroll Box
286
Selected Window
286
Index
291
Advertisement
Commodore Amiga 500 Technical Manual (50 pages)
Brand:
Commodore
| Category:
Desktop
| Size: 13 MB
Table of Contents
Table of Contents
3
Specifications
4
Memory M Ap
5
System Block Diagram
6
Theory of Operations
7
Fat Agnus
11
Denise
13
Paula
15
Gary
17
Complex Interface Adapter
19
Interface Signals
19
Register Map
20
Function Description
21
Electrical Parameters
25
Timing Diagrams
26
Input/Output Connectors
28
I/O Connectors
28
Serial Connector
29
Parallel Connector
30
Rgb Monitor Connector
31
Mouse/Game Controller Connectors
32
External Disk Connector
34
Power Supply Connector
34
Expansion 86-Pin Connector
35
Major Componet Parts List
36
Service Parts Reference Diagram
36
Componet Parts List
37
Pcb Board Layout
39
Ram/Clock Pcb Board Layout
40
Schematics
41
Advertisement
Related Products
Commodore Amiga 3000
Commodore Amiga 1200
Commodore Amiga
Commodore Amiga 500+
Commodore AMIGA 2500
Commodore AMIGA 1060 SIDECAR
Commodore A500 PLUS
Commodore Amiga A4000
Commodore A1060 Sidecar
Commodore Amiga A1000
Commodore Categories
Desktop
Monitor
Floppy Disk Drive
Printer
Calculator
More Commodore Manuals
Login
Sign In
OR
Sign in with Facebook
Sign in with Google
Upload manual
Upload from disk
Upload from URL