Tosibox Lock 200 User Manual
Hide thumbs
Also See for Lock 200:
- Quick start manual (2 pages) ,
- User manual (70 pages) ,
- Quick start manual (2 pages)
Table of Contents
Advertisement
Advertisement
Table of Contents

Related Manuals for Tosibox Lock 200


Summary of Contents for Tosibox Lock 200
- Page 1 Table of Contents Lock 200 & Key 200 User Manual v1.2...
-
Page 2: Table Of Contents
Table of Contents Table of ConTenTs 1. TOSIBOX overview 11. Technical data ® 1.1 Lock connections 11.1 TOSIBOX Lock 200 ® 2. TOSIBOX glossary 11.2 TOSIBOX Key 200 ® ® 12. Limited Warranty 3. TOSIBOX Key, Lock, User interfaces, ®... - Page 3 Table of Contents 1. TosIboX overvIew ® FinLand Tosibox was born from the idea that secure remote access doesn’t have to be complicated, expensive or time- http://help.tosibox.com (suomeksi) consuming. +358 44 744 0065 TOSIBOX offers a new, automatic way to establish a ®...
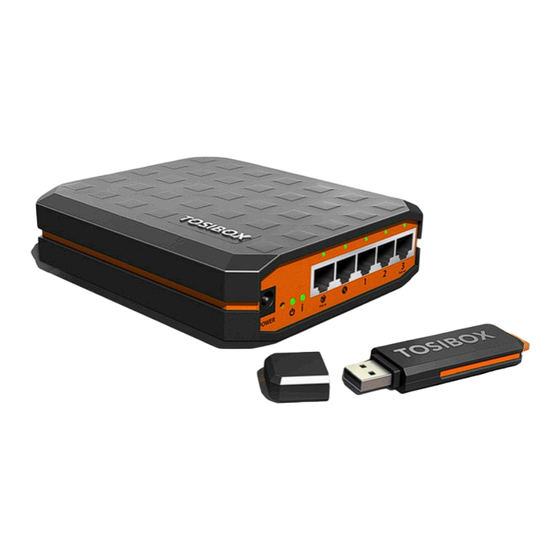
- Page 4 Table of Contents 1.1 Lock connections LAn3 Port LAn2 Port LAn1 Port service port WAn Port Reset Button (not used) Dc Power input UsB Port (for serialization and UsB- Modem)
- Page 5 Table of Contents 2. TosIboX glossary ® Lock 200 sales package content An intelligent USB-connected device that contains a secure cryptoprocessor. The Key is used to establish a secure connection to the Lock. sub key An additional Key that has restricted access rights.
- Page 6 The Key is used to establish a connection with the Lock. Key user interface* *Key user interface (installed from the Key device). In the image on the right you’ll notice TOSIBOX Lock devices that are serialized for the ® TOSIBOX ®...
- Page 7 Table of Contents 3.2 tosiBoX Lock ® TOSIBOX Lock is a device that accepts remote ® connections from serialized Keys and provides access to connected network devices. For more information, please see glossary (page 5). *Web user interface of the Lock. The Lock settings can be changed via: •...
- Page 8 Table of Contents 3.3 UseR inteRFAce – Lock Locks and Keys Remotely controlled Details of the Status bar shows Login using devices remotely controlled general information. “admin” user. Green: Connected devices Passwords can Green: Connected Red: Disconnected be found on the Red: Disconnected bottom of the Lock...
-
Page 9: Deploying The Lock
® The instructions below can be further clarified by seeing the accompanying diagram on the following page. 1. Connect the TOSIBOX AC adapter to the ® Lock and wait for 2 minutes. Serialize the Key to the Lock by inserting the Key into the USB port of the Lock. - Page 10 Table of Contents 5. TosIboX loCK ® 5.1 DePLoying tHe Lock ConneCTinG neTworK deviCeS To The LoCK With its factory default settings, the Lock is connected to the Internet via its WAN port or a USB modem that can A) connecting network devices that use dynamic iP be connected to the USB port of the Lock.
- Page 11 Table of Contents setting the Lock to client mode: 4. Go to the Lock’s web user interface and click “Scan for LAN Devices”. The Lock will automatically locate all devices that match Log into the Lock’s web user interface as admin and open the LAN the Lock’s IP range.
- Page 12 Lock/Sub Lock solution (see accompanying image Connecting Locks). Up to 10 Sub Locks can be connected to one Lock. First serialize the Key to all the Locks to be connected as described in section “TOSIBOX Lock and Key ® serialization”.
-
Page 13: Updating The Lock Software
Confirm the selection > Save. double click the Lock symbol in the Key user interface. Log in using Connect a Tosibox supported USB Modem to the USB port of the “admin” for the user ID. The admin password is visible on the Lock. -
Page 14: Advanced Settings For The Lock
Table of Contents 5.6 ADvAnceD settings FoR tHe Lock 5.8 P On the Advanced settings page you can configure LAN The “PoE out” port supports PoE output, with auto and Internet access restrictions and security related detection feature. This means you can connect laptops settings. -
Page 15: Mounting Instructions
Table of Contents 5.9 MoUnting instRUctions installation to Din rail The Lock can be installed to DIN rail with the clip and screws included in the sales package. There are M3 grooved mounting holes on three sides of the equipment. For attachment on either of the narrow sides, the screws with length of 10 mm shall be used. - Page 16 Table of Contents Using the rubber feet Rubber feet included in the sales package can be installed in the bottom of the Lock for more convenient installation horizontally e.g. on a table. Please see picture 5 and 6 for the mounting. Picture 5.
-
Page 17: Input Powering Options
Table of Contents 5.10 inPUt PoWeRing oPtions Using the Dc input plug In case the operating voltage of 8-27V DC +/-10% is available from an external power source with only stripped wires, a DC input plug included in the sales package can be used. - Page 18 Table of Contents Picture 7. Picture 8.
-
Page 19: Taking The Master Key Into Use
• Yellow = The Key is connected to the Internet, but not to any found allow Tosibox to make changes to your computer click yes. Locks. The Key software will ask for a password that you can enter if you •... - Page 20 Table of Contents 1. depLoyinG The Key 3. Key USer inTerFaCe 2. SeTTinG The paSSword...
- Page 21 Table of Contents Key USer inTerFaCe Double click to open Lock user interface Picture 1. Picture 2. Picture 3.
-
Page 22: Renaming And Using Devices
Table of Contents 6.2 RenAMing AnD Using Devices 6.3 ADDing eXtRA keys Picture 1. Additional Keys can be serialized to a Lock. Insert a previously serialized Key into the USB of your computer. This is the start window for the Key user interface. You can open the Lock user interface by double clicking the Lock Insert a new Key to another USB port of the computer. - Page 23 Locks but it has no rights to serialize new Keys. Confirm the selection by pressing ”Save”. Serialization for the extra Key is now complete. Serializations of additional keys can be removed in the Lock user interface by clicking “Edit Tosibox devices” (admin only).
- Page 24 Table of Contents addinG baCKUp Key Choose ”Backup Key” Confirm by pressing and press ”Next”. All ”Save”. serializations and user rights are automatically synchronized between the Backup Keys. The Backup Key is now The Backup Keys can be managed later in the Key user interface created.
- Page 25 Table of Contents exTra Key USe CaSe...
-
Page 26: Remote Serialization Of Extra Keys
PUK is needed. The PUK code is delivered Insert the Key into the USB port of the computer and wait for the with the Key. Store it safely. TOSIBOX Key application to start. ® Go to the ”Password” menu in the Key software and choose Choose ”Manage Keys”... -
Page 27: Mobile Client For Android Devices
Table of Contents 7. mobIle ClIenT 7.1 MoBiLe cLient FoR AnDRoiD Devices 1. Download and install 2. Open the TOSIBOX 3. Go the software menu and select ® software by plugging a the TOSIBOX Mobile Devices > Manage Keys. ®... - Page 28 Table of Contents 4. Select the mobile clients tab and click 5. Enter the name of your mobile 6. Select the Locks that you would Add new... device and click Next. like to access through your mobile device and click Next.
- Page 29 Table of Contents 7. Open the TOSIBOX 8. Tap the screen to start 9. Scan the QR code displayed on your ® Mobile Client on your serialization. computer or enter the serialization device. code where prompted on your device.
- Page 30 Table of Contents 10. Click Finish once the the serialization 11. Create a password for 12. Connect to a Lock by is complete. the mobile client. selecting its on/off icon.
- Page 31 Table of Contents Table of Contents 13. Check the I trust this Congratulations! You’re done! Now your mobile client is serialized and can application dialogue connect to the selected Locks and devices connected to them. box and click OK. You can open network devices through your web browser (if available) by clicking the the appropriate globe icon.
-
Page 32: Mobile Client For Iphones And Ipads
Table of Contents 7.2 MoBiLe cLient FoR iPHones AnD iPADs 1. Download and 2. Open the TOSIBOX 3. Go the software menu and select ® install the TOSIBOX software by plugging a Devices > Manage Keys. ® Mobile Client from serialized Key into the USB the App Store. - Page 33 Table of Contents 4. Select the Mobile Clients tab and click 5. Enter the name of your mobile 6. Select the Locks that you would Add new... device and click Next. like to access through your mobile device and click Next.
- Page 34 Table of Contents 7. Open the TOSIBOX 8. Tap the screen to 9. Scan the QR code displayed on your ® Mobile Client on start serialization. computer or enter the serialization your device. code where prompted on your device.
- Page 35 Table of Contents 10. Click Finish once the the serialization 11. Create a password 12. Connect to a Lock by is complete. for the mobile client. selecting its on/off icon.
- Page 36 Table of Contents Table of Contents 13. On the first time Congratulations! You’re done! Now your mobile client is serialized and can connect to the selected Locks and devices connected to them. when connecting to a Lock, the user You can open network devices through your web browser (if available) by clicking the the appropriate globe icon.
- Page 37 Lock and specify the IP address of the authorized service facility. device . • After the service life of the devices is over, do not throw them Go to http://help.tosibox.com for more instructions. into domestic waste. Instead, take them to an authorized waste electronics collection facility.
- Page 38 Table of Contents 11. TeChnICal daTa Mobile connection features: 11.1 tosiBoX Lock 200 ® • Supported 3G/4G USB modems: Huawei E3372, E3276, E392, E372, Ports: E3531, E3131, E353, E367, E160, E169, E173, E176, E180, E1552, Tosibox 3G modem • 1 x USB 2.0, type A •...
- Page 39 11.2 tosiBoX key 200 ® • 1024 bit RSA key in the cryptographic module • 4 GB or larger flash memory storage for Tosibox Key software and settings • USB 2.0 interface, type A • Standard CSP/PKCS#11 supported operating systems: •...
- Page 40 PURPOSE, SHALL BE LIMITED AS SET FORTH HEREIN TOSIBOX product which fails due to a defect in material AND TO THE DURATION OF THE LIMITED WARRANTY, or workmanship within Two Years following the initial OTHERWISE THE REPAIR OR REPLACEMENT AS consumer purchase.
- Page 41 Table of Contents For Product Purchased in the UsA: For Product Purchased in canada: Performance of any obligation under this warranty may Performance of any obligation under this warranty may be be obtained by returning the warranted product, prepaid obtained by returning the warranted product, along with freight, along with proof of purchase to: proof of purchase, to your place of purchase in Canada.
- Page 42 EP12788813.9, EP12748933.4, EP13772027.2, IN9022/ mentioned herein without prior notice. DELNP/2014, IN7185/CHENP/2013, 10104/CHENP/2013, Tosibox shall not take responsibility of any loss of IN5910/CHENP/2014, JP2014-202978, JP2014-550741, information or income or any special, incidential, JP2015-503907, CA2869110, CA2860680, CA2826636, consequential or indirect damages.
- Page 43 15. deClaraTIons 15.1 DecLARAtion oF conFoRMity 15.2 FeDeRAL coMMUnicAtion coMMission inteRFeRence stAteMent Hereby, Tosibox Oy declares that TOSIBOX Lock is ® in compliance with the essential requirements of the This device complies with FCC part 15 of the FCC rules.
- Page 44 Table of Contents elektroniikkatie 10 Fin-90590 oulu www.tosibox.com Copyright © Tosibox oy 2015...
Need help?
Do you have a question about the Lock 200 and is the answer not in the manual?
Questions and answers