
Related Manuals for IMG STAGE LINE BEAM-4/RGBW


Summary of Contents for IMG STAGE LINE BEAM-4/RGBW
- Page 1 LED Beam Moving Bar, RGBW BEAM-4/RGBW Order No. 38.0230 INSTRUCTION MANUAL ELECTRONICS FOR SPECIALISTS ELECTRONICS FOR SPECIALISTS ELECTRONICS FOR SPECIALISTS ELECTRONICS FOR SPECIALISTS...
-
Page 2: Table Of Contents
Backside ................................. 8 Installation .................................. 9 Set Up and Operation ............................... 9 Control Modes ............................... 9 One BEAM-4/RGBW (Auto and Manual) ......................9 One BEAM-4/RGBW (Sound-controlled) ......................9 Multiple BEAM-4/RGBWs (Master/Slave control) .................... 9 Multiple BEAM-4/RGBWs (DMX Control) ......................10 Fixture Linking ............................... -
Page 3: Warning
BEAM-4/RGBW Warning Unpacking Instructions Immediately upon receiving this product, carefully unpack the carton and check the contents to ensure that all parts are present, and have been received in good condition. Notify the dealer immediately and retain packing material for inspection if any parts appear damaged from shipping or the carton itself shows signs of mishandling. - Page 4 • If your BEAM-4/RGBW fails to work properly, discontinue the use immediately. Pack the unit securely (preferably in the original packing material), and return it to your IMG Stage Line dealer for service. • For adult use only. Moving head must be installed beyond the reach of children. Never leave the unit running unattended.
-
Page 5: Operating Determinations
BEAM-4/RGBW • The user is responsible for correct positioning and operating of the device. The manufacturer will not accept liability for damages caused by the misuse or incorrect installation of this device. • This device falls under protection class I. Therefore it is essential to connect the yellow/green conductor to earth. -
Page 6: Connection With The Mains
BEAM-4/RGBW The BEAM-4/RGBW can be placed on a flat stage floor or mounted to any kind of truss with a clamp and quick-locks. Improper installation can cause serious injuries and/or damage of property! Connection with the mains Connect the device to the mains with the power-plug. -
Page 7: Description Of The Device
BEAM-4/RGBW Description of the device Features The BEAM-4/RGBW is an innovative concept and brings continuous rotating to LED Bars in a compact housing but still with a surprisingly high light output. • Very fast movement • Continuous pan-rotation • Light source: 4 x 10W RGBW LED •... -
Page 8: Frontside
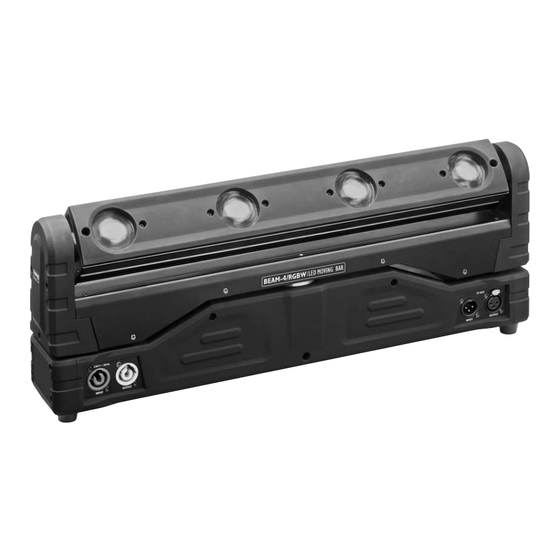
BEAM-4/RGBW Frontside Fig. 02 01) Moving head with 4 x 10W RGBW lenses 02) LCD Display + control buttons 03) 5-pin DMX signal connector OUT 04) 5-pin DMX signal connector IN 05) Power switch ON/OFF 06) Fuse T3A/250V Backside Fig. 03... -
Page 9: Installation
02) Plug the end of the electric mains power cord into a proper electric power supply socket. 03) Turn on the music. If the device is set to sound-control, then the BEAM-4/RGBW will react to the beat of the music. Please see page 18 for more information about the sound-control options. -
Page 10: Multiple Beam-4/Rgbws (Dmx Control)
01) Fasten the effect light to a firm trussing. Leave at least 0,5 meter on all sides for air circulation. 02) Always use a safety cable (e.g. IMG Stage Line TAR-1004SAVE or TAR-603SAVE). 03) Use a 3-pin or 5-pin XLR cable to connect the BEAM-4/RGBWs and other devices. -
Page 11: Fixture Linking
BEAM-4/RGBW Multiple BEAM-4/RGBWs DMX Set Up Fig. 05 Note : Link all cables before connecting electric power Fixture Linking You will need a serial data link to run light shows of one or more fixtures using a DMX-512 controller or to run synchronized shows of two or more fixtures set to a master/slave operating mode. -
Page 12: Control Panel
When using multiple BEAM-4/RGBWs, make sure you set the DMX addresses right. Therefore, the DMX address of the first BEAM-4/RGBW should be 1(001); the DMX address of the second BEAM-4/RGBW should be 1+26=27 (027); the DMX address of the third one should be 27+26=53 (053), etc. -
Page 13: Menu Overview
BEAM-4/RGBW Menu Overview See next page for the remaining menu functions. Order No. 38.0230... - Page 14 BEAM-4/RGBW Order No. 38.0230...
-
Page 15: Main Menu Options
BEAM-4/RGBW Main Menu Options Manual Mode Auto Mode Sound-controlled Mode DMX-512 Mode Master/Slave Mode Settings 1. Manual Mode 01) While in the main menu, press the MODE button until the display shows 02) Press the SETUP button to enter the menu. -
Page 16: Manual Mode - Pan
BEAM-4/RGBW Cyan • Yellow • White • Blue • Green • • Black (Blackout) • 15) Press the MODE button to return to step 12 and press the UP and DOWN buttons until the display shows 16) Press the SETUP button to enter the menu. -
Page 17: Manual Mode - Tilt
BEAM-4/RGBW 10) When the display shows , press the SETUP button to enter the menu. 11) Press the UP and DOWN buttons to manually adjust the speed of clockwise pan movement. The adjustment range is between 1.3 Manual Mode - Tilt... -
Page 18: Settings
BEAM-4/RGBW 6. Settings 01) While in the main menu, press the UP and DOWN buttons until the display shows 02) Press the UP and DOWN buttons to toggle between the following options: 6.1 BL time • 6.2 Adjust • 6.3 Reset •... -
Page 19: Settings - Sensor
BEAM-4/RGBW 6.8 Settings – Sensor 01) When the display shows , press the SETUP button to enter the sensor settings. 02) Press the UP and DOWN buttons to toggle between the following 4 options: p-hall • t-hall • p-Rast •... -
Page 20: Dmx Channels
BEAM-4/RGBW DMX Channels 1 channel Channel 1 – Functions 0-29 LEDs OFF 30-44 Built-in show 1 45-59 Built-in show 2 60-74 Built-in show 3 75-89 Built-in show 4 90-104 Built-in show 5 105-119 Built-in show 6 120-134 Built-in show 7... -
Page 21: Channels
BEAM-4/RGBW Channel 11 – LED 2 Red intensity 0-255 Gradual adjustment Red from 0 – 100% Channel 12 – LED 2 Green intensity 0-255 Gradual adjustment Green from 0 – 100% Channel 13 – LED 2 Blue intensity 0-255 Gradual adjustment Blue from 0 – 100% Channel 14 –... - Page 22 BEAM-4/RGBW Channel 6 – Continuous Pan Push the slider up, in order to move head horizontally (PAN). Not functional, between 0-129. Clockwise rotation from fast slow, between 130-192. Counterclockwise rotation from slow to fast, between 193-255. Channel 7 – Dimmer...
- Page 23 BEAM-4/RGBW Channel 22 – LED 4 Blue intensity Dimmer must be open 0-255 Gradual adjustment Blue from 0 – 100% Channel 23 – LED 4 White intensity Dimmer must be open 0-255 Gradual adjustment White from 0 – 100% Channel 24 – Functions...
-
Page 24: Maintenance
04) If all of the above appears to be O.K., plug the unit in again. 05) If you are unable to determine the cause of the problem, do not open the BEAM-4/RGBW, as this may damage the unit and the warranty will become void. -
Page 25: No Response To Dmx
No power to the fixture. Check that power is switched on and ● fixtures are cables are plugged in. completely dead. Internal fuse blown. Return the device to your IMG Stage Line ● dealer Fixtures reset The controller is not connected. Connect controller. ●... -
Page 26: Product Specifications
BEAM-4/RGBW Product Specifications Model: IMG Stage Line BEAM-4/RGBW Input Voltage: 100-240 VAC, 60/50Hz Power consumption: 60W (full output) DMX linking: 30pcs Fuse: 5S3A/250V Dimensions: 555 x 94 x 220 mm (LxWxH) Weight: 6,9 kg Operating and Programming: Signal pin OUT:... -
Page 27: Dimensions
BEAM-4/RGBW Dimensions Order No. 38.0230... -
Page 28: Notes
BEAM-4/RGBW Order No. 38.0230...
Need help?
Do you have a question about the BEAM-4/RGBW and is the answer not in the manual?
Questions and answers