Table of Contents
Advertisement
Quick Links
Advertisement
Table of Contents

Subscribe to Our Youtube Channel
Related Manuals for IMG STAGE LINE BEAM-20LED


Summary of Contents for IMG STAGE LINE BEAM-20LED
-
Page 3: Table Of Contents
Backside ..................................8 Installation ................................... 8 Set Up and Operation ..............................8 Control Modes ................................9 One BEAM-20LED (Built-in Programs)........................9 One BEAM-20LED (Sound-control)......................... 9 Multiple BEAM-20LEDs (Master/Slave control) ....................9 Multiple BEAM-20LEDs (DMX Control)........................10 Fixture Linking ................................11 Data Cabling ................................ -
Page 4: Warning
Your shipment includes: • IMG Stage Line BEAM-20 LED Beam with IEC powercable 0,9m • 1 bracket for truss mounting • Safety eye •... - Page 5 If your IMG Stage Line device fails to work properly, discontinue use immediately. Pack the unit securely (preferably in the original packing material), and return it to your dealer for service.
-
Page 6: Operating Determinations
When rigging, derigging or servicing the projector, always make sure, that the area below the installation place is blocked and staying in the area is forbidden. The BEAM-20LED can be placed on a flat stage floor or mounted to any kind of truss by a clamp. - Page 7 Mounting a clamp to the underside of the BEAM-20LED moving head Improper installation can cause serious damage to people and property ! Connection with the mains Connect the device to the mains with the power-plug. Always pay attention, that the right color cable is connected to the right place.
-
Page 8: Claims
Claims The client has the obligation to check the delivered goods immediately upon delivery for any short- comings and/or visible defects, or perform this check after our announcement that the goods are at their disposal. Damage incurred in shipping is the responsibility of the shipper; therefore the damage must be reported to the carrier upon receipt of merchandise. -
Page 9: Description Of The Device
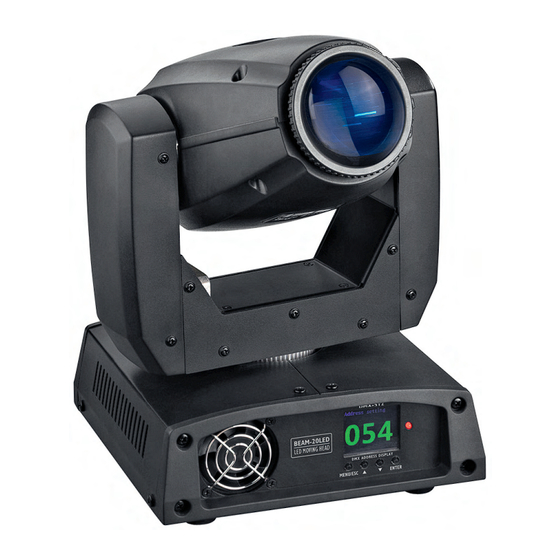
Description of the device Features The IMG Stage LIne BEAM-20LED Beam is a moving-head with high output and great effects. • Input Voltage: 100-240 VAC, 50/60Hz • Power consumption: 65W max. at full output • LED Drive Current: 5A • DMX-control via standard DMX-controller •... -
Page 10: Backside
Installation Remove all packing materials from the Beam. Check that all foam and plastic padding BEAM-20LED is removed. Connect all cables. Do not supply power before the whole system is set up and connected properly. Always disconnect from electric mains power supply before cleaning or servicing. -
Page 11: Control Modes
When the BEAM-20LED is not connected by a DMX-cable, it functions as a stand-alone device. Turn on the music. If the device is set to sound-control, then the BEAM-20LED will react to the beat of the music. Please see page 15 for more information about the sound-control options. -
Page 12: Multiple Beam-20Leds (Dmx Control)
1. Fasten the effect light onto firm trussing. Leave at least 0,5 meter on all sides for air circulation. 2. Always use a safety cable (IMG Stage Line TAR-1004SAVE / TAR-603SAVE). Use a 3-p XLR cable to connect the BEAM-20LEDs and other devices. -
Page 13: Fixture Linking
We recommend IMG Stage Line cables: CDMXN-150/SW CDMXN-300/SW CDMXN-500/SW CDMXN-1000/SW The BEAM-20LED Beam can be operated with a controller in control mode or without the controller in stand-alone mode. -
Page 14: Control Panel
When using multiple BEAM-20LEDs, make sure you set the DMX addresses right. Therefore, the DMX address of the first BEAM-20LED should be 1(001); the DMX address of the second one should be 1+12=13 (013); the DMX address of the third BEAM-20LED should be 13+12=25 (025), etc. -
Page 15: Menu Overview
Menu Overview... -
Page 16: Main Menu Options
Main Menu Options DMX address DMX Mode / Built-in Programs / Sound-controlled / Master-Slave Mode Audio Sensitivity / Pan + Tilt/Reverse Pan + Tilt / Display/Reverse Display/ Pan + Tilt Angle System Info DMX Addressing With this menu you can set the DMX address. 1) Press Mode, until the display shows 2) Press Enter to confirm. -
Page 17: Built-In Programs Mode
Built-in Programs Mode You can select 4 different Programs when using the BEAM-20LED. 1) Press MODE until the display shows , then press ENTER to open the menu and change your settings. 2) Use the UP / DOWN buttons to select one of 4 programs. -
Page 18: Advanced Mode
Advanced Mode You can select 6 different Advanced settings when using the BEAM-20LED Beam. 1) Press MODE until the display shows , then press ENTER to open the menu and change your settings. 2) Use the UP / DOWN buttons to select all 6 settings. -
Page 19: System Information
System Information You can see the current Running Mode, the DMX Address and the current Software version. 1) Press MODE until the display shows , then press ENTER to open the menu and view your settings. Password Change This is a Service Function. 1) Press and hold MODE for 3 seconds. -
Page 20: Dmx Channels
DMX Channels 12 Channels Channel 1 – Horizontal movement (Pan) Push the slider up, in order to move head horizontally (PAN). Gradual head adjustment from one end of the slider to the other (0-255, 128-center). The head can be turned by 540° and stopped at any position you wish. –... - Page 21 Channel 8 – Dimmer intensity 0-255 From black to brightest Channel 9 – Shutter / Strobe (Dimmer must be open Close Shutter open 8-76 Strobe effect, from slow to fast (0-10 flashes/sec.) 77-145 Pulse strobe effect from slow to fast 146-215 Random strobe effect, from slow to fast (0-10 flashes/sec.) 216-255...
-
Page 22: Channels
9 Channels Channel 1 – Horizontal movement (Pan) Push the slider up, in order to move head horizontally (PAN). Gradual head adjustment from one end of the slider to the other (0-255, 128-center). The head can be turned by 540° and stopped at any position you wish. Channel 2 –... - Page 23 Channel 7 – Channel Functions No Function 10-14 Blackout during Pan/Tilt movement 15-19 Blackout during Colorwheel movement 20-24 Blackout during Gobowheel movement 25-29 Blackout during Pan/Tilt/Colorwheel movement 30-34 Blackout during Pan/Tilt/Gobowheel movement 35-39 Blackout during Gobowheel /Colorwheel movement 40-44 Blackout during Pan/Tilt/Gobowheel /Colorwheel movement 45-69 No Function 70-74...
-
Page 24: Channel Settings
3. Mechanically moving parts like axles, eyes and others may not show any traces of wearing. 4. The electric power supply cables must not show any damages or material fatigue. The IMG Stage Line BEAM-20LED Beam requires almost no maintenance. However, you should keep the unit clean. -
Page 25: Replacing A Fuse
1. Power supply. Check that the unit is plugged into an appropriate power supply. 2. The LEDs. Return the BEAM-20LED Beam to your IMG Stage Line dealer. 3. The fuse. Replace the fuse. See page 23 for replacing the fuse. - Page 26 Problem Probable cause(s) Remedy No power to the fixture • Check that power is switched on One or more and cables are plugged in. fixtures are Primary fuse blown. • Replace fuse. completely dead. Fixtures reset The controller is not connected. •...
-
Page 27: Product Specification
Product Specification Model: IMG Stage Line BEAM-20LED Beam Input Voltage: 100-240 VAC, 50/60Hz Power consumption: 65W max. at full output Fuse F2A / 250V Dimensions: 205 x 214 x 273 mm(WxDxH) Weight: 4,7 kg Operation and Programming Signal pin OUT: pin 1 earth, pin 2 (-), pin 3 (+) - Page 28 ® MONACOR INTERNATIONAL GmbH & Co. KG • Zum Falsch 36 • 28307 Bremen • Germany A-0000.99.01.04.2016...
Need help?
Do you have a question about the BEAM-20LED and is the answer not in the manual?
Questions and answers