Table of Contents
Advertisement
Quick Links
Advertisement
Table of Contents

Subscribe to Our Youtube Channel
Related Manuals for Marantz RC2001


Summary of Contents for Marantz RC2001
- Page 1 Model RC2001 User Guide Remote Controller...
-
Page 2: Declaration Of Conformity
(1) This device may not cause harmful interference, and (2) this device must accept any interference received, including interference that may cause undesired operation. U.S. Responsible Party: Marantz America, Inc. 100 Corporate Drive, Mahwah, NJ, 07430, U.S.A. TEL: 630-741-0300... -
Page 3: Table Of Contents
Thank you for purchasing the Marantz RC2001 remote controller. This remarkable component has been engineered to provide you with many years of home theater enjoyment. Please take a few minutes to read this manual thoroughly before you operate the RC2001. -
Page 4: Before Use
BEFORE USE LOADING BATTERIES Before using the remote controller for the fi rst time, load the batteries in the remote controller. The batteries provided are used to verify the operations of the remote controller only. Note: The settings remain saved in the remote controller even if the power completely runs out. -
Page 5: Using The Remote Controller With Infrared Rays
USING THE REMOTE CONTROLLER WITH INFRARED RAYS The remote controller uses infrared (IR) signals to operate devices. This means that you have to point the IR sending eye of the remote controller towards the devices you are operating. Operate the device with the remote controller within the range of the illustration below. -
Page 6: Names And Functions
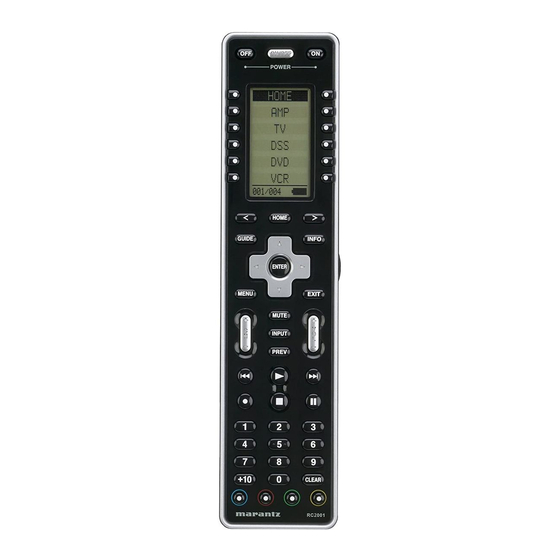
NAMES AND FUNCTIONS REMOTE CONTROLLER POWER ON and OFF buttons These buttons are used when controlling devices that have been set with separately powered on and off remote commands. SOURCE ON/OFF button This button is used when controlling devices that have been set with a single power on/off remote command. -
Page 7: Remote Controller Lcd
REMOTE CONTROLLER LCD USB port This port is used to connect the remote controller and a PC with the supplied USB cable to enable editing with the Wizz.it 3 editor software. Mode display area Home: This is displayed during Home mode. Device Name: This displays the device mode name that is currently active. -
Page 8: Basic Operation
• This is a convenient function for devices that do not have a sleep timer or for setting the sleep timer using multiple devices. • The RC2001 performs regular operation even when the sleep timer is activated. Press the button that will be assigned to the sleep timer. -
Page 9: Other Operation
2 inches (0.05 m). Display the MAIN MENU on the LCD of the RC2001, and then press the button next to the LEARNING indicator. The screen appears as shown below. Either press the ENTER button or wait for... - Page 10 Learning cannot be performed when a special remote controller signal code is used. • The RC2001 can learn up to a maximum of 1,000 remote controller codes. Once 1,000 codes are programmed for learning, LEARNFULL is displayed on the LCD, and learning can no longer be performed.
-
Page 11: Timer
2. TIMER The timer function of the RC2001 can be used to send a preset remote controller command at a programmed time. The Wizz.it 3 editor can be used to operate multiple devices. One Touch Operation (Macro) can also use the timer function for transmission. - Page 12 Home mode is shown in the LCD. Select the commands and devices for the commands that will be sent by timer programming. • I f a c o m m a n d a s s i g n e d t o t h e HARD button is to be sent by timer programming, press the HARD button when selecting the command to make...
- Page 13 OPERATION ON/OFF SETTINGS Press the button next to the ON/OFF indicator in the TIMER menu screen on the LCD to display the timer operation ON/OFF setting screen. Press the button next to the TIMER ON (Enable) or TIMER OFF (Disable) indicators on the LCD to either enable or disable timer operation.
-
Page 14: Sys.setup
3. SYS.SETUP Display the MAIN MENU on the LCD of the RC2001, then press the button next to the SYS. SETUP indicator. The items below can be set in the SYS.SETUP screen. • CLOCK (Clock setting) • BACK LIGHT (Backlight illumination time setting) •... - Page 15 BACK LIGHT (BACKLIGHT ILLUMINATION TIME SETTING) Press the LIGHT button on the RC2001 to turn on the backlight, then set the time until the backlight turns off. Press the button next to the BACKLIGHT indicator in the SYS.SETUP menu screen in the LCD to display the backlight illumination time setting screen.
- Page 16 The LCD setting menu is displayed. LCD TIMER (LCD timer setting) This sets the time that the LCD remains on, after a button is pressed on the RC2001. When there are no operations and the LCD is turned off, this setting enables power consumption to be reduced and the life of the batteries to be extended.
- Page 17 • Pressing the Home button returns the LCD to the MAIN MENU. BEEP (BEEP SOUND SETTING) This sets the built-in beep sound in the RC2001. Press the button next to the BEEP indicator in the SYS.SETUP menu screen in the LCD to display the beep setting screen.
- Page 18 MEM CLEAR (INITIALIZATION SETTING) This returns the settings made in the RC2001 to their initial settings. Press the button next to the MEM CLEAR indicator in the SYS.SETUP menu screen in the LCD to display the initialization setting screen. Press the button next to the NO (Disable) or YES (Enable) indicators on the LCD to either enable or disable initialization.
-
Page 19: Status Indicator
LCD returns to the MAIN MENU. 5. RESET If the RC2001 is not operating properly, use the procedure below to perform a reset (restart). Performing a reset does not erase the settings in the RC2001. -
Page 20: Specifications
SPECIFICATIONS RC2001 LCD Resolution ...“11x81pixel x6 line ...9x81pixel x1line” Backlight ... EL backlight Transmission ...IR Learning ... Capability: MAX 1000code Operating/ learning IR frequency range ...Up to 455kHz Interface .. USB 2.0 connection with USB bus power supply Memory Size ... 4M bit (512kB) Dimensions (W x H x L) ... -
Page 21: Others
In the event of diffi culty, refer to your dealer or write directly to the nearest location to you that is listed on the Marantz Authorized Service Station list. If writing, please include the model and serial number of the equipment together with a full description of what you think is abnormal about the equipment s behaviour. - Page 22 You can find your nearest authorized distributor or dealer on our website. is a registered trademark. Printed in China 10/ 2007 00M42CW851250 mzh-d...
Need help?
Do you have a question about the RC2001 and is the answer not in the manual?
Questions and answers