Marantz RC5400 User Manual
Touch screen remote control
Hide thumbs
Also See for RC5400:
- User manual (68 pages) ,
- Specifications (1 page) ,
- Full line catalog (39 pages)
Table of Contents
Advertisement
Quick Links
Advertisement
Table of Contents

Related Manuals for Marantz RC5400


Summary of Contents for Marantz RC5400
- Page 1 Rhein Tech Laboratories Client: Philips RCS 360 Herndon Parkway Model: RC5400 Suite 1400 FCC ID: PT5RC5400 Herndon, VA 20170 Standards: FCC Part 15.231 http://www.rheintech.com RTL WO# : 2003133 APPENDIX G: MANUAL Please see the following pages. Page 29 of 49...
- Page 2 Model RC5400 User Guide Touch Screen Remote Control...
-
Page 3: Fcc Compliancy
RC5400 Remote Control User Guide The information in this manual is copyright-protected. No part of this user guide may be copied or reproduced in any form without prior written consent from Marantz. MARANTZ SHALL NOT BE LIABLE FOR OMISSIONS OR FOR TECHNICAL OR EDITO- RIAL ERRORS CONTAINED IN THIS USER GUIDE. -
Page 4: Table Of Contents
Table of Contents Introduction 1. The Marantz RC5400 2. The Battery Getting Started 1. Activating the RC5400 2. Navigating the RC5400 3. Operating a Device 4. Check Battery Life - The Information Page 5 The Setup Pages 6. The Mode Menus 7. -
Page 5: Introduction
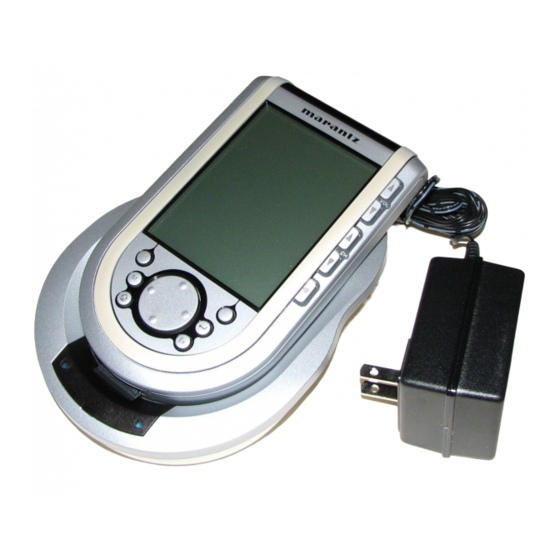
Introduction The Marantz RC5400 The RC5400 is designed to control most devices that understand infra- red (IR) remote control signals. Its easy-to-use Touch Screen and its intuitive interface make it a perfect remote control for every user. The RC5400 is completely customizable and programmable. You can add devices and functions, re-label buttons, record macros and animate your macros. -
Page 6: The Battery
CURSOR NAVIGATION button (page 9) MODE icon (page 7) The Battery When you use the RC5400 for the first time, you will have to: • Install the battery pack. • Place the RC5400 in the docking station and charge the RC5400. -
Page 7: Installing The Battery Pack
Make sure the cable of the battery pack does not get stuck between the molded interior and the battery cover. After a few seconds, the RC5400 starts up automatically and an Introduction screen appears. The RC5400 beeps twice to indicate that it has finished starting up. - Page 8 1 Connect the power adapter to the docking station and plug it into a wall outlet. 2 Place the RC5400 in the docking station. Make sure you hold the RC5400 at an angle of 30° to 45° when you place it in the docking station.
-
Page 9: Getting Started
By pressing the BACKLIGHT button on the left side of the RC5400, the backlight is turned on. Picking up the RC5400 The RC5400 has the Pickup sensor in it. By picking your RC5400 from the docking station and tilting more than 50°, the backlight is turned on. -
Page 10: Navigating The Rc5400
Mode menu deactivation. Navigating the RC5400 Your RC5400 is capable of displaying hundreds of different control pages. RC5400 presents you various ways to navigate to the speci- fic device and page easily. Navigating the Devices Home — The Home Page displays... - Page 11 Note When you jump to a Device by tapping the device button in the Device Overview pages, the RC5400 will change the input of your home theater receiver/preamp. Using the Home page button is exactly the same thing as pres- sing a button in the Device Overview page.
- Page 12 Getting Started Press and hold either of the two Left and Right function buttons, then tap the device you would like to jump to. No “input select” commands will be sent to your receiver/preamp. Device Scroll — You can also navigate the devices by tap- ping the device scroll buttons on the left and right side of the Upper Tool Bar.
- Page 13 Getting Started Page Scroll — you can navigate the pages by pressing the Page + and - buttons on the left side of RC5400. Cursor Navigation — This function enables you to navigate to the different pages as well as the device by pressing the Up and Down direction of the 4-way navigation button.
-
Page 14: Operating A Device
Since Volume Up, Volume Down and Mute are typically recei- ver/preamp commands in most home theaters, these direct access but- tons have been pre-programmed to always operate a Marantz recei- ver/preamp. Should you own another brand, see the programming instructions on page 28-29. -
Page 15: Check Battery Life - The Information Page
Tap the INFO button again or press the Left function button labeled Exit. The Setup Pages Most of the RC5400’s features can be set to your own wishes. 1 Tap the INFO button in the Upper Tool Bar. The information page appears. - Page 16 Tap the Revert button and configuration. follow the on-screen instruction * When you revert the RC5400, all customization items (settings, macros, learned IR commands,..) are lost permanently. The Revert button will only appear if one change has been made. User Guide...
-
Page 17: The Mode Menus
Getting Started The Mode Menu RC5400 provides different modes. For customizing your RC5400 you have to switch to the appropriate mode via the Mode menu page. The mode menus are utilized like this: 1 Tap and hold the Mode icon more than 3 seconds in the lower Tool Bar. -
Page 18: Adjusting The Touch Screen Contrast
You can now work in the selected mode. Note USE mode is the normal operating mode for the RC5400. The RC5400 will not “time out” and automatically return to USE mode. You must redisplay the Mode Menu page and press left function button labeled Exit. -
Page 19: Customizing Your Rc5400
It is best to proceed with customizing in several stages. The first stage is to teach all of your existing remote codes to the RC5400. The second stage is to practice using your home theater system with the RC5400. As you gain familiarity with your system, you’ll notice that many operations in a home theater require several... - Page 20 10 Switch to LABEL mode to relabel any buttons as needed to match your existing remote controls. Check all of your devices. 12 Switch to LEARN mode and teach the RC5400 all of your non- Marantz components’ RC Codes (see page 26-30).
-
Page 21: Complex Operation? Macros Or Help
Customizing Your RC5400 Complex Operation? Macro or Help... If your entire system is new to you, practice using the RC5400 manu- ally for a few days before programming any macros. You’ll find that your home theater requires many operations that require multiple steps to do. - Page 22 Customizing Your RC5400 The problems don’t stop with powering up a system. Often, you will want to construct a macro to watch or listen to a specific source. This may require that both the Television and the Surround Receiver be set to new inputs.
-
Page 23: Programming Help Lists
Customizing Your RC5400 Programming Help List 1 Write a list of all of the actions in the operation you want to record. 2 Gather all of the remote controls you will need for the operation. 3 Select ADD from the Mode menu. Choose “Create New DEVI- CE”... -
Page 24: Macro Capabilities
(see page 42). Macros Perform Jumps to Any Device Page The RC5400 has the unique capability of jumping to any device panel during a macro. You can make any or all of the 250 steps a jump to any Device panel. - Page 25 Customizing Your RC5400 Page Overview page. You are only allowed to jump to Device pages when programming with the RC5400 stand alone. Macros Send Commands To Your System You can make any or all of the 250 steps send a remote control command to your system.
-
Page 26: Programming Macros
Before proceeding with programming, make sure that you understand how to move around in the MACRO mode and how to read the RC5400’s shorthand notation for each macro step (see page 40). 1 Write a list of all of the actions in the operation you want to record. - Page 27 Customizing Your RC5400 The MACRO edit page will appears. If you had any previously programmed commands in this button, they will appear for you to edit. 10 Working from your written list, navigate to the desired device and page to program all of the steps in the Macro (see page 41).
- Page 28 Customizing Your RC5400 putting in lots of delays will make the macro work, but may make the macro unnecessarily long. Try moving commands, so that a TV command alternates with another component command before another TV command is issued. To move a command, simply select it and use the buttons to reposition it within the Macro page.
-
Page 29: Reference
Most commands learn correctly when you press and hold them until the “OK” indicator appears. However, sometimes the RC5400 will say “OK”, yet the command will not operate the component properly. If this occurs, try re-teaching the command with a brief tap. After a short delay the “OK” indicator will appe- ar. - Page 30 You cannot program HOME page buttons directly. You have to program them using “Learn DEVICE” function (see page 28). The RC5400 also offers empty control panel buttons which you can program and label as existing buttons. They are visible in USE mode as grayed-out.
- Page 31 Reference 9 Return to USE mode by pressing the Left function button labeled “Exit” via the Mode menu. Programming The Device Buttons to Switch Sources Note When you teach a command as a Device Action, this command is automatically assigned to the corresponding button in the Home page AND to the act of selecting the Device from the Device Overview page.
- Page 32 Reference Hard buttons can be programmed with a global function for all devi- ces and/or for a device specific (local) command for a particular device. When a command is taught to a hard button from the Home page, it will be issued as long as the active device does not have a local command.
-
Page 33: Labeling Buttons, Pages And Devices
Reference Labeling Buttons, Pages and Devices The following elements can be labeled: Buttons on a device page, Text frames on a device page (they don’t do anything except dis- play text), Page (the name that appears on the Page Overview page), Device (the name that appears on the Device Overview but- ton, Device Overview page and the Home page) and Left/Right function buttons (these are pre-labeled at the factory as Ahead and... - Page 34 Reference 6 Edit the label. To delete a character, press the Right function button labeled “Delete”. To change the font size, Tap the “+” or “-” buttons beside the “Font size” label on the page. To enter a character, tap the keyboard near the character you want to use.The keyboard is zoomed in, allowing you to tap...
- Page 35 Reference Labeling a Device Remember, the buttons on Home page are linked (automatically aliased) to the labels you create for the Device Overview, so any change you make to the Device Overview names will be automati- cally carried out on your Home page buttons. 1 Tap and hold the Mode icon in the Lower Tool Bar more than 3 seconds.
-
Page 36: Adding Devices
Reference Adding Devices If you have a device that is not provided in the Device Overview page, you can add it to the RC5400. There are two possible ways to add a device: Create New Device Copy Existing Device In the following sections we’ll discuss what these options offer you. - Page 37 Reference Receivers are both A/V AMPS and TUNERS - Since you typically use the two sections of your Marantz receiver at different times, we have separated them into two devices. You will find the amp section in A/V AMPS and the Tuner section in TUNERS.
- Page 38 DSS - Since Marantz does not make a DSS receiver, we included a template. Simply teach the RC5400 from your original remote. Creating a New Device Step by Step 1 Tap and hold the Mode icon in the Lower Tool Bar more than 3 seconds.
- Page 39 4 You can add the device with or without RC codes. Create with RC codes: Choose this option if you have the exact Marantz component listed. The new device is added with operational buttons. C r eate without RC codes: If you choose this option, the new device is added with invisible buttons.
-
Page 40: Deleting Buttons And Devices
Reference Deleting Buttons and Devices You can delete the Buttons in device pages and the Device itself. Home page buttons cannot be deleted directly. Deleting a Button Note Frames (borderless buttons) such as the greeting on the home panel also can be deleted. 1 Tap and hold the Mode icon in the Lower Tool Bar more than 3 seconds. -
Page 41: Deleting A Device
Warning Do Not Delete the Left and Right function Buttons! Remember, your RC5400 is programmed at the factory with the Browse feature. If you accidentally reprogram the Left/Right function but- tons from the Home page, you cannot restore them with the remote control. -
Page 42: Moving Devices
Lower Tool Bar more than 3 seconds. Mode menu page will appear. Tap the “MOVE” button to switch to the MOVE mode. The RC5400 displays the Device list box. 3 Tap the device name of your choice. The device name is highlighted. -
Page 43: Programming Macros
Reference Programming Macros Macro Page Notation Before you begin to program a Macro, study the notation used in the MACRO mode. Each type of action has its own notation. AMP - ON - When a - When only a device device name and a but- name is listed, the macro ton name are listed, that... - Page 44 Lower Tool Bar more than 3 seconds. Mode menu page will appear. 2 Tap the “MACRO” button to switch to MACRO mode. The RC5400 displays first Macro mode page . 3 Tap the “Macro to BUTTON” button to proceed to the next step.
- Page 45 3 seconds. Mode menu page will appear. 2 Tap the “MACRO” button to switch to MACRO mode. The RC5400 displays first Macro mode page . 2 Tap the “Macro to DEVICE” button to proceed to the next step. The Device Overview page appears.
-
Page 46: Editing Macros
3 seconds. Mode menu page will appear. 2 Tap the “MACRO” button to switch to MACRO mode. The RC5400 displays first Macro mode page . 3 Tap the “Macro to BUTTON” button if you want to edit the macro for the operation button, or “Macro to DEVICE” button for the device to proceed to the next step. -
Page 47: Using The Remote Control With Rf (Radio Frequency)
Using the RC5400 with Radio Frequency Warning To use the Remote Control with Radio Frequency (RF) you need an Marantz RX-77 RF Extender. This is an optional accessory for the RC5400. By default, the RC5400 uses infrared (IR) signals to operate devices. - Page 48 IR/RF settings. 8 Tap label to return to the Mode menu page. The RC5400 is configured to operate the devices you have set with RF signals. 9 Return to USE mode by pressing the Left function button labeled “Exit”...
-
Page 49: Wizz.it Software
4 Tap the “Done” button to finish. Software If you want to personalize your RC5400 even more, beyond its standard programming features, Wizz.it is the tool for you to use. Wizz.it is the RC5400’s companion software that you can download from the following internet address;... -
Page 50: System Requirements
Upload and download new configurations to and from your RC5400. You do this with the USB cable supplied with your RC5400 connected to the USB port on the left side of the remo- Connect the USB cable to the port above the Page + button Convert the RC5200/5000’s... -
Page 51: Maintaining The Rc5400
RC5400 in any location that is extremely damp or wet. When you have spilled water on the RC5400, you have to take out the batteries and let the RC5400 dry for 48 hours befo- re you place the batteries back. When you have spilled other liquids like coffee on the RC5400, you can clean it with distilled water. -
Page 52: Troubleshooting
(page 15). The RC5400 shuts itself off This is a feature of the RC5400 to save power. You can change the length the RC5400 stays on in the Setup (page 13). Devices do not respond to commands from the RC5400 Make sure the RC5400 is in USE mode (page 7). -
Page 53: Programming Problems
Avoid programming the RC5400 under bright fluorescent light, it might affect the infrared signals. If the label locked appears on the RC5400 icon, the device con- trol pages have been locked to prevent unwanted changes. You cannot modify or delete commands for this device. -
Page 54: Recharging Problems
“Revert” button on the third Setup page (page 13). All your customized commands, devices, and macros will be lost, and you will have to reprogram your RC5400. Should you need the Marantz factory default configuration, you will have to use the Wizz.it with a Windows PC to restore it (page 46). -
Page 55: Frequently Asked Questions
Normally, you never have to reset the RC5400. However, if the RC5400’s display freezes or if you notice unusual behavior, you might need to reset the RC5400. You will not lose any saved pro- grammed commands or macros. Carefully press the reset button inside the battery compartment of the RC5400 with a paperclip or sharp pencil. - Page 56 Frequently Asked Questions How do I calibrate the Touch Screen? The RC5400 is calibrated when it leaves the factory, so normally you do not have to calibrate it yourself. It is possible that the RC5400 displays a message to calibrate the Touch Screen. If this message appears do the following.
-
Page 57: Overview Of Symbols
Overview of Symbols Pause Stop Play, Normal run, normal speed Reverse Play, Normal run, normal speed Fast Forward, Scan Forwards, Fast run, fast speed Rewind, Scan Backwards, Fast run, fast speed Slow Motion Forwards, Slow run, slow speed Slow Motion Backwards, Slow run, slow speed Eject, Open/Close Record, general Key, Lock... - Page 58 Overview of Symbols Page number up Page number down Page enlargement TV and text mixed 1st or 2nd language Last view, previous program Power, Stand-by Zone focus: long distance Zone focus: very short distance Single or multi-digit selection Brightness, brilliance Contrast Brightness/contrast Color saturation...
-
Page 59: Specifications
Exclusive rechargeable battery pack Power Power On: By tapping the Touch Screen, by pressing buttons, management by picking up the RC5400 Power Off: Auto shout of by adjustable timer Dimensions 153mm x 90mm x 33.5mm (6inch x 3.5inch x 1.2inch) Operating 0°C to 50°C (32°F to 122°F) -
Page 60: Index
Index Button Activating 4-Way Cursor 2, 11 Pickup sensor 6, 14 Backlight 2, 6 ADD mode CHANNEL 2, 11 Switch Modes Cursor Navigation AMPS Device Overview Copy Existing Device Device Scroll Create New Device ENTER 2, 11 Device Template EXIT 2, 11 Device Type Divide Function... - Page 61 Index General Problem Delay 22, 40 Globally DELETE Mode Button Device Undo Hard Button Device Action 8, 24, 42 Help Device Menu Help List 18, 20 Device Overview Button HOME Button 2, 11 Device Overview Page Home Page Device Scroll Buttons Device Scroll Device Template Import Graphics...
- Page 62 Index Jump Jump Macro-Friendly LCD Sleep Move Learning Multiple Step Locally Page Jump Low Battery Icon Page Notation Lower System Area RC Command Status Device Test 24, 41 LABEL Mode Toggle Command Button Maintaining Device Cleaning Font Size Important Notice Page Memory Symbols...
- Page 63 Index Navigating Radio Frequency Cursor Navigation RC Command Device Action Receivers Device Overview page Recharging Problem Device Scroll Remote Central Home Page Reset Devices Revert 13, 51 Pages NO IR RF Extender Page Overview Page RX-77 Tab Button NO IR Setting IR / RF Service &...
- Page 64 Index Software Version Specification VOLUME Buttons Memory Option Symbols 31, 54 With RC Codes 16, 36 System Requirement Without RC Codes 16, 36 Wizz.it .ccf Tab Button Configuration file Tap Technique Download Teach Import Graphics Test 24, 41 Internet Address Text Frame Internet Fun Time...
-
Page 65: Service And Support
For service and support, please contact your Marantz authorized dealer or Marantz customer service. On the Marantz internet site you can find more contact details. When you contact Marantz customer service, you will be asked for the technical information listed on the Info panel. - Page 66 Memo User Guide...
- Page 67 You can find your nearest Marantz authorized dealer or distributor on our website. JAPAN Marantz Japan, Inc. 7-35-1 Sagami Ohno, Sagamihara-shi, Kanagawa 228-8505, Japan U.S.A Marantz America, Inc. 1100 Maplewood Drive, Itasca, IL 60143, U.S.A EUROPE Marantz Europe B.V.
Need help?
Do you have a question about the RC5400 and is the answer not in the manual?
Questions and answers